> ## Documentation Index
> Fetch the complete documentation index at: https://www.courier.com/docs/llms.txt
> Use this file to discover all available pages before exploring further.
# Brand Designer
> Customize brand appearance with logos, colors, headers, footers, and custom templates using the Brand Designer.
The Brand Designer lets you customize every aspect of your brand's visual appearance. Configure standard templates with simple settings, or use custom MJML/Handlebars for full control.
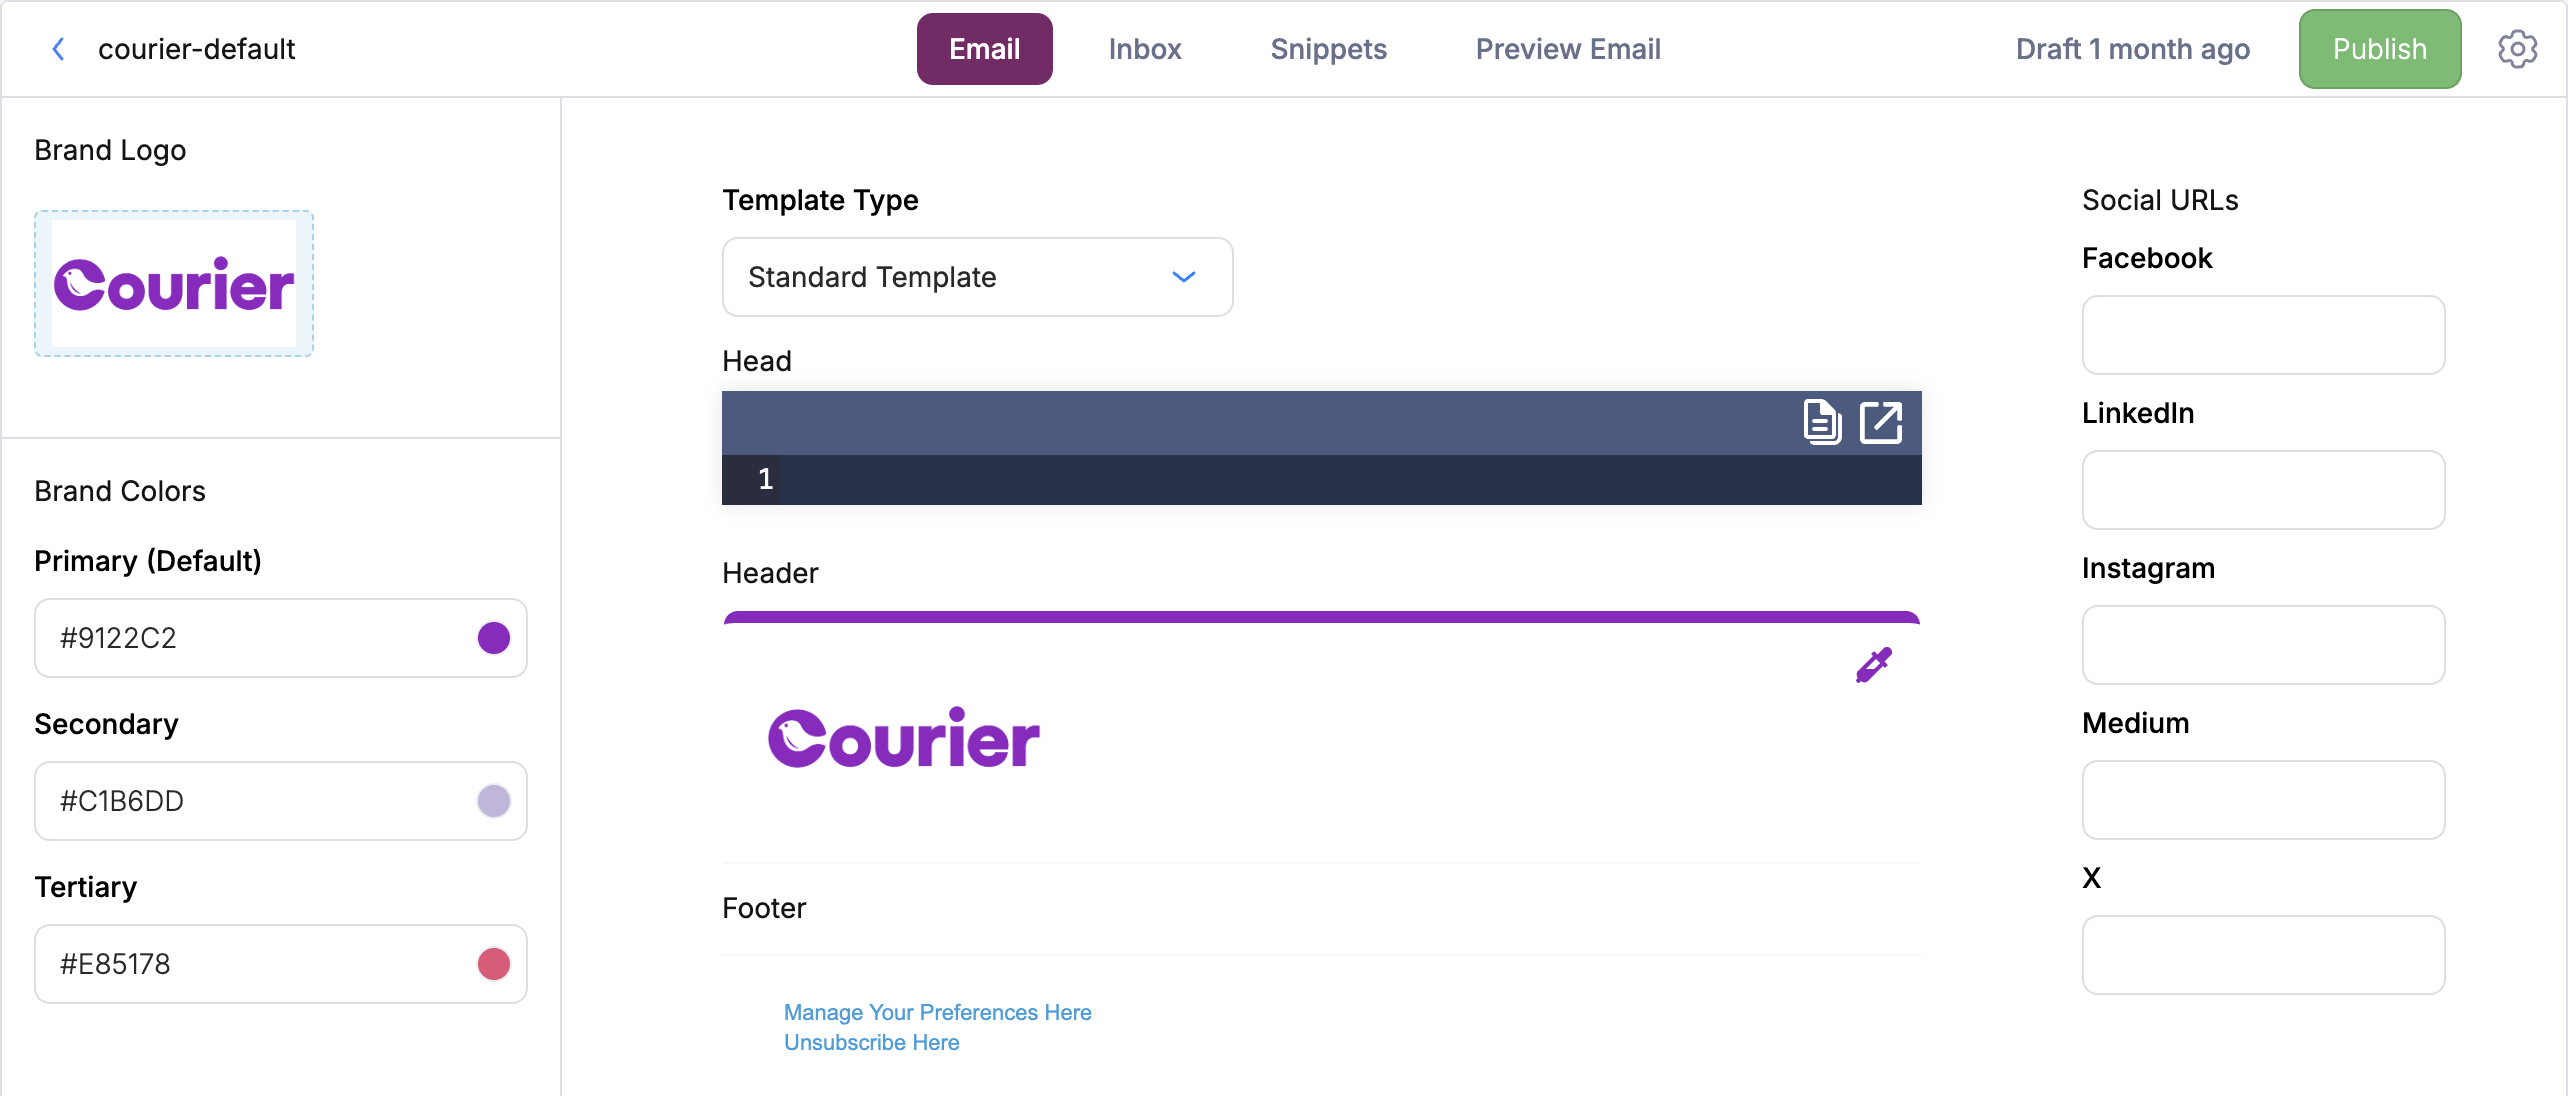 ## Standard Template
Customize Standard Template Brands with:
* Name
* Logo
* Brand colors (Primary, Secondary, Tertiary)
* Brand Header color
* Brand Footer Social URLs
**Logo Requirements**
* Format: JPEG, PNG, or GIF
* Width: 140px (height is flexible)
* Maximum file size: 5MB
## Custom MJML/Handlebars Template
Use a Custom MJML/Handlebars Template to fully customize the header, footer, and background using HTML, [MJML](https://mjml.io/), or [Handlebars](https://handlebarsjs.com/).
## Standard Template
Customize Standard Template Brands with:
* Name
* Logo
* Brand colors (Primary, Secondary, Tertiary)
* Brand Header color
* Brand Footer Social URLs
**Logo Requirements**
* Format: JPEG, PNG, or GIF
* Width: 140px (height is flexible)
* Maximum file size: 5MB
## Custom MJML/Handlebars Template
Use a Custom MJML/Handlebars Template to fully customize the header, footer, and background using HTML, [MJML](https://mjml.io/), or [Handlebars](https://handlebarsjs.com/).
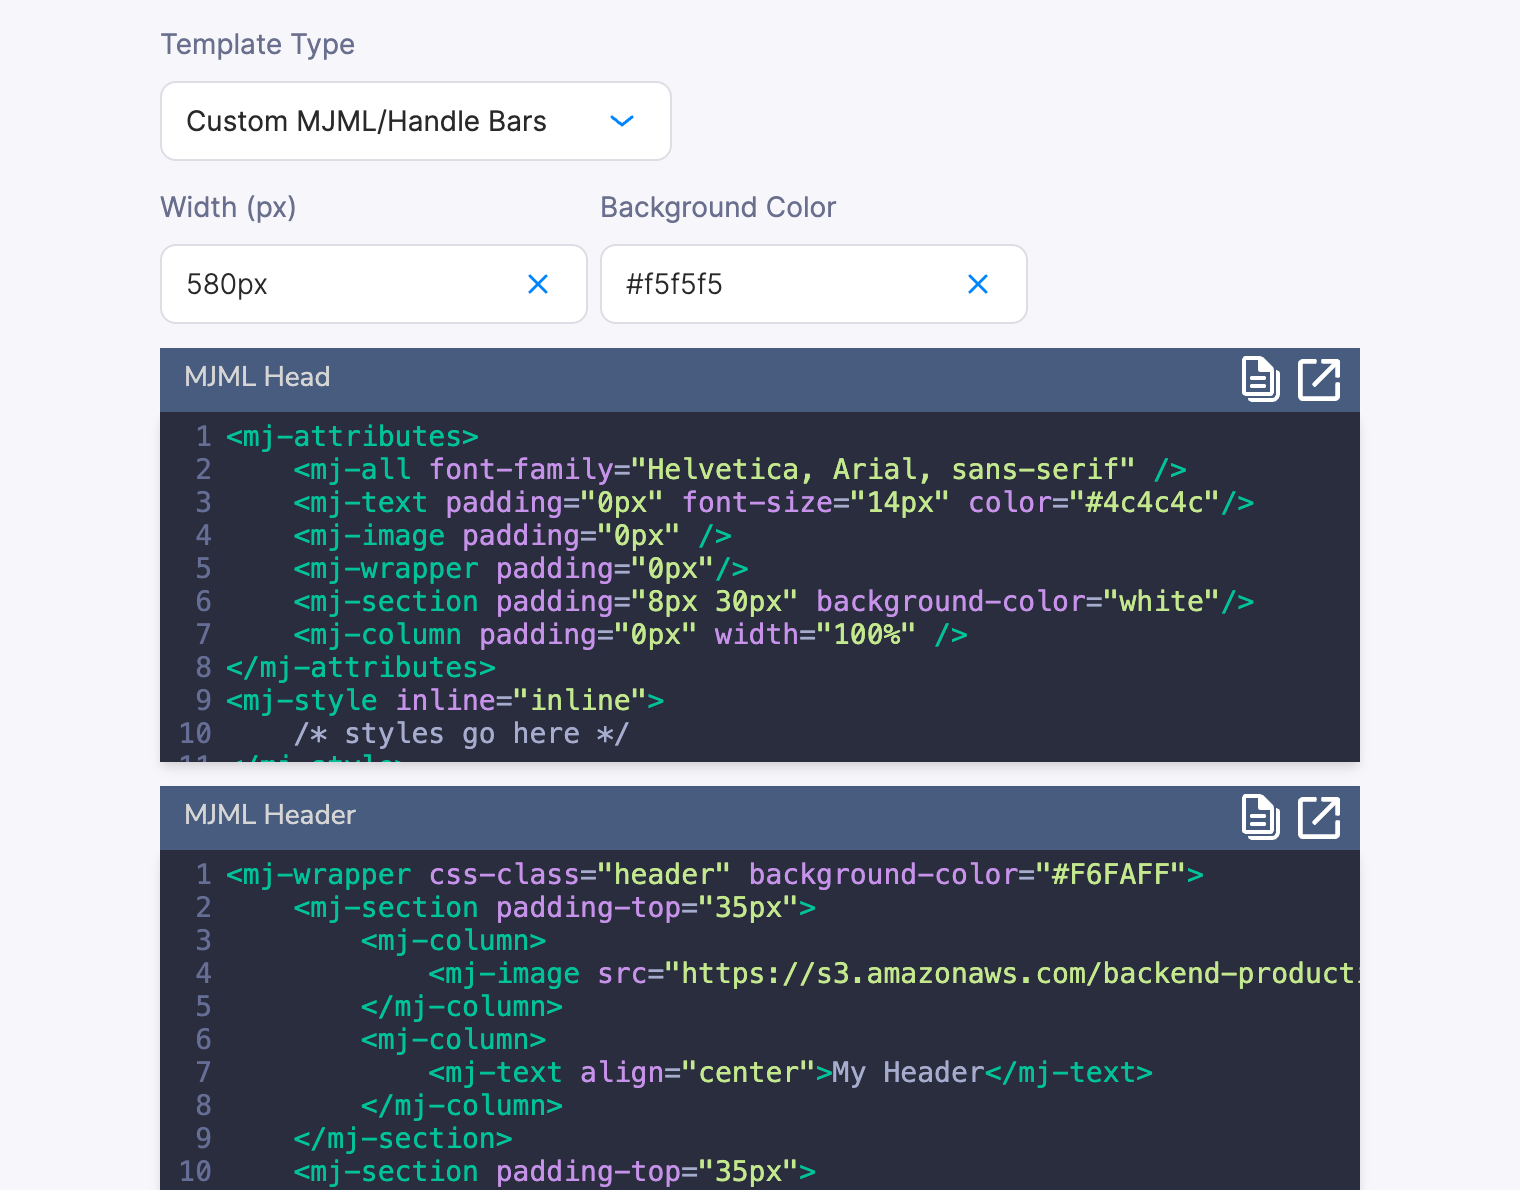 A custom template has four configurable fields:
### Head
The **Head** field injects content into the `` element of the compiled email. Use it for `
```
Courier's MJML compiler generates inline styles that take precedence over class-based rules. Add `!important` to your custom CSS class selectors to ensure they apply. See [CSS Classnames](/platform/content/brands/css-classnames) for details.
### Header
The **Header** field renders MJML or HTML content **above** your template's content blocks. Use it for branded banners, navigation bars, or promotional strips that appear at the top of every email.
```mjml theme={null}
Free shipping on orders over $50
```
### Footer
The **Footer** field renders MJML or HTML content **below** your template's content blocks. Use it for legal disclaimers, unsubscribe links, social media icons, or company address.
```mjml theme={null}
© 2026 Your Company · 123 Main St · Unsubscribe
```
For Outlook-compatible footers, wrap table-based HTML in `` with MSO conditional comments. See [Email Safe Formatting](/platform/content/email-safe-formatting#formatting-mjml-for-outlook-compatibility) for the pattern.
### Background Colors and Layout
Both the **Custom MJML/Handlebars** and **Handlebars** template types expose a **Background Color** field and a **Width** field. The **Handlebars** type also exposes additional layout controls:
| Field | Custom MJML/Handlebars | Handlebars | Description |
| ---------------------------- | :--------------------: | :--------: | ------------------------------------------------------------------- |
| **Background Color** | Yes | Yes | Overall email background color (behind the entire email) |
| **Width** | Yes | Yes | Email container width (default `600px`) |
| **Content Background Color** | No | Yes | Background color for the content area (behind your template blocks) |
| **Footer Background Color** | No | Yes | Background color for the footer section only |
| **Full Width Footer** | No | Yes | Whether the footer background extends to the full email width |
In Custom MJML/Handlebars mode, control content and footer backgrounds directly in your MJML code using `background-color` attributes on `` and `` elements.
These fields can also be set via the [Brands API](/api-reference/brands/create-a-new-brand) on `settings.email.templateOverride`.
***
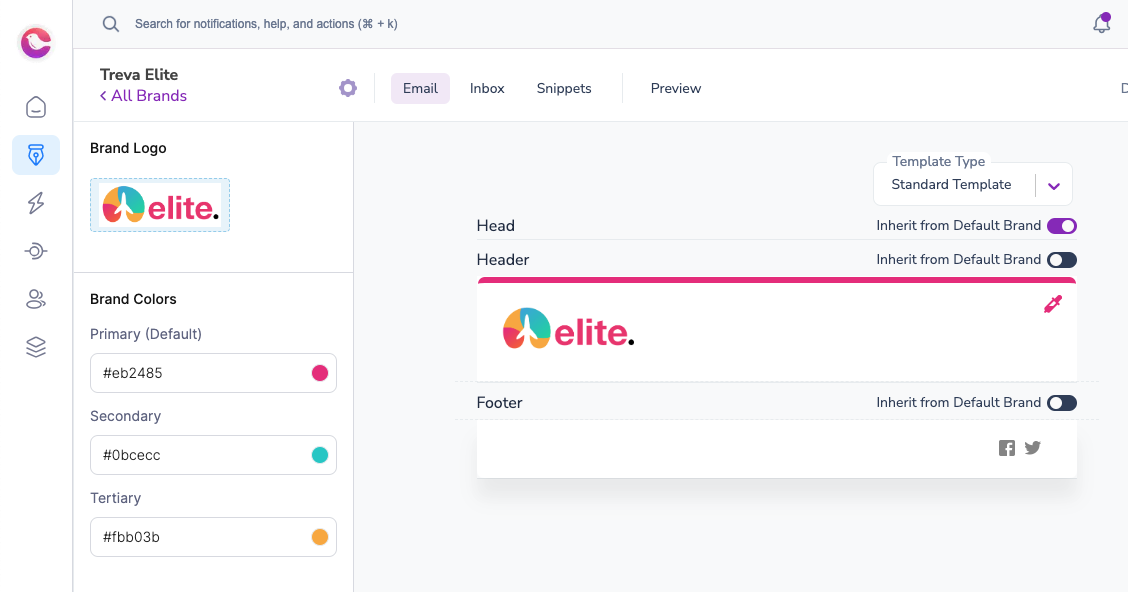
## Reusing Styles Across Brands
### Inheriting from the Default Brand
Use the **Inherit from Default Brand** toggle to inherit the `Head`, `Header`, or `Footer` from the Default brand. Both brands must use the standard brand type.
A custom template has four configurable fields:
### Head
The **Head** field injects content into the `` element of the compiled email. Use it for `
```
Courier's MJML compiler generates inline styles that take precedence over class-based rules. Add `!important` to your custom CSS class selectors to ensure they apply. See [CSS Classnames](/platform/content/brands/css-classnames) for details.
### Header
The **Header** field renders MJML or HTML content **above** your template's content blocks. Use it for branded banners, navigation bars, or promotional strips that appear at the top of every email.
```mjml theme={null}
Free shipping on orders over $50
```
### Footer
The **Footer** field renders MJML or HTML content **below** your template's content blocks. Use it for legal disclaimers, unsubscribe links, social media icons, or company address.
```mjml theme={null}
© 2026 Your Company · 123 Main St · Unsubscribe
```
For Outlook-compatible footers, wrap table-based HTML in `` with MSO conditional comments. See [Email Safe Formatting](/platform/content/email-safe-formatting#formatting-mjml-for-outlook-compatibility) for the pattern.
### Background Colors and Layout
Both the **Custom MJML/Handlebars** and **Handlebars** template types expose a **Background Color** field and a **Width** field. The **Handlebars** type also exposes additional layout controls:
| Field | Custom MJML/Handlebars | Handlebars | Description |
| ---------------------------- | :--------------------: | :--------: | ------------------------------------------------------------------- |
| **Background Color** | Yes | Yes | Overall email background color (behind the entire email) |
| **Width** | Yes | Yes | Email container width (default `600px`) |
| **Content Background Color** | No | Yes | Background color for the content area (behind your template blocks) |
| **Footer Background Color** | No | Yes | Background color for the footer section only |
| **Full Width Footer** | No | Yes | Whether the footer background extends to the full email width |
In Custom MJML/Handlebars mode, control content and footer backgrounds directly in your MJML code using `background-color` attributes on `` and `` elements.
These fields can also be set via the [Brands API](/api-reference/brands/create-a-new-brand) on `settings.email.templateOverride`.
***
## Reusing Styles Across Brands
### Inheriting from the Default Brand
Use the **Inherit from Default Brand** toggle to inherit the `Head`, `Header`, or `Footer` from the Default brand. Both brands must use the standard brand type.
 ### Using Brand Snippets
[Brand Snippets](/platform/content/brands/brand-snippets) let you share custom styles between standard and custom brand templates (Handlebars & MJML).
1. Create a snippet in your default brand with reusable CSS styling. You can use [CSS Classnames](/platform/content/brands/css-classnames) to style Courier blocks.
### Using Brand Snippets
[Brand Snippets](/platform/content/brands/brand-snippets) let you share custom styles between standard and custom brand templates (Handlebars & MJML).
1. Create a snippet in your default brand with reusable CSS styling. You can use [CSS Classnames](/platform/content/brands/css-classnames) to style Courier blocks.
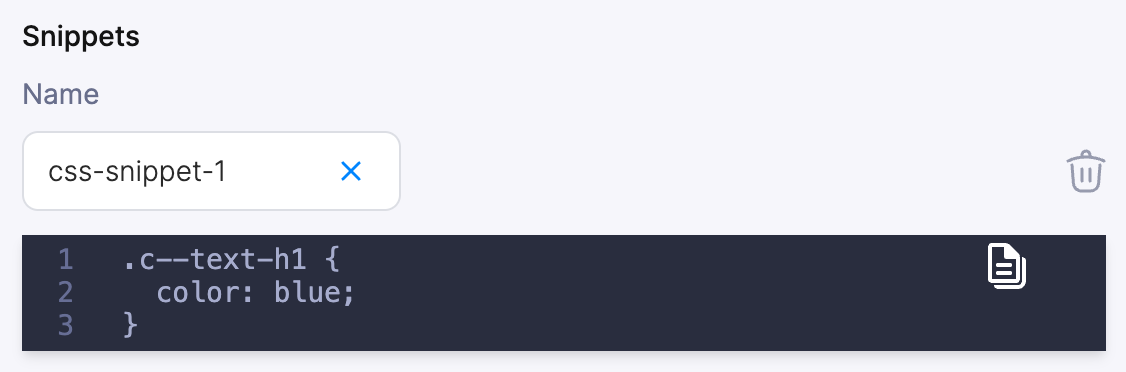 2. Reference the snippet in a custom brand's `Head` section:
```html theme={null}
```
Snippets in your Default brand can be referenced in custom brands as long as the snippet name is unique.
***
## Previewing Brands
To preview how your notification looks with different brands:
1. Open the template in the designer
2. Open **Preview**
3. Select a brand from **Preview Details > Brand**
2. Reference the snippet in a custom brand's `Head` section:
```html theme={null}
```
Snippets in your Default brand can be referenced in custom brands as long as the snippet name is unique.
***
## Previewing Brands
To preview how your notification looks with different brands:
1. Open the template in the designer
2. Open **Preview**
3. Select a brand from **Preview Details > Brand**
 ***
## Brand Variables Reference
Reference brand attributes in templates using the `var` helper with the `brand` prefix.
### Available Variables
| Variable | Description |
| ------------------------------- | ---------------------- |
| `brand.id` | Brand identifier |
| `brand.colors.primary` | Primary brand color |
| `brand.colors.secondary` | Secondary brand color |
| `brand.colors.tertiary` | Tertiary brand color |
| `brand.email.header.barColor` | Email header bar color |
| `brand.email.header.logo.href` | Logo click-through URL |
| `brand.email.header.logo.image` | Logo image URL |
| `brand.social.facebook` | Facebook profile URL |
| `brand.social.instagram` | Instagram profile URL |
| `brand.social.linkedin` | LinkedIn profile URL |
| `brand.social.medium` | Medium profile URL |
| `brand.social.twitter` | Twitter/X profile URL |
### Examples
**Using brand colors for inline styling:**
```handlebars theme={null}
***
## Brand Variables Reference
Reference brand attributes in templates using the `var` helper with the `brand` prefix.
### Available Variables
| Variable | Description |
| ------------------------------- | ---------------------- |
| `brand.id` | Brand identifier |
| `brand.colors.primary` | Primary brand color |
| `brand.colors.secondary` | Secondary brand color |
| `brand.colors.tertiary` | Tertiary brand color |
| `brand.email.header.barColor` | Email header bar color |
| `brand.email.header.logo.href` | Logo click-through URL |
| `brand.email.header.logo.image` | Logo image URL |
| `brand.social.facebook` | Facebook profile URL |
| `brand.social.instagram` | Instagram profile URL |
| `brand.social.linkedin` | LinkedIn profile URL |
| `brand.social.medium` | Medium profile URL |
| `brand.social.twitter` | Twitter/X profile URL |
### Examples
**Using brand colors for inline styling:**
```handlebars theme={null}
Welcome to our platform!
```
**Adding social links in a footer:**
```handlebars theme={null}
{{#if (var "brand.social.twitter")}}
Follow us on Twitter
{{/if}}
```
**Referencing the brand logo:**
```handlebars theme={null}
 ```
```