> ## Documentation Index
> Fetch the complete documentation index at: https://www.courier.com/docs/llms.txt
> Use this file to discover all available pages before exploring further.
# Export to Elemental
> Convert Designer-built notifications into Courier Elemental JSON format. Export templates from Courier Design Studio 2.0 to use in API requests, version control, or programmatic template management.
## Overview
Export to Elemental allows you to convert your templates into Courier Elemental JSON format. This enables you to:
* **Use templates programmatically**: Include exported Elemental JSON directly in `/send` API requests
* **Version control templates**: Store template definitions as code in version control systems
* **Migrate to Elemental**: Convert existing Designer templates to Elemental format
* **Template management**: Create, update, and manage templates via API using exported JSON
* **Customization**: Modify exported JSON to add advanced features like conditionals, loops, or custom logic
Export to Elemental is available in both Courier Design Studio 2.0 (v2) and the legacy Designer (v1). You can export templates from either designer to Elemental format.
## Why Export to Elemental?
**Benefits of exporting:**
1. **API-First Workflows**: Use templates in API calls without managing them in the Designer UI
2. **Version Control**: Track template changes in Git alongside your codebase
3. **Programmatic Management**: Create, update, and manage templates via the Templates API
4. **Advanced Features**: Add control flow (`if`, `loop`, `ref`), complex layouts, or custom logic that may not be available in the Designer UI
5. **Reproducibility**: Define templates as code for consistent deployments across environments
6. **Collaboration**: Share template definitions as JSON files with your team
## How to Export
1. Open your template in [Courier Design Studio](/platform/content/template-designer/template-designer-overview)
2. Click the dropdown arrow next to **"Publish"**
3. Select **"Export to Elemental"**
4. Copy the JSON output containing the Elemental syntax

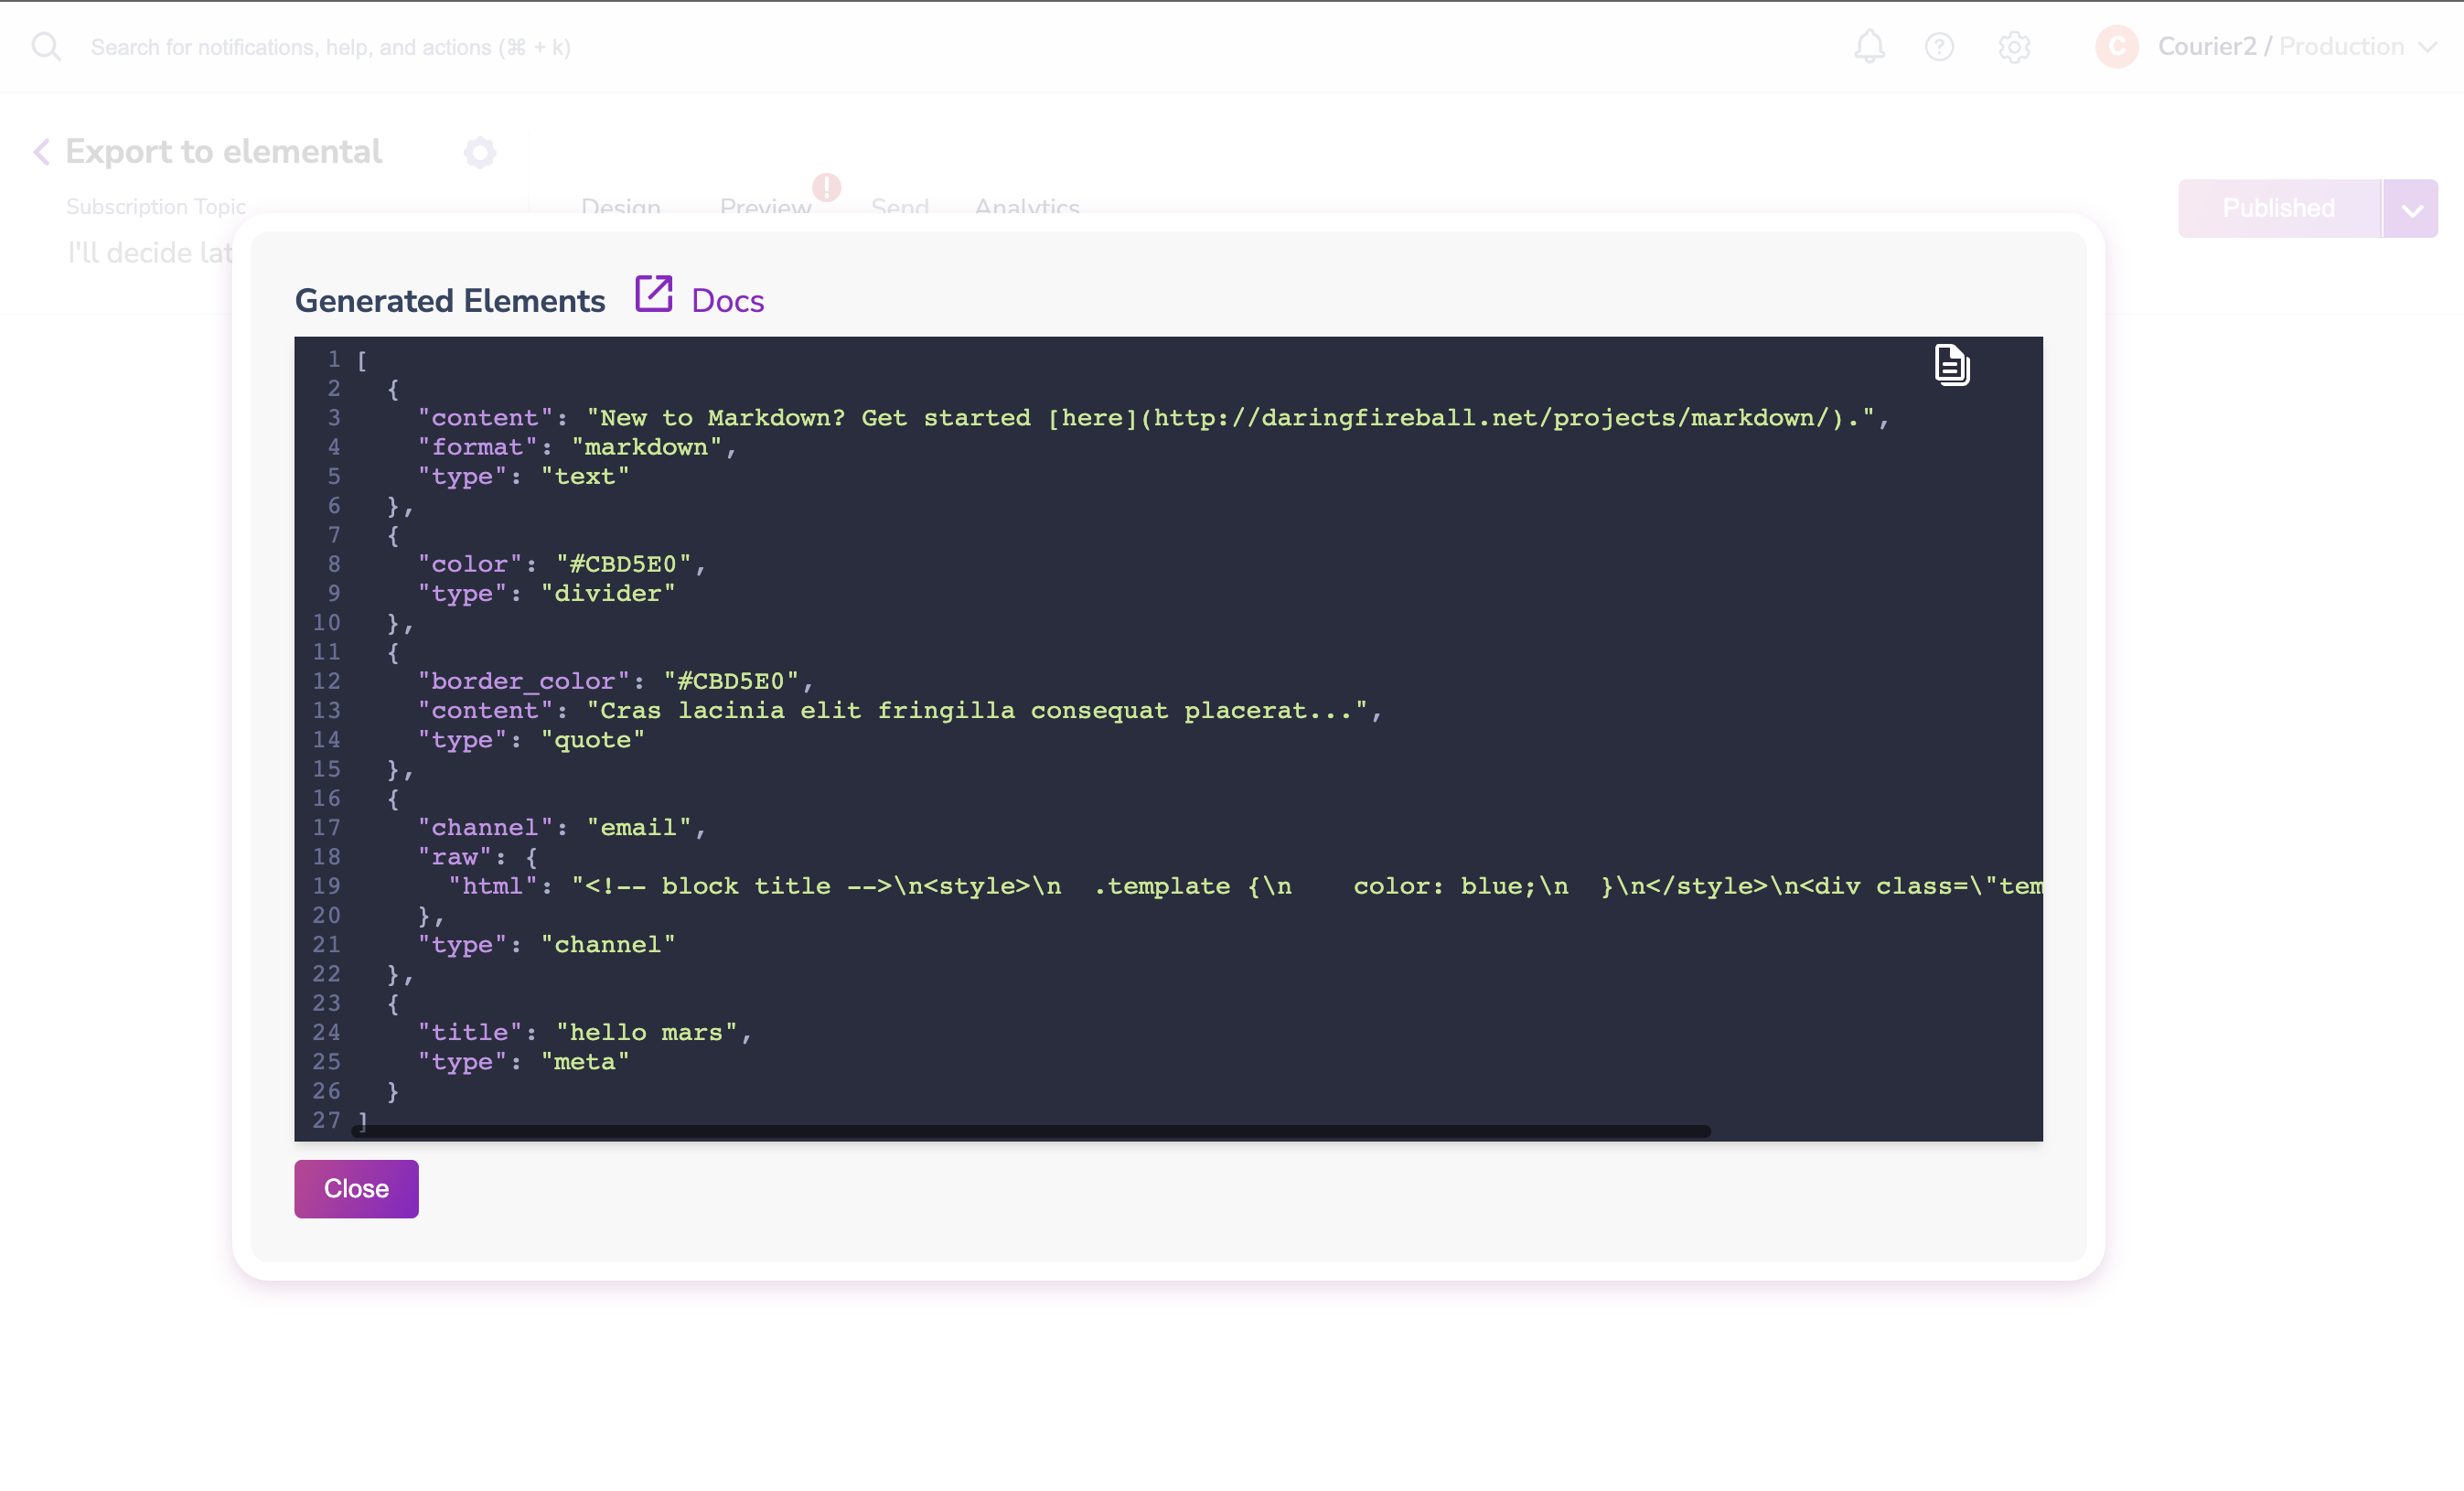 ## Using Exported Elemental JSON
The exported Elemental JSON follows the standard Elemental format with `version` and `elements` fields. You can use it in several ways:
### In Send API Requests
Include the exported JSON directly in the `content` field of your `/send` API request:
```bash cURL icon="terminal" wrap theme={null}
curl -X POST https://api.courier.com/send \
-H "Authorization: Bearer $COURIER_AUTH_TOKEN" \
-H "Content-Type: application/json" \
-d '{
"message": {
"to": { "email": "user@example.com" },
"content": {
"version": "2022-01-01",
"elements": [
{
"type": "meta",
"title": "Welcome!"
},
{
"type": "text",
"content": "Thanks for signing up, {{name}}"
}
]
},
"data": { "name": "Alex" }
}
}'
```
```javascript Node.js icon="node-js" lines theme={null}
const { CourierClient } = require("@trycourier/courier");
const courier = new CourierClient({
authorizationToken: process.env.COURIER_AUTH_TOKEN,
});
// Use exported Elemental JSON
const exportedTemplate = {
version: "2022-01-01",
elements: [
{
type: "meta",
title: "Welcome!",
},
{
type: "text",
content: "Thanks for signing up, {{name}}",
},
],
};
await courier.send({
message: {
to: { email: "user@example.com" },
content: exportedTemplate,
data: { name: "Alex" },
},
});
```
```python Python icon="python" lines theme={null}
import os
from trycourier import Courier
client = Courier(auth_token=os.environ["COURIER_AUTH_TOKEN"])
# Use exported Elemental JSON
exported_template = {
"version": "2022-01-01",
"elements": [
{
"type": "meta",
"title": "Welcome!",
},
{
"type": "text",
"content": "Thanks for signing up, {{name}}",
},
],
}
client.send_message(
message={
"to": {"email": "user@example.com"},
"content": exported_template,
"data": {"name": "Alex"},
}
)
```
### In Template API Requests
Create or update templates using the exported JSON via the Templates API:
```json theme={null}
{
"name": "Welcome Email",
"content": {
"version": "2022-01-01",
"elements": [
// ... exported Elemental JSON
]
}
}
```
### Customizing Exported JSON
After exporting, you can enhance the JSON with advanced Elemental features:
**Add conditional logic:**
```json theme={null}
{
"type": "text",
"content": "Premium feature available!",
"if": "data.user_tier === 'premium'"
}
```
**Add loops:**
```json theme={null}
{
"type": "group",
"loop": "data.products",
"elements": [
{
"type": "text",
"content": "{{$.item.name}} - {{$.item.price}}"
}
]
}
```
**Add channel-specific content:**
```json theme={null}
{
"type": "text",
"content": "Detailed email content",
"channels": ["email"]
}
```
For more information on advanced Elemental features, see the [Control Flow documentation](/platform/content/elemental/control-flow) and [Elements Reference](/platform/content/elemental/elements/index).
## Supported Block Types
The following Designer Studio block types can be exported to Elemental:
| Designer Block | Elemental Node Type(s) | Notes |
| -------------- | ------------------------- | ---------------------------------------- |
| Text | `text` | Plain text content |
| Image | `image` | Image elements with src, alt\_text, etc. |
| Action | `action` | Buttons and links |
| Divider | `divider` | Horizontal dividers |
| Markdown | `text` (format: markdown) | Markdown-formatted text |
| Quote | `quote` | Quote blocks |
| Template | `html` | Raw HTML content |
## Limitations
**Export Limitations**
The following features have limited or no support when exporting:
* **List blocks**: Not directly supported in export
* **Jsonnet blocks**: Not supported in export
* **Block-level locales**: Locale definitions at the block level are not exported
* **Complex nested structures**: Some deeply nested Designer layouts may not export perfectly
* **Custom styling**: Some Designer-specific styling may not translate directly to Elemental
**Workarounds:**
* For lists: Use Elemental `list` elements directly in your exported JSON
* For locales: Add locale definitions manually after export using Elemental's `locales` property
* For complex layouts: Review and adjust exported JSON structure as needed
## Best Practices
1. **Review exported JSON**: Always review the exported JSON to ensure it matches your Designer template
2. **Test before deploying**: Test exported templates with sample data before using in production
3. **Version control**: Store exported JSON in version control for tracking changes
4. **Enhance after export**: Add advanced features (conditionals, loops) after export if needed
5. **Document customizations**: Document any manual changes you make to exported JSON
6. **Keep Designer in sync**: If you make changes to exported JSON, consider updating the Designer template as well
## Related Documentation
Learn about Courier Elemental and its capabilities.
Complete reference for all Elemental element types.
Add conditionals, loops, and references to your templates.
Localize your exported templates for multiple languages.
## Using Exported Elemental JSON
The exported Elemental JSON follows the standard Elemental format with `version` and `elements` fields. You can use it in several ways:
### In Send API Requests
Include the exported JSON directly in the `content` field of your `/send` API request:
```bash cURL icon="terminal" wrap theme={null}
curl -X POST https://api.courier.com/send \
-H "Authorization: Bearer $COURIER_AUTH_TOKEN" \
-H "Content-Type: application/json" \
-d '{
"message": {
"to": { "email": "user@example.com" },
"content": {
"version": "2022-01-01",
"elements": [
{
"type": "meta",
"title": "Welcome!"
},
{
"type": "text",
"content": "Thanks for signing up, {{name}}"
}
]
},
"data": { "name": "Alex" }
}
}'
```
```javascript Node.js icon="node-js" lines theme={null}
const { CourierClient } = require("@trycourier/courier");
const courier = new CourierClient({
authorizationToken: process.env.COURIER_AUTH_TOKEN,
});
// Use exported Elemental JSON
const exportedTemplate = {
version: "2022-01-01",
elements: [
{
type: "meta",
title: "Welcome!",
},
{
type: "text",
content: "Thanks for signing up, {{name}}",
},
],
};
await courier.send({
message: {
to: { email: "user@example.com" },
content: exportedTemplate,
data: { name: "Alex" },
},
});
```
```python Python icon="python" lines theme={null}
import os
from trycourier import Courier
client = Courier(auth_token=os.environ["COURIER_AUTH_TOKEN"])
# Use exported Elemental JSON
exported_template = {
"version": "2022-01-01",
"elements": [
{
"type": "meta",
"title": "Welcome!",
},
{
"type": "text",
"content": "Thanks for signing up, {{name}}",
},
],
}
client.send_message(
message={
"to": {"email": "user@example.com"},
"content": exported_template,
"data": {"name": "Alex"},
}
)
```
### In Template API Requests
Create or update templates using the exported JSON via the Templates API:
```json theme={null}
{
"name": "Welcome Email",
"content": {
"version": "2022-01-01",
"elements": [
// ... exported Elemental JSON
]
}
}
```
### Customizing Exported JSON
After exporting, you can enhance the JSON with advanced Elemental features:
**Add conditional logic:**
```json theme={null}
{
"type": "text",
"content": "Premium feature available!",
"if": "data.user_tier === 'premium'"
}
```
**Add loops:**
```json theme={null}
{
"type": "group",
"loop": "data.products",
"elements": [
{
"type": "text",
"content": "{{$.item.name}} - {{$.item.price}}"
}
]
}
```
**Add channel-specific content:**
```json theme={null}
{
"type": "text",
"content": "Detailed email content",
"channels": ["email"]
}
```
For more information on advanced Elemental features, see the [Control Flow documentation](/platform/content/elemental/control-flow) and [Elements Reference](/platform/content/elemental/elements/index).
## Supported Block Types
The following Designer Studio block types can be exported to Elemental:
| Designer Block | Elemental Node Type(s) | Notes |
| -------------- | ------------------------- | ---------------------------------------- |
| Text | `text` | Plain text content |
| Image | `image` | Image elements with src, alt\_text, etc. |
| Action | `action` | Buttons and links |
| Divider | `divider` | Horizontal dividers |
| Markdown | `text` (format: markdown) | Markdown-formatted text |
| Quote | `quote` | Quote blocks |
| Template | `html` | Raw HTML content |
## Limitations
**Export Limitations**
The following features have limited or no support when exporting:
* **List blocks**: Not directly supported in export
* **Jsonnet blocks**: Not supported in export
* **Block-level locales**: Locale definitions at the block level are not exported
* **Complex nested structures**: Some deeply nested Designer layouts may not export perfectly
* **Custom styling**: Some Designer-specific styling may not translate directly to Elemental
**Workarounds:**
* For lists: Use Elemental `list` elements directly in your exported JSON
* For locales: Add locale definitions manually after export using Elemental's `locales` property
* For complex layouts: Review and adjust exported JSON structure as needed
## Best Practices
1. **Review exported JSON**: Always review the exported JSON to ensure it matches your Designer template
2. **Test before deploying**: Test exported templates with sample data before using in production
3. **Version control**: Store exported JSON in version control for tracking changes
4. **Enhance after export**: Add advanced features (conditionals, loops) after export if needed
5. **Document customizations**: Document any manual changes you make to exported JSON
6. **Keep Designer in sync**: If you make changes to exported JSON, consider updating the Designer template as well
## Related Documentation
Learn about Courier Elemental and its capabilities.
Complete reference for all Elemental element types.
Add conditionals, loops, and references to your templates.
Localize your exported templates for multiple languages.