> ## Documentation Index
> Fetch the complete documentation index at: https://www.courier.com/docs/llms.txt
> Use this file to discover all available pages before exploring further.
# How to Send Automations with Tenant Context
> Learn how to invoke automations with tenant context to apply tenant-specific branding, profile overrides, and preferences to recipients in multi-tenant applications.
# Overview
When working with multi-tenant applications, you often need to send notifications that reflect tenant-specific configurations—such as custom branding, profile data overrides, or tenant-scoped preferences. This tutorial shows you how to invoke an automation with tenant context so that Courier applies the correct tenant configuration to each recipient.
## Use Cases
You might need tenant context in automations when:
* **Custom Branding**: Each tenant has their own brand identity that should appear in notifications
* **Profile Overrides**: Tenant-specific user data needs to be merged with base user profiles
* **Tenant Preferences**: Different tenants have different notification settings or routing rules
* **Data Isolation**: Each tenant's data needs to remain scoped to their organization
## An Example
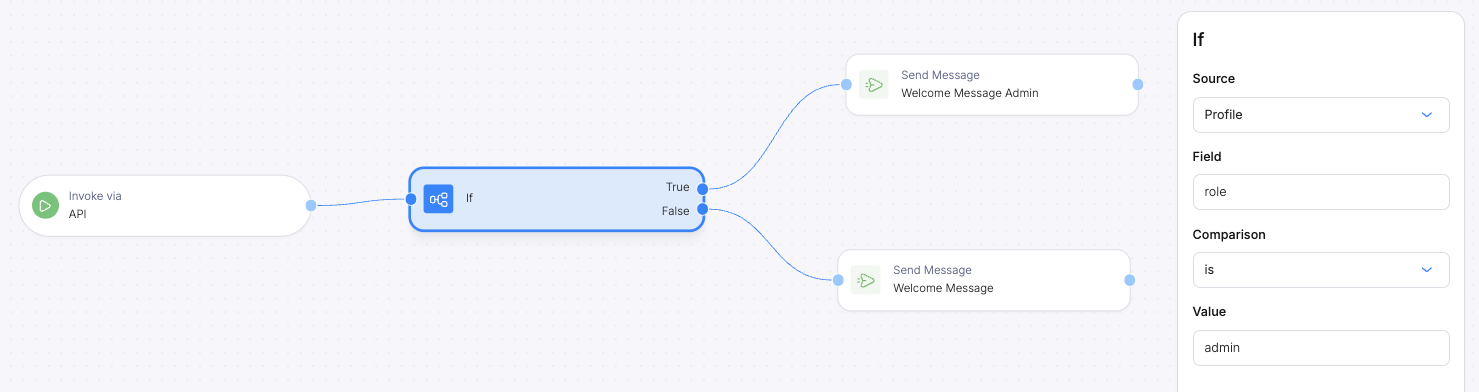
For this example, say we want to invoke an automation for a whole tenant and send admins one message and non-admins a different message. We can create a simple automation that looks at the user's profile and check the user's role.
 To send an automation with tenant context, you need to:
1. Pass the `tenant_id` in the automation invocation payload (in both `profile` and `data`)
2. Configure the automation's send node to use the tenant context from the data payload
This ensures that when the automation executes, Courier applies the tenant-specific configuration to the notification.
## Step-by-Step Guide
When calling the automation, include the `tenant_id` in both the `profile` object and the `data` object.
```json icon="code" highlight={3-5,6-8} theme={null}
{
"recipient": null,
"profile": {
"tenant_id": "courier-default"
},
"data": {
"tenant_id": "courier-default"
}
}
```
* **`profile.tenant_id`**: Associates the recipient with the tenant for profile lookups
* **`data.tenant_id`**: Makes the tenant ID available as a variable in the automation flow
In your automation, open the Send node's JSON editor and add a `context` object that references the `tenant_id` from your data payload:
To send an automation with tenant context, you need to:
1. Pass the `tenant_id` in the automation invocation payload (in both `profile` and `data`)
2. Configure the automation's send node to use the tenant context from the data payload
This ensures that when the automation executes, Courier applies the tenant-specific configuration to the notification.
## Step-by-Step Guide
When calling the automation, include the `tenant_id` in both the `profile` object and the `data` object.
```json icon="code" highlight={3-5,6-8} theme={null}
{
"recipient": null,
"profile": {
"tenant_id": "courier-default"
},
"data": {
"tenant_id": "courier-default"
}
}
```
* **`profile.tenant_id`**: Associates the recipient with the tenant for profile lookups
* **`data.tenant_id`**: Makes the tenant ID available as a variable in the automation flow
In your automation, open the Send node's JSON editor and add a `context` object that references the `tenant_id` from your data payload:
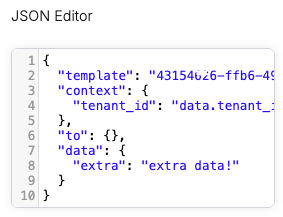 ```json icon="code" highlight={3-5} theme={null}
{
"template": "ad2c9305-5bf8-4a8e-9108-aac5e3bdd2ff",
"context": {
"tenant_id": "data.tenant_id"
},
"to": {},
"data": {}
}
```
The `context.tenant_id` field tells Courier to apply tenant-specific configuration. The value `"data.tenant_id"` references the tenant ID you passed in the automation invocation.
Use the exact syntax `"data.tenant_id"` to reference the tenant ID from your payload—this is a variable reference, not a string literal.
## Testing Your Configuration
Invoke the automation with a test tenant ID and verify the tenant-specific branding appears in the Data Logs:
```bash icon="terminal" wrap theme={null}
curl -X POST https://api.courier.com/automations/invoke \
-H "Authorization: Bearer $COURIER_AUTH_TOKEN" \
-H "Content-Type: application/json" \
-d '{
"recipient": null,
"profile": {
"tenant_id": "your-tenant-id"
},
"data": {
"tenant_id": "your-tenant-id"
}
}'
```
## Troubleshooting
If tenant branding isn't appearing, verify:
* The `tenant_id` matches an existing tenant in your workspace (case-sensitive)
* The tenant has a brand configured
* The `context` object is properly set in the Send node JSON with `"data.tenant_id"` syntax
## Related Resources
* [Managing Tenants](/platform/tenants/tenants-overview) - Create and configure tenants
* [Automation API Reference](/api-reference/automations/invoke-an-automation) - Complete API documentation
* [Multi-Tenant Branding](/platform/content/brands/brands-overview) - Customize branding for each tenant
```json icon="code" highlight={3-5} theme={null}
{
"template": "ad2c9305-5bf8-4a8e-9108-aac5e3bdd2ff",
"context": {
"tenant_id": "data.tenant_id"
},
"to": {},
"data": {}
}
```
The `context.tenant_id` field tells Courier to apply tenant-specific configuration. The value `"data.tenant_id"` references the tenant ID you passed in the automation invocation.
Use the exact syntax `"data.tenant_id"` to reference the tenant ID from your payload—this is a variable reference, not a string literal.
## Testing Your Configuration
Invoke the automation with a test tenant ID and verify the tenant-specific branding appears in the Data Logs:
```bash icon="terminal" wrap theme={null}
curl -X POST https://api.courier.com/automations/invoke \
-H "Authorization: Bearer $COURIER_AUTH_TOKEN" \
-H "Content-Type: application/json" \
-d '{
"recipient": null,
"profile": {
"tenant_id": "your-tenant-id"
},
"data": {
"tenant_id": "your-tenant-id"
}
}'
```
## Troubleshooting
If tenant branding isn't appearing, verify:
* The `tenant_id` matches an existing tenant in your workspace (case-sensitive)
* The tenant has a brand configured
* The `context` object is properly set in the Send node JSON with `"data.tenant_id"` syntax
## Related Resources
* [Managing Tenants](/platform/tenants/tenants-overview) - Create and configure tenants
* [Automation API Reference](/api-reference/automations/invoke-an-automation) - Complete API documentation
* [Multi-Tenant Branding](/platform/content/brands/brands-overview) - Customize branding for each tenant