Courier Push
Introduction
Courier Push is a provider that delivers notifications to a web frontend via a websocket. These notifications can be displayed via the provided Courier Toast and Courier Inbox components or via a custom component.
Why use Courier Push?
Integrating third-party applications for notifications can be tough. Courier Push allows developers to skip over problems like authentication, building proxy API routes, and maintaining upgrading costs.
We offer two components - Toast and Inbox - that are easy to integrate, work seamlessly with Courier's APIs, and can be styled to match any existing website.
Courier Components
The Courier Toast and Inbox components provide notification implementations that are much easier and quicker to integrate into your codebase than building a system from scratch.
What is Toast 🍞
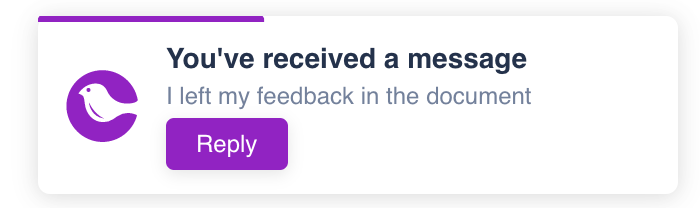
Similar to snackbar and in-app pop-up notifications, the Toast Component provides the ability to communicate directly with your customers inside your own application, or possibly inside your customers application. While users are online in your app, they can receive Toast notifications instantaneously. The beauty of Toast is that each notification allows developers to communicate a CTA (Call to Action).
What is Inbox 📬
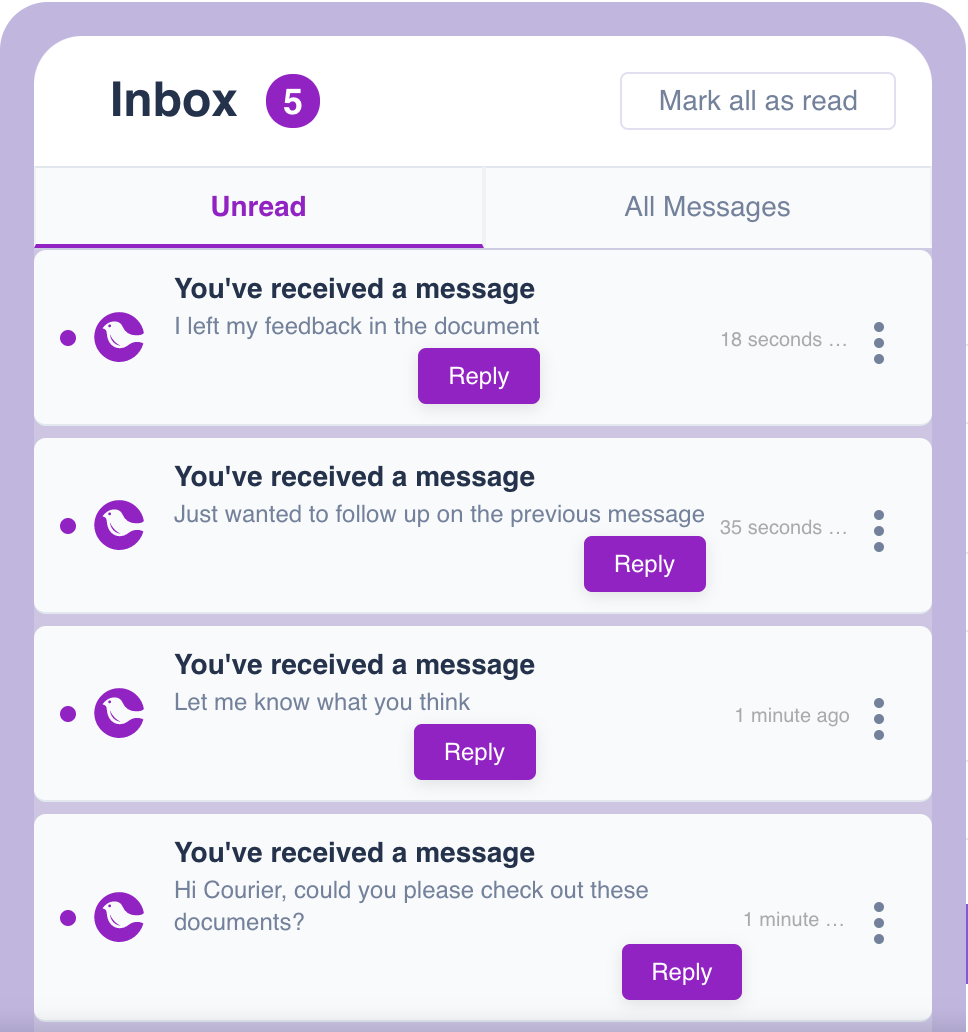
Courier's Inbox Integration provide an extended interface that can store notifications for receivers to read and access later at their own convenience. While Toast notifications are great for immediate communication, Inbox notifications save messages and allow users to access them at the appropriate time.
Demo
- Check out the demo >
- Use the form to send out a message using Courier Toast
- Once the message is sent, click on the 🔔 bell icon and watch Courier Inbox in action
Getting Started
Installation
Before getting started, make sure you have an active account on https://app.courier.com.
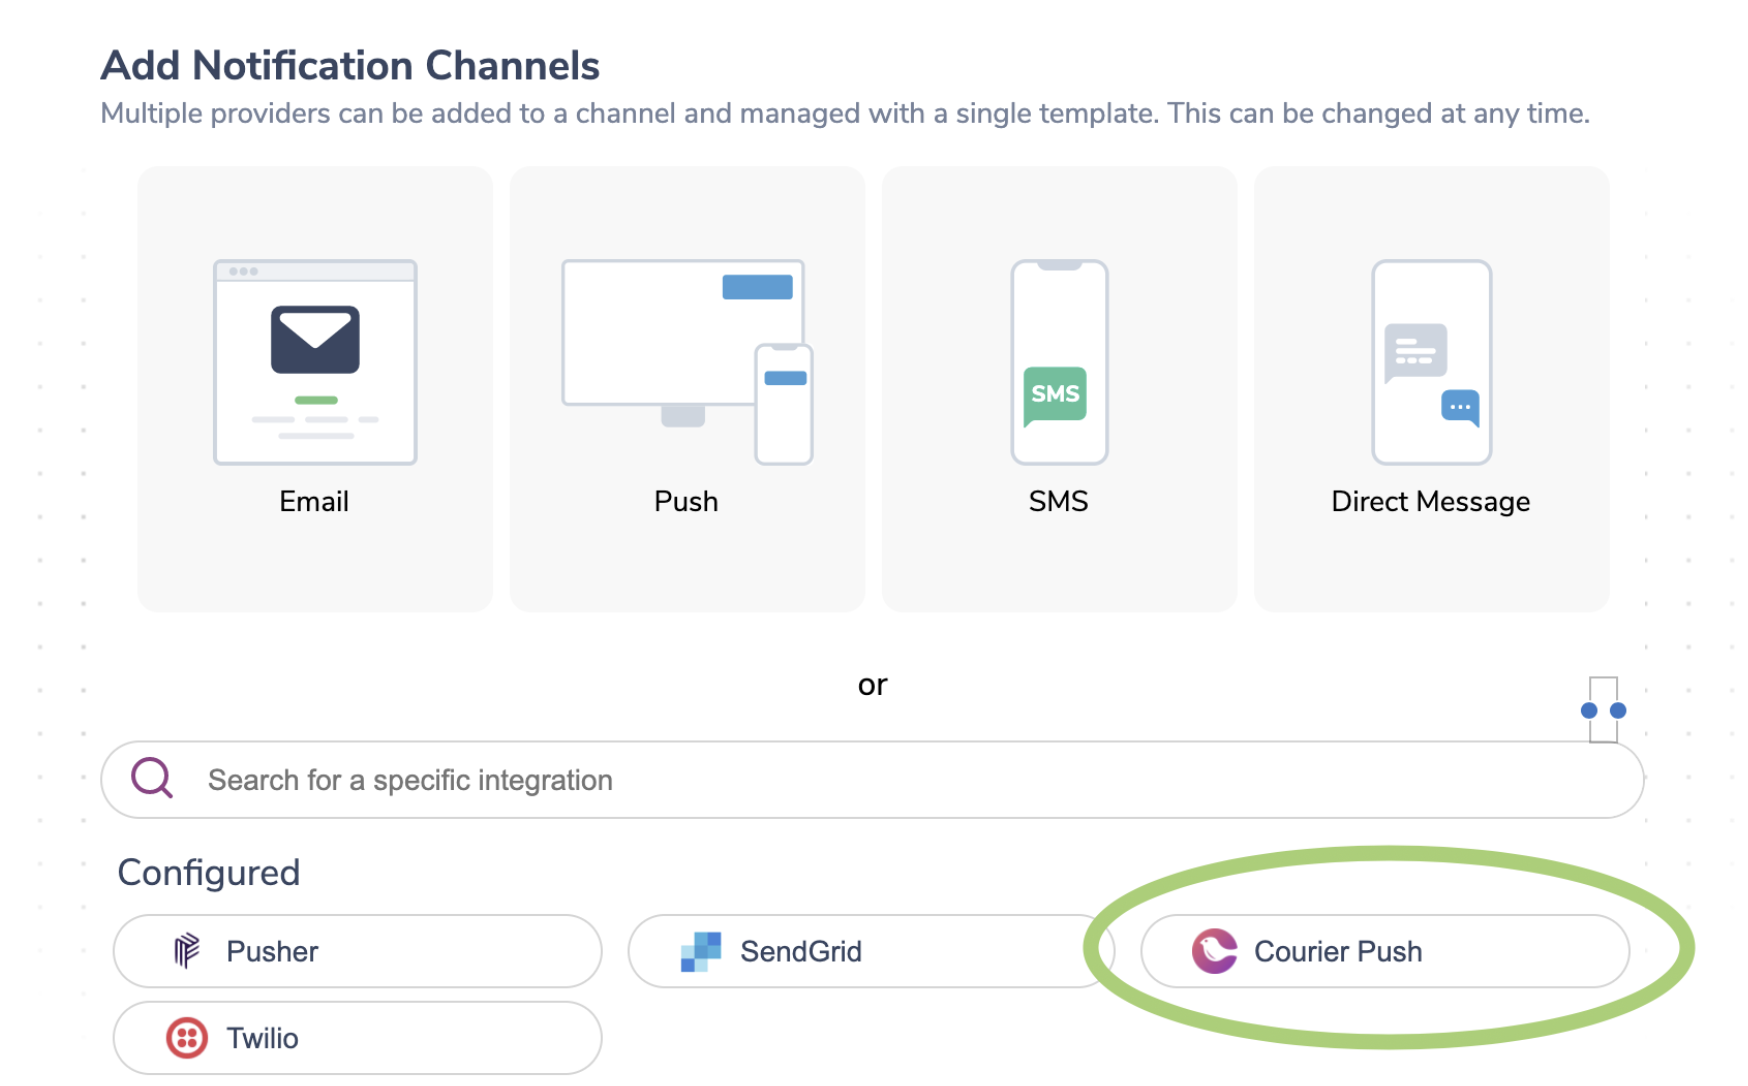
- Navigate to the Courier Push Provider.
- Click the Install button in the bottom right of the page.
We will be coming back here shortly to copy the Client Key when we are ready to integrate the components.
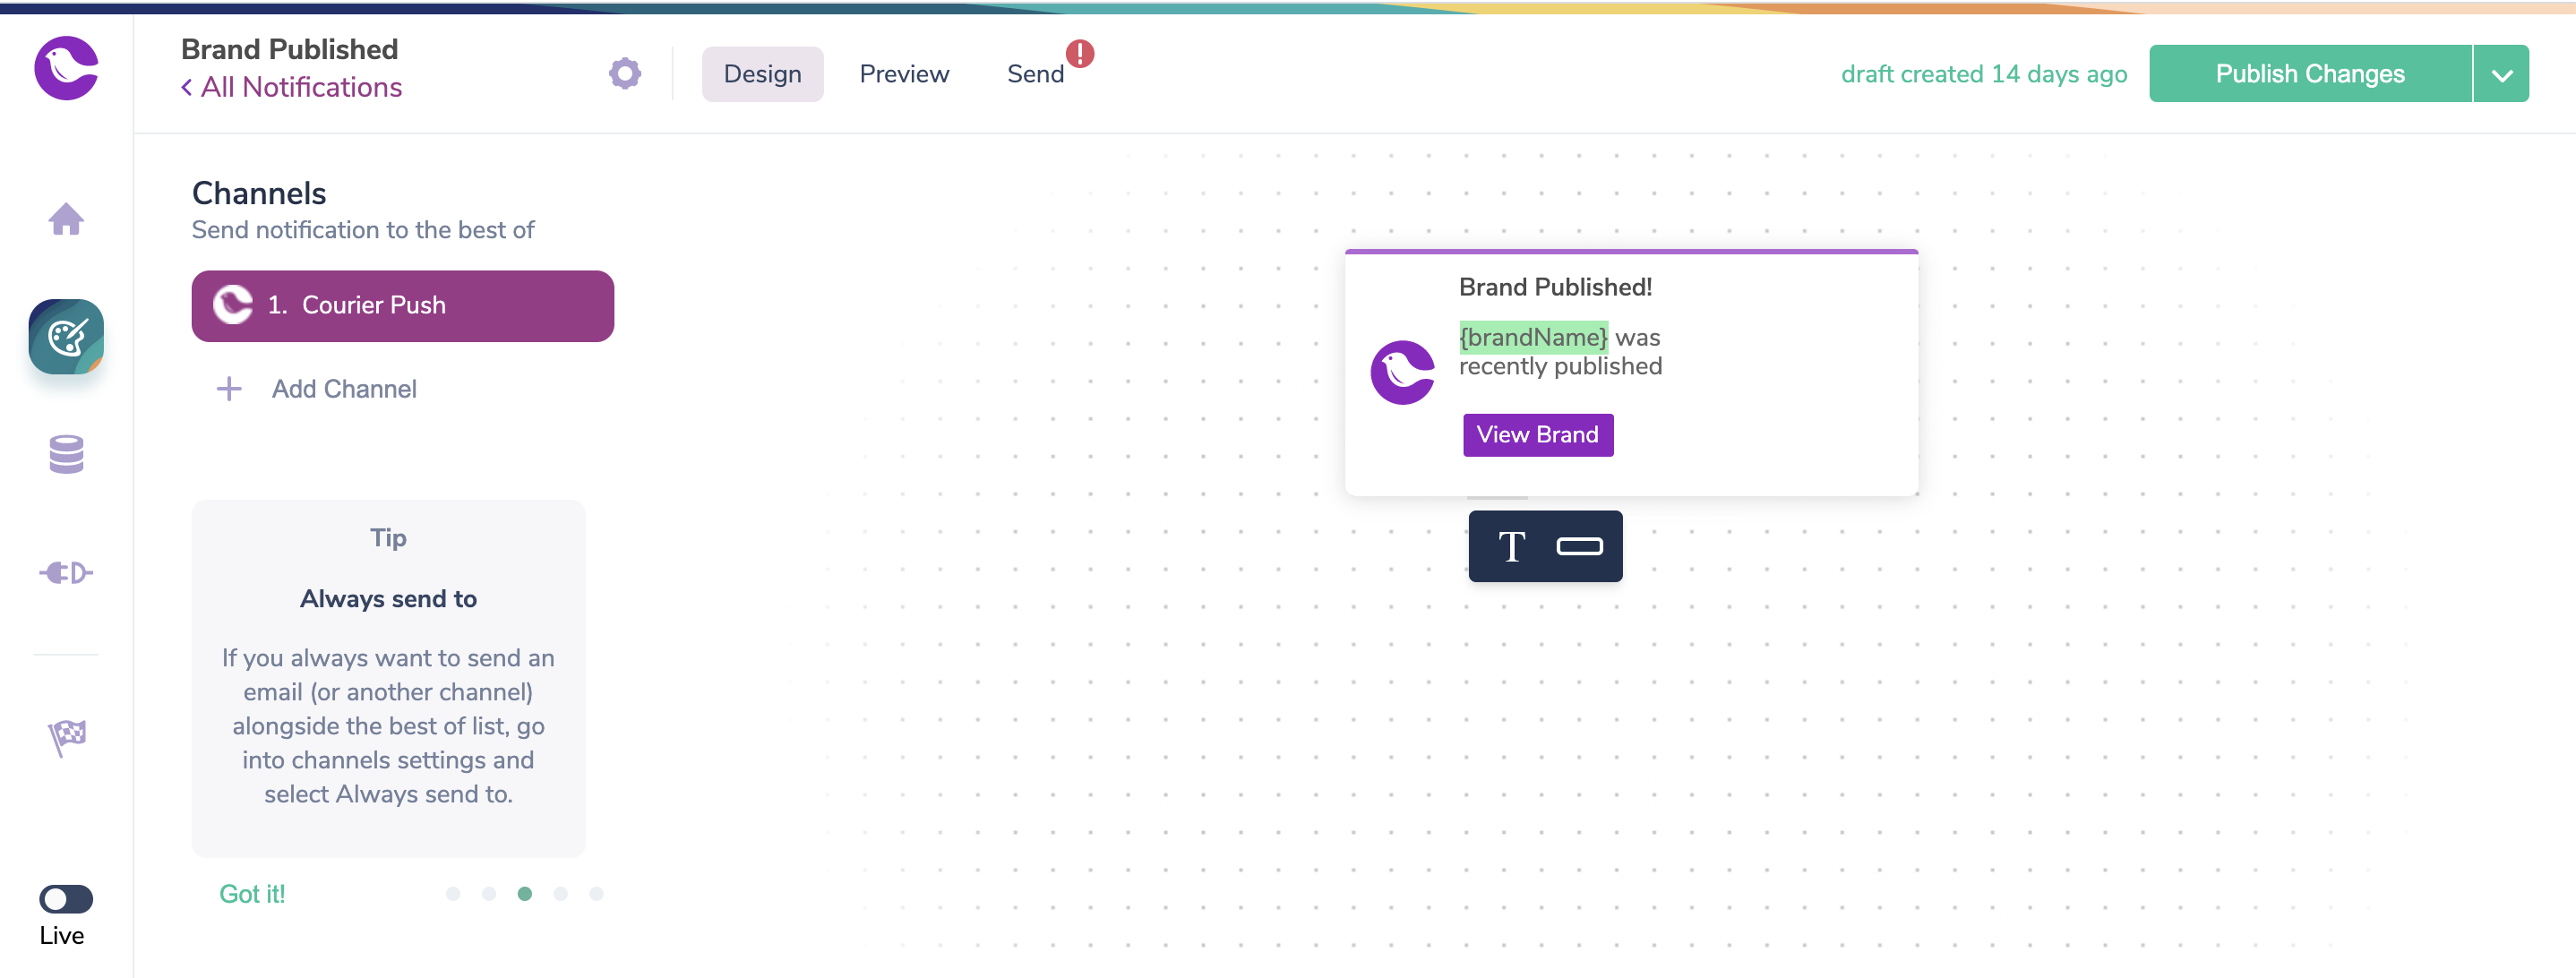
Create a Notification Template
Now that the new Courier Push Provider is installed, we need to create a Template and design our Notification.
- Navigate to the Notification List
- Click "Create Notification"
- Select the "Courier Push Provider" Integration.
- Add a Title and Body to your new template. You should end up with something similar to the Brand Published template show below. Make sure to publish!!
Authentication
Default Authentication
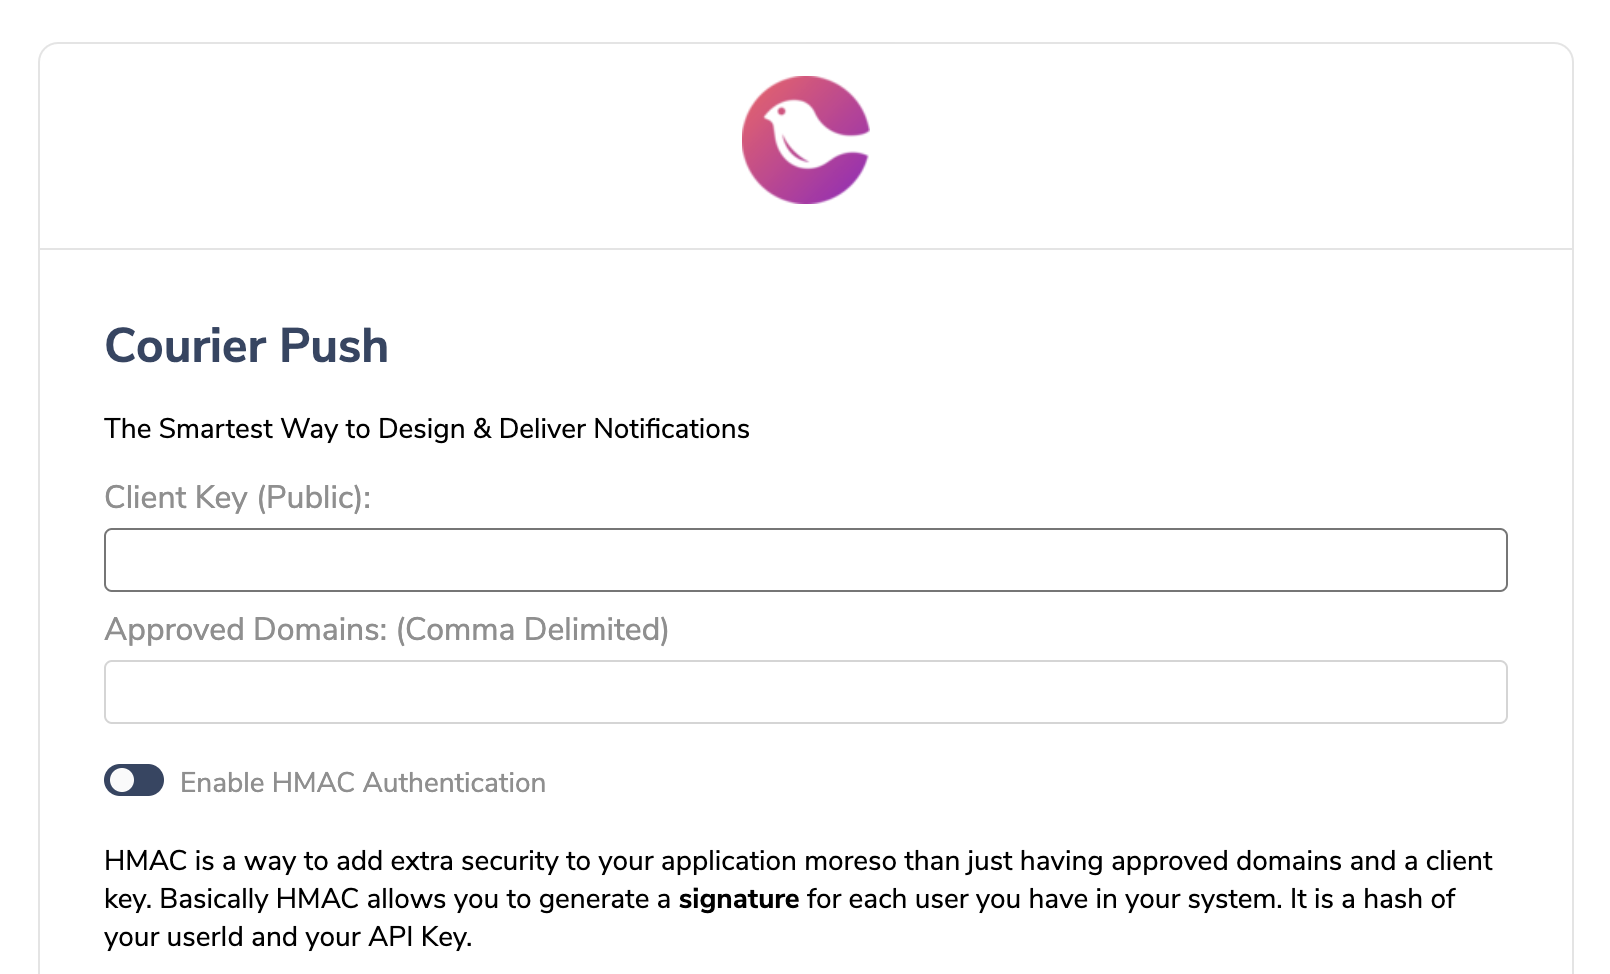
The default authentication is pretty open and only relies on your public Client Key. This is intentional to make the first implementation easy. As you get closer to a production deployment, we advise you lock down the authentication with the following options.
Approved Domains
A simple solution to authentication is to provide us with a list of comma delimited approved domains. This means that to access Courier's client API, you must be requesting from the corresponding domains.
HMAC Signature
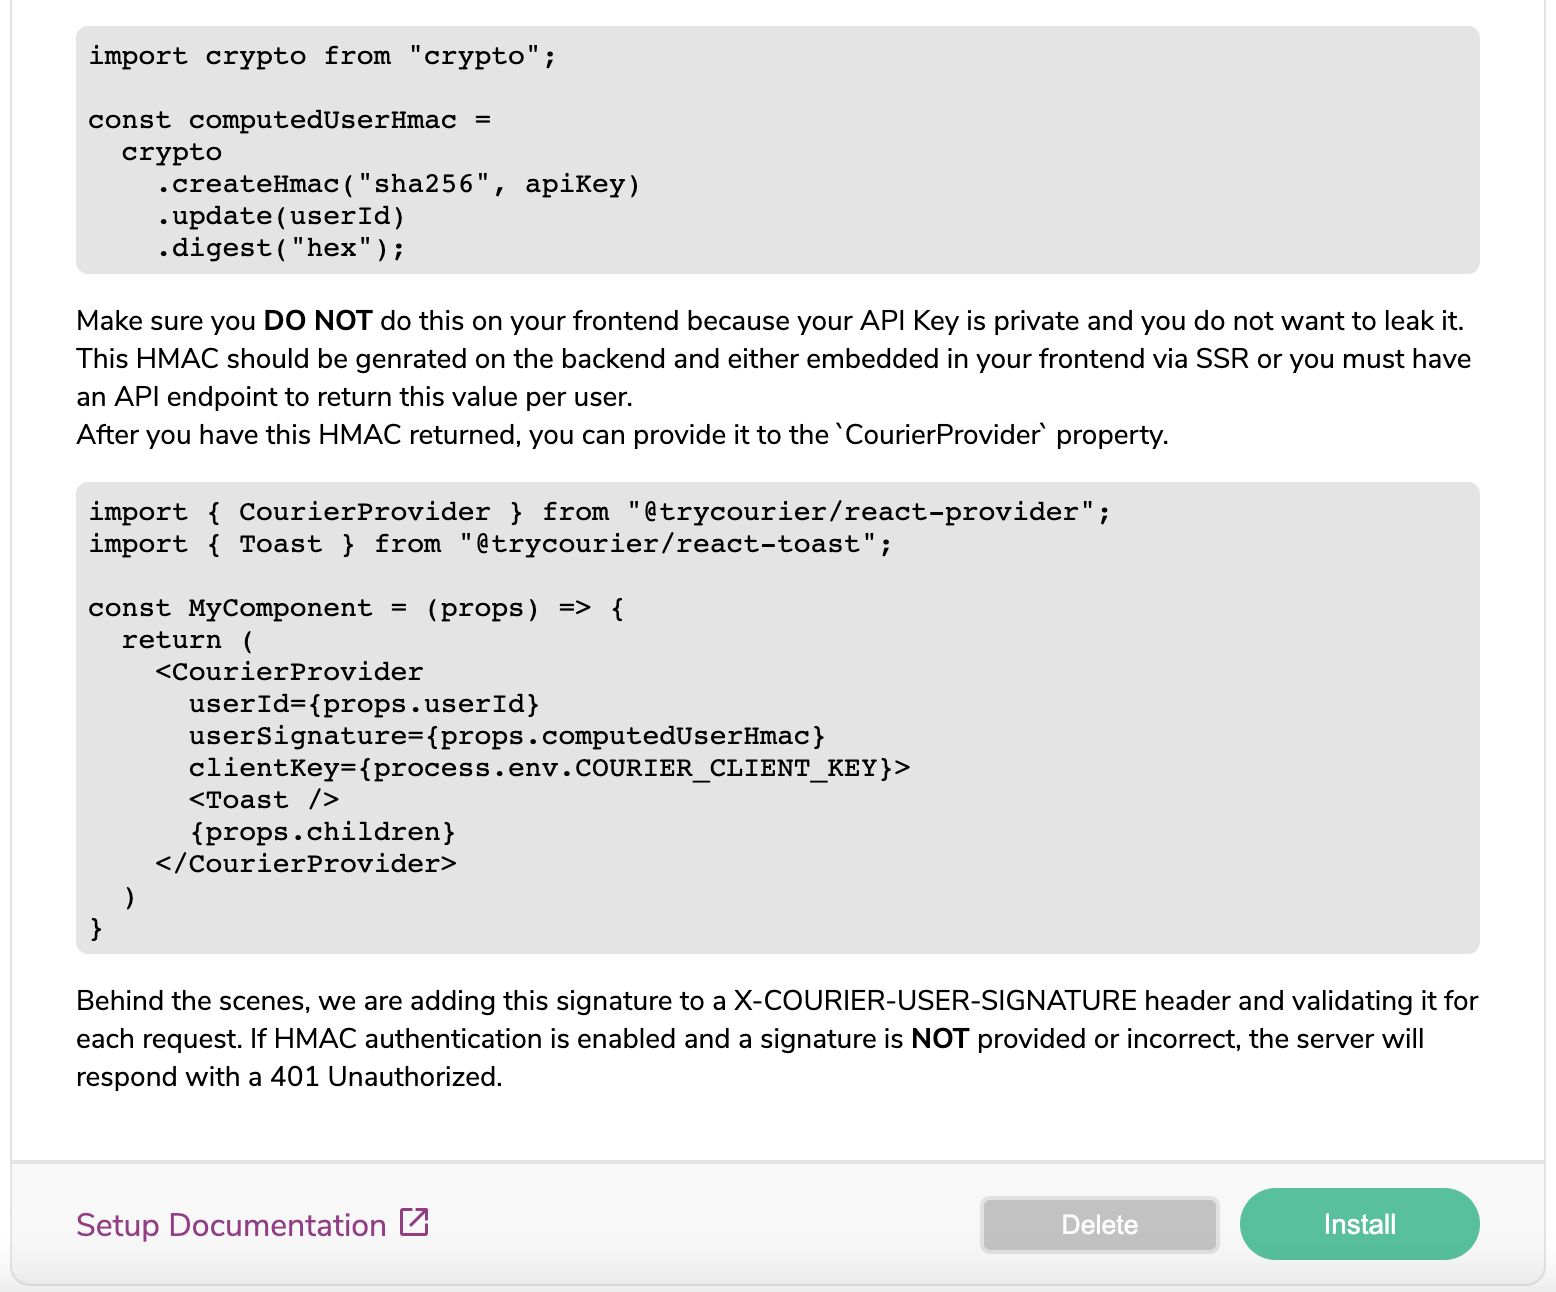
While approved domains will prevent a malicious actor from accessing your data on a site that is not yours, it doesn't prevent a user on your page from accessing another user's data. Turning on HMAC allows you to generate a signature for each user you have in your system. It is a hash of your userId and your API Key.
This HMAC should be generated on the backend and either embedded in your frontend via SSR, or you must have an API endpoint to return this value per user.
Backend
import crypto from "crypto";

const computedUserHmac = crypto
  .createHmac("sha256", process.env.SECRET_API_KEY)
  .update(userId)
  .digest("hex");
Frontend
import { CourierProvider } from "@trycourier/react-provider";
import { Toast } from "@trycourier/react-toast";

const MyComponent = (props) => {
  return (
    <CourierProvider
      userId={props.userId}
      userSignature={props.computedUserHmac}
      clientKey={process.env.COURIER_CLIENT_KEY}
    >
      <Toast />
      {props.children}
    </CourierProvider>
  );
};
React Integration
Integrate Toast

Check out the repo for all of our React Components >
All Courier Components require CourierProvider installed from @trycourier/react-provider. This handles all the authentication and integration with the backend.
yarn add @trycourier/react-provider or npm i @trycourier/react-provider
Using CourierProvider is easy. At the top level in your React tree, add something that resembles the following. The ClientKey can be found in the Courier Push integration page and the userId is the identifier you use to identify your user - this will be used later in the API call to courier.
import { CourierProvider } from "@trycourier/react-provider";
import { Toast } from "@trycourier/react-toast";

const MyApp = ({ children }) => {
  return (
    <CourierProvider clientKey={CLIENT_KEY} userId={USER_ID}>
      <Toast />
      {children}
    </CourierProvider>
  );
};
You can add Toast to the frontend anywhere as long as it is a child of the CourierProvider.
yarn add @trycourier/react-toast or npm i @trycourier/react-toast
import { CourierProvider } from "@trycourier/react-provider";
import { Toast } from "@trycourier/react-toast";

const MyApp = ({ children }) => {
  return (
    <CourierProvider clientKey={CLIENT_KEY} userId={USER_ID}>
      <Toast />
      {children}
    </CourierProvider>
  );
};
Integrate Inbox
Inbox should be added in the application as a child of CourierProvider, but where you want the Bell icon to display. For this example, we will just put it right next to Toast. yarn add @trycourier/react-inbox or npm i @trycourier/react-inbox
import { CourierProvider } from "@trycourier/react-provider";
import { Toast } from "@trycourier/react-toast";
import { Inbox } from "@trycourier/react-inbox";

const MyApp = ({ children }) => {
  return (
    <CourierProvider clientKey={CLIENT_KEY} userId={USER_ID}>
      <Toast />
      <Inbox />
      {children}
    </CourierProvider>
  );
};
Embedded Integration
Overview
These components can be embedded in any website using a simple <script> tag. This is useful if you don't have a React build but still want to use Courier's components.
Initialization
Installation is simple. All you need to do is add <courier> components to your page and add 2 script tags to the bottom of the <body> or <footer>.
- Setup Courier Configurations
- Download the Components
This section covers synchronous initialization where you have all information like the clientKey and userId available on first render. See Async Initialization below for how to control the initialization.
<body>
  <section>
    <h1>Hello World</h1>
    <courier-toast></courier-toast>
    <courier-inbox></courier-inbox>
  </section>
  <script type="text/javascript">
    window.courierConfig = {
      clientKey: "{{CLIENT_KEY}}",
      userId: "{{USER_ID}}",
    };
  </script>
  <script src="https://courier-components-xvdza5.s3.amazonaws.com/latest.js"></script>
</body>
Config Options
The supported configuration of window.courierConfig are:
| Key | Type | Description |
|---|---|---|
| clientKey | string | Key associated with your account. Found on https://app.courier.com/integrations/courier |
| userId | string | The current user logged into your app. Associated with Courier's recipientId |
| initOnLoad | boolean | If you don't want Courier to try and render the components right away, you can pass this flag to defer initialization |
| components | ComponentConfig | Map of configuration for each component (toast and inbox) on the page |
The components will not render unless we have both the userId and clientKey
Asynchronous Initialization
To interact with Courier and its components, we have exposed an sdk on window.courier. Since this sdk initializes asynchronous, you can use window.courierAsyncInit to know when the Courier code has been loaded.
window.courierAsyncInit can either be a function or an array. Arrays are useful if you want to separate the logic for each component to different files.
Function Example:
<script type="text/javascript">
  window.courierAsyncInit = () => {
    console.log("Courier is Ready!");
  };
</script>
Array Example:
<script type="text/javascript">
  window.courierAsyncInit = window.courierAsyncInit || [];
  window.courierAsyncInit.push(() => {
    console.log("Courier is Ready!");
  });
</script>
Courier SDK
After Courier has initialized, the object window.courier is ready.
- window.courier.init(config);
Use this function to initialize the rendering of the Courier components if you were not able to initialize synchronously.
- window.courier.on((action, cb));
To listen for actions that happen inside Courier's SDK.
SDK Actions
toast/init
<script>
  window.courierAsyncInit = () => {
    window.courier.on("toast/init", () => {
      window.courier.toast({
        title: "Hello",
        body: "World",
      });
    };
  };
</script>
inbox/init
<script>
  window.courierAsyncInit = () => {
    window.courier.on("inbox/init", () => {
      console.log(window.courier.inbox.config);
    };
  };
</script>
Configuring Components
You can configure components in 2 different ways. Inline html attributes but also through window.courierConfig.
Inline configuration attributes will take precedence over window.courierConfig options
- Inline
Configuring simple options through HTML attributes is simple. For each configuration, make sure you are using kebab-case https://www.theserverside.com/definition/Kebab-case instead of camelCase because HTML attributes are case insensitive.
Example:
<courier-toast auto-close="false"></courier-toast>
window.courierConfig
Some components have many options and adding many attributes to HTML entities can be cumbersome, you can also add configuration through our window.courierConfig object.
Example:
window.courierConfig = {
  components: {
    toast: {
      autoClose: false,
    },
  },
};
Testing The Integration
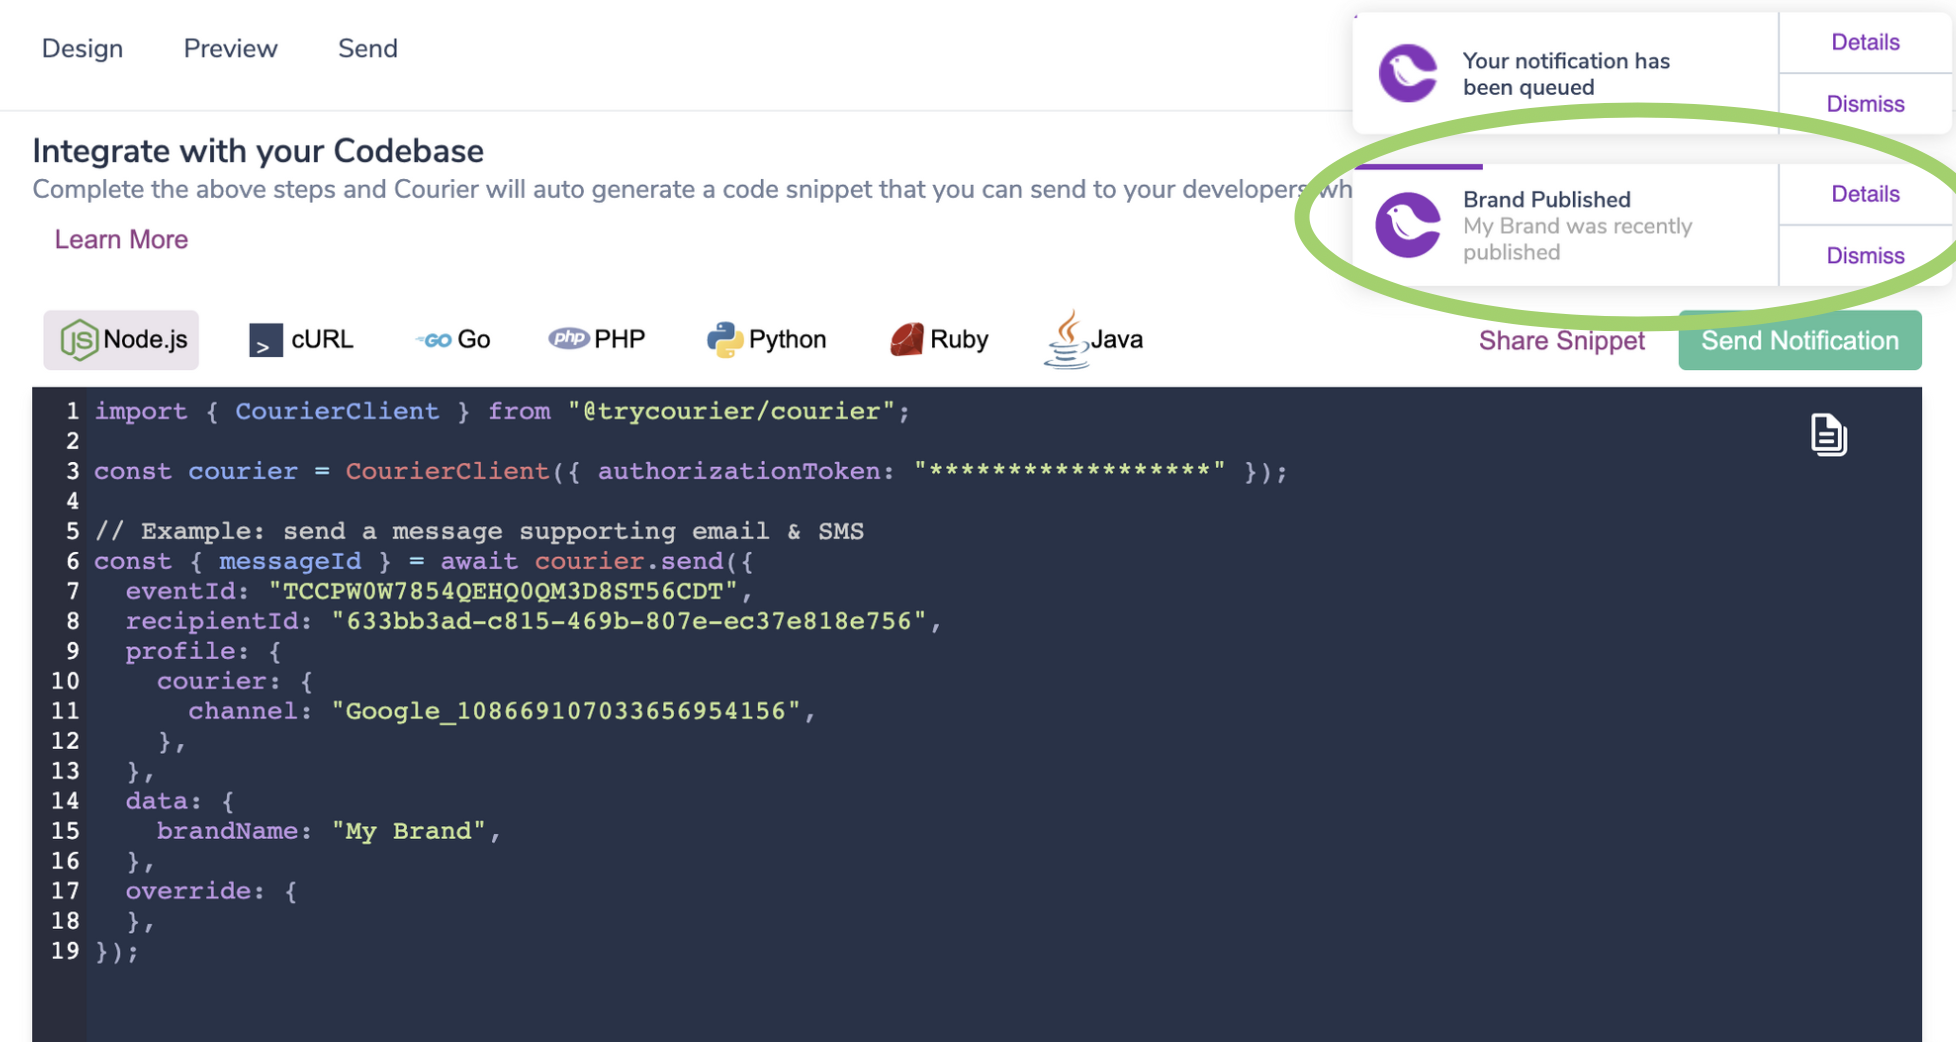
Now that we have the Frontend setup and the Studio setup, we should be able to test the entire integration by sending a Toast. In this section, we will go back to the Courier Designer Studio, Create a Test Event, trigger a Send request and verify a Message pops up in your web application.
- Navigate back to the Notification we recently created, or to the Notification List and select our Template.
- Create a Test Event. This will emulate what is send in a HTTPS POST request to Courier's backend. Below is an example of the "Brand Published" Test Event.
{
  "data": {
    "brandName": "My Brand"
  },
  "profile": {
    "courier": {
      "channel": "USER_ID"
    }
  },
  "override": {}
}
Note the USER_ID here, this is VERY IMPORTANT as this tells the Send request who we want to deliver the Toast Message to. If your Send request does NOT include profile.courier.channel, the message will not send.
- Now we should have access to the Send Tab. Again, make sure the
profile.courier.channelmatches theuserIdand click "Send Notification". In our example, the Courier UI is the UI that we integrated the Courier Components into so when we clicked "Send Notification" ~ you can see our "Brand Published" event :).

Troubleshooting
My Toast Message doesn't appear?!
If your message doesn't show up after making a Send request, the first thing we want to do is make sure we are connected via WebSockets.
Open your Dev Console to the Network Tab and click the WS button show below to verify the following information.
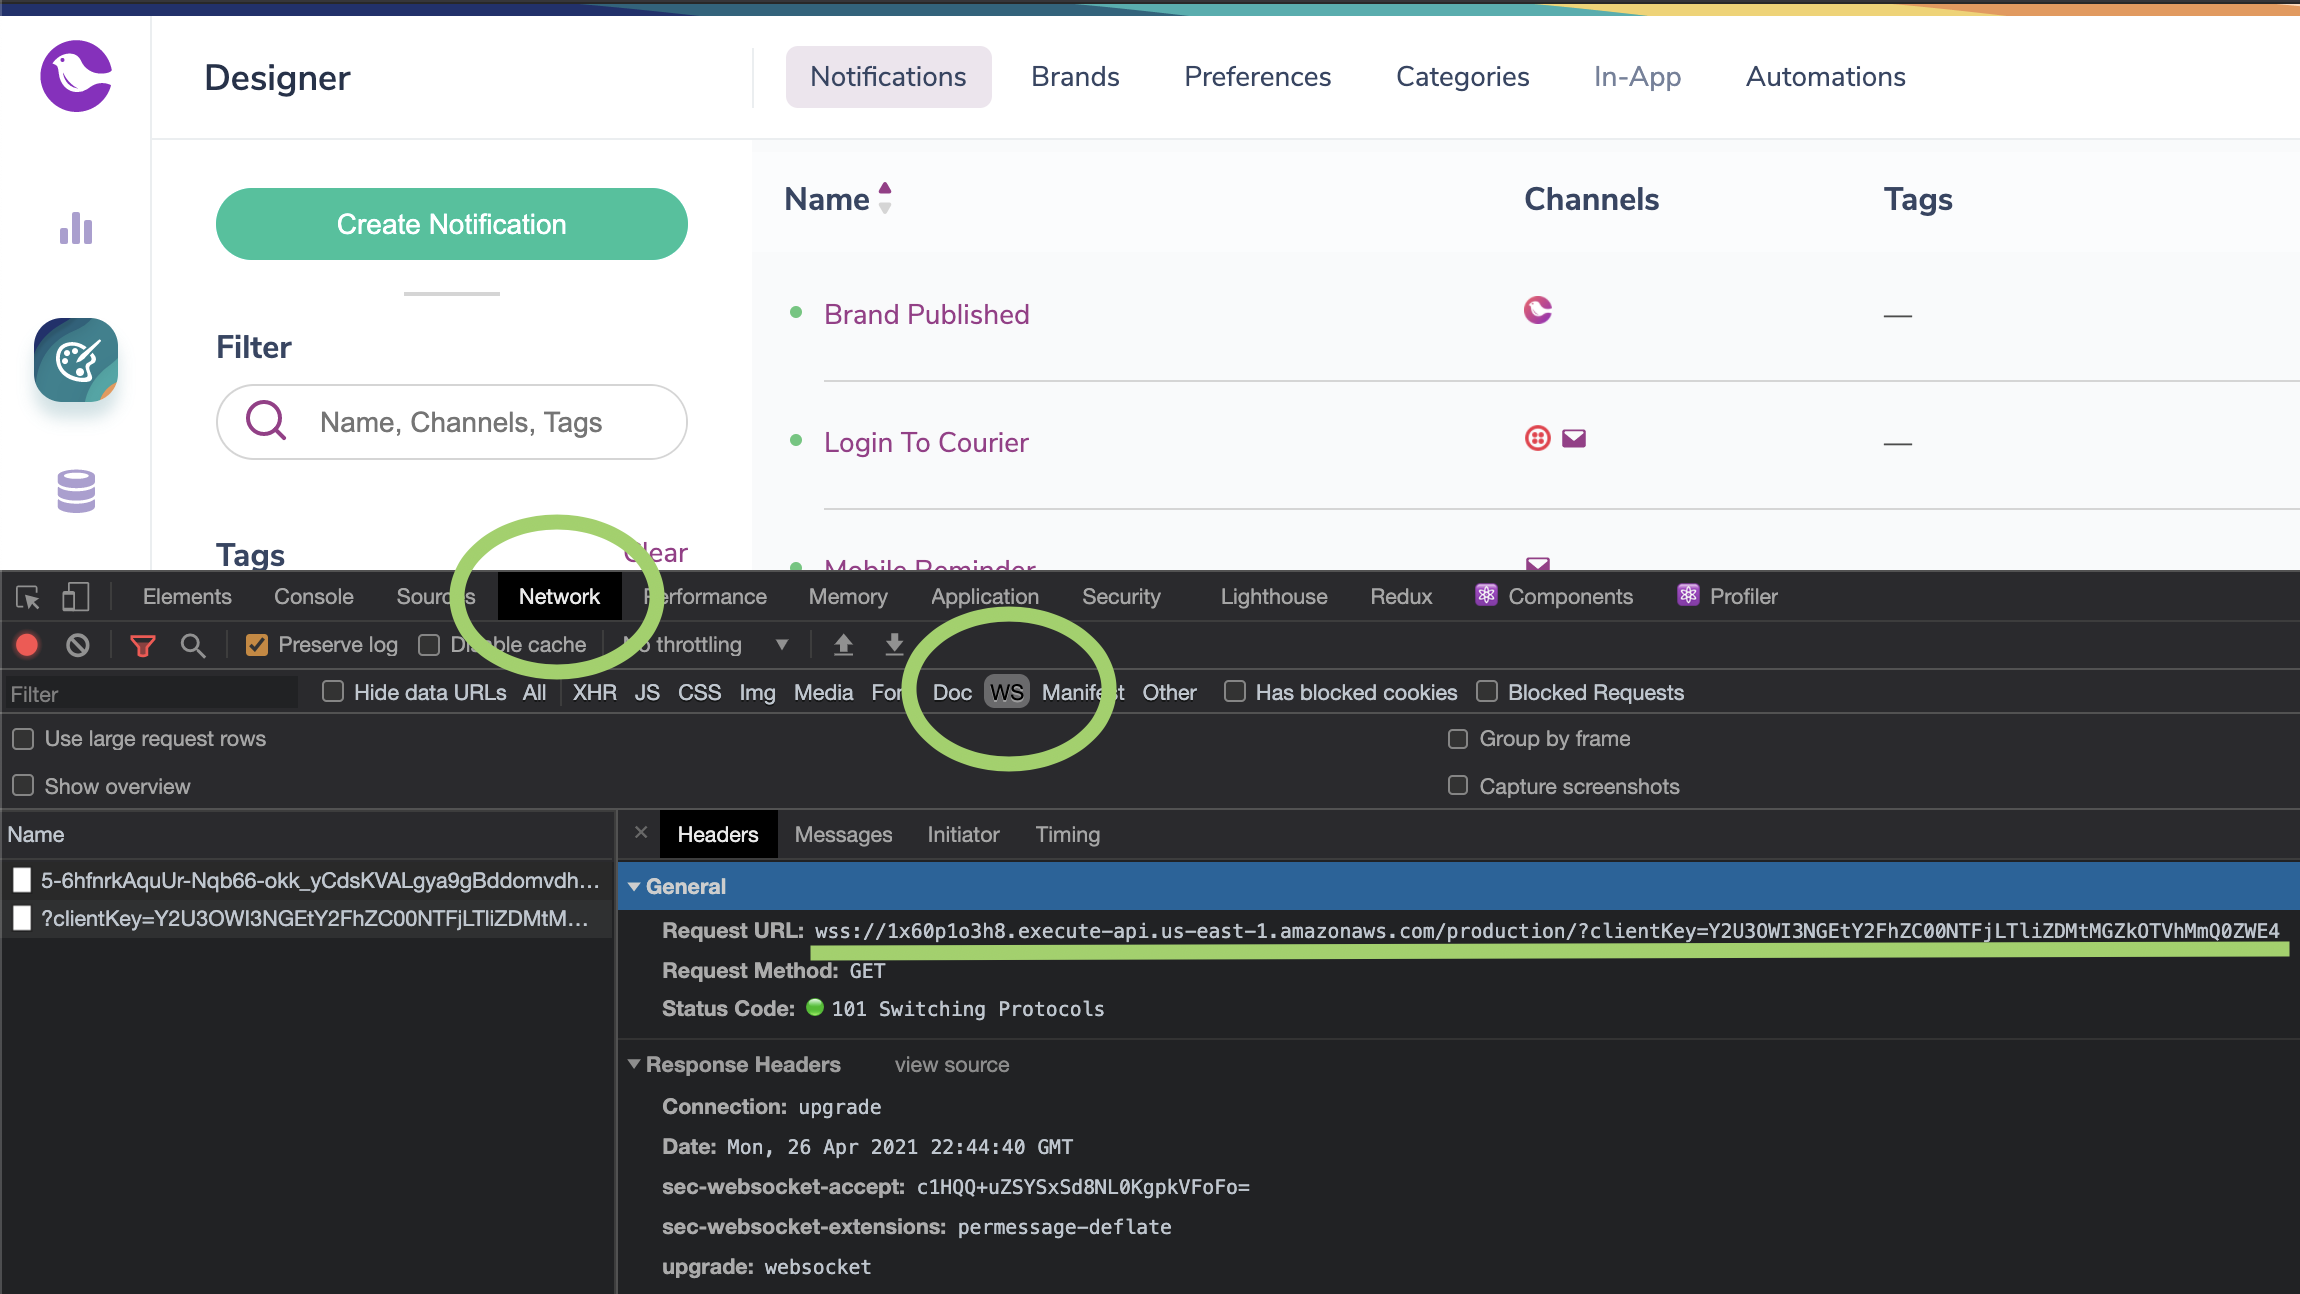
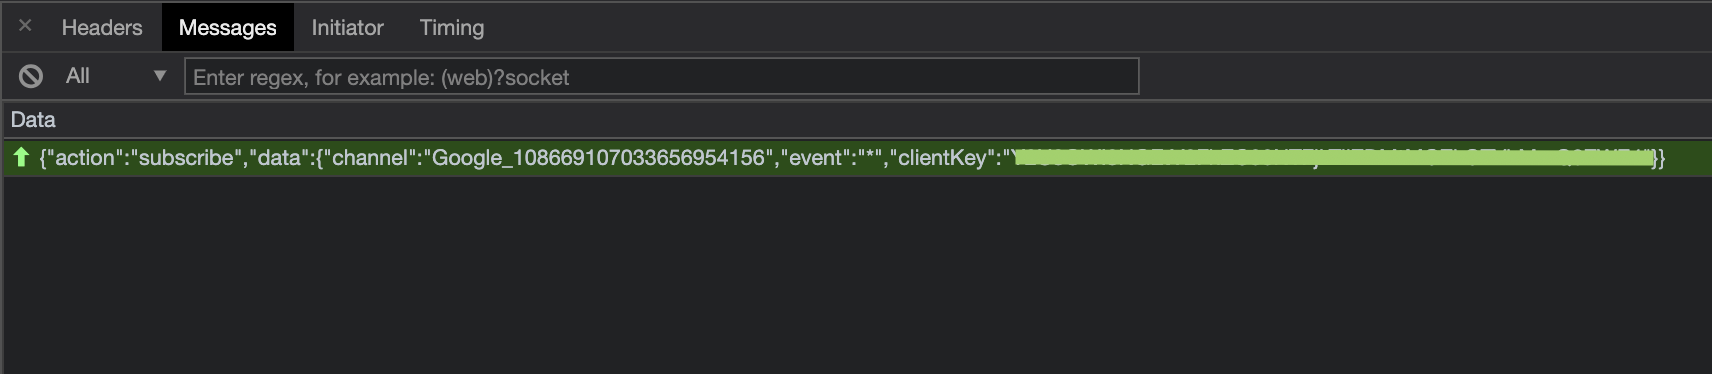
From here, click "Messages" and you should see a "subscribe" call. This should contain your Client Key and your User Id. Make sure these match with the information being sent.
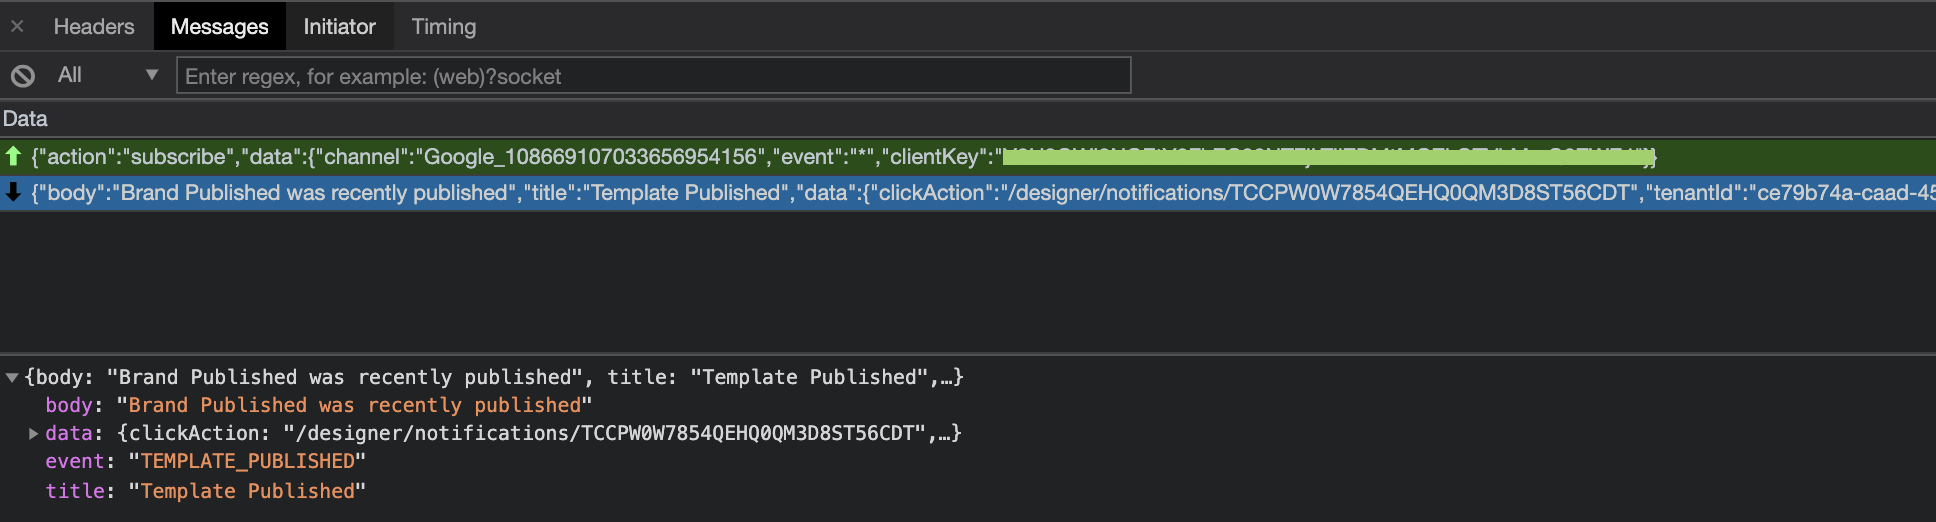
After making the Send request, we can see the incoming message like the following screenshot:
Listening to Messages
There are a few ways to listen for messages and being able react.
Via Props
import { CourierProvider } from "@trycourier/react-provider";

const MyApp = ({ children }) => {
  const handleOnMessage = (messsage: ICourierMessage) => {
    console.log(message);
    return message;
  };

  return <CourierProvider onMessage={handleOnMessage}>{children}</CourierProvider>;
};
Via Transport
You can create a Transport and pass it into CourierProvider.
import { useEffect } from "react";
import { CourierProvider, CourierTransport } from "@trycourier/react-provider";

const courierTransport = new CourierTransport({
  clientKey: CLIENT_KEY,
});

const MyApp = ({ children }) => {
  useEffect(() => {
    courierTransport.intercept((message) => {
      console.log(message);
      return message;
    });
  });

  return <CourierProvider transport={courierTransport}>{children}</CourierProvider>;
};
Via useCourier hook
If you don't pass in a transport, we will automatically create one. You can then access the transport via the CourierContext exposed through useCourier.
import { useEffect } from "react";
import { CourierProvider, useCourier } from "@trycourier/react-provider";

const courierTransport = new CourierTransport({
  clientKey: CLIENT_KEY,
});

const MyComponent = () => {
  const courier = useCourier();

  useEffect(() => {
    courier.transport.intercept((message) => {
      console.log(message);
      return message;
    });
  });

  return <div>Hello World</div>;
};

const MyApp = ({ children }) => {
  return (
    <CourierProvider>
      <MyComponent />
    </CourierProvider>
  );
};
Customize
Toast
Props
interface ToastProps {
  // Number in ms for Toast to auto close
  // Set as `false` to disable auto close

  autoClose?: false | number;

  // Default icon if no icon is present in message
  defaultIcon?: string | false;

  // Hide the progress bar
  hideProgressBar?: boolean;
  onClick?: MouseEventHandler<Element>;

  // Toast positioning when triggered
  position?:
    | "top-left"
    | "top-right"
    | "top-center"
    | "bottom-left"
    | "bottom-right"
    | "bottom-center";
  role?: "alert" | "status";
  theme?: Theme;

  // Animation when the Toast is displayed
  transition?: "bounce" | "slide" | "zoom";
}
Theme
interface ITheme {
  body?: React.CSSProperties;
  root?: React.CSSProperties;
  toast?: React.CSSProperties;
  dismiss?: React.CSSProperties;
  message?: {
    actionBlock?: React.CSSProperties,
    textBlock?: React.CSSProperties,
    body?: React.CSSProperties,
    contents?: React.CSSProperties,
    icon?: React.CSSProperties,
    title?: React.CSSProperties,
  };
  progressBar?: React.CSSProperties;
}
Example Theme
const theme = {
  toast: {
    backgroundColor: "black",
    borderRadius: 5,
    boxShadow: "0px 5px 20px 2px rgba(0,0,0,0.60)",
  },
  dismiss: {
    background: "orange",
  },
  message: {
    title: {
      color: "white",
    },
    textBlock: {
      color: "white",
    },
    actionBlock: {
      backgroundColor: "white",
      color: "red",
      "&:hover": {
        backgroundColor: "red",
      },
    },
  },
};
Hook
If you do not want to use Courier Push to trigger a Toast notification then you can always invoke the Toast locally with the useToast hook. Below is an example creating a notification from the client rather than creating it from a transport. Do not forget to wrap this component with a CourierProvider somewhere up the component hierarchy chain.
Example Hook
import { CourierProvider } from "@trycourier/react-provider";
import { Toast, useToast } from "@trycourier/react-toast";

const MyComponent: React.FunctionComponent = () => {
  //We can access this because the parent is a `CourierProvider`
  const [show] = useToast();

  return <button onClick={() => show("You just made a notification 🎉")}></button>;
};

const App: React.FunctionComponent = () => {
  return (
    <CourierProvider userId={USER_ID} clientKey={CLIENT_KEY}>
      <Toast />
      <MyComponent />
    </CourierProvider>
  );
};
Inbox
You can customize your inbox to match your product's branding.
Props
interface InboxProps = {
  //Brand Override
  brand?: Brand;

  //Icon Class Name
  className?: string;

  // Default Icon to use if no Icon is present in Message
  defaultIcon?: false | string;

  // Placement of the Bell relative to the Inbox
  placement?: "top" | "left" | "right" | "bottom";

  // Render Props for Custom Rendering
  renderTabs?: React.FunctionComponent<{
    currentTab?: ITab;
    tabs?: ITab[];
  }>;
  renderFooter?: React.FunctionComponent;
  renderHeader?: React.FunctionComponent;
  renderIcon?: React.FunctionComponent<{
    unreadMessageCount?: number;
  }>;
  renderMessage?: React.FunctionComponent<IMessage>;
  renderNoMessages?: React.FunctionComponent;

  // Tab Overrides
  tabs?: Array<ITab>;
  theme?: ThemeObject;

  // Inbox Title Override
  title?: string;
  trigger?: "click" | "hover";
}
Theme
interface ITheme {
  container?: React.CSSProperties;
  footer?: React.CSSProperties;
  header?: React.CSSProperties;
  icon?: React.CSSProperties;
  messageList?: {
    container?: React.CSSProperties;
    message?: {
      actions?: {
        container?: React.CSSProperties;
        details?: React.CSSProperties;
        dismiss?: React.CSSProperties;
      }
      body?: React.CSSProperties;
      container?: React.CSSProperties;
      icon?: React.CSSProperties;
      title?: React.CSSProperties;
      unreadIndicator?: React.CSSProperties;
    }
  };
  tabList?: {
    container?: React.CSSProperties;
    tab?: React.CSSProperties;
  };
  root?: React.CSSProperties;
}
Example Theme
const props = {
  isOpen: true,
  title: "Custom Title",
};

const theme = {
  container: {
    background: "green",
  },
  header: {
    background: "pink",
  },
  messageList: {
    container: {
      background: "pink",
    },
  },
  tabList: {
    tab: {
      color: "white",
      background: "blue",
      "&.active": {
        color: "red",
        borderBottom: "2px dashed red",
      },
    },
  },
};
Render Props
Render Props are a react concept that allows you to supply your own react components instead of the ones built for this library. Inbox supplies render props for most sub components.
// Render Props for Custom Rendering
  renderContainer?: React.FunctionComponent;
  renderTabs?: React.FunctionComponent<{
    currentTab?: ITab;
    tabs?: ITab[];
  }>;
  renderFooter?: React.FunctionComponent;
  renderHeader?: React.FunctionComponent;
  renderIcon?: React.FunctionComponent<{
    unreadMessageCount?: number;
  }>;
  renderMessage?: React.FunctionComponent<IMessage>;
  renderNoMessages?: React.FunctionComponent;
To overwrite the rendering of each of these you can supply your own react component.
View an Example
import React from "react";

export const CustomContainer: React.FunctionComponent = (props) => {
  return <>{props.children}</>;
};

export const CustomHeader: React.FunctionComponent = () => {
  return <h1>Custom Header</h1>;
};

export const CustomFooter: React.FunctionComponent = () => {
  return <div>Custom Footer</div>;
};

export const CustomIcon: React.FunctionComponent = () => {
  return <div>Icon</div>;
};

export const CustomTabs: React.FunctionComponent = () => {
  return <div>No Tabs For You</div>;
};

export const CustomNoMessages: React.FunctionComponent = () => {
  return <div>No Messages</div>;
};

const props = {
  isOpen: true,
  title: "Custom Title",
  theme: {
    root: {
      width: 300,
      padding: 10,
      background: "#ccc",
      borderRadius: 0,
    },
  },
};
Hooks
useInbox is a hook that you can import and use to interact with Inbox without having to use any of the react components. Think of it as a headless Inbox.
Example Hook
import React, { useEffect } from "react";
import { useInbox, ITab } from "@trycourier/react-inbox";

export const MyCustomInbox: React.FunctionComponent = () => {
  const {
    currentTab,
    fetchMessages,
    isLoading,
    messages = [],
    unreadMessageCount,
    getUnreadMessageCount,
    setCurrentTab,
    tabs,
  } = useInbox();

  const handleOnClickTab = (newTab: ITab) => (event: React.MouseEvent) => {
    event.preventDefault();
    setCurrentTab(newTab);
  };

  useEffect(() => {
    getUnreadMessageCount();
    fetchMessages();
  }, []);

  return (
    <div
      style={{
        backgroundColor: "pink",
        padding: "10px",
        borderRadius: "12px",
        width: 250,
        height: 200,
      }}
    >
      <h3>My Inbox</h3>
      <div>Unread Messages: {unreadMessageCount}</div>
      <div>Current Tab: {currentTab?.id}</div>
      {tabs?.map((tab) => (
        <button key={tab.id} onClick={handleOnClickTab(tab)}>
          {tab.label}
        </button>
      ))}
      {!isLoading &&
        messages?.map((message) => (
          <div key={message.messageId}>
            <div>MessageId: {message.messageId}</div>
            <div>Title: {message.title}</div>
          </div>
        ))}
      {isLoading && messages?.length === 0 && <div>Loading</div>}
    </div>
  );
};