Navigate to “Settings” → “My Security Credentials”
Go to “Access management” → “Users”
On the “Users” page, select “Add user” and follow the steps to create a new IAM user with AmazonSESFullAccess permissions
Download the Access Key ID and Secret Access Key at user creation. AWS does not show the secret again.
To scope permissions tighter than AmazonSESFullAccess, create a custom policy. In the AWS IAM console, open Policies → Create policy and define it in the JSON editor:
Users will need to add /test to the end of the ExternalId value that you set in the role policy you create in your AWS instance for working in Courier’s test environment.
After creating the role, copy its ARN and paste it in the “Role ARN” field in the Courier AWS SES integration settings.
When using IAM Role authentication, you’ll need to replace the following placeholders:
${YOUR_AWS_ACCOUNT_ID}: Your AWS account ID
${YOUR_COURIER_WORKSPACE_ID}: Your Courier workspace ID
A new AWS SES account starts in the SES sandbox, which only sends to verified addresses and domains. Reaching anyone else means asking AWS to lift it: Moving out of the Amazon SES sandbox.
Step 3: create and send a Courier notification using AWS SES
Refer to for instructions on building your notification template and sending a message with the Courier API using cURL.Addressing a recipient and sending are the same on every email provider, so they are documented once: and .
SES tracks delivery through SNS webhooks rather than polling, so without the setup below every message sits at SENT in your forever.
To track delivery, set up Amazon SNS topics. Then configure AWS SES to publish delivery notifications to those topics. Every event carries the SES MessageId, which is what your own webhook uses to match the event to the message.
Setup instructions
1
Get Your Courier Webhook URL
You’ll need your Courier Message Events webhook URL for AWS SES.Via Courier App:
Navigate to Channels → Email → AWS SES provider
Look for “Message Events Webhook URL” section
Copy the webhook URL
Important: Keep this URL secure - it authenticates webhooks from AWS to Courier.
2
Create AWS SES Configuration Set
Configuration Sets in AWS SES enable event publishing.
Open the AWS Console and navigate to Amazon SES
Click Configuration Sets in the left sidebar
Click Create Configuration Set
Enter a name (e.g., courier-delivery-tracking)
Click Create
3
Add SNS Event Destination
Click on your newly created Configuration Set
Navigate to the Event destinations tab
Click Add destination
Select Amazon SNS as the destination type
Configure the destination:
Event types: Select Bounce, Delivery, and Reject
SNS Topic:
Choose Create new SNS topic if you don’t have one
Or select an existing topic
Topic Name (if creating new): courier-ses-delivery-events
Click Next and then Add destination
4
Configure SNS Subscription to Courier
Navigate to Amazon SNS in AWS Console
Click Topics in the left sidebar
Find and click the topic you created/selected in Step 3
Click Create subscription
Configure the subscription:
Protocol: Select HTTPS
Endpoint: Paste your Courier webhook URL from Step 1
Enable raw message delivery: UNCHECKED (very important!)
Click Create subscription
Automatic Confirmation: AWS will send a subscription confirmation request to Courier. Courier automatically confirms the subscription - no action needed on your part. Wait 30 seconds, then refresh the page to see the subscription status change to “Confirmed”.
Assign configuration set to your identity
Assign the Configuration Set as the default for your verified email address or domain. This ensures all emails sent from that identity automatically use the Configuration Set for delivery tracking.For a Verified Email Address:
In AWS SES Console, navigate to Verified identities
Select your Configuration Set (courier-delivery-tracking)
Click Save changes
For a Verified Domain:
In AWS SES Console, navigate to Verified identities
Click on your verified domain (e.g., yourdomain.com)
Go to the Configuration set tab
Click Edit
Select your Configuration Set (courier-delivery-tracking)
Click Save changes
Grant the Configuration Set in your IAM policy.
A default Configuration Set on an identity makes SES authorize ses:SendRawEmail against it too. A policy scoped to ARNs without it fails every send.
The error names the resource it could not reach:
  User `arn:aws:sts::<account>:assumed-role/customer-ses-role/...` is not authorized to
  perform `ses:SendRawEmail` on resource
  `arn:aws:ses:us-east-1:<account>:configuration-set/courier-delivery-tracking`
Add the Configuration Set ARN to the Resource list of the policy attached to the IAM user (Method 1) or the assumed role (Method 2):
covers the two levels and which one wins. lists the fields every email provider takes.A provider override changes what Courier sends to SES’s SendRawEmail API. body takes any field that method accepts, and config swaps the AWS credentials and region for one send.
Dealing with Amazon SES requests can result in some errors. You can find them below to help you troubleshoot. You can also check the to help debug any provider errors you may encounter. For anything else, you may contact Courier Support.
Amazon SES 554 error
This error occurs due to numerous reasons.
It occurs when you have not verified the sender email (sender identity) on Amazon SES.
If you’re using the Amazon SES in the sandbox environment and have not verified the recipient’s email address, you may encounter this error.
You may encounter this error when you’ve provided an invalid recipient email address.
Open the Amazon SES console and verify that the sender email identity you are using has a verification status of verified.
If you’re using the sandbox environment, ensure that you have added the recipient email address as a verified identity on the SES console. It is mandatory to add the recipient emails on Amazon SES when running in the Sandbox environment.
If both the sender and recipient email addresses are verified, ensure that you have provided the correct recipient email address for the “To” parameter.
If none of the above works for you, verify that the region specified in your AWS SDK is the same region that contains the verified identities. For example, if the verified identities are located in the Virginia region (us-east-1), you should initialize the Amazon SES instance in the same region.
Amazon SES email address is not verified
This error occurs if you try to send emails using an unverified identity in the region specified.Additionally, this error occurs when sending emails in the sandbox environment using unverified sender and recipient email identities.
Verify that you are connected to SES in the region where all your verified identities are located.
Confirm identity verification
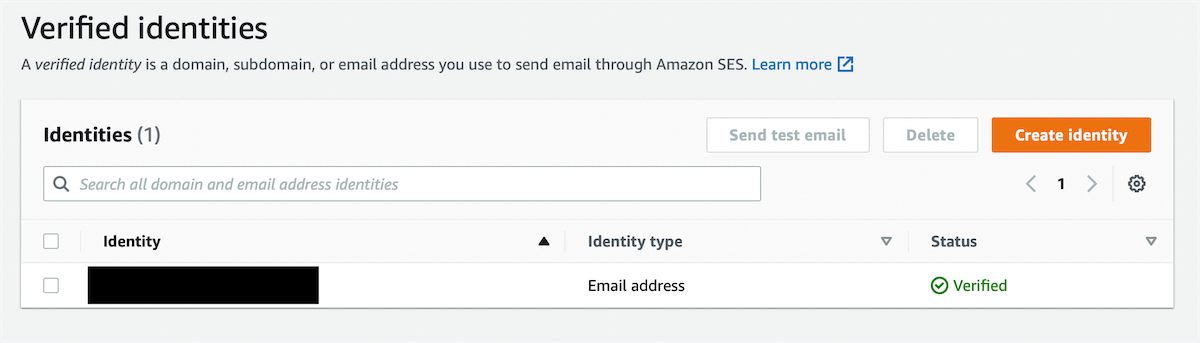
Confirm that the sender’s identity has been verified. If you are using the sandbox environment, confirm the verification status of the recipient identities as well.To do so, visit the SES Console and navigate to your verified identities. The status of the identities should be marked as “Verified” as shown below.
Viewing the verified identities on SES
If the status for your identity is Unverified you will have to verify the identity before sending the email.
Verify email addresses
If the identities have been verified, ensure that the email addresses you have provided are correctly spelled.
AWS SES timeout
This error occurs when the client (such as an EC2) cannot establish a TCP connection to the public endpoint of Amazon SES.This usually means the client (EC2) has a firewall blocking outgoing connections on the SMTP ports (25, 587, or 465). It can also mean the client has no internet connection.
To resolve the error, ensure that the client has an active/stable internet connection.Hereafter, update the firewall rules on the client to allow outgoing connections on ports 25, 587, and 465 (depending on the port you use).
AWS SES BCC not working
This error occurs when the recipient email in the “TO” field is present in the “BCC” field. Certain email providers do not allow the email to contain duplicate recipients.Additionally, this error may occur if the email address in the “BCC” field does not exist.
To resolve the error, ensure that the recipient’s email address is not the same as the BCC email address.If the email addresses in the BCC are unique, verify the validity of the email addresses specified in the “BCC” list.
Error: is not authorized to perform ses sendemail
This error occurs when an AWS service such as a Lambda function is not authorized to send an email using Amazon SES.
To resolve the error, you will need to attach a policy to the IAM role to allow the AWS resource to execute the ses:SendEmail action.For example, to let a Lambda function send email with SES, attach an inline policy to the function’s IAM role that allows the ses:SendEmail action. The inline policy is shown below.
The inline policy shown above will ensure that the AWS service is allowed to execute the SendEmail action on an Amazon SES resource and will resolve the permission error.
Amazon SES authentication credentials invalid
This error occurs when the SMTP username and password provided to connect to the SMTP endpoint of Amazon SES are incorrect.
Verify credentials: Ensure that the username and password you enter are correct and the same one SES provided.
Verify the region: SMTP credentials in Amazon SES differ per region. Therefore, ensure that the credentials used are associated with your region.
Use SMTP credentials and not console credentials:
The SMTP endpoint credentials are not your AWS credentials. Use the Amazon SES SMTP credentials to reach the Amazon SES SMTP interface.
You will have to create an IAM user that can invoke the SES services and generate SMTP credentials for the newly created IAM user. It can be done using the SES console.
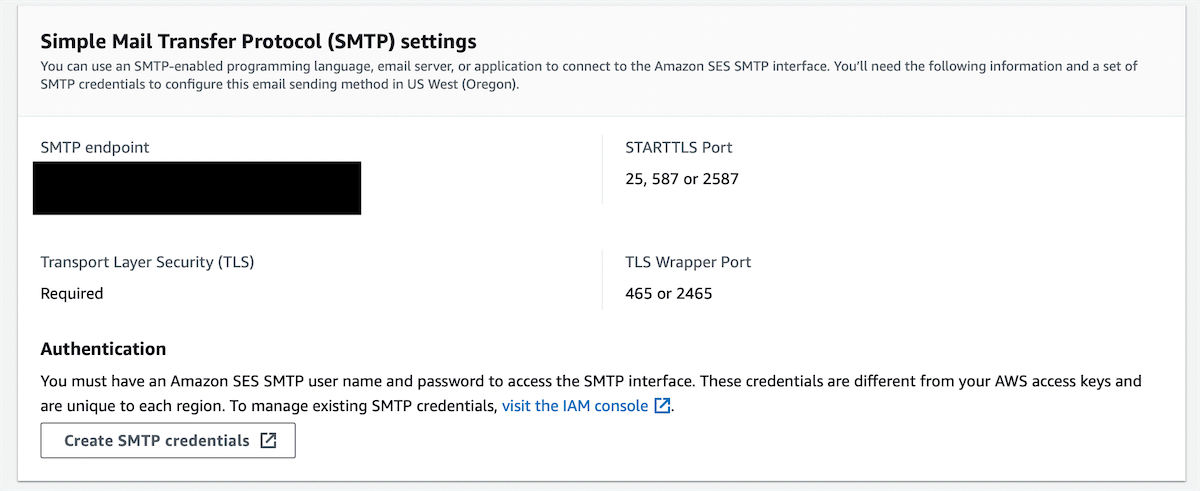
First, navigate to your SES account dashboard. You will see a section titled - “SMTP Settings.” Under this, you should see the output shown below.
Viewing SES Settings in AWS Console
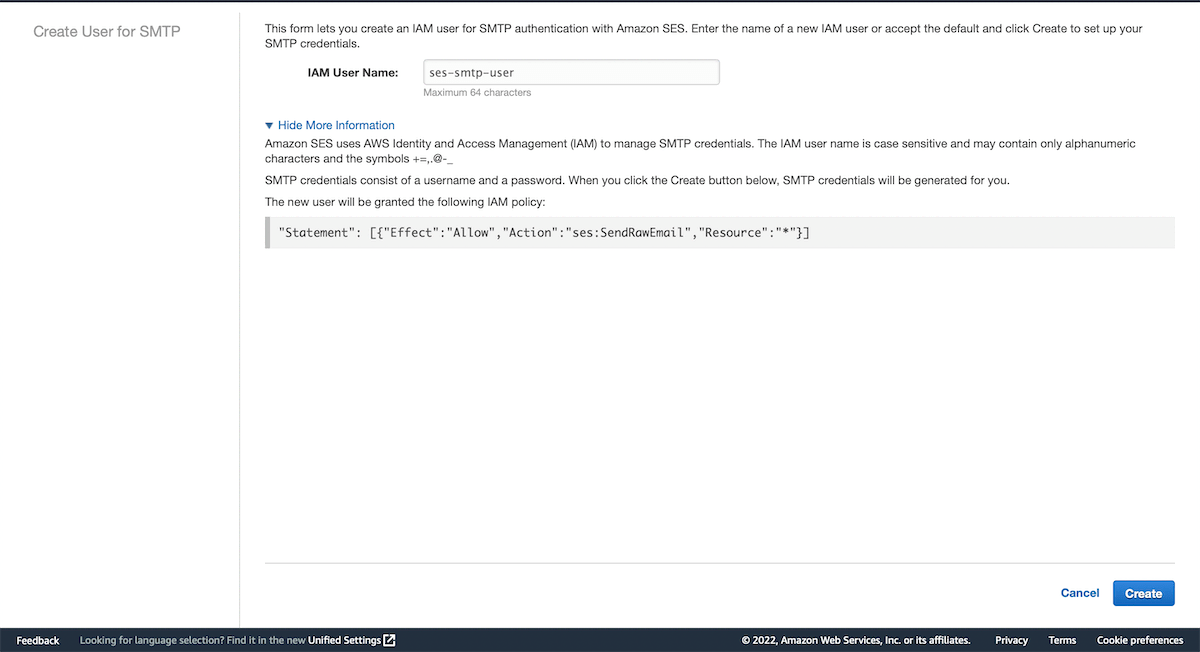
Click “Create SMTP Credentials.” The IAM Console opens and prompts you to create an IAM User with the policies required to invoke SES.
Creating the IAM user
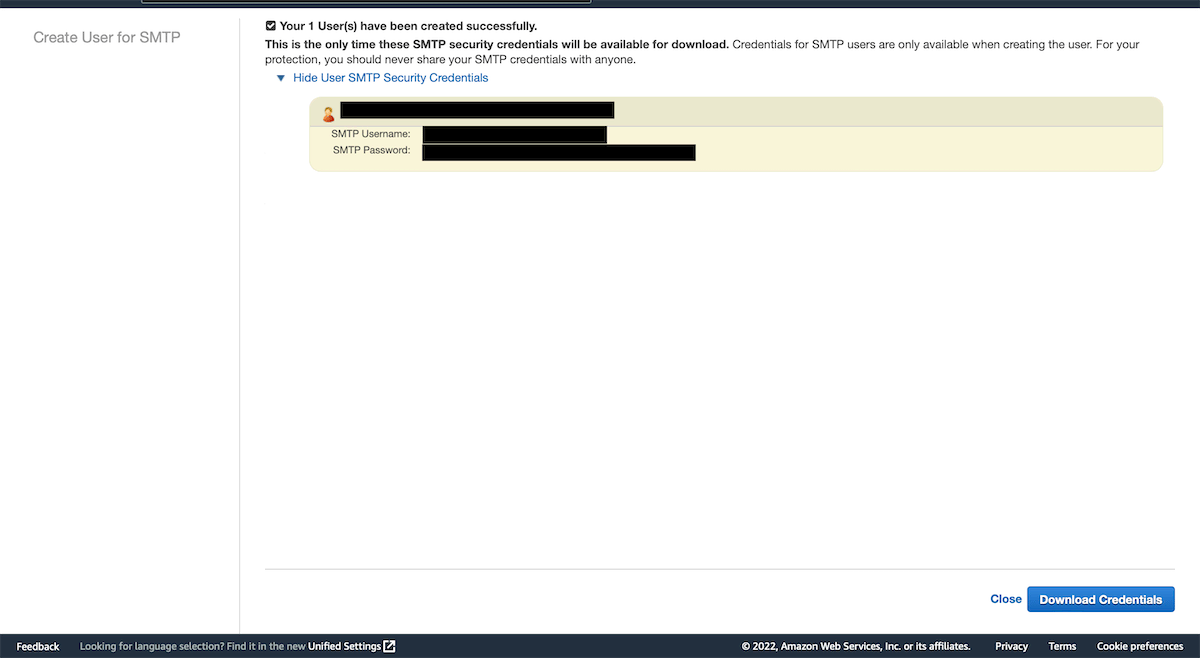
Afterward, click “Create.” This will create the IAM User, generate the credentials, and display the output below.
Viewing the SMTP credentials for IAM user
To resolve the error, you can download the generated credentials and provide these values for the SMTP username/password.
Amazon SES 530 authentication required
This error occurs when the SMTP credentials provided to Amazon SES are invalid. This can be the username, password, port, and endpoint. Additionally, this error may occur if you have not used TLS.
You can try the following to see which one fixes the error.
Verify credentials: Ensure that the SMTP username and password you provide are the same credentials you created for the IAM User with permissions to invoke SES.
Verify the region: Verify that you connect to SES in the region where all your verified identities are located.
Verify SMTP configurations: Visit the SES console and navigate to your account dashboard. In the account dashboard, you should see the SMTP configurations for SES.
SMTP configurations for SES
Cross-check the SMTP configurations shown in the SES console with the endpoint and the port you’ve provided to ensure that SES has been configured correctly.
Use the correct port: Ensure that the port used is port - 587. Some users have experienced issues using the TLS Wrapper port and found that using port 587 (TLS port) fixes the error.
AWS SES rate limit
Amazon SES has a limit of one email per second in the sandbox environment. However, you can exceed this rate for a short period, not for long periods.
To resolve this error, contact AWS and request production access for SES. Your request will be reviewed, and based on your use case, AWS will grant a reasonable email rate for your SES account. Later on, you can increase this rate by contacting AWS.
AWS SES email not received
This error occurs if the templated email is missing a handlebar parameter. For example, if the email template requires five handlebar parameters and you’ve specified only four, Amazon SES will send the email and will not display any error. However, the email will not get delivered to the recipient, causing this. It may be possible to debug by viewing the for any rendering errors.