

Prerequisites
Setup
1
Get your OneSignal keys
In OneSignal, open accounts and keys and copy your App ID and REST API Key.
2
Configure in Courier
Open the in Courier, enter your
App ID and REST API Key, then click “Save.”Profile requirements
Device tokens live on the user profile rather than on the send, so one profile can hold tokens for several devices and every push provider reads them from the same place. covers the model. OneSignal addresses the recipient by PlayerId or ExternalId. Store either one once with , which merges into the profile and creates it if it does not exist:- Player ID
- External ID
The id OneSignal assigned the device.
const profile = await client.profiles.create('user_123', {
  profile: {
    oneSignalPlayerID: 'YOUR_ONESIGNAL_PLAYER_ID',
  },
});
profile = client.profiles.create(
    user_id="user_123",
    profile={
        "oneSignalPlayerID": "YOUR_ONESIGNAL_PLAYER_ID",
    },
)
curl --request POST \
  --url https://api.courier.com/profiles/user_123 \
  --header "Authorization: Bearer $COURIER_API_KEY" \
  --header 'Content-Type: application/json' \
  --data '{
    "profile": {
      "oneSignalPlayerID": "YOUR_ONESIGNAL_PLAYER_ID"
    }
  }'
profile = courier.profiles.create(
  "user_123",
  profile: {
    oneSignalPlayerID: "YOUR_ONESIGNAL_PLAYER_ID"
  }
)
profile, err := client.Profiles.New(
	context.TODO(),
	"user_123",
	courier.ProfileNewParams{
		Profile: map[string]any{
			"oneSignalPlayerID": "YOUR_ONESIGNAL_PLAYER_ID",
		},
	},
)
ProfileCreateParams params = ProfileCreateParams.builder()
    .userId("user_123")
    .profile(ProfileCreateParams.Profile.builder()
        .putAdditionalProperty("oneSignalPlayerID", JsonValue.from("YOUR_ONESIGNAL_PLAYER_ID"))
        .build())
    .build();
ProfileCreateResponse profile = client.profiles().create(params);
$profile = $client->profiles->create('user_123', profile: [
  'oneSignalPlayerID' => 'YOUR_ONESIGNAL_PLAYER_ID',
]);
ProfileCreateParams parameters = new()
{
    UserID = "user_123",
    Profile = new Dictionary<string, JsonElement>()
    {
        { "oneSignalPlayerID", JsonSerializer.SerializeToElement("YOUR_ONESIGNAL_PLAYER_ID") },
    },
};
var profile = await client.Profiles.Create(parameters);
courier profiles create \
  --api-key "$COURIER_API_KEY" \
  --user-id user_123 \
  --profile '{"oneSignalPlayerID":"YOUR_ONESIGNAL_PLAYER_ID"}'
With Courier MCP, save the OneSignal player id YOUR_ONESIGNAL_PLAYER_ID on user_123.
The id your own system uses, once you have set it in OneSignal.
const profile = await client.profiles.create('user_123', {
  profile: {
    oneSignalExternalUserId: 'user_123',
  },
});
profile = client.profiles.create(
    user_id="user_123",
    profile={
        "oneSignalExternalUserId": "user_123",
    },
)
curl --request POST \
  --url https://api.courier.com/profiles/user_123 \
  --header "Authorization: Bearer $COURIER_API_KEY" \
  --header 'Content-Type: application/json' \
  --data '{
    "profile": {
      "oneSignalExternalUserId": "user_123"
    }
  }'
profile = courier.profiles.create(
  "user_123",
  profile: {
    oneSignalExternalUserId: "user_123"
  }
)
profile, err := client.Profiles.New(
	context.TODO(),
	"user_123",
	courier.ProfileNewParams{
		Profile: map[string]any{
			"oneSignalExternalUserId": "user_123",
		},
	},
)
ProfileCreateParams params = ProfileCreateParams.builder()
    .userId("user_123")
    .profile(ProfileCreateParams.Profile.builder()
        .putAdditionalProperty("oneSignalExternalUserId", JsonValue.from("user_123"))
        .build())
    .build();
ProfileCreateResponse profile = client.profiles().create(params);
$profile = $client->profiles->create('user_123', profile: [
  'oneSignalExternalUserId' => 'user_123',
]);
ProfileCreateParams parameters = new()
{
    UserID = "user_123",
    Profile = new Dictionary<string, JsonElement>()
    {
        { "oneSignalExternalUserId", JsonSerializer.SerializeToElement("user_123") },
    },
};
var profile = await client.Profiles.Create(parameters);
courier profiles create \
  --api-key "$COURIER_API_KEY" \
  --user-id user_123 \
  --profile '{"oneSignalExternalUserId":"user_123"}'
With Courier MCP, save the OneSignal external user id user_123 on user_123.
user_id and Courier resolves the address.
For a one-off with no stored profile, pass it inline instead: "to": { "oneSignalPlayerID": "YOUR_ONESIGNAL_PLAYER_ID" }.
Send by user id
The call in every language, and the rest of the profile object.
Send to a recipient
- Send to user id
- Send to
oneSignalPlayerID
Courier reads
oneSignalPlayerID off the saved profile, so preferences apply and the value can change without touching this code.const { requestId } = await courier.send.message({
message: {
to: {
user_id: "user_123",
},
template: "nt_01kx4h2jdafq8bk9aftxak4b40",
},
});
response = client.send.message(
    message={
        "to": {
            "user_id": "user_123",
        },
        "template": "nt_01kx4h2jdafq8bk9aftxak4b40",
    },
)
curl -X POST https://api.courier.com/send \
  -H "Authorization: Bearer $COURIER_API_KEY" \
  -H "Content-Type: application/json" \
  -d '{
    "message": {
      "to": {
        "user_id": "user_123"
      },
      "template": "nt_01kx4h2jdafq8bk9aftxak4b40"
    }
  }'
response = courier.send_.message(
  message: {
    to: {
      user_id: "user_123"
    },
    template: "nt_01kx4h2jdafq8bk9aftxak4b40"
  }
)
response, err := client.Send.Message(context.TODO(), courier.SendMessageParams{
	Message: courier.SendMessageParamsMessage{
		To: courier.SendMessageParamsMessageToUnion{
			OfUserRecipient: &shared.UserRecipientParam{
				UserID: courier.String("user_123"),
			},
		},
		Template: courier.String("nt_01kx4h2jdafq8bk9aftxak4b40"),
	},
})
SendMessageParams params = SendMessageParams.builder()
    .message(SendMessageParams.Message.builder()
        .to(UserRecipient.builder().userId("user_123").build())
        .template("nt_01kx4h2jdafq8bk9aftxak4b40")
        .build())
    .build();
SendMessageResponse response = client.send().message(params);
$response = $client->send->message(
  message: [
    'to' => [
      'user_id' => 'user_123',
    ],
    'template' => 'nt_01kx4h2jdafq8bk9aftxak4b40',
  ],
);
SendMessageParams parameters = new()
{
    Message = new()
    {
        To = new UserRecipient { UserID = "user_123" },
        Template = "nt_01kx4h2jdafq8bk9aftxak4b40",
    },
};

var response = await client.Send.Message(parameters);
courier send message \
  --api-key "$COURIER_API_KEY" \
  --message.to '{"user_id": "user_123"}' \
  --message.template nt_01kx4h2jdafq8bk9aftxak4b40
With Courier MCP, send my template to user_123 by email.
Pass it inline instead and nothing is stored. Swap this
to object into the call on the other tab.const { requestId } = await courier.send.message({
message: {
// A provider recipient is a profile field, so it sits outside the typed union.
to: {
oneSignalPlayerID: "...",
} as any,
template: "nt_01kx4h2jdafq8bk9aftxak4b40",
},
});
response = client.send.message(
    message={
        "to": {
            "oneSignalPlayerID": "...",
        },
        "template": "nt_01kx4h2jdafq8bk9aftxak4b40",
    },
)
curl -X POST https://api.courier.com/send \
  -H "Authorization: Bearer $COURIER_API_KEY" \
  -H "Content-Type: application/json" \
  -d '{
    "message": {
      "to": {
        "oneSignalPlayerID": "..."
      },
      "template": "nt_01kx4h2jdafq8bk9aftxak4b40"
    }
  }'
response = courier.send_.message(
  message: {
    to: {
      oneSignalPlayerID: "..."
    },
    template: "nt_01kx4h2jdafq8bk9aftxak4b40"
  }
)
// A provider recipient is a profile field, so it sits outside the typed union.
to := param.Override[shared.UserRecipientParam](
	json.RawMessage(`{"oneSignalPlayerID": "..."}`),
)

response, err := client.Send.Message(context.TODO(), courier.SendMessageParams{
	Message: courier.SendMessageParamsMessage{
		To: courier.SendMessageParamsMessageToUnion{OfUserRecipient: &to},
		Template: courier.String("nt_01kx4h2jdafq8bk9aftxak4b40"),
	},
})
// A provider recipient is a profile field, so it sits outside the typed union.
UserRecipient to = UserRecipient.builder()
    .putAdditionalProperty("oneSignalPlayerID", JsonValue.from("..."))
    .build();

client.send().message(SendMessageParams.builder()
    .message(SendMessageParams.Message.builder()
        .to(to)
        .template("nt_01kx4h2jdafq8bk9aftxak4b40")
        .build())
    .build());
$response = $client->send->message(
  message: [
    'to' => [
      'oneSignalPlayerID' => '...',
    ],
    'template' => 'nt_01kx4h2jdafq8bk9aftxak4b40',
  ],
);
// A provider recipient is a profile field, so it sits outside the typed union.
UserRecipient to = UserRecipient.FromRawUnchecked(
    JsonSerializer.Deserialize<Dictionary<string, JsonElement>>(
        """{"oneSignalPlayerID": "..."}"""
    )
);

var response = await client.Send.Message(new() { Message = new() { To = to, Template = "nt_01kx4h2jdafq8bk9aftxak4b40" } });
courier send message \
  --api-key "$COURIER_API_KEY" \
  --message.to '{"oneSignalPlayerID": "..."}' \
  --message.template nt_01kx4h2jdafq8bk9aftxak4b40
With Courier MCP, send my template to that OneSignal player id.
Overrides
covers the two levels and which one wins. lists the fields every push provider takes. A provider override changes the request body Courier sends to OneSignal’s API, and takes any field supported by OneSignal’s Create notification endpoint.const { requestId } = await courier.send.message({
message: {
template: "nt_01kx4h2jdafq8bk9aftxak4b40",
to: {
oneSignalPlayerID: "player-id-123",
},
providers: {
onesignal: {
override: {
body: {
priority: 10,
ttl: 3600,
small_icon: "ic_notification",
},
},
},
},
},
});
response = client.send.message(
    message={
        "template": "nt_01kx4h2jdafq8bk9aftxak4b40",
        "to": {
            "oneSignalPlayerID": "player-id-123",
        },
        "providers": {
            "onesignal": {
                "override": {
                    "body": {
                        "priority": 10,
                        "ttl": 3600,
                        "small_icon": "ic_notification",
                    },
                },
            },
        },
    },
)
curl -X POST https://api.courier.com/send \
  -H "Authorization: Bearer $COURIER_API_KEY" \
  -H "Content-Type: application/json" \
  -d '{
    "message": {
      "template": "nt_01kx4h2jdafq8bk9aftxak4b40",
      "to": {
        "oneSignalPlayerID": "player-id-123"
      },
      "providers": {
        "onesignal": {
          "override": {
            "body": {
              "priority": 10,
              "ttl": 3600,
              "small_icon": "ic_notification"
            }
          }
        }
      }
    }
  }'
response = courier.send_.message(
  message: {
    template: "nt_01kx4h2jdafq8bk9aftxak4b40",
    to: {
      oneSignalPlayerID: "player-id-123"
    },
    providers: {
      onesignal: {
        override: {
          body: {
            priority: 10,
            ttl: 3600,
            small_icon: "ic_notification"
          }
        }
      }
    }
  }
)
// This provider addresses the recipient with fields outside the typed
// UserRecipient model, so pass the recipient as raw JSON.
to := param.Override[shared.UserRecipientParam](json.RawMessage(`{
  "oneSignalPlayerID": "player-id-123"
}`))

response, err := client.Send.Message(context.TODO(), courier.SendMessageParams{
	Message: courier.SendMessageParamsMessage{
		To: courier.SendMessageParamsMessageToUnion{OfUserRecipient: &to},
		Template: courier.String("nt_01kx4h2jdafq8bk9aftxak4b40"),
		Providers: shared.MessageProvidersParam{
			"onesignal": shared.MessageProvidersTypeParam{
				Override: map[string]any{
					"body": map[string]any{
						"priority": 10,
						"ttl": 3600,
						"small_icon": "ic_notification",
					},
				},
			},
		},
	},
})
SendMessageParams params = SendMessageParams.builder()
    .message(SendMessageParams.Message.builder()
        // This provider addresses the recipient with fields outside the
        // typed UserRecipient model, so pass them as additional properties.
        .to(UserRecipient.builder()
            .putAdditionalProperty("oneSignalPlayerID", JsonValue.from("player-id-123"))
            .build())
        .template("nt_01kx4h2jdafq8bk9aftxak4b40")
        .providers(MessageProviders.builder()
            .putAdditionalProperty("onesignal", JsonValue.from(java.util.Map.of("override", java.util.Map.of(
                    "body", java.util.Map.of(
                        "priority", 10,
                        "ttl", 3600,
                        "small_icon", "ic_notification"
                    )
                ))))
            .build())
        .build())
    .build();
SendMessageResponse response = client.send().message(params);
$response = $client->send->message(
  message: [
    'template' => 'nt_01kx4h2jdafq8bk9aftxak4b40',
    'to' => [
      'oneSignalPlayerID' => 'player-id-123',
    ],
    'providers' => [
      'onesignal' => [
        'override' => [
          'body' => [
            'priority' => 10,
            'ttl' => 3600,
            'small_icon' => 'ic_notification',
          ],
        ],
      ],
    ],
  ],
);
SendMessageParams parameters = new()
{
    Message = new()
    {
        // This provider addresses the recipient with fields outside the
        // typed UserRecipient model, so build it from raw JSON.
        To = UserRecipient.FromRawUnchecked(
            JsonSerializer.Deserialize<Dictionary<string, JsonElement>>(
                """
                {
                  "oneSignalPlayerID": "player-id-123"
                }
                """
            )
        ),
        Template = "nt_01kx4h2jdafq8bk9aftxak4b40",
        Providers = new Dictionary<string, MessageProvidersType>()
        {
            {
                "onesignal",
                new()
                {
                    Override = JsonSerializer.Deserialize<Dictionary<string, JsonElement>>(
                        """
                        {
                          "body": {
                            "priority": 10,
                            "ttl": 3600,
                            "small_icon": "ic_notification"
                          }
                        }
                        """
                    ),
                }
            },
        },
    },
};

var response = await client.Send.Message(parameters);
courier send message \
  --api-key "$COURIER_API_KEY" \
  --message.to '{"oneSignalPlayerID": "player-id-123"}' \
  --message.template nt_01kx4h2jdafq8bk9aftxak4b40 \
  --message.providers '{"onesignal": {"override": {"body": {"priority": 10, "ttl": 3600, "small_icon": "ic_notification"}}}}'
With Courier MCP, send my template to this OneSignal player id with a body override.
Data mapping
OneSignal imposes a limit to push notification payloads. When sending push notifications through automated workflows that include batching, data payloads can become too large, which will result in a failed send. Enable data mapping on the push channel to choose which fields reach the provider. covers the template setting.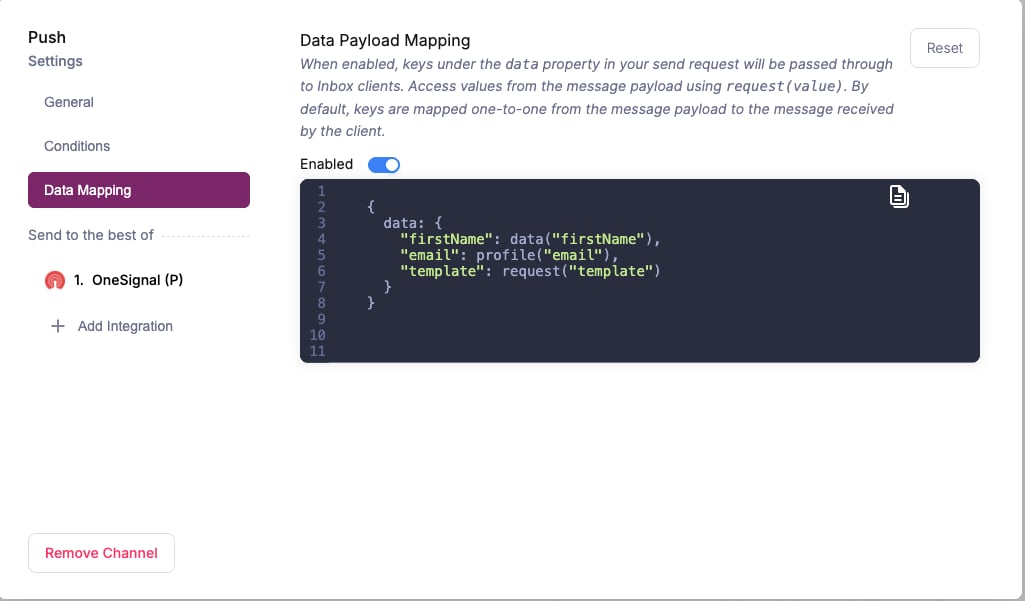
OneSignal Data Mapping
Provider details
onesignal
routing.channels instead is supported, and sends through just this provider.
Send to a specific provider
When that is worth doing, and what you give up: failover, channel priority, and providers you add later.