Most Popular
Start Routing Notifications Today!
Courier is a notification service that centralizes all of your templates and messaging channels in one place which increases visibility and reduces engineering time.
Sign-up

How to Set Up Multi-Channel Notifications in Your AWS Stack
How to Set Up Multi-Channel Notifications in Your AWS Stack In this article, we’ll walk through an example architecture for building your own notification service with AWS, and show you how to implement it in Node.js. We’ll also discuss a few considerations related to using AWS services for notifications.
Let’s dive in!
Why build multi-channel notifications?
Notifications are core to many software products today, from apps to e-commerce stores. For example, Instagram would not last without notifications, since users would probably not keep it open just to monitor activity.
Multi-channel notifications become a strategic concern when companies realize that they cannot cater to their users, who are present on a variety of channels, with a one-size-fits-all approach. For instance, a user might prefer a summary of travel forum activity over email, since it works well for asynchronous communication. But for an activity requiring immediate attention, like a change to a flight schedule, a company would likely trade the email notification for a push notification, which the person concerned would likely see sooner.
Ultimately, multi-channel notifications can affect your bottom-line: companies that tailor their notifications based on user needs tend to enjoy higher user engagement.
Why use AWS services for multi-channel notifications?
If you’re building multi-channel notifications into your project, the main reason you might go with AWS services is if you’re already using AWS for the rest of your infrastructure. If you already have AWS experience, it makes sense to build notifications in AWS since you’ll already be familiar with the AWS APIs and know your way around the AWS Management Console.
Amazon Web Services offers two products for end-user notifications: SES and SNS. Both services have a pay-per-use pricing model that’s ideal for companies that want to start small and scale up their AWS use as the business grows.
Amazon Simple Email Service (SES) is an API for sending emails and managing email lists. SES’s main API endpoints are focused on sending emails and managing email contacts. The service also includes more advanced endpoints related to deliverability, like managing the dedicated IP addresses from which SES sends your emails.
Amazon Simple Notification Service (SNS) is an API for sending notifications to applications and people. For many developers, the key to SNS is the “people” part—ability to send push and SMS messages to customers. SNS’s API endpoints allow you to send individual messages, but most of the service’s functionality is built around SNS topics for sending batches of notifications over time.
Multi-channel notification system architecture for AWS
AWS SES and SNS provide APIs for sending notifications, but it's still the developer's job to tell the services which notifications to send, and to whom.
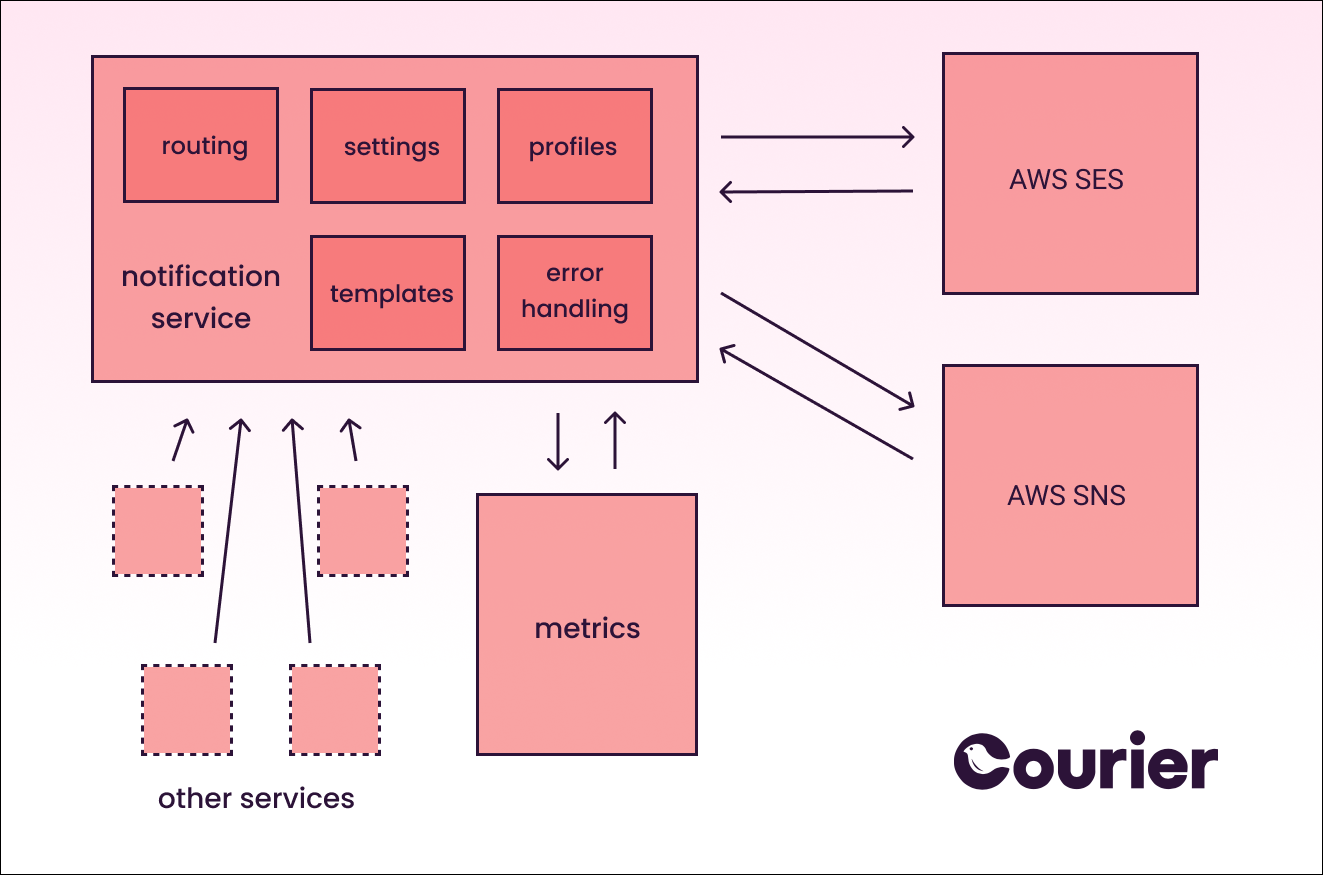
Here's an example architecture for building out a notification system for AWS:

A common pattern in a service-oriented architecture is to extract notification logic to create a standalone service. In our example architecture, the notification service contains a few core pieces of functionality:
- Templates: most notifications you send follow a standardized format. Templates allow you to create that format once and then replace placeholders with user information.
- Error handling: when a notification cannot be delivered, whether because the end user is unreachable or the notification APIs are down, you’ll likely need to try and resend the notification.
- Preferences: you’ll need to store user choices for message categories such as account-related notifications or marketing messages.
- User profiles: you’ll want to store user emails and phone numbers.
- Notification routing: this is the core logic for deciding which notification should be sent based on event type, user preference, user location, and other factors.
- Tracking: to analyze the effectiveness of your notifications, you’ll need to track interactions with individual notifications.
The notification service usually needs to expose an API to which other services can connect. The API can be synchronous, available through an HTTP REST or GRPC endpoint, or asynchronous and based on a message broker, like RabbitMQ.
Beyond the code in the notification service itself, developers often need to collect metrics in a centralized metrics store. Team members in charge of the notification service track the service’s status through metrics like the number of notifications sent per hour, or the share of API errors from various providers. If the service has a queue-based API, the queue size would also be published as a metric. Service operators could use these metrics to understand whether the service is behaving normally, or if there are issues requiring attention from the development team.
While the service connects to third-party notification-sending services (SES and SNS, in our case), you can extend it to support other providers in the future.
Sample implementation of a notification service
Check out How to Send Emails with Attachments Using Amazon SES and S3
Let’s walk through a notification service implementation in code. For this example, we’ll go with a Node.js web framework called Fastify. It’s a lightweight framework that’s optimized for speed, which is exactly what we need in an internal REST service.
We’ll implement a REST API as our interface to the notification service, but your implementation can have a different structure—it can be a GRPC API, or it can consume messages off of a RabbitMQ queue.
In case you’d like to follow along, our complete example implementation is available in the notification-service repository on GitHub.
We start by cloning the repo and installing all required dependencies:
1$ git clone git@github.com:/trycourier/aws-notification-service.git2$ cd notification-service3$ npm install
The logic of our example notification service is contained in the fastify/index.js file.
Now we'll define an email template. We’ll use AWS SES’s built-in template functionality, but you could use a library like mustache.js or build your own templating system instead. Our template map contains the fields that SES requires in their API:
1// fastify/index.js2const paramsForTemplateCreation = {3Template: {4TemplateName: 'MigrationConfirmation',5HtmlPart: "<h1>Hello {{name}},</h1><p>You are confirmed for the winter migration to <a href='https://en.wikipedia.org/wiki/{{location}}'>{{location}}</a>.</p>",6SubjectPart: 'Get ready for your journey, {{name}}!',7TextPart: "Dear {{name}},\r\nYou are confirmed for the winter migration to <a href='https://en.wikipedia.org/wiki/{{location}}'>{{location}}</a>"8}9}
We’ll need to create this template on AWS, so we’ll add a function for creating a template using the AWS SDK:
1async function createTemplate (params) {2try {3const data = await sesClient.send(new CreateTemplateCommand(params))4console.log('Success', data)5} catch (err) {6console.log('Error', err.stack)7}8}
We’ll get an error if we try to create a template that already exists in the system, so we wrap the createTemplate() function in a try/catch block. In this block, we’ll try to get the template with the relevant name, and if that fails we’ll create it in AWS:
1async function createTemplateIfNotExists (params) {2try {3const queryParams = { TemplateName: params.Template.TemplateName }4const templateExists = await sesClient.send(new GetTemplateCommand(queryParams))5} catch (err) {6createTemplate(params)7}8}
We won’t add many other features to our simple templating system for now.
Next, let’s take care of the notification sending. Because we’re using AWS SES templates, it makes sense to use the SES sendTemplatedEmail endpoint:
1async function sendTemplatedEmail (params) {2try {3const data = await sesClient.send(new SendTemplatedEmailCommand(params))4console.log('Success.', data)5return data // For unit tests6} catch (err) {7console.log('Error', err.stack)8}9}
In this function, we’ll simply pass the parameters that we receive to the sendTemplatedEmail API endpoint. Let’s also create a set of placeholder parameters so that we can easily call the sendTemplatedEmail function when we need to:
1const paramsForTemplatedEmail = {2Destination: {3ToAddresses: [4'kingfisher@example.imap.cc'5]6},7Source: 'nightjar@example.imap.cc',8Template: 'MigrationConfirmation',9TemplateData: '{ "name":"Alaric", "location": "Mexico" }' /* required */,10ReplyToAddresses: []11}
Now it’s time to define the API routes that our services will use to send notifications. We define the main route, /notify, by using Fastify’s URL shorthand:
1const app = fastify({ logger: true })23app.post('/notify', async (req, res) => {4const { userId, event, params } = req.body5switch (event) {6case 'migration-confirmed':7sendTemplatedEmail(paramsForTemplatedEmail)8res.send('migration-confirmed email sent')9break10default:11res.send('event not configured')12}13})
Here, we’re defining the POST /notify endpoint. Once the application receives a request to the /notify URL, it’ll parse out the following elements from the request body:
- userId: an internal user identifier.
- event: an event type requiring user notification.
- params: any additional parameters for building out notification contents.
Based on the event value, we’ll need to decide which notification to send. Some products will have complex notification routing logic, but we’ll start with a single switch statement. A long switch statement will become unmaintainable if you add many events, so this section should eventually be split into multiple functions.
We only have migration-confirmed defined for now, and when that event occurs we want to send an email notification. Other calls to services, like AWS SNS, would go inside the statement that handles the migration-confirmed event.
Beyond the /notify endpoint above, we can create additional endpoints as needed. For example, here are a few endpoints that your notification service will need (we’ll leave implementation up to you):
1app.post('/subscriber', async (req, res) => {2const { userId, email, phoneNum } = req.body3// handle new subscribers4res.send('handling of new subscribers not yet implemented')5})67app.delete('/subscriber/:userId', async (req, res) => {8const userId = req.params.userId9// unsubscribe user identified by userId from all emails10res.send('handling of unsubscribes not yet implemented')11})1213app.put('/subscriber/:userId/preferences', async (req, res) => {14const { preferences } = req.body15// handle subscription preferences16res.send('handling of preferences not yet implemented')17})
Finally, we tell our Fastify backend to listen on port 3000:
1const server = app.listen(3000, () => console.log('🚀 Server ready at: http://localhost:3000'))
Let’s start the app and try it out:
1$ npm run dev2[nodemon] starting `node fastify/index.js`3{"level":30,"time":1628785943753,"pid":16999,"hostname":"notification-service","msg":"Server listening at http://127.0.0.1:3000"}4🚀 Server ready at: http://localhost:3000
Now we’ll try issuing a POST request to the /notify endpoint. We’ll use cURL for this purpose, but you can also use an app like Postman:
1$ curl -X POST \2-H 'Content-Type: application/json' \3-H 'Accept: application/json' \4-d '{"userId": 123, "event": "migration-confirmed"}' \5localhost:3000/notify
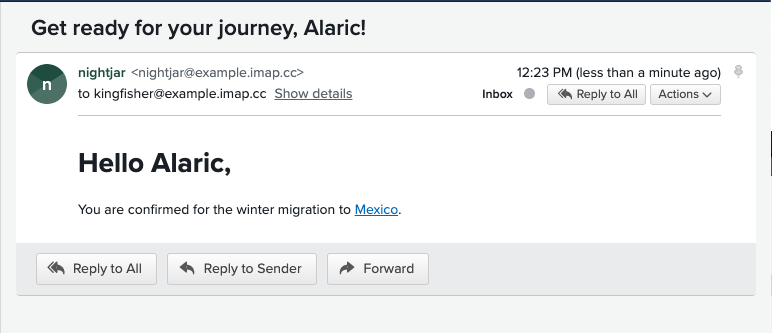
We can see the notification email land in our inbox shortly after calling the endpoint:
 Email notification in our test inbox.
Nice work! We now have a working notification service with AWS.
Limitations to AWS notification solutions
Before you jump into the design and implementation phases for your AWS-backed notification service, consider the following limitations to AWS services.
AWS services are “raw”
Think about SES and SNS as services with APIs closely resembling the underlying notification protocols. Both services will require you to implement most features that are not core to notification sending.
For example, SES requires you to manually compose multi-part messages if you’re looking to send attachments. It does not offer a seamless API that would automatically take care of the attachments—you’ll need to implement that yourself on top of the SES API.
Contact management is another area in which SES requires additional work. If you opt for SES-managed lists, you’ll need to build the logic for adding and removing subscribers for each email list.
SNS is also limited in terms of developer usability. For example, notifications that cannot be delivered end up in a dead-letter queue, which you’ll need to monitor for retries.
Error-checking is laborious
Another aspect of AWS’s “rawness” is error-checking. For example, you need to check for email bounces or undelivered push notifications and manage them yourself.
As we mentioned above, any SNS notification that cannot be delivered will end up in a dead-letter queue. This queue is an Amazon Simple Queue Service (SQS) queue, and you’ll need to implement functionality to listen for messages on this channel.
When you get an “unsuccessful notification” message in this queue, you’ll need to decide whether to try the notification again (and schedule it in your notification service accordingly), or to send it through an alternative notification method (a different channel or provider). You’ll also need to track which push targets and email addresses are consistently unresponsive and thus need to be removed from future notification lists.
You can build error-handling functionality with SNS and SES, as the necessary details for each error case are available on both services’ APIs. But you’ll also need to implement error handling yourself.
You’ll need to build a templating engine
While you can readily implement simple email and notification templates using tools like mustache.js, complex templates, like elaborate HTML emails, are another story.
You’ll need to test your templates to ensure they work as expected on all supported devices and clients. Email formatting is difficult to get right, so we recommend budgeting extra time to develop and test your templates.
How Courier improves the notification experience for AWS-based customers
Courier is an API for multi-channel notifications, and many of our customers use AWS. We offer our customers an opportunity to use AWS services for notifications without having to build all of the additional functionality on top of AWS services themselves.
Here's how you might send an email and SMS notification with Courier:
1import { CourierClient } from "@trycourier/courier";23const courier = CourierClient({ authorizationToken: "<AUTH_TOKEN>" }); // get from the Courier UI45// Example: send a message supporting email & SMS6const { messageId } = await courier.send({7eventId: "<EVENT_ID>", // get from the Courier UI8recipientId: "<RECIPIENT_ID>", // usually your system's User ID9profile: {10email: "kingfisher@example.imap.cc",11phone_number: "555-228-3890"12},13data: {} // optional variables for merging into templates14});
Courier handles all communication with AWS on the backend and offers a number of additional advantages to reduce your implementation work:
- Notification Designer: we offer a web interface for designing notification templates, allowing users to create and edit notification templates without redeploying any code. This reduces the engineering work required to get new notifications added to a product.
- Automated handling of unsubscribes and errors: Courier handles notification preferences and automatically adjusts notification flows for unsubscribing users. There’s no need to monitor dead-letter SQS queues.
- Multi-provider: down the line, you may want to switch from SNS and SES, or add an additional provider for sending international SMS messages. Courier integrates with 50+ providers, all using the same API.
Conclusion
In this article, we presented our suggested notification service architecture for integrating with AWS SES and SNS.
It’s easy to get started with Courier to orchestrate notifications in your AWS services.
We’re offering a free plan with up to 10,000 notifications/month, and we don’t require your credit card to get started.
Start Routing Notifications Today!
Courier is a notification service that centralizes all of your templates and messaging channels in one place which increases visibility and reduces engineering time.
Sign-up
More from Engineering

Simplifying notifications with the Courier iOS SDK
Push notifications are a valuable tool for keeping users informed and increasing their engagement with your app. You can use push notifications to alert users about promotions, new content, or any other important updates. While push notifications are a powerful tool, setting up push notifications in iOS can be a daunting task that requires a significant amount of effort and time. Fortunately, the Courier iOS Mobile Notifications Software Development Kit (SDK) simplifies this process.
Mike Miller
March 23, 2023

Building Android push notifications with Firebase and Courier’s SDK
Push notifications have become an essential part of modern mobile apps, allowing you to keep your users engaged and informed. However, implementing push for different platforms can be a complex and time-consuming task, requiring developers to set up and handle token management, testing, and other logistical details.
Mike Miller
March 21, 2023
Free Tools
Comparison Guides
Build your first notification in minutes
Send up to 10,000 notifications every month, for free.
Get started for free

Build your first notification in minutes
Send up to 10,000 notifications every month, for free.
Get started for free

© 2024 Courier. All rights reserved.