How to Send Emails with Attachments Using Amazon SES and S3

Aydrian Howard
December 02, 2020

Nearly all software products rely on email to communicate with their users. In many cases, it’s the primary channel for sending transactional notifications, or notifications that are automatically triggered by a user’s behavior in the application. These transactional emails frequently include attachments, such as an invoice, order confirmation, or other statement.
As a developer, it's up to you to generate or retrieve the file and then attach it to the appropriate email using one of the many email provider APIs. Depending on your email provider, this can be a difficult task – Amazon SES, which we’ll use as an example in this tutorial, doesn’t make it easy if you’re relying on a direct integration – and, for many email providers, the documentation can often be hard to follow.
Let's take a look at how we can accomplish this using a couple popular offerings from Amazon Web Services (AWS). We'll retrieve a file from an Amazon S3 bucket and then attach it to an email sent using Amazon Simple Email Service (SES), which we’ll integrate with Courier for template management and delivery.
Prerequisites
To complete this tutorial, you’ll need a few things:
- An AWS account with an S3 bucket created.
- An SES domain that’s been verified.
- A Courier account – it’s free to sign up and includes 10,000 notifications per month.
We'll use Courier to create the email and send it through AWS SES with an attachment stored in AWS S3. Using Courier allows us to manage our email template outside the source code and take advantage of additional functionality like retrying failed sends and tracking delivery and user engagement.
You'll need a Node.js v12+ environment to run the code.
1. Build your email notification in Courier
Configure Amazon SES as your email provider
Once you've created your Courier account, we'll start by configuring Amazon SES as our email provider. This will allow us to use Courier’s API to call Amazon SES and deliver the email we’re about to compose, plus our attachment.
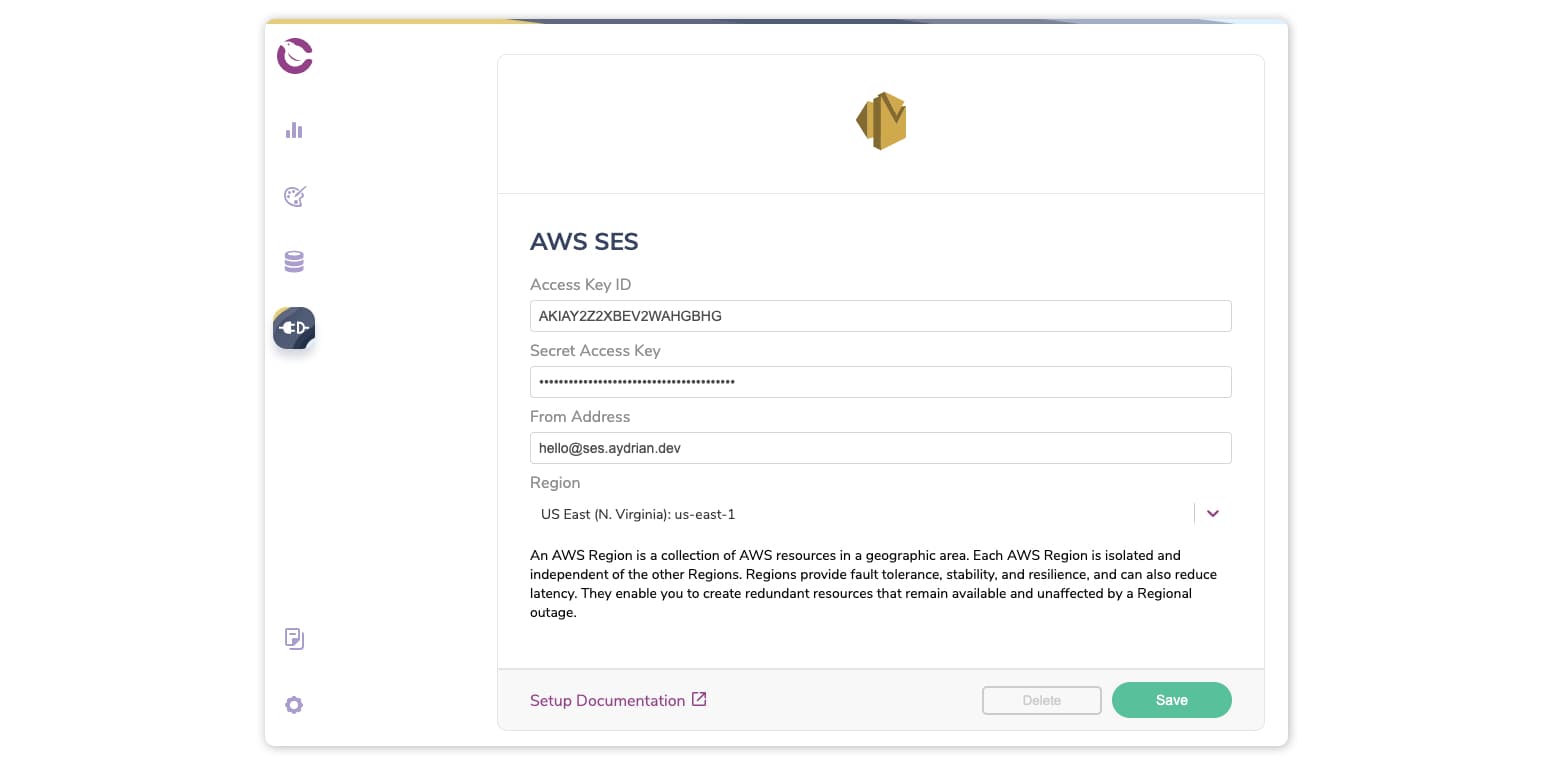
First, navigate to Integrations and select AWS SES from the Integrations Catalog. We'll need the access key ID and secret access key from an IAM user with SES access. You can learn more about how to get them using the AWS Developer Guide.
Next we'll need a “From Address” for our email. This can be any email address that uses the domain you have configured. Lastly, select the region your SES account is configured for. You can now click Install and we’re ready to create our email notification.
Design your email notification
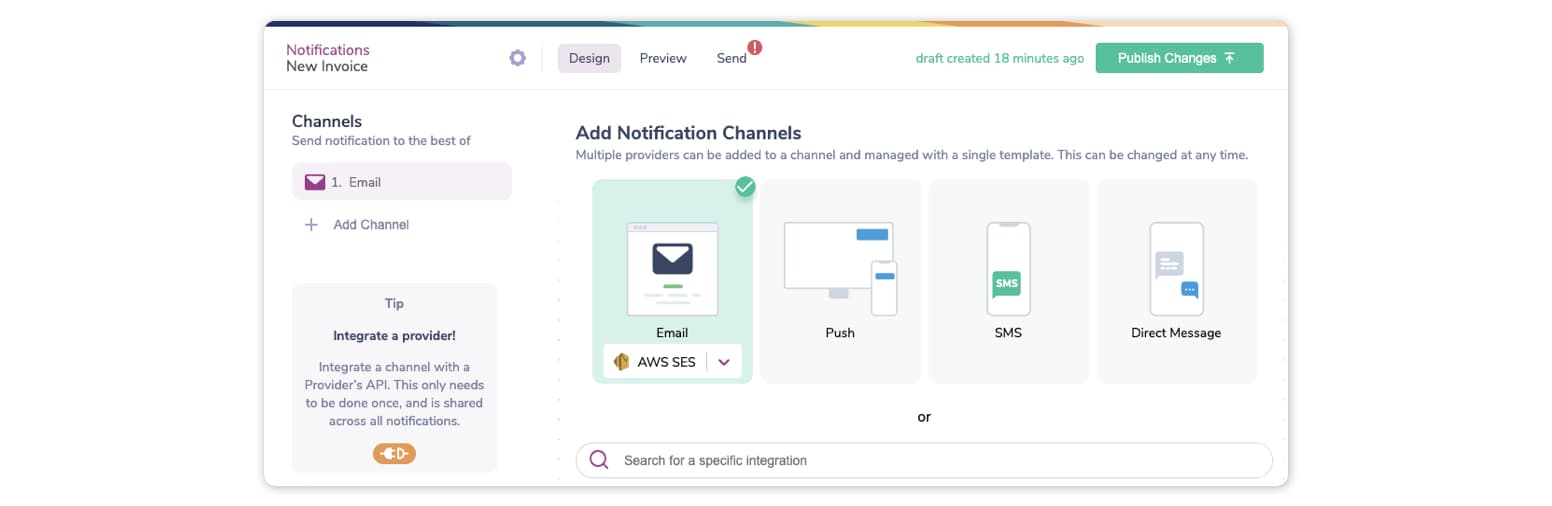
Navigate to the Notification Designer and select Create Notification. Click “Untitled Notification” on the top left to give your notification a descriptive name – in this case, I’ve named mine “New Invoice.”
Now let's add email as a channel for our notification by selecting Email and choosing AWS SES from the dropdown. We can now add Email under Channels to the left and start designing our notification.
We’ll design a simple email notification. First, let's update the subject line to “New Invoice“ by clicking on New Subject and updating the text. Next, we'll use a text block – click the “T” on the toolbar – to add a short greeting. Feel free to copy-paste the following text: “Hello {name}, your invoice is attached below.“ We’re personalizing the email with a “name” variable, which we'll pass to the notification below in the data object as part of calling the Courier API.
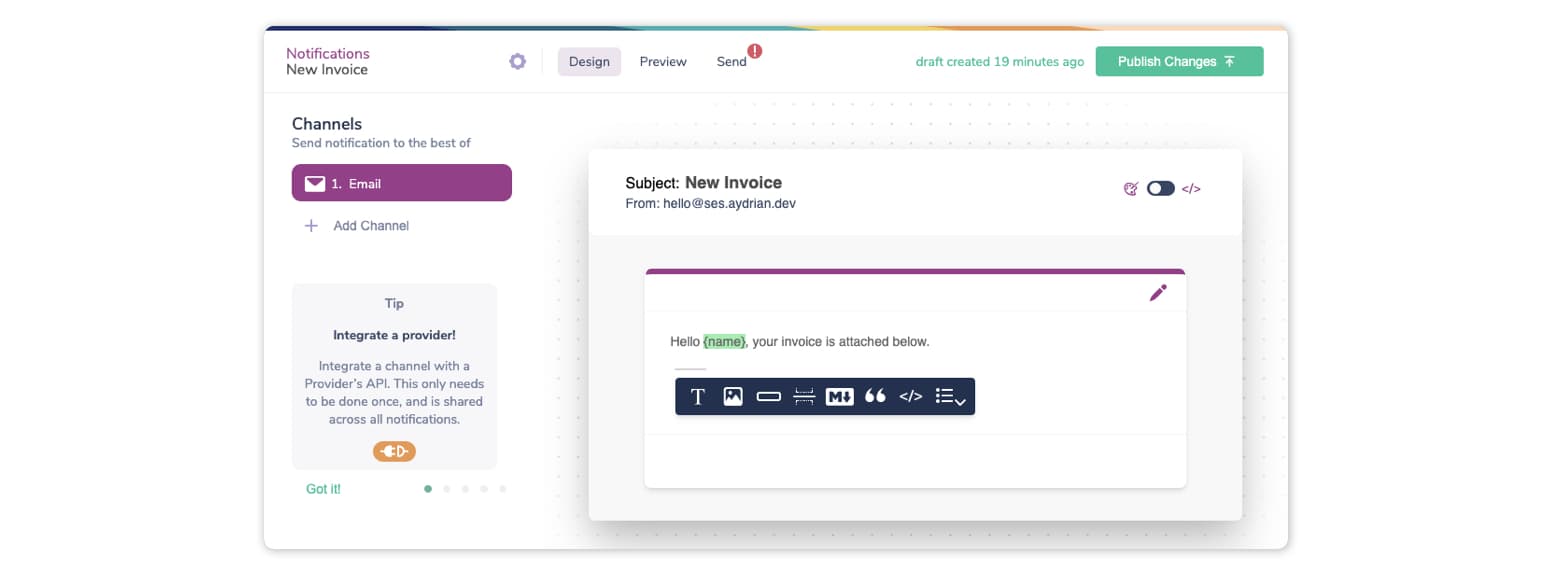
This is enough for now, but feel free to add more content blocks and continue designing the email. When you’re finished, click Publish Changes in the upper righthand corner.
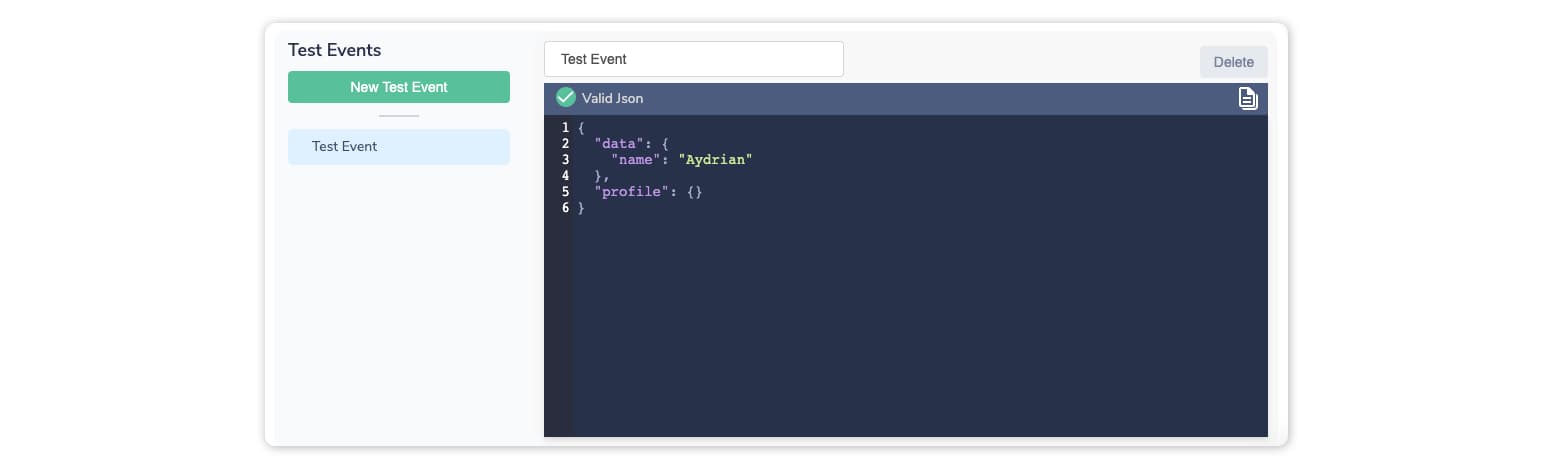
If you’d like, you can preview the email using the Preview tab and ensure your variables are templated properly. You'll be prompted to Create a Test Event and then you'll want to add the name property to the data JSON object. Once you save your test event, you should see the name variable populate in the Preview tab with whatever value you’ve set.
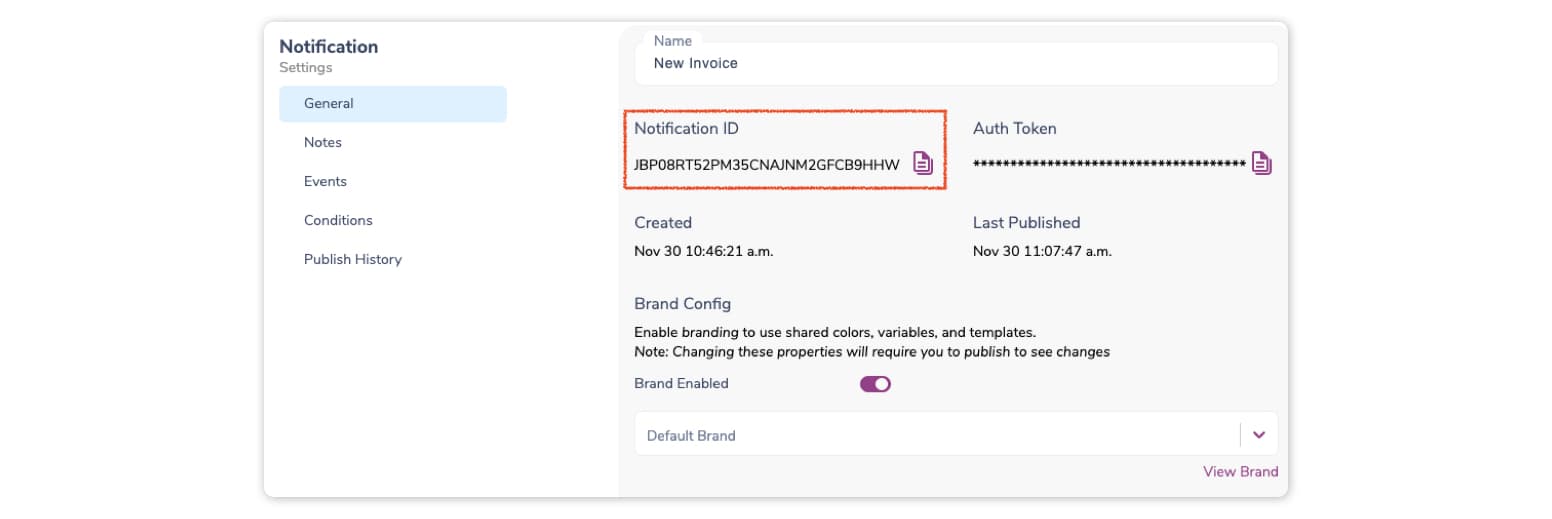
Retrieve your Notification ID
The last thing we need to do before moving onto code is retrieve the Notification ID. We'll need this to send the right notification when we call the Courier API later.. Next to the notification name, click the gear icon to launch the Notification Settings. Copy the Notification ID value and save it to use in the code below.
2. Code the send
Now that we have a notification setup in Courier, we'll use the Courier Node.js SDK to send it. We'll start by creating a new npm project.
> mkdir courier-send && cd courier-send> npm init --yes
Now we can add a couple packages that will assist us in calling the Courier API. We'll install the Courier Node.js package and since we'll be using environment variables, we'll go ahead and install the dotenv package.
> npm install @trycourier/courier dotenv
To handle authentication with the Courier API, we'll store our Courier Auth Token in the environment variable COURIER_AUTH_TOKEN using a .env file. Be sure not to check this file into source control. You can find your Courier Auth Token in Settings > API Keys in your Courier account. Let's create the .env file and populate it with your auth token.
> echo "COURIER_AUTH_TOKEN=YOUR_AUTH_TOKEN" > .env
Now we can create an index file and open it in our favorite editor. I'll be using VS Code.
> touch index.js && code .
Paste in the following code:
require("dotenv").config();const { CourierClient } = require("@trycourier/courier");const courier = CourierClient();const main = async () => {};main();
This code will load the environment variables from our .env file and create a Courier client using our auth token. It also sets up an async main function so we can use async/wait. Now let's add the Courier send call. In the main function, add the following code:
const { messageId } = await courier.send({eventId: "YOUR_NOTIFICATION_ID",recipientId: "YOUR_RECIPIENT_ID",profile: {email: "YOUR_EMAIL"}data: {name: "Aydrian"}});console.log("Sent notification: ", messageId);
This code will send the notification specified by the eventId to the specified recipient. Make sure you replace the eventId value with the Notification ID you copied earlier. You'll also want to update the recipientId to a unique string (For my example, I use my name and zip in all caps without spaces: AYDRIAN10036). You'll also want to update email with your email address. Now if you were to run this, you would receive the email without an attachment. Let's tackle that next.
Add your email attachment
To add the attachment, we'll need to first retrieve it from our S3 Bucket and convert it to a base64 string. Then we'll be able to add it to the send call above using a provider override. Each provider has its own override configuration and you can see them all in the Courier Integration Guides. We'll be using the attachment override for the AWS SES integration.
Let's start by adding the AWS SES SDK:
> npm install @aws-sdk/client-s3
Next we'll configure the environment variables needed for authentication. For this you'll need to get your AWS credentials. They consist of an access key ID and a secret access key. You can learn more about how to get them on the AWS Developer Guide. Make sure the IAM user you’re using has at least S3 Read Access.
Open your .env file and add the following lines and replace the values with your credentials.
AWS_ACCESS_KEY_ID=YOUR_ACCESS_KEY_IDAWS_SECRET_ACCESS_KEY=YOUR_SECRET_ACCESS_KEY
Now go back to the index.js and add the following lines above the main function:
const S3 = require("@aws-sdk/client-s3");const s3Client = new S3.S3Client({region: "us-east-1"});
This code will create an S3 Client using your credentials stored in the .env file. If you aren't using us-east-1, you should change it to your region. Now we can create the command to get an object from your S3 bucket and have the client execute it.
Add the following code to the beginning of the main function:
const command = new S3.GetObjectCommand({Bucket: "courier-test-ajh",Key: "test-pdf.pdf"});const data = await s3Client.send(command);
Update the values of Bucket and Key to match your bucket id and the key of the file you'd like to attach. The data contains all we need to attach the file, but we'll have to convert the Body from a readable stream to a buffer so we can get it as a base64 string. We'll use a helper function to convert it.
Add the following function above the main function:
function streamToBuffer(stream) {return new Promise((resolve, reject) => {let buffers = [];stream.on("error", reject);stream.on("data", (data) => buffers.push(data));stream.on("end", () => resolve(Buffer.concat(buffers)));});}
Now we can use it right after data in the main function:
const command = new S3.GetObjectCommand({Bucket: "courier-test-ajh",Key: "invoice.pdf"});const data = await s3Client.send(command);const buff = await streamToBuffer(data.Body);
And we'll use all this to create an attachment object right below it.
const attachment = {filename: "invoice.pdf",contentType: data.ContentType,data: buff.toString("base64")};
Now let's update our Courier send call to use the override:
const { messageId } = await courier.send({eventId: "JBP08RT52PM35CNAJNM2GFCB9HHW",recipientId: "AYDRIAN10036",data: {name: "Aydrian"},override: {"aws-ses": {attachments: [attachment]}}});
Putting it all together
Now if you run the code again, it should pull the specified file from S3, attach it to your email, and send it to you.
Your completed code should look like the following:
require("dotenv").config();const S3 = require("@aws-sdk/client-s3");const { CourierClient } = require("@trycourier/courier");const s3Client = new S3.S3Client({region: "us-east-1"});const courier = CourierClient();// Helper function that takes a stream and returns a bufferfunction streamToBuffer(stream) {return new Promise((resolve, reject) => {let buffers = [];stream.on("error", reject);stream.on("data", (data) => buffers.push(data));stream.on("end", () => resolve(Buffer.concat(buffers)));});}const main = async () => {// Retrieve the file from an S3 Bucketconst command = new S3.GetObjectCommand({Bucket: "courier-test-ajh",Key: "invoice.pdf"});const data = await s3Client.send(command);// Convert the readable stream to a bufferconst buff = await streamToBuffer(data.Body);// Create an attachment object to provide the overrideconst attachment = {filename: "invoice.pdf",contentType: data.ContentType,data: buff.toString("base64")};const { messageId } = await courier.send({eventId: "JBP08RT52PM35CNAJNM2GFCB9HHW",recipientId: "AYDRIAN10036",data: {name: "Aydrian"},override: {"aws-ses": {attachments: [attachment]}}});console.log("Sent notification: ", messageId);};main();
I hope this was helpful. If you're not using AWS SES, you can easily configure Courier to send attachments using another email provider. For other email providers, you can see what changes need to be made to the override to handle attachments by visiting the Courier Email Integrations docs. Give it a try and let me know what you think.
Having trouble getting started, or curious how this would work with a different email provider? A product expert on our team can help.
Similar resources

Email open tracking and consent: the new rules in Europe
Regulators in Europe are treating the email open-tracking pixel like a cookie, which means it needs consent before it fires. Here's what changed, who's actually in scope, what compliance requires, and how to keep sending while gating tracking on consent, including how to wire it up in Courier.

You can build anything now. That's exactly why you shouldn't build this.
AI made building software cheap, so the temptation is to build everything. But owning infrastructure is a permanent draw on your scarcest resource, attention. The value lives at two ends, the systems everything runs on and the product only you can make; the move is to build less, buy the opinionated platform, and let an agent operate it.

I redid every cover image on our blog in an afternoon with Claude, Ideogram, and Contentful
I refreshed 81 blog covers, two years of posts, in a single afternoon. Claude Code orchestrated the pipeline, Ideogram generated the art, and the Contentful MCP moved every post in and out. Here is the stack, and why it only took an afternoon.
© 2026 Courier. All rights reserved.