Develop a Motivational QOTD with Courier and GPT2

Prakhar Srivastav
February 09, 2023

Motivational quotes were quite the rage back in the day when MMS & email forwarding were popular. I remember my parents forwarding me at the start of every morning. Fast forward to today, if you are lucky, you are part of some forward group on your messaging app of choice (Whatsapp, Telegram, etc.).
Inspired by the same idea, today we are going to build a service that sends our friends and family an AI generated motivational quote-of-the-day. Rather than hardcoding a list of motivational quotes, we are going to use a machine learning model to generate a quote on demand, so that we never run out of quotes to share!
Instructions
Part 1: Using AI to generate motivational quotes
OpenGPT2 and Language Models
OpenAI GPT-2 model was proposed in Language Models are Unsupervised Multitask Learners by Alec Radford, Jeffrey Wu, Rewon Child, David Luan, Dario Amodei and Ilya Sutskever. It’s a causal transformer pre-trained using language modeling on a very large corpus of ~40 GB of text data.
To simplify this, at a high level OpenAI GPT2 is a large language model that has been trained on massive amounts of data. This model can be used to predict the next token in a given sequence.
If that sounds too complicated, don't worry, you don't need to know any Machine Learning or AI to follow along with this project. Libraries such as Hugging Face make using this model in our app very easy.
Hugging Face
We'll use the Hugging Face library to load and serve the ML model that will generate the quotes for us. Hugging Face makes it very easy to use transformer models (of which GPT2 is a type) in our projects without any knowledge of ML or AI. As mentioned earlier, GPT2 is a general purpose language model which means that it is good at predicting generic text given an input sequence. In our case, we need a model more suited for generating quotes. To do that, we have two options:
- We can fine-tune the GPT2 model by using our own text for which we'll need a good dataset of quotes.
- Or we can find an already existing model which has been fine-tuned with some quotes.
Luckily, in our case there’s a fine-tuned model that has been trained on the 500k quotes dataset - https://huggingface.co/nandinib1999/quote-generator
With Hugging Face, using this model is as easy as as creating a tokenizer
from transformers import AutoTokenizer, AutoModelWithLMHead, pipelinetokenizer = AutoTokenizer.from_pretrained("nandinib1999/quote-generator")
then, constructing a model from the pretrained model
model = AutoModelWithLMHead.from_pretrained("nandinib1999/quote-generator")
and finally, constructing the generator which we can use to generate the quote
generator = pipeline("text-generation", model=model, tokenizer=tokenizer)# use a starting promptgenerator("Keep an open mind and")[{'generated_text': 'Keep an open mind and a deep love for others'}]
Building an API to serve the model
Now that we have a way to generate quotes for us, we have to think about how we can use this in our app. There are multiple ways to go about building this.
- Load the model everytime we want to run the script to send the script.
- Create an API or service that serves this GPT2 model to generate quotes for us on demand.
A key plus point of the second option is that once the model is loaded the API can respond to us quickly and can be used in other applications as well. FWIW, the first option is a totally valid approach as well.
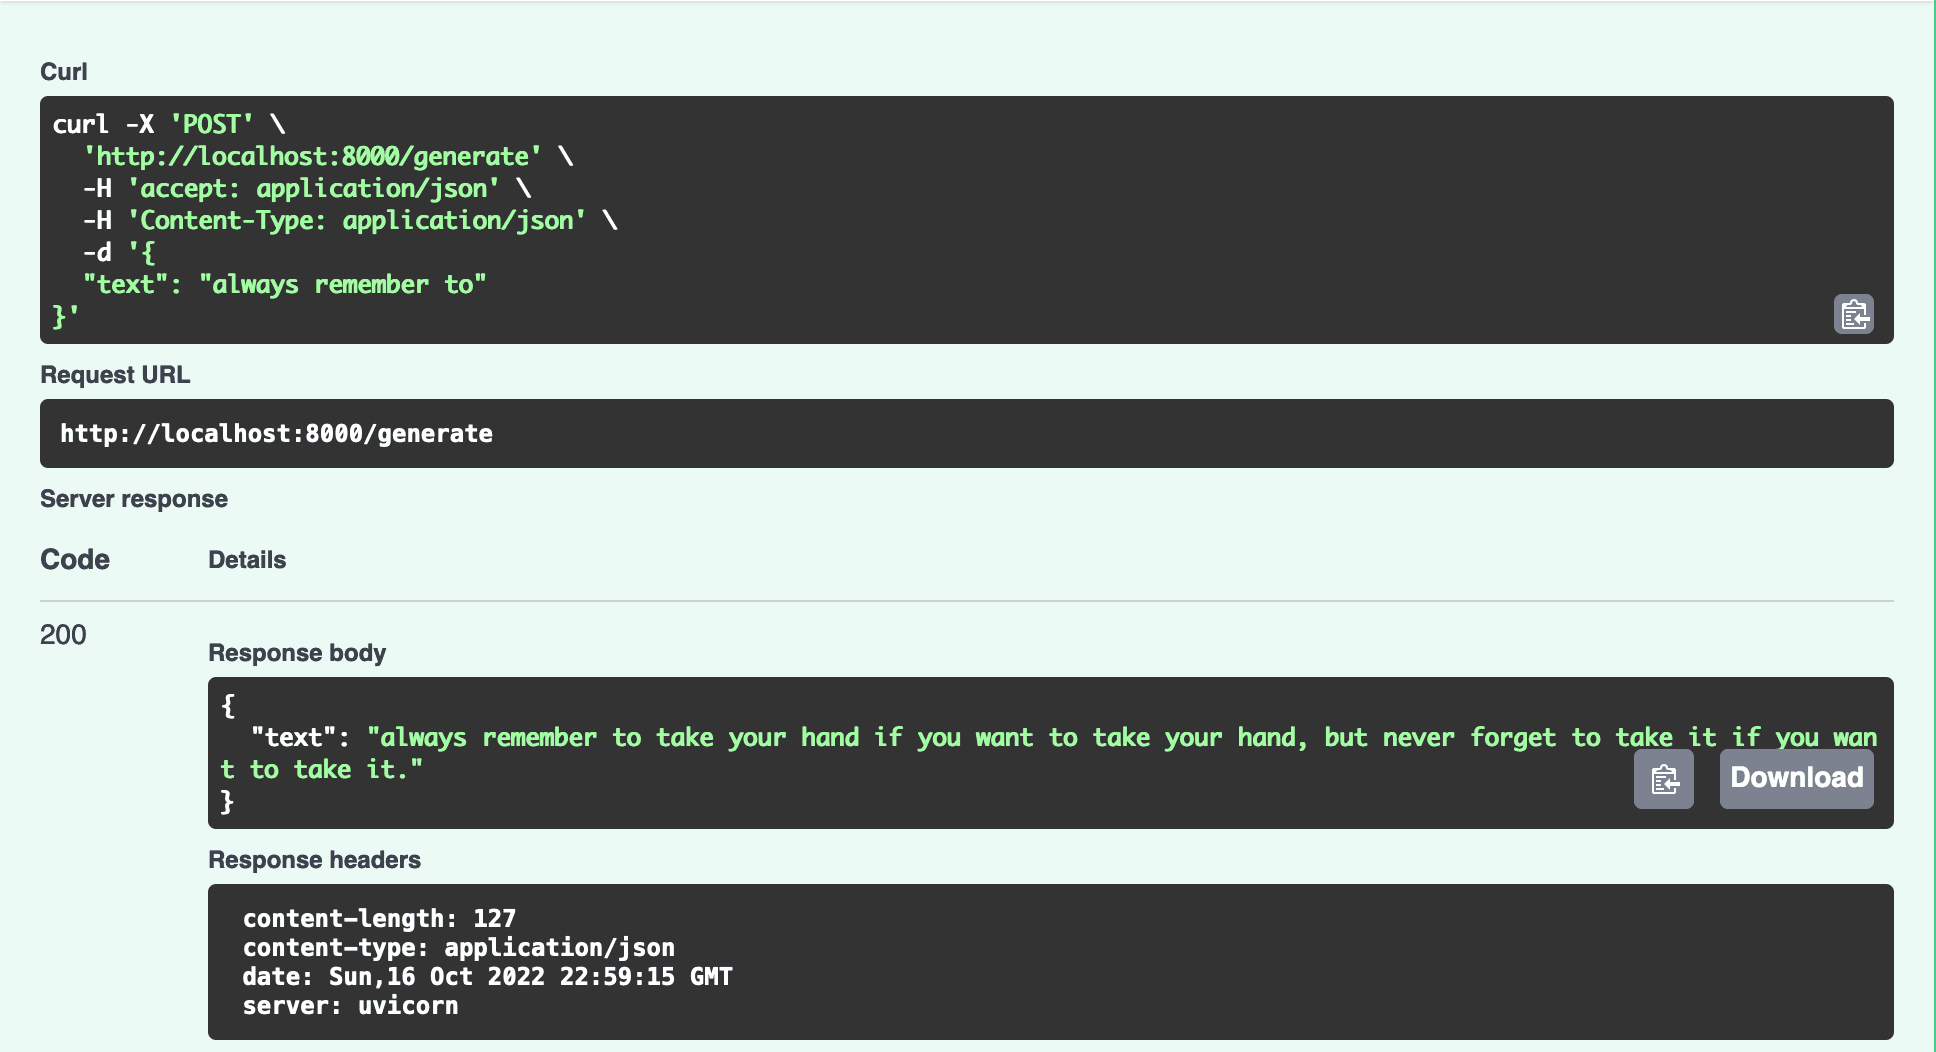
We can use Fast API to build a quick serving API. Here's what that looks like
# in file api.pyfrom pydantic import BaseModelfrom fastapi import FastAPI, HTTPExceptionfrom transformers import AutoTokenizer, AutoModelWithLMHead, pipeline## create the pipelinetokenizer = AutoTokenizer.from_pretrained("nandinib1999/quote-generator")model = AutoModelWithLMHead.from_pretrained("nandinib1999/quote-generator")generator = pipeline("text-generation", model=model, tokenizer=tokenizer)app = FastAPI()class QuoteRequest(BaseModel):text: strclass QuoteResponse(BaseModel):text: str### Serves the Model API to generate quote@app.post("/generate", response_model=QuoteResponse)async def generate(request: QuoteRequest):resp = generator(request.text)if not resp[0] and not resp[0]["generated_text"]:raise HTTPException(status_code=500, detail='Error in generation')return QuoteResponse(text=resp[0]["generated_text"])
Let's test it out
$ uvicorn api:appINFO: Started server process [40767]INFO: Waiting for application startup.INFO: Application startup complete.INFO: Uvicorn running on http://127.0.0.1:8000 (Press CTRL+C to quit)
Now we can start sending requests to the /generate endpoint that will generate a quote for us.
Part 2: Building the Quote Generator
Now that we have a way to generate quotes on demand, we can stop here and start working on sending this via Courier. But who are we kidding, no one reads text anymore! We can make this interesting by using a nice image and placing our quote on it to make it look like a poster.
Generate quote
Given our API, we can now do the following to generate a quote
from random import choice# feel free to add more starting prompts for more varietycanned_seeds = ["Always remember to", "Start today with", "It is okay to"]seed = choice(canned_seeds)resp = requests.post('http://127.0.0.1:8000/generate', data=json.dumps({"text": seed}))return resp.json()["text"]
Downloading the background image
The first challenge is getting a beautiful background image for our quote. For that, we'll use the Unsplash API that provides a nice endpoint to return a random image matching a query. Opening https://source.unsplash.com/random/800×800/?nature in our browser returns a nice nature image.
To keep things interesting, we can use different query terms such as stars, etc. Here's the how the code for downloading our background image looks like -
from random import choiceimage_backgdrops = ['nature', 'stars', 'mountains', 'landscape']backdrop = choice(image_backdrops)response = requests.get("https://source.unsplash.com/random/800×800/?"+ backdrop, stream=True)# write the output the img.png on our filesystemwith open('img.png', 'wb') as out_file:shutil.copyfileobj(response.raw, out_file)del response
Creating the image with the quote
Ok, now we have our background image and a quote which means we can work on assembling the final image that will be sent to the recipients. At a high level we want to place some text on an image but even this simple task can be challenging. For starters, there are a number of questions for us to answer
- How will the text be placed on the image?
- What about wrapping the text?
- What color should the text be so that it is visible on the background image?
- How do we do this for images with varying widths and heights?
The answers to some of these questions are more complicated than others. To keep it simple, we'll put the text in the center, and do some wrapping so that it looks good. Finally, we'll use a light color text for now. For all image manipulation, we'll use Python Image Library (PIL) to make this easy for us.
# use the image we downloaded in the above stepimg = Image.open("img.png")width, height = img.sizeimage_editable = ImageDraw.Draw(img)# wrap textlines = textwrap.wrap(text, width=40)# get the line count and generate a starting offset on y-axisline_count = len(lines)y_offset = height/2 - (line_count/2 * title_font.getbbox(lines[0])[3])# for each line of text, we generate a (x,y) to calculate the positioningfor line in lines:(_, _, line_w, line_h) = title_font.getbbox(line)x = (width - line_w)/2image_editable.text((x,y_offset), line, (237, 230, 211), font=title_font)y_offset += line_himg.save("result.jpg")print("generated " + filename)return filename
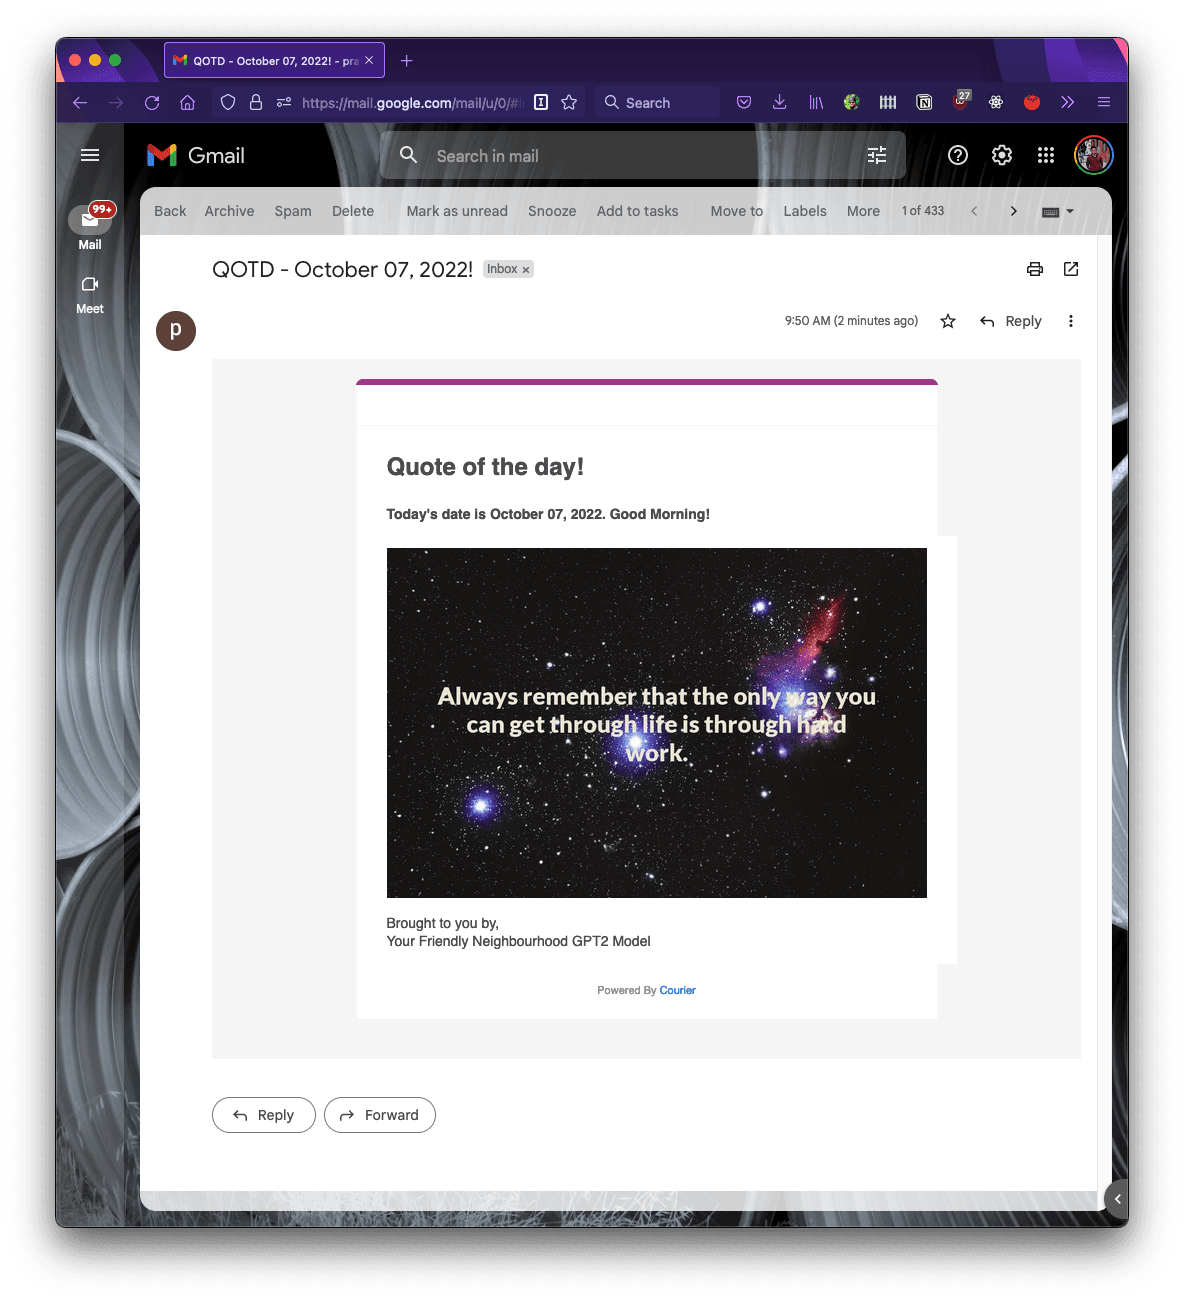
This generates the final image called result.jpg
Uploading the image
For the penultimate step, we need to upload the image so that we can use that with Courier. In this case, I'm using Firebase Storage but you can feel free to use whatever you like.
import firebase_adminfrom firebase_admin import credentialsfrom firebase_admin import storagecred = credentials.Certificate('serviceaccount.json')firebase_admin.initialize_app(cred, {...})bucket = storage.bucket()blob = bucket.blob(filename)blob.upload_from_filename(filename)blob.make_public()return blob.public_url
Step 3: Integrating with Courier
Finally, we have everything we need to start sending our awesome quotes to our friends and family. We can use Courier to create a good looking email template.
Creating the template in Courier
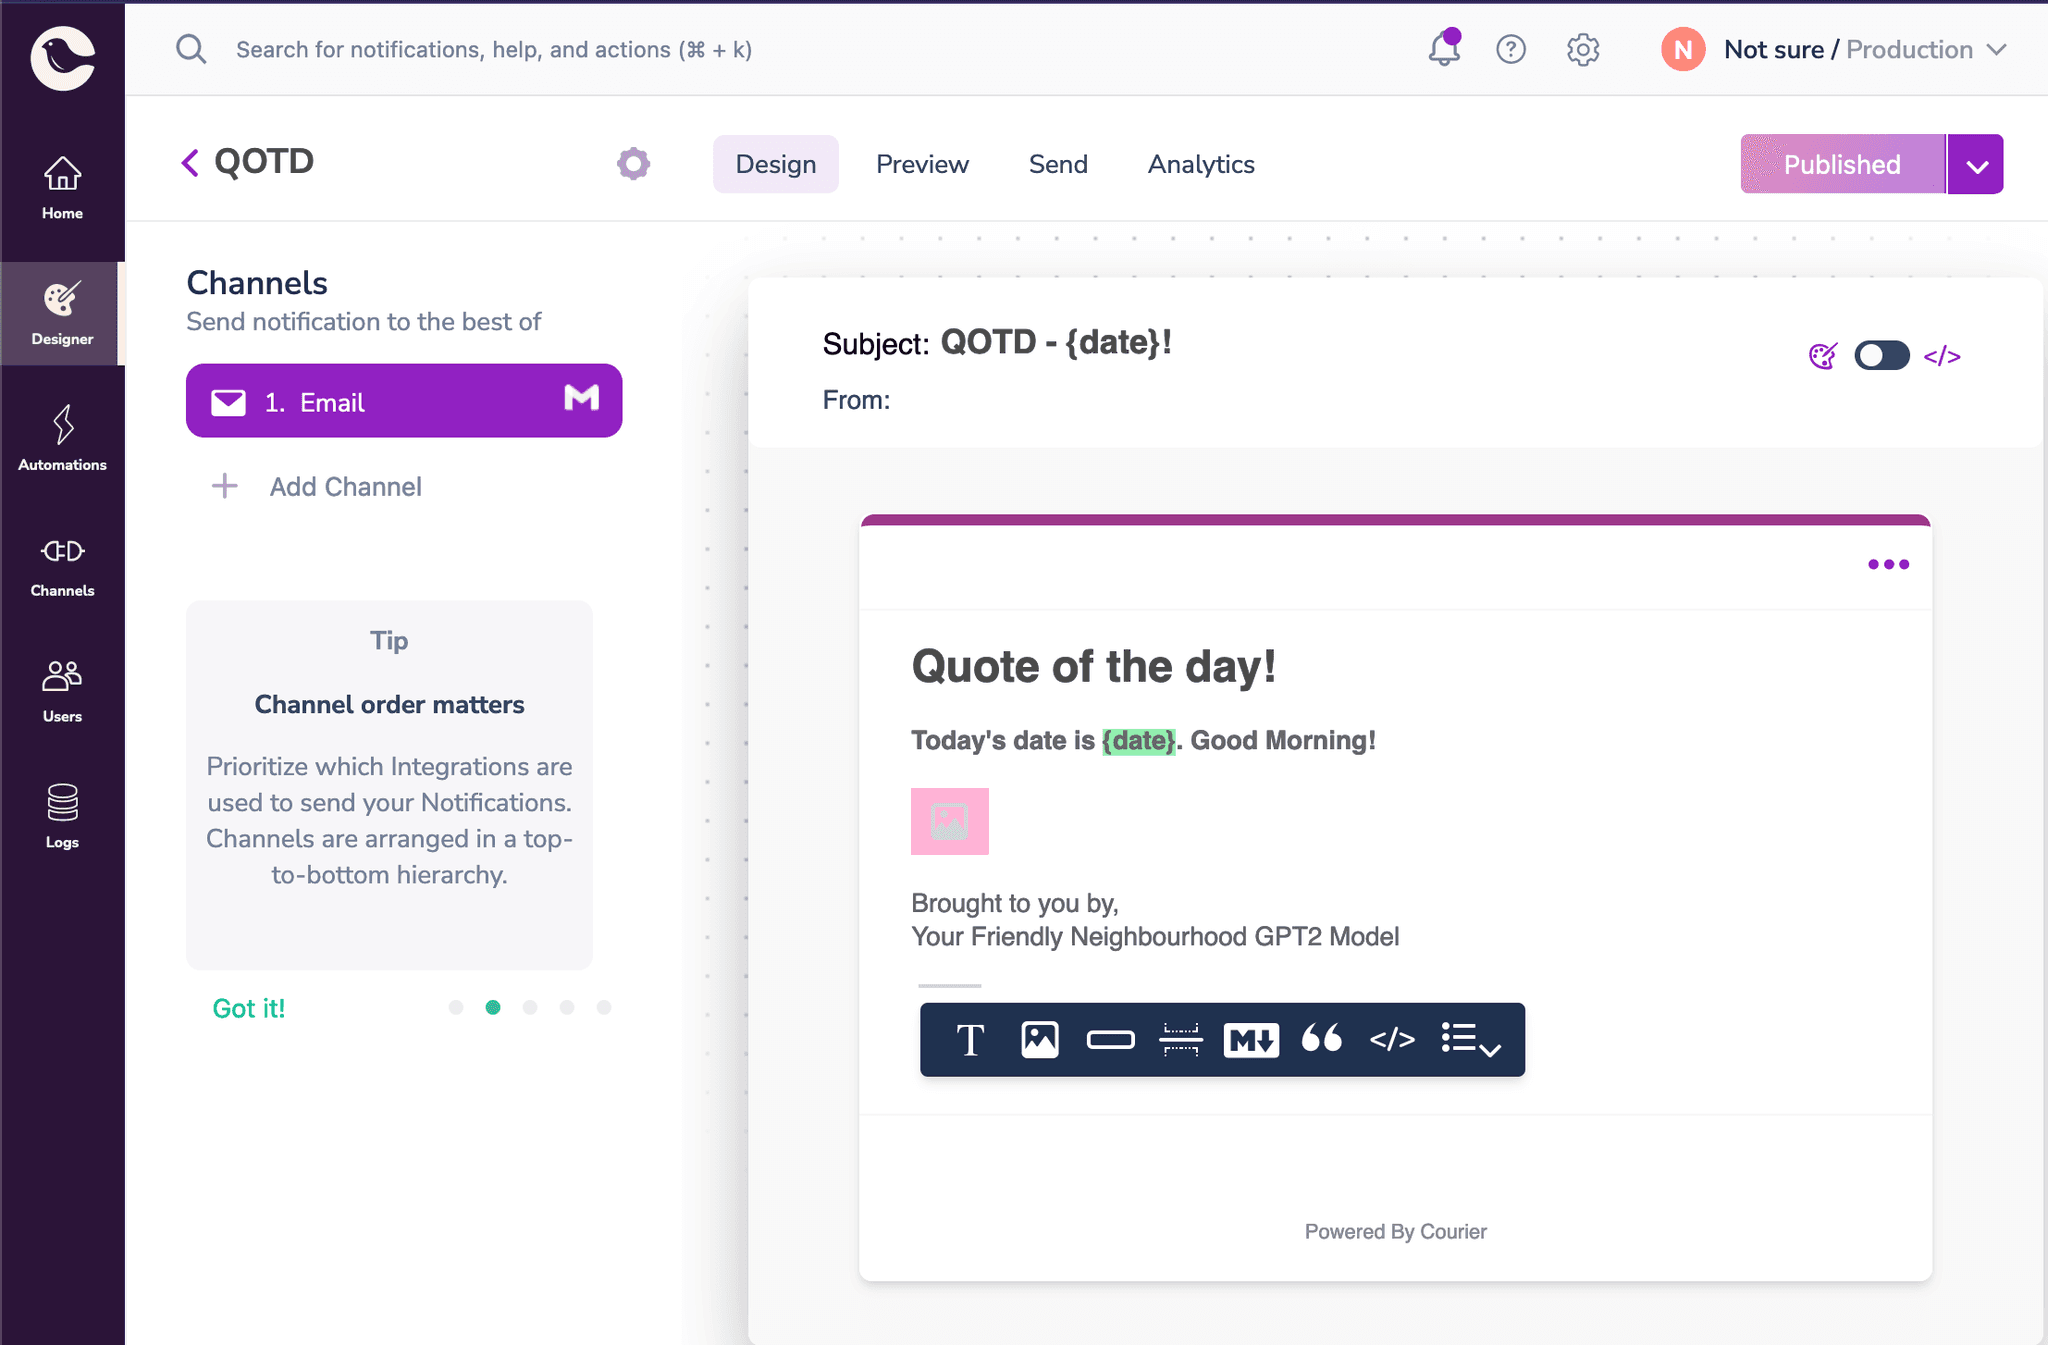
Sending the message
Sending a message with Courier is as easy as it gets. While Courier has its own SDKs that can make integration easy, I prefer using their API endpoint to keep things simple. With my AUTH_TOKEN and TEMPLATE_ID in hand, we can use the following piece of code to send our image
import requestsheaders = {"Accept": "application/json","Content-Type": "application/json","Authorization": "Bearer {}".format(os.environ['COURIER_AUTH_TOKEN'])}message={"to": { "email": os.environ["COURIER_RECIPIENT"] },"data": {"date": datetime.today().strftime("%B %d, %Y"),"img": image_url ## this is image url we generated earlier},"routing": {"method": "single","channels": ["email"]},"template": os.environ["COURIER_TEMPLATE"]}requests.post("https://api.courier.com/send", json={"message": message}, headers=headers)
The API key can be found in Settings and the Template ID can be found in the template design's settings. And that's it!
Conclusions
This tutorial demonstrated how easy it is to get started with machine learning & Courier.
If you want to go ahead and improve this project, here are some interesting ideas to try
- Better background image: Use a term from the generated quote to search for an image?
- Better background color for the text: Use better colors for the text. One cool idea is to use the complimentary color from the image's main color. You can use k-means clustering to find that out.
- Adding more channels : Extends this to messages on messaging clients and sms!
About the Author
Prakhar is a senior software engineer at Google where he works on building developer tools. He's a passionate open-source developer and loves playing the guitar in his free time.
Quick Links
🔗 Fast API
Similar resources

Email open tracking and consent: the new rules in Europe
Regulators in Europe are treating the email open-tracking pixel like a cookie, which means it needs consent before it fires. Here's what changed, who's actually in scope, what compliance requires, and how to keep sending while gating tracking on consent, including how to wire it up in Courier.

You can build anything now. That's exactly why you shouldn't build this.
AI made building software cheap, so the temptation is to build everything. But owning infrastructure is a permanent draw on your scarcest resource, attention. The value lives at two ends, the systems everything runs on and the product only you can make; the move is to build less, buy the opinionated platform, and let an agent operate it.

I redid every cover image on our blog in an afternoon with Claude, Ideogram, and Contentful
I refreshed 81 blog covers, two years of posts, in a single afternoon. Claude Code orchestrated the pipeline, Ideogram generated the art, and the Contentful MCP moved every post in and out. Here is the stack, and why it only took an afternoon.
© 2026 Courier. All rights reserved.