How to Set Up Automatic Push Notifications Based on Segment Events
Sarah Barber
November 17, 2023
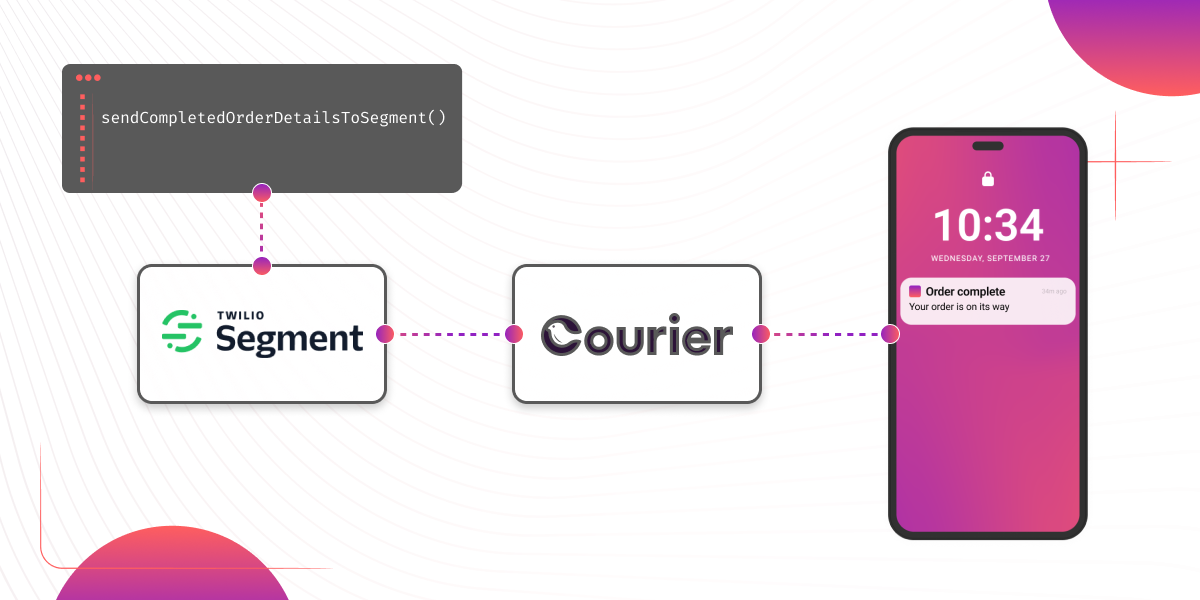
Table of contents
Using Segment and Courier together
Prerequisites
Firebase setup
Courier setup
Create a push notification template
Create a web page
Segment setup
Send an event to Segment from your website
Set up Courier to send a push notification when a Segment event fires
Integrate Courier into an Android app
Send a Segment event and watch it trigger a push notification on your phone
Wrapping Up
Push notifications have carved their own niche as a powerful tool for continuous user engagement. Regardless of whether an app is actively in use, they deliver your messages straight to your user's device.
Two useful tools to enhance your push notification strategy are Segment and Courier. In this article, we show you how to set up Courier to listen to your Segment events and then send push notifications to an Android device based on data from these events.
Segment is a customer data platform, enabling you to unify your customer data into a single data store, including information on how your users are interacting with a web page or the details of a successful transaction.
Courier is a multi-channel notification platform that goes beyond a simple push implementation. Designed for developers, Courier integrates seamlessly with both mobile and web platforms, providing a toolbox packed with rich notification features suitable for a wide range of use cases. Whether it's a simple task like a password reset or a more intricate multi-touch approval workflow, Courier has you covered.
Using Segment and Courier together
Segment’s user groupings and event data are particularly useful for transactional push notifications, and will be useful to you if you develop systems like employee collaboration tools or e-commerce stores. Take a look at these examples:
Collaboration tools
- Inactivity reminders: Notify team members who haven't engaged with the collaboration platform for a while, using a personalized push notification. The message could remind them of their pending tasks, check in with them, or summarize important activities they might have missed.
- User mentions: Trigger an immediate push notification when a user is mentioned in a discussion. The promptness of such notifications could be adjusted based on the user's role or status within the organization.
E-commerce stores
- Transaction notifications: For instance, when a user completes a purchase in your Shopify store, Segment records the event (provided Shopify is integrated with Segment). Courier, acting as a listener to Segment events, can then send a push notification acknowledging the transaction.
- Real-time related offers: Suppose you're running an online sports goods store. If a customer purchases a significant amount of skiing equipment, you could send push notifications with exclusive offers on ski gear. Conversely, if they buy football gear, notifications would pivot to football-specific deals, ensuring relevance and user interest.
- Abandoned cart recovery: Don't let potential sales slip away. Use Segment and Courier to send reminders about abandoned shopping carts and maybe even offer a small incentive to encourage checkout.
Prerequisites
To complete this tutorial, you will need the following:
- A free Firebase account
- A free Segment account
- A free Courier account
- Android Studio installed on your Mac or PC
Firebase setup
Log-in to the Firebase console and create a new project. Once this project is created, create a new Android app.
Give it the package name com.example.courierpush and click Register App. Download the google-services.json (for later) and click Next. Don't worry about the SDK installtion information, just click Next and finally Continue to Console.
Finally, in your Project Overview click the "gear" icon and go to your Project Setting. Click Service Accounts and, in the "Firebase Admin SDK" section, click Generate new private key. This will cause a JSON file to be downloaded, so please hold on to it for the next step.
Courier setup
If you don’t yet have a Courier account, create one for free, then navigate to Users and create a user. Give your user an ID, and make a note of it, as you will need to use this later in the tutorial.
Technically, no other fields are required for this tutorial, but it makes sense to give your user a name, email address, and phone number as a bare minimum, in case you want to use Courier to send other types of notifications such as email and SMS.
Next, set up a Firebase as a push provider in Courier. In the Courier dashboard go to Integrations → Integration Catalog, search for Firebase in the list of providers and click on the logo. Paste the contents of the JSON file you downloaded earlier into the "Service Account JSON" field and click Install Provider. More details about how to do all this is provided in Courier’s FCM setup documentation.
Create a push notification template
In the Courier dashboard, go to Templates and click Create Notification. Name it “Push notification test” and click Create Template. You’ll now be prompted to add your notification channel. Select Push, then Firebase FCM.
Next, on the left side of your screen, click on your newly-created Push channel, and paste in this for title:
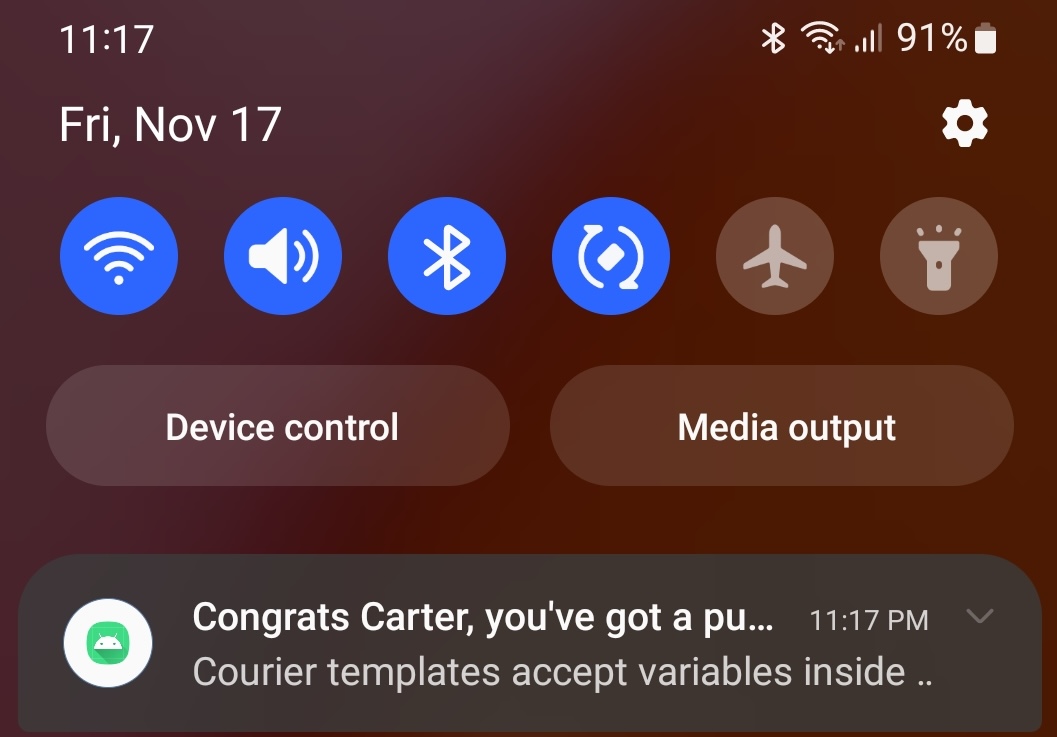
Congrats {name}, you've got a push notification!
...and this for content:
Copied!
Courier templates accept variables inside curly braces. In this example, we use the "name" value from the Segment event and to populate the name field above 💡.
Finally, click Publish Changes to activate your template.
Create a web page
In order to showcase how data can be sent from your website to Segment, we will need only the most basic web page, with no fancy hosting requirements — you can simply open the file locally in a browser. Create a file called index.html with the following content, and load the page in your browser.
Copied!
<html><head></head><body><h1>Courier Segment Tutorial</h1><p>Loading this page will send events to Segment 📬</p></body></html>
Segment setup
Sign up for a free Segment account, if you don’t already have one. Once logged into the app, you’ll need to create a workspace, and then within that workspace, create a link between a “source” and a “destination.” In this example, the source will be your own website and the destination will be Courier, but you can also connect a wide variety of other data sources including Google Ads and Shopify.
Add a data source
To add a source, navigate to Sources and click + Add source. Select JavaScript Website as the source and then click Add source. You’ll then see some options to fill in, such as your website URL. However, for this example you’ll be adding your Segment code to a local HTML file, so you can skip these options and click Add source. Next, paste the generated JavaScript code snippet inside the <head> tag of your website code, to set up the link between your website and Segment.
Add a destination
To add Courier as the destination, navigate to Destinations and click Add destination. Search for “Courier” in the catalog search box, and when it appears, click it and then select Add destination. Select your website from your list of sources to connect your source to your destination, and click Next. Give it a destination name of “Courier Tutorial” and click Create destination.
Connect your source to your destination
In your destination settings, paste in your Courier API key to create the connection between Segment and Courier. Click on the API Key section under Connection Settings to edit it. Also in your destination settings, there is a toggle that you must toggle on to ensure your destination is enabled.

You can find your Courier API key in the Courier dashboard, under Settings → API keys. Remember that best practice is to use your test API key for testing purposes and reserve your production API key for production code.
Send an event to Segment from your website
In your website code, at the bottom of the <script> tag, after your pasted function that joins your site with Segment, let's now make two calls to Segment:
Identify call
This method tells Segment who is on your website. For our purposes, we will use the ID of the Courier user record you created earlier. Include the following code underneath the call to analytics.page(), making sure to replace the placeholder below with the Courier user ID:
Copied!
analytics.identify('<COURIER_USER_ID>');
Track call
This method allows you to track user actions on your site and store associated data in Segment. For our tutorial, add the following lines of code underneath your analytics.identify() call from above, making sure to replace <NAME> with the user's name.
Copied!
analytics.track('Order complete', {type: "track",name: "<NAME>",});
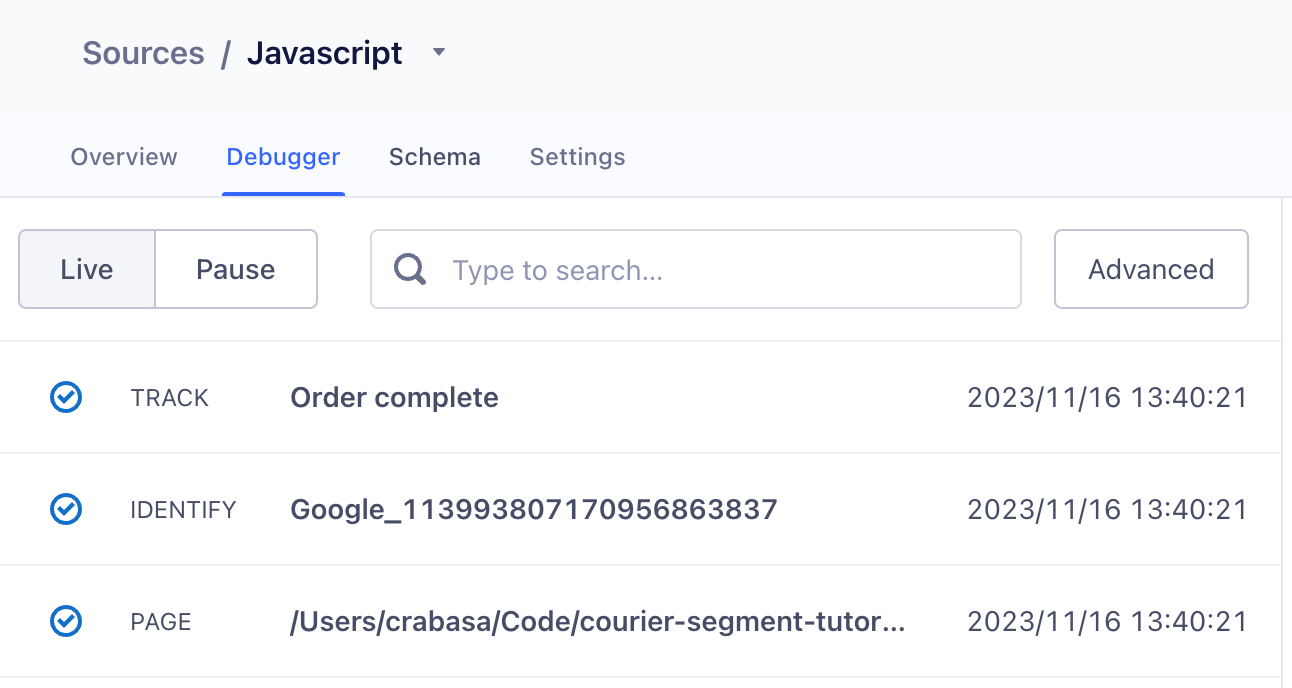
Open your HTML file in a browser, and the two Segment calls will occur on page load. You can verify this has happened by checking the Debugger tab of your Source in Segment. It should look like this:
Check your Segment event gets sent to Courier
You can check that Courier received your events by clicking on your track event in the same Segment Source Debugger tab and clicking Validate… Select your Courier destination and click Next, which will take you to an event tester area where you can send a test version of your event. Select Track as your event type to generate your example payload and click Send test event. If the event is sent successfully, you’ll receive a 202 response.
Now you know that Courier is able to receive your Segment event, you’re ready to set up an automation in Courier to send a push notification whenever this happens.
Set up Courier to send a push notification when a Segment event fires
You can use Courier Automations to send of push notifications based on trigger conditions. In this case, we are going to trigger the sending of a notification when a Segment event happens.
Start by clicking "Automation" in the Courier dashboard and click on "New Automation." Change the name of your automation from the default “Untitled Automation” to a more descriptive title, like “Push notification test automation”.
Add a trigger to your automation
- Drag the Segment node from the left-hand side of the screen towards the top of the main canvas.
- Select the Segment event that you have recently created, which should be listed as “Order complete.”
Note: If you did not send a test Segment event you won’t see your Segment event in the list. If that's the case, take a moment to do that now.
Connect your trigger to an action
You now need to connect your trigger to an action step that sends a push notification.
- Under "Actions" on the left-hand side of the page, drag the Send node onto the canvas, below the "Segment" trigger.
- These steps should now be connected to each other by a line.
- In the "Send" node, select your push notification template as the notification that will be sent.
- Now click Advanced on your "Send" node and enter
refs.data.userIdfor the user ID and for the data object. This ensures that these values will be populated from the data that Courier receives from Segment, meaning that each time an event is called from your site, if your code sends a different user ID each time, the message can be sent to different users. - Also in Advanced, look for the "Data" section and click Edit. Add a field, give the "Field Name" the value of
nameand set the value torefs.data.properties.name. Doing this ensures that thenamevariable in your notification template will be populated by the relevant user's name each time, via the Segment event data. - Finally, click Publish changes to save the automation.
Integrate Courier into an Android app
In order to receive a push notification you are going to need an app. If you want to get started quickly, you can download and build our Android push notification test app. After you clone the repo, make sure to copy the google-services.json that you downloaded earlier when you created your Firebase project into the app/src directory in your Android project.
If you're building an app from scratch or want to integrate Courier into an existing app, check out this step-by-step tutorial: Mastering Android Push Notifications: A Guide Using Courier’s SDK.
Assuming you’ve downloaded our GitHub repo, you will need to follow the steps in the README to build your Android app send a push notification.
Send a Segment event and watch it trigger a push notification on your phone
Reload your index.html page to trigger another Segment event to be sent to Courier. This will now trigger your automation, which will cause your push notification to be sent to your Android phone!
Troubleshooting tips
- The Courier logs can provide useful information if a notification has failed.
- Ensure your Firebase service account JSON used in step 1 comes from the same Firebase project that you’re using.
- Ensure you have the correct version of
google-services.jsoninside your Android project. - Ensure your app is permitted to receive notifications.
- The
userIdin your Android app (that you use to sign in to Courier) must match the user ID in theanalytics.identify()call inside yourindex.htmlfile. - Ensure the name of the event at the top of your automation in Courier matches the name of the event you are triggering from your application.
Wrapping Up
In this tutorial you have learned how to trigger a push notification based on a Segment event. You can now use these principles to set up real Segment events in your applications and use them to trigger push notifications using Courier automations and the Courier SDK in your Android app code.
If you want to see more use cases of how Segment events can trigger notifications, you can watch this video of Courier and Segment developers working through this integration together.
It’s worth noting that if you’re using RudderStack instead of Segment, Courier also has a RudderStack integration that works in a very similar way. Or, if you want your push notifications to be triggered by a time schedule, you can do all this in the automations designer.
Linking Segment events with your push notifications is a real game changer, so it’s definitely worth giving this a try. You can sign up to Courier and try our free tier with 10,000 free messages, or get in touch if you want to find out more.
Similar resources
Build with AI: let your agent handle notifications end to end
Courier's Build with AI toolkit gives coding agents direct access to your notification infrastructure. Four integration points, one goal: let your agent send messages, debug deliveries, manage users, and follow notification best practices without context-switching. Works with Claude Code, Cursor, and any agent that can run shell commands or call MCP tools.
By Kyle Seyler
April 07, 2026

How to Use Claude Code on Mobile to Design, Test, and Ship Multichannel Notifications
A walkthrough of using Claude Code's mobile app with Courier's MCP server and CLI to design, test, and ship a multichannel product announcement from a phone. Covers the full workflow: drafting the content outline, creating notification templates using Courier's elemental format, building channel-specific variants for email, Slack, push, and SMS, customizing brand styling through the API, iterating on design with test sends, getting team approval, and publishing with custom routing rules. The whole thing took a couple hours, mostly cold start and design iterations.
By Kyle Seyler
April 06, 2026
Transactional, Product, and Marketing Notifications: What Are the Differences?
Understanding the difference between transactional, product, and marketing notifications is essential for developers building notification infrastructure. Transactional notifications confirm user actions and require no opt-in. Product notifications drive feature adoption through education. Marketing notifications promote sales and require explicit consent. This guide explains the legal requirements, best practices, and when to use each notification type to build compliant systems users trust.Retry
By Kyle Seyler
October 23, 2025
© 2026 Courier. All rights reserved.