Most Popular
Get the Courier iOS SDK
Have you downloaded Courier's iOS SDK yet? It's the easiest and most effective way to communicate with your users using push notifications.
Sign-up
How to Send Firebase Notifications to iOS Devices Using Courier
Firebase offers useful SDKs for both iOS and Android apps. It provides database services, analytics, and push notification tools. It also works with most programming languages, including Swift.
If you're reading this article, you've probably already come across Firebase and its Cloud Messaging tool, which can be used to send push notifications to both Android and iOS devices. Firebase Cloud Messaging (FCM) is Google’s push notification service and, as such, is the native way of sending push notifications to Android, but it’s also a convenient way of sending notifications to iOS. If you’re already familiar with FCM from working with Android apps, it’s an obvious choice to continue using it with Apple products.
Unfortunately, FCM can only send one type of notification: push notifications. Most modern apps need to deal with many types of notification: email, SMS, chat apps like Slack or MS Teams, and in-app notifications. Courier’s notification platform allows you to use a single API for all types of notification, meaning you don’t need to learn multiple different APIs.
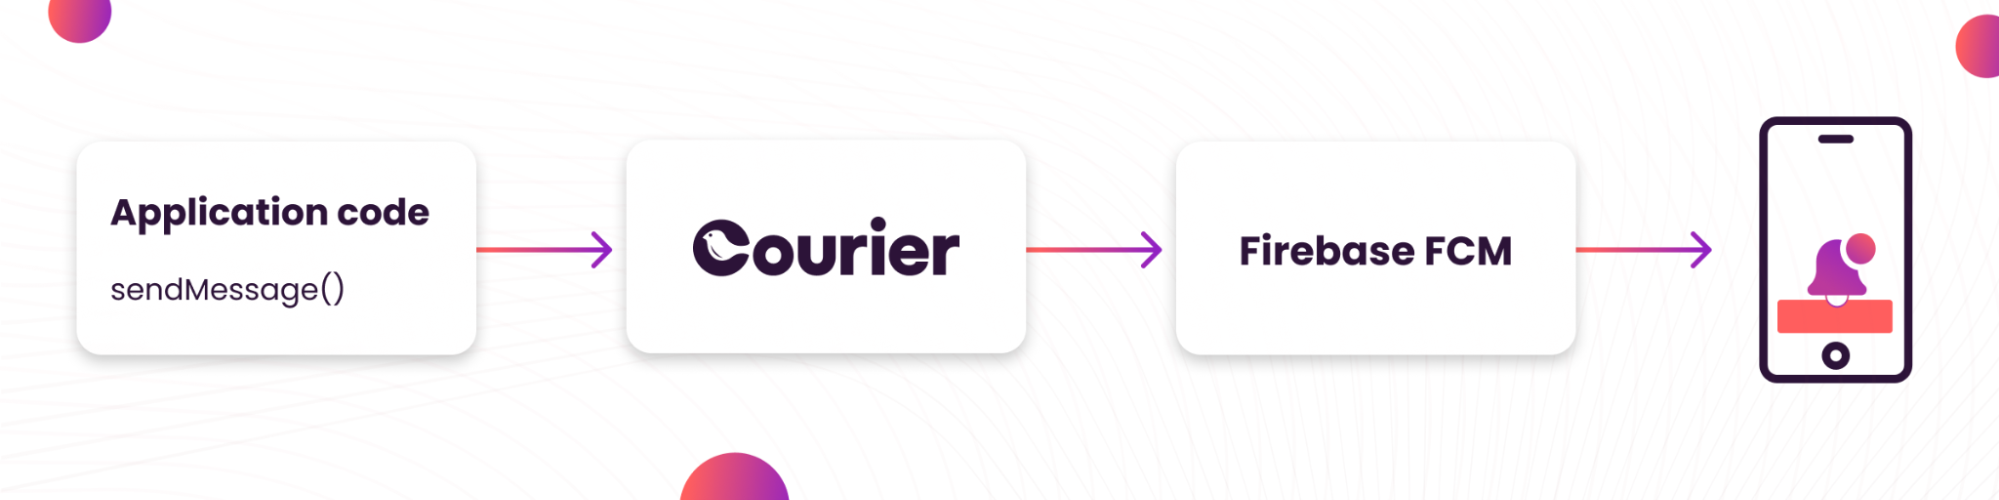
Courier’s API sits on top of Firebase’s API, and it also simplifies one of the more complex aspects of Firebase — token management. All device tokens are dealt with by Courier under the hood.
In this article, you'll learn how to send Firebase notifications to iOS devices from your own code project. You’ll do this using Courier’s iOS SDK that makes it easy to call Courier’s API, which in turn calls Firebase, which handles the sending of push notifications.
You can find the full source code for this tutorial on Github.
Prerequisites
To complete this tutorial, you will need the following:
- An Apple Developer membership (to obtain the required permissions to send push notifications)
- A physical iOS device to receive push notifications (which cannot be tested on simulators)
- A laptop running macOS to develop an iOS project
- A Firebase account
- A Courier account
- Xcode installed on your Mac
Create a basic iOS app
Open Xcode and create a new project, choosing the App template.

Give your project a name, and select your own name as the team for now, or leave it blank. Your bundle identifier will be generated here — you will use this later when connecting to Firebase. Select SwiftUI as your interface and Swift as your language.
Allow push notifications
In order to send push notifications to Apple devices, you need to be an official, paid-up Apple Developer. In order to prove this to iOS devices, you’ll need to link your Apple Developer account with your project.
Go to the Accounts tab in your Xcode Settings and ensure your Apple Developer account has been added. Once added, it should display any teams associated with your account. If a company you work for has a paid Apple Developer account, you can join their team and it will then appear here.
Now that you’ve added your account, you need to associate your team that has paid for an Apple Developer license with your project.
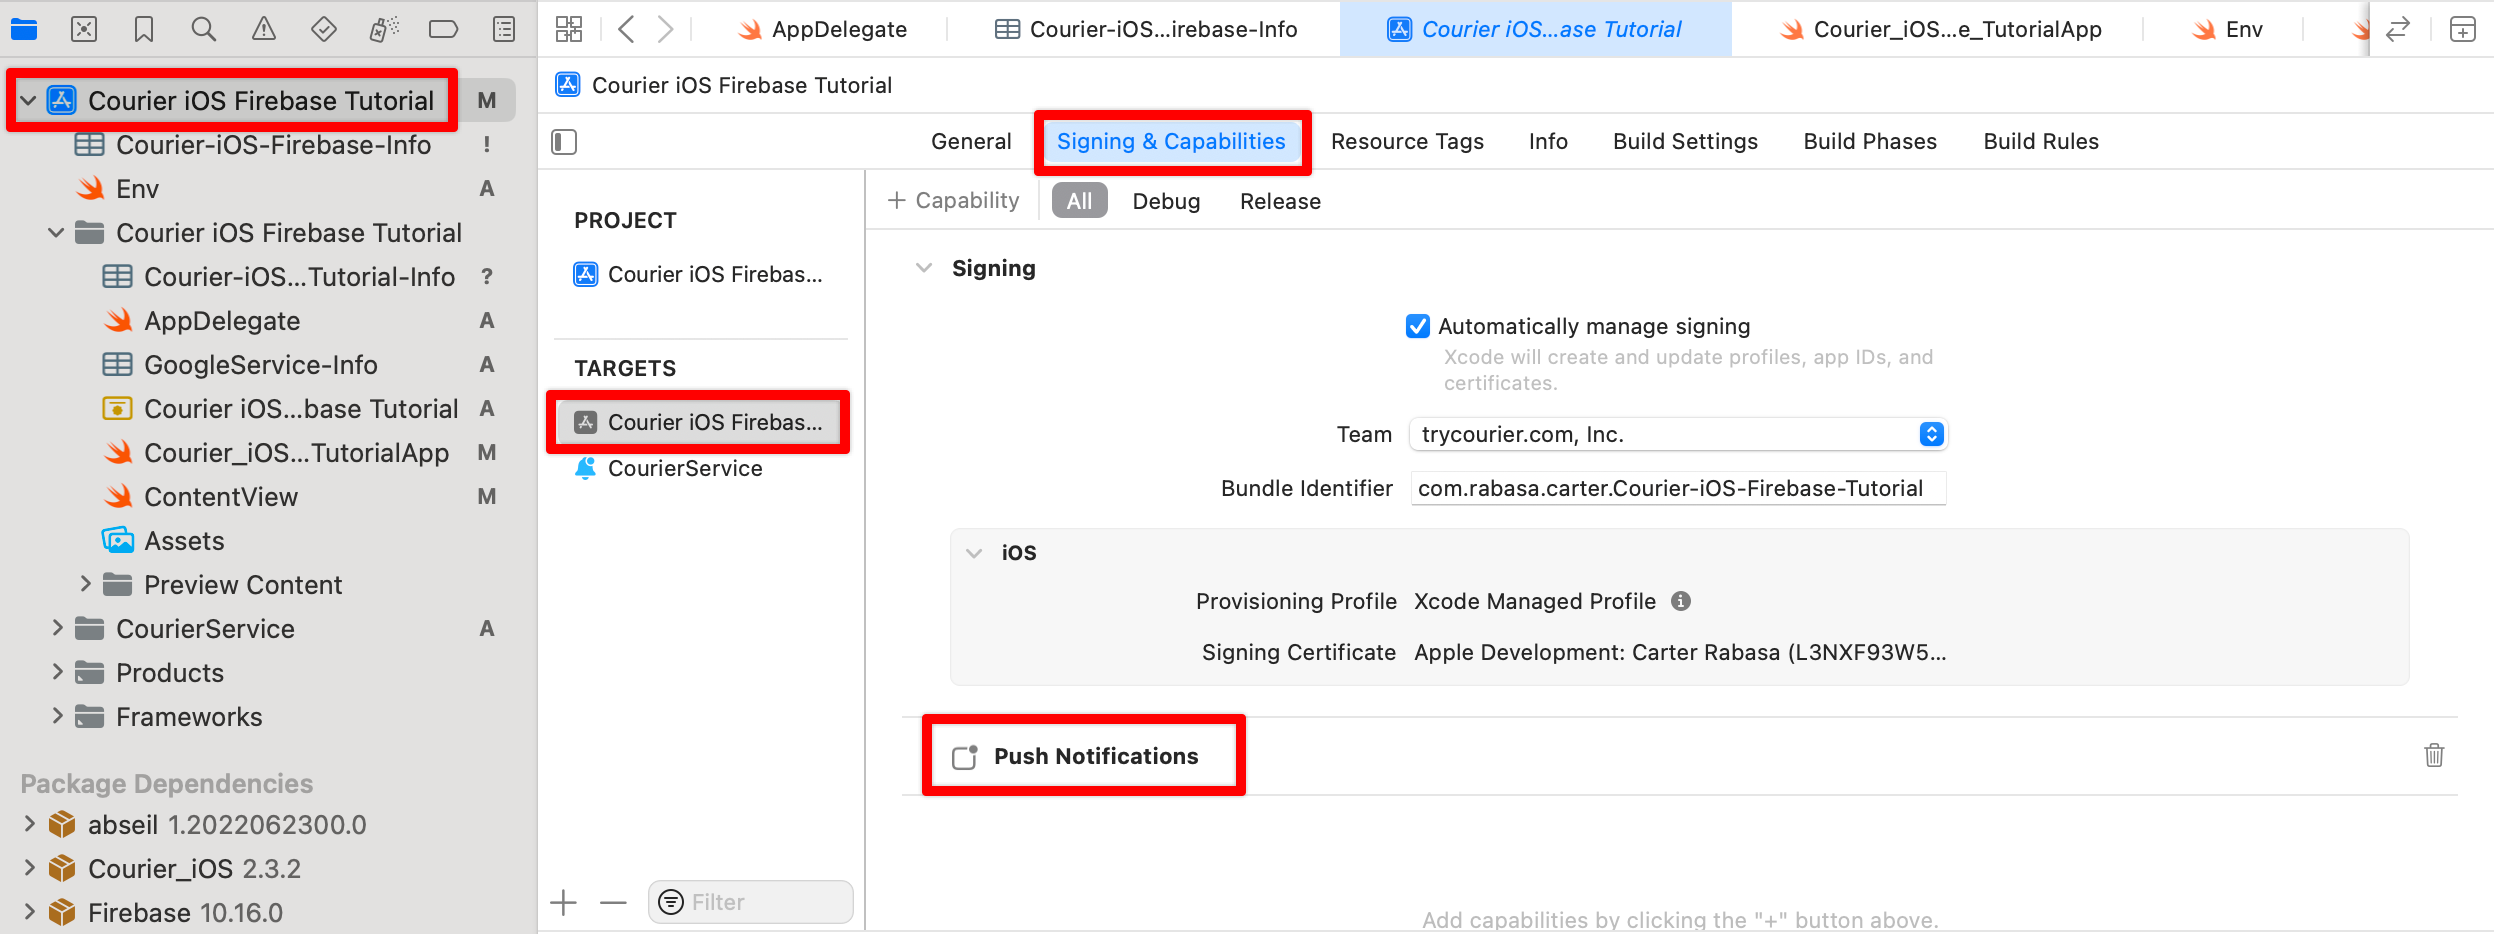
Click on your root-level project directory on the left-hand side menu to open up the configuration page on the right. Click on your target on the new screen and go to the Signing & Capabilities tab. Here, ensure your team is a team that is associated with a paid Apple Developer account.
Now you will be able to add push notification capabilities to your project. Do this by clicking + Capability, typing “push” in the search box, and selecting Push Notifications. Once you’ve added this capability, it will appear at the bottom of the screen.
Add Courier and Firebase dependencies
For this tutorial, we will be using the Swift Package Manager to handle adding dependencies.
First, add the Courier iOS SDK. In Xcode, go to File → Add Package Dependencies. Paste https://github.com/trycourier/courier-ios in the "Search or Enter Package URL" field and then click Add Package.
Next, add the Firebase iOS SDK using the URL https://github.com/firebase/firebase-ios-sdk.git. Install the Firebase packages that you need for your app, but please note that the FirebaseMessaging package is required for sending push notifications.
Add Firebase to your iOS app
Log into the Firebase console and click Add Project. Give your project a name, decide whether you want to track your app in Google Analytics, and click Continue to advance to your project's overview page.
Click the cogwheel icon next to Project Overview on the upper-left side of the screen and select Project settings. Then, scroll down to Your apps and click the iOS icon to pair your app with Firebase.
At this stage, you will be prompted to enter your app's bundle identifier, which you can find in Xcode. Click on your project at the top level. Then, on the new screen that opens, click on your project name under “TARGETS”. You will find your bundle identifier in the “Identity” section.
Enter your app’s bundle identifier and click Register app.
Next, you’ll be shown a blue button for downloading the GoogleService-Info.plist file from Firebase. Download it and drag it from your Finder window into your Xcode project. If Xcode prompts you to add this file to a target, ensure your project’s box is checked and click Finish.
Once that's done, return to Firebase and hit Next on all the options until you’ve returned to the console. We are not skipping these steps, but they will be covered in slightly different ways throughout this tutorial.
Firebase and APNs
It’s worth noting that all iOS devices use the Apple Push Notifications service (APNs) to natively send push notifications. Firebase is just another layer on top of this. So in order to get Firebase push notifications to work, you need to create an APNs authentication key and add it to Firebase. Luckily this is simple to do.
Log into your Apple Developer account, then under Certificates, Identifiers & Profiles click on Keys. Click the + button to register a new key. Give this key a name and check the box to enable the Apple Push Notifications service. Click Continue, and then Register. Download your key, and make note of your key ID and team ID.
Back in Firebase, go to your project settings in Project settings, and then the Cloud Messaging tab. Under APNs Authentication Key, click the Upload button to upload your key. Here, you need to drag your downloaded file into the box to upload it, and enter your key ID and team ID.
Integrating Firebase with Courier
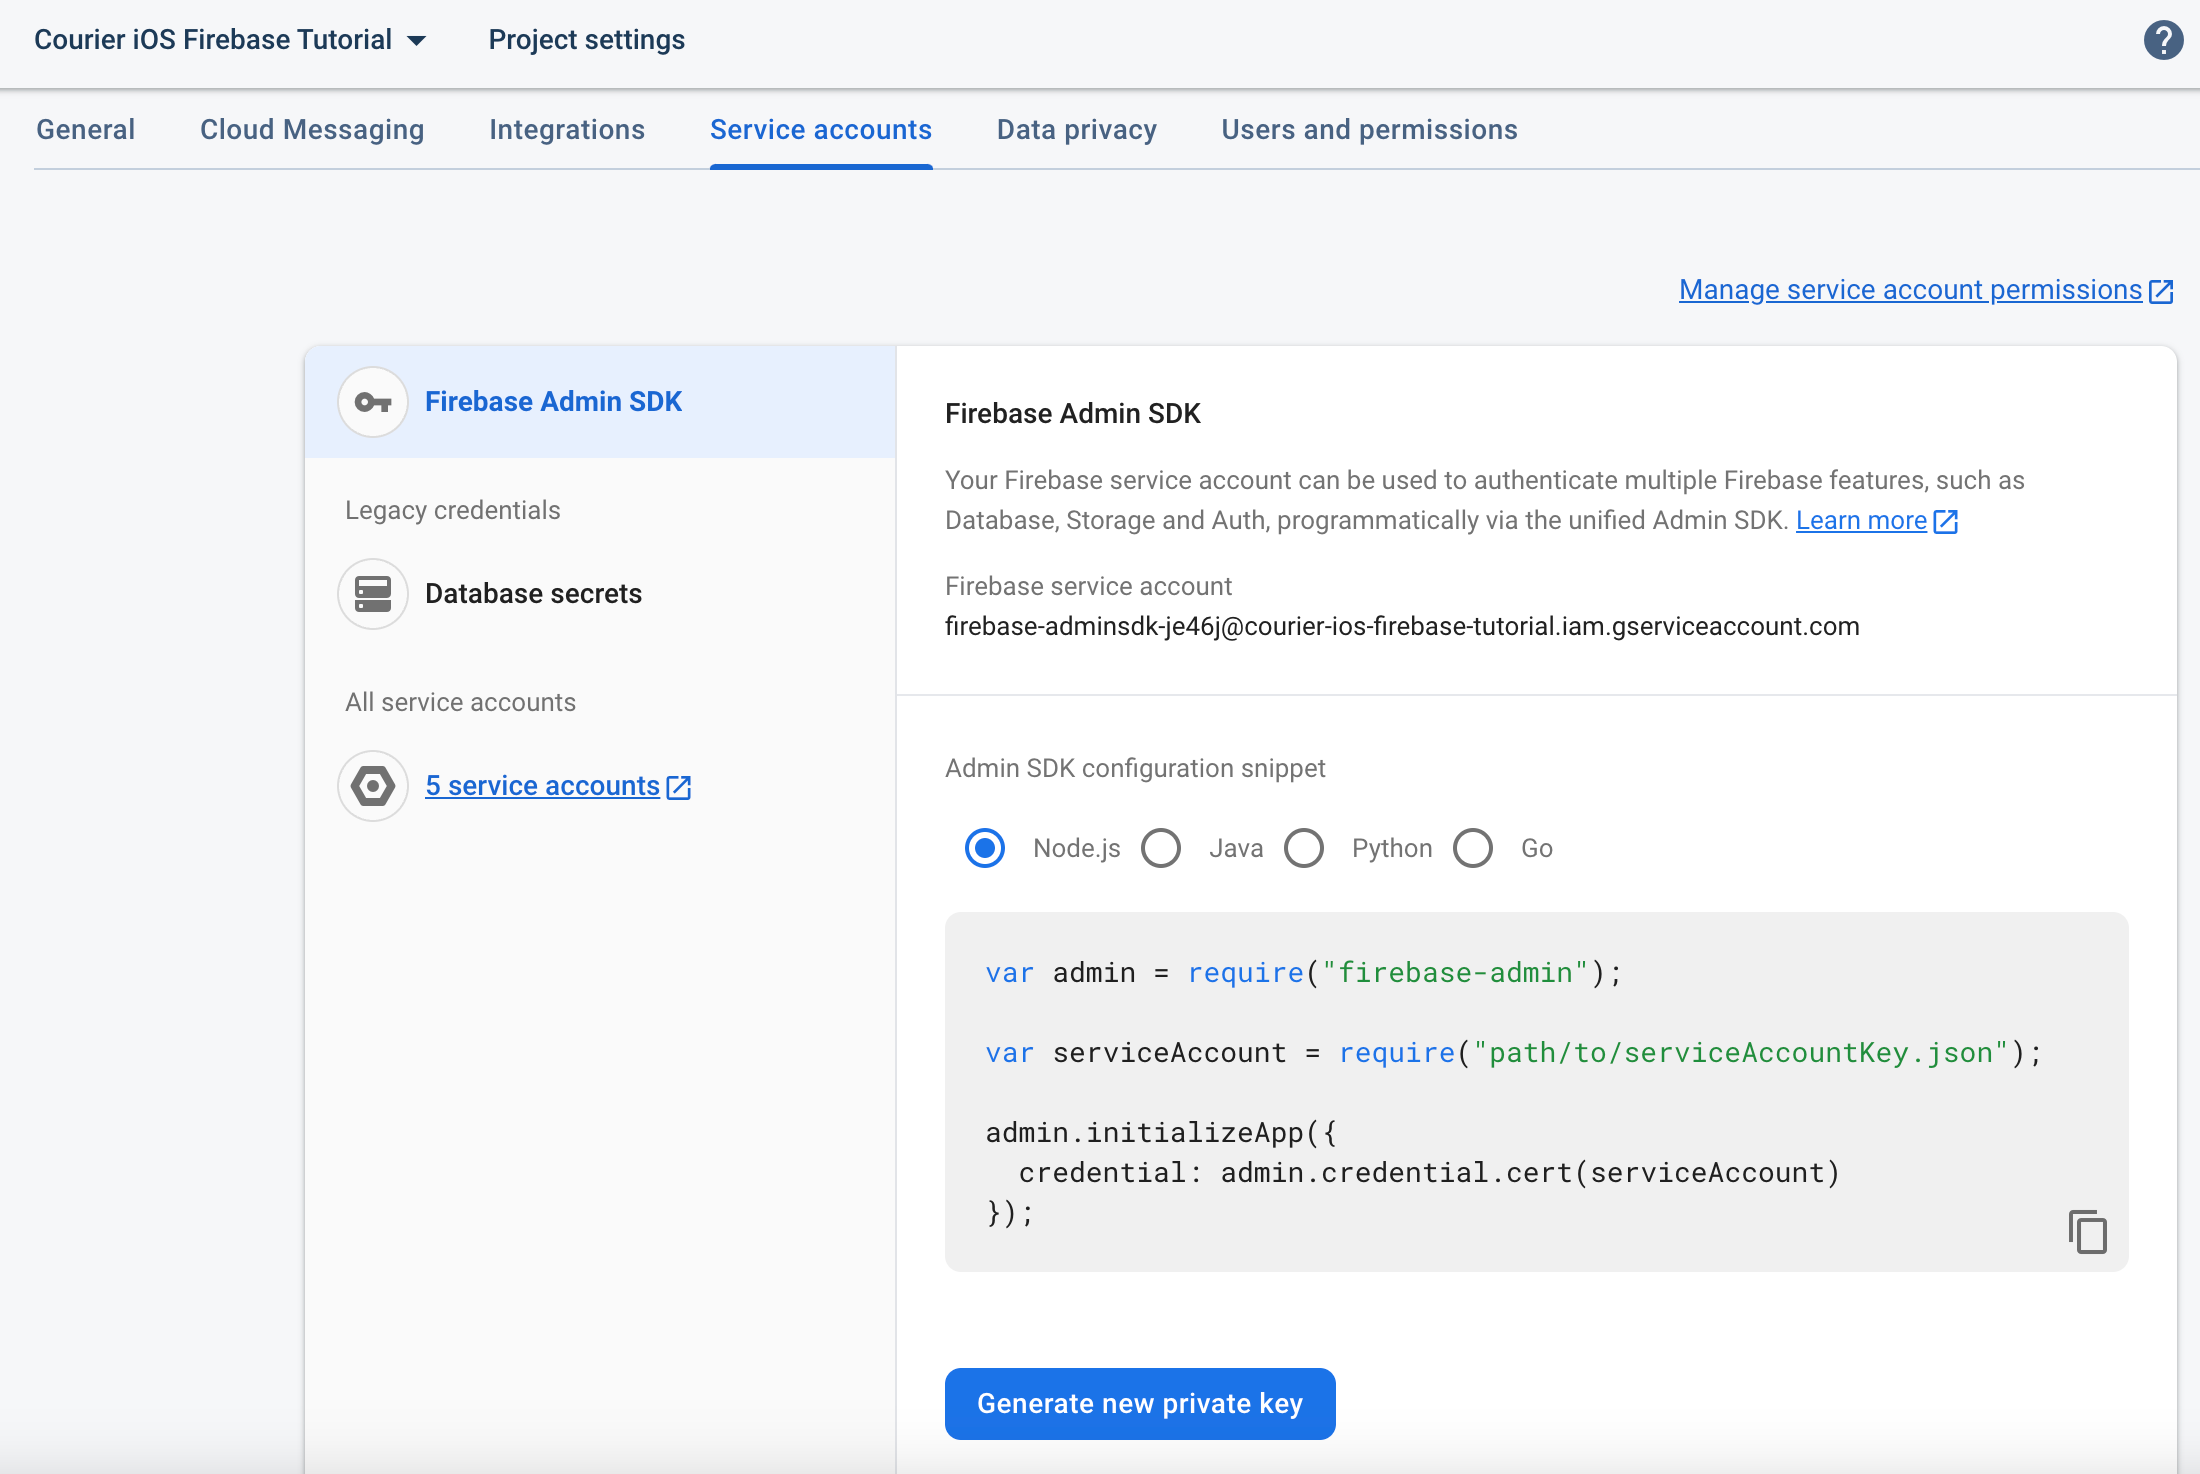
To link up your Firebase and Courier accounts, you need to copy your Firebase service account key and paste it into Courier.
Head over to your Firebase console and, under Project Overview, select Project settings → Service accounts → Generate new private key. This should download a JSON file to your computer, which you will use to connect Firebase with Courier.
Next, log in to Courier (or sign up if you haven't already), and in the Courier console, click Integrations in the left-hand side menu and then select Integration Catalog. Search for Firebase in the catalog and click on it. Paste the contents of your downloaded JSON file into the Service Account JSON box and click Install Provider.
Adding Courier to your iOS app
To allow Courier to track when a notification is successfully delivered to an iOS device, you need to add the Courier Notification Service Extension. First, unzip this file, open the folder in your terminal and run sh make_template.sh to create the Notification Service Extension template. Next, add the template to your project in Xcode by going to File → New → Target, selecting Courier Service, and clicking Next.
Give your new Notification Service Extension the name “CourierService" and ensure that you have the correct Team selected (this should be the team that has paid for your Apple license again). Click Finish and when asked if you want to "Activate", select Cancel.
Now that you’ve created the Service, you need to add the Courier iOS SDK dependency to it. Select your Project and under Targets, select CourierService. Under the "General" tab, look for "Frameworks & Libraries". Click the “+” icon, select Courier_iOS and click Add. When asked if you want to Activate, click Cancel.
Receiving Firebase notifications on your iOS device
Now let's write the code that will receive a notification from Firebase, via Courier. For the purposes of this tutorial, we'll just print some output to the debug console when these push notifications come in.
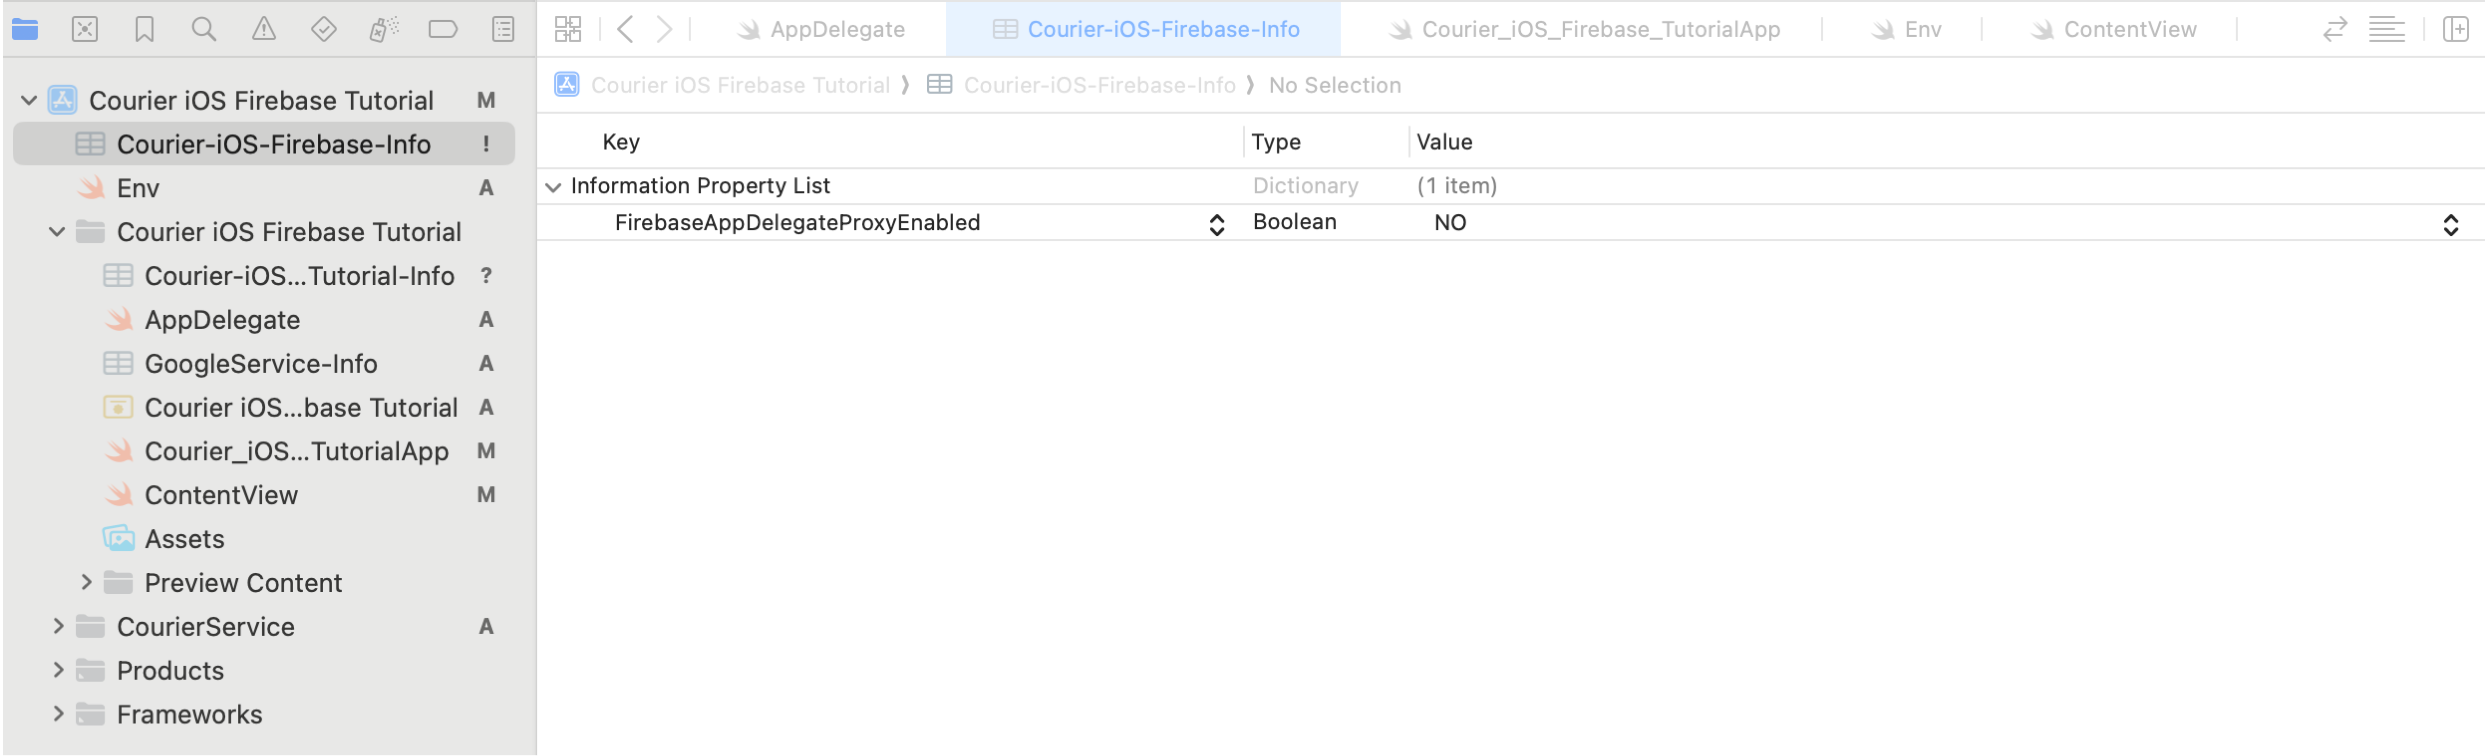
First, you will want to disable Firebase Token “Swizzling”. Firebase will automatically do some token management and to work properly with the CourierDelegate, we need to disable this and manually tell the Firebase SDK about the APNS token.
Look for your existing Info.plist file or create a new one: go to File → New → File and select "Property List". Make sure our app target is selected before you save. Then, open up this plist and add a property named FirebaseAppDelegateProxyEnabled of type Boolean set to the value of NO.
With that set-up out of the way, we can start writing some Swift! Go to File → New → File, make sure "Swift File" is selected and then click Continue. Name the file "AppDelegate" and click Create. Paste in the following code:
1import Courier_iOS2import SwiftUI3import FirebaseCore4import FirebaseMessaging56class AppDelegate: CourierDelegate, MessagingDelegate {78private var firebaseMessaging: Messaging {9get {10return Messaging.messaging()11}12}1314override func application(_ application: UIApplication, didFinishLaunchingWithOptions launchOptions: [UIApplication.LaunchOptionsKey : Any]? = nil) -> Bool {1516FirebaseApp.configure()17firebaseMessaging.delegate = self1819return true2021}2223override func deviceTokenDidChange(rawApnsToken: Data, isDebugging: Bool) {2425firebaseMessaging.setAPNSToken(rawApnsToken, type: isDebugging ? .sandbox : .prod)2627}2829public func messaging(_ messaging: Messaging, didReceiveRegistrationToken fcmToken: String?) {3031guard let token = fcmToken else { return }3233Task {34do {35try await Courier.shared.setFCMToken(token)36} catch {37print(String(describing: error))38}39}4041}4243override func pushNotificationDeliveredInForeground(message: [AnyHashable : Any]) -> UNNotificationPresentationOptions {4445print("\n=== 💌 Push Notification Delivered In Foreground ===\n")46print(message)47print("\n=================================================\n")4849// This is how you want to show your notification in the foreground.50// Pass "[]" if you don’t want to show the notification to the user, or51// you can handle this using your own custom styles52return [.sound, .list, .banner, .badge]5354}5556override func pushNotificationClicked(message: [AnyHashable : Any]) {5758print("\n=== 👉 Push Notification Clicked ===\n")59print(message)60print("\n=================================\n")6162}6364}
AppDelegate is the entry point for the app and this class extends CourierDelegate from the Courier iOS SDK and MessagingDelegate from the Firebase SDK.
First, we extend MessagingDelegate to then initialize Firebase, then call a messaging function that deals with FCM token management.
Next, we override the pushNotificationDeliveredInForeground and pushNotificationClicked methods from CourierDelegate. This allows you to handle actions when your user clicks your notifications or do something custom for your app when a new notification is delivered to the device while your user is using your app. In this case we'll simply print some debug statements to illustrate the integration is working.
Now, find the main Swift file for your app. It was generated when you created your app and its filename is your application's name followed by an App at the end. Overwrite the code in that file with the code below:
1import SwiftUI23@main4struct Courier_iOS_FirebaseApp: App {5@UIApplicationDelegateAdaptor(AppDelegate.self) var delegate6var body: some Scene {7WindowGroup {8ContentView()9}10}11}
This will bind your application to the AppDelegate we've just built and initializes the ContentView when the app first starts. Now, open up the ContentView class and paste the following code in:
1import SwiftUI2import Courier_iOS34struct ContentView: View {5var body: some View {6VStack {7Image(systemName: "globe")8.imageScale(.large)9.foregroundStyle(.tint)10Text("Hello Push Notifications with Courier!")11}.onAppear {1213Task {1415// Make sure your user is signed into Courier16// This allows Courier to sync push notification tokens automatically17try await Courier.shared.signIn(18accessToken: <COURIER_AUTH_TOKEN>,19userId: <COURIER_USER_ID>20)2122// Shows a popup where your user can allow or deny push notifications23// You should put this in a place that makes sense for your app24// You cannot ask the user for push notification permissions again25// If they deny, you will have to get them to open their device26// settings to change this27let status = try await Courier.requestNotificationPermission()28print(status)2930}3132}33.padding()34}35}3637#Preview {38ContentView()39}
Replace COURIER_AUTH_TOKEN with your API key. You can find your Courier API keys by logging-in to the Console and clicking Settings → API Keys. Since you're in development, make sure to use one of the Test Keys.
NOTE: Using API keys for the purposes of building and testing is fine, but you would not want to store these credentials publicly (Github, etc) or ship them when you publish your app for the AppStore. Please review this guide on how to handle Courier credentials in production for iOS.
Finally, replace COURIER_USER_ID with the user ID you'd like to use for testing. If you don't have a user ID in mind, just create a new user (you can delete it later).
Running the App
Connect your iOS device to your computer, selecting Trust this device if prompted. You must use a real device and not a simulator for testing push notifications. Go to Product → Scheme and select your project name. Now go to Product → Destination and select your iOS device (you may be prompted to register this device in your Apple Developer account).
To build your project, click the "play" button to run the app. If you get a signing error, make sure to select the apple developer account in you app settings that you created the APNS key with in the steps above. When building for the first time, you may get a popup window that reads something like “codesign wants to access key ‘Apple Development: XXXXXXXXXX’ in your keychain. To allow this, enter the ‘login’ keychain password.” If you get this message, enter your Mac password and select Always allow.
Now you’re ready to run your app on your iOS device. Go to Product → Run and ensure your iOS device is unlocked. Your project should now install on your device. When this is done, you will see an icon on your home screen for your new app.
Your app will automatically launch and you'll see the message "Hello, push notifications with Courier!". Now, we prove that everything works by sending yourself a push notification.
Sending a push notification
There are several ways to send yourself a push notification, including using the command line. For this tutorial, we're going to keep it simple and leverage Courier's Quick Send feature.
Log-in to the Courier Dashboard and click the Send a Message button in the top right. In Quick Send, on the right configuration pane, select "Push" for the Channel and "Firebase FCM" for the Provider.
In the Message Design interface, enter the same User ID value that you configured in the Env class for the "To:" field. Enter a Subject and Body for the push notification and then click Send Now. If everything works, you should see the push notification pop up on your iOS device. Huzzah! 🎉
Viewing activity logs in Courier
In the event you don't see the push notification come through, the first step in debugging a Courier app is to review the logs. In your Courier console, click the Logs icon at the bottom of the left panel to view all of your activity logs. You can filter logs by status, recipient, or even date.
The most recent message you sent should be at the top of the log, so click it to to see its details. You'll see a list of events associated with the delivery (or attempted delivery) of the message, along with useful information for debugging if there's an error.
Common errors
It's easy to get confused when using new platforms you're not familiar with. The following are the most common errors that developers encounter when dealing with Courier and Firebase and how to solve them.
“Missing Provider Support”
This indicates that Courier and Firebase are not connected. In the provider configuration for Firebase, ensure the correct service account JSON from your Firebase project has been installed.
“Request failed with status code 403”
This could suggest that Firebase and APNs are not connected. For Firebase Cloud Messaging to work with your project, you must upload your APNs key to Firebase to provide the necessary permission for Firebase to send push notifications to your users' devices.
On your Firebase console, click Project Overview → Project settings → Cloud Messaging and scroll down to Apple app configuration. Make sure you've uploaded your APNs Authentication Key as we described earlier.
Other possible issues
Firebase and your app code are not connected: Ensure your bundle ID in your Firebase app matches the bundle ID of your app in Xcode.
Push notifications are not allowed: Ensure you have added push notification capabilities to your target, and ensure your user hasn’t accidentally clicked to deny push notifications. They can change this in their app settings if they have.
Conclusion
In this tutorial, you learned how to send push notifications to iOS devices using Courier’s iOS SDK and Firebase. If you prefer to download and start using a working project, you can find the complete tutorial project on GitHub. If you’d like to learn how to send other types of notifications using Courier, such as SMS and email, we’ve also got you covered.
Get the Courier iOS SDK
Have you downloaded Courier's iOS SDK yet? It's the easiest and most effective way to communicate with your users using push notifications.
Sign-up
More from Tutorial
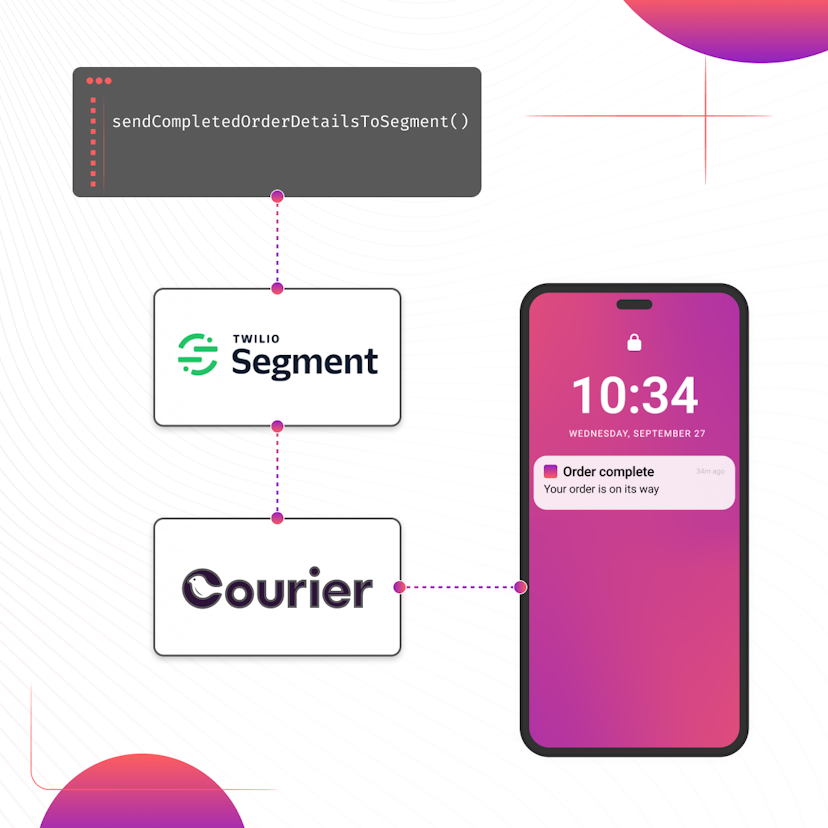
How to Set Up Automatic Push Notifications Based on Segment Events
Push notifications have carved their own niche as a powerful tool for continuous user engagement. Regardless of whether an app is actively in use, they deliver your messages straight to your user's device. Two key players that can combine to enhance your push notification strategy are Segment and Courier. In this tutorial, we show you how to set up Courier to listen to your Segment events and then send push notifications to an Android device based on data from these events.
Sarah Barber
November 17, 2023
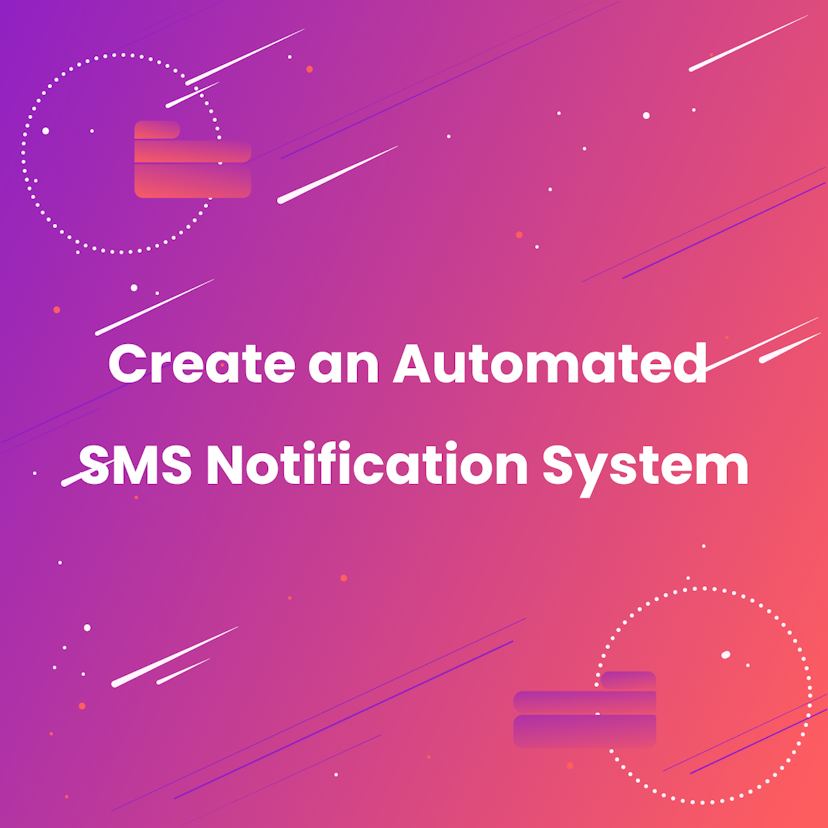
How to Create an Automated SMS Notification System
This article explains why you need an automated SMS notification system, with an example using Courier to send an automated SMS with Twilio.
The Courier Team
August 17, 2023
Free Tools
Comparison Guides
Build your first notification in minutes
Send up to 10,000 notifications every month, for free.
Get started for free

Build your first notification in minutes
Send up to 10,000 notifications every month, for free.
Get started for free
© 2024 Courier. All rights reserved.