Driving user engagement is extremely important for product success and user retention. One way Android developers can achieve this is by integrating push notifications into their applications.
Push notifications are pop-up messages created by apps on mobile devices for many purposes, from conveying messages and reminding users of time-sensitive information to encouraging users to take particular actions. They’re used on all kinds of apps—sports apps, to notify users when a team scores; health apps, to remind users to take their medicine; or banking apps, to request approval for a transaction. Push notifications add value to the app and keep your users engaged.
In this article, you will learn how to integrate push notifications on Android apps written in Flutter, React Native, and Kotlin using popular providers such as Expo, Firebase Cloud Messaging, and Courier.
Let’s get started!
Firebase Cloud Messaging
Firebase Cloud Messaging (FCM) is a free cross-platform messaging service that allows you to send instant messages to all registered devices.
Pros of FCM
- You can send instant messages to all devices at zero cost.
- It has topics to segment devices and group users whom you want to subscribe to different messages.
- It provides detailed analytics and metrics to let you see how your messages are engaging users.
Cons of FCM
- It does not provide a way to view individual users and the messages they have received.
How to Implement FCM
Firebase can be integrated in multiple ways, depending on the tools and language frameworks used to build your app. Before you can start using the service, you need to register and set up an Android app on the Firebase console.
Android Kotlin
To integrate FCM into a Kotlin app, you first need to set up your app and add the following dependencies into the app/build.gradle file:
1
2
3
implementation platform('com.google.firebase:firebase-bom:31.0.2')
implementation 'com.google.firebase:firebase-common-ktx:20.2.0'
implementation 'com.google.firebase:firebase-messaging-ktx'
If you want to handle the messages in the background beyond receiving notifications, add the following code into your manifest file:
1
2
3
4
5
6
7
<service
  android:name=".MyFirebaseMessagingService"
  android:exported="false">
 <intent-filter>
 <action android:name="com.google.firebase.MESSAGING_EVENT" />
 </intent-filter>
</service>
Then, create the MyFirebaseMessagingService file in your Android project with the following code:
1
2
3
4
5
6
7
8
9
10
11
12
13
14
15
16
17
18
class MyFirebaseMessagingService : FirebaseMessagingService() {
  private val TAG="FCM-SERVICE"

override fun onMessageReceived(message: RemoteMessage) {
        super.onMessageReceived(message)
        Log.d(TAG,message.toString())
        val intent= Intent(applicationContext,MainActivity::class.java)
        intent.putExtra("title", message.notification?.title)
        intent.putExtra("body", message.notification?.body)
        intent.flags = Intent.FLAG_ACTIVITY_NEW_TASK
        startActivity(intent)
    }

override fun onNewToken(token: String) {
        super.onNewToken(token)
        Log.d(TAG,"New Token: $token")
    }
}
Apps running on Android 13 or higher need to request runtime permissions to display notifications. Use the following code to do so:
1
2
3
4
5
6
7
8
9
10
11
12
13
14
15
16
17
18
19
20
21
22
23
24
private val requestPermissionLauncher = registerForActivityResult(
  ActivityResultContracts.RequestPermission()
) { isGranted: Boolean ->
  if (isGranted) {
  getFirebaseToken()
  Toast.makeText(this, "Notifications permission granted", Toast.LENGTH_SHORT)
  .show()
 } else {
  Toast.makeText(this, "FCM can't post notifications without POST_NOTIFICATIONS permission",
  Toast.LENGTH_LONG).show()
 }}

private fun askNotificationPermission() {
  // This is only necessary for API level >= 33 (TIRAMISU)
  if (Build.VERSION.SDK_INT >= Build.VERSION_CODES.TIRAMISU) {
  if (ContextCompat.checkSelfPermission(this, Manifest.permission.POST_NOTIFICATIONS) ==
            PackageManager.PERMISSION_GRANTED
 ) {  // FCM SDK (and your app) can post notifications.
  } else if (shouldShowRequestPermissionRationale(Manifest.permission.POST_NOTIFICATIONS)) {
  // TODO: display an educational UI explaining to the user the features that will be enabled
  } else {
  // Directly ask for the permission
  requestPermissionLauncher.launch(Manifest.permission.POST_NOTIFICATIONS)
 } }}
Finally, to be able to send notifications to a device, you need to retrieve the registration token generated by the FCM SDK for the app instance:
1
2
3
4
5
6
7
8
9
10
11
12
private fun getFirebaseToken(){
Firebase.messaging.token.addOnCompleteListener(OnCompleteListener { task ->
  if (!task.isSuccessful) {
  Log.w(TAG, "Fetching FCM registration token failed", task.exception)
  return@OnCompleteListener
  }

  // Get FCM registration token
  val token = task.result
  Log.d(TAG, "Token: $token")
  })
}
With that, you can receive and handle notification messages sent to your Kotlin app. You can consult this repo for the complete code.
Flutter
Before integrating the FCM service with Flutter, you’ll need to set up your app for Firebase usage as described here.
Then, to start FCM integration, run flutter pub add firebase_messaging on your root folder to add the cloud messaging plugin.
Next, register the device and get an FCM token. Since FCM messages can be handled in the foreground or in the background, you need to cover both cases. Here’s how that looks in code:
1
2
3
4
5
6
7
8
9
10
11
12
13
14
15
16
17
18
19
20
21
22
23
24
25
26
27
28
29
30
31
32
33
34
35
36
37
38
39
40
41
42
43
44
45
46
47
48
49
50
51
52
53
54
55
56
57
58
59
60
61
import  'package:firebase_core/firebase_core.dart';
import  'package:firebase_messaging/firebase_messaging.dart';

final navigatorKey = GlobalKey<NavigatorState>();

@pragma('vm:entry-point')
Future<void> _firebaseMessagingBackgroundHandler(RemoteMessage message) async {
print("Handling a background message: ${message.messageId}");
}

Future<void> main() async {
WidgetsFlutterBinding.ensureInitialized();
await  Firebase.initializeApp();
FirebaseMessaging  messaging = FirebaseMessaging.instance;

//Get FCM token
final  fcmToken = await  messaging.getToken();

FirebaseMessaging.onMessage.listen((RemoteMessage  message) {

print('Got a message whilst in the foreground!');
print('Message data: ${message.data}');

if (message.notification != null) {
      print('Message also contained a notification: ${message.notification}');
      showDialog(
          context: navigatorKey.currentContext!,
          builder: (context) => Center(
                child: Material(
                  color: Colors.white,
                  child: Column(
                    mainAxisSize: MainAxisSize.min,
                    mainAxisAlignment: MainAxisAlignment.center,
                    children: [
                      Text('Notification Received'),
                      SizedBox(
                        height: 20,
                      ),
                      Text(
                          'Notification Title: ${message.notification?.title}'),
                      SizedBox(
                        height: 20,
                      ),
                      Text('Notification Body: ${message.notification?.body}'),
                      SizedBox(
                        height: 20,
                      ),
                    ],
                  ),
                ),
              ));
    }

});

//_firebaseMessagingBackgroundHandler must be a top-level function
FirebaseMessaging.onBackgroundMessage(_firebaseMessagingBackgroundHandler);

runApp(const  MyApp());

}
Now your Flutter app is ready to receive and handle notifications. You can find the complete code in this repo.
React Native
Before you can use FCM with your React Native app, you need to set up Firebase as described here.
To install the FCM dependency, run bash yarn add @react-native-firebase/messaging from your root project. This enables you to receive and handle notifications on your app.
To send notifications to a specific device, you need to retrieve its registration token, as shown here:
1
2
3
4
async function getFCMToken() {
    const token = await messaging().getToken();
    console.log(token);
}
FCM notification messages can be handled when the app is in different states, in the foreground or in the background.
To listen to foreground messages, add the following code to your App.js file:
1
2
3
4
5
6
7
8
9
10
11
12
13
14
15
16
17
18
19
20
21
22
23
24
25
26
27
28
import React, { useEffect } from 'react';
import { Alert, View, Text } from 'react-native';
import messaging from '@react-native-firebase/messaging';

async function getFCMToken() {
    const token = await messaging().getToken();
    console.log(token);
}

function App() {
    getFCMToken();

    useEffect(() => {
        const unsubscribe = messaging().onMessage(async remoteMessage => {
            Alert.alert('FCM Title: ' + remoteMessage.notification.title, 'FCM Body: ' + remoteMessage.notification.body);
        });

        return unsubscribe;
    }, []);

    return (
        <View>
            <Text>Android Push Notifications</Text>
        </View>
    )
}

export default App;
To listen to background messages, you need a background handler outside of your application logic. To implement that, add the following code to your index.js file:
1
2
3
4
5
6
7
8
9
10
import { AppRegistry } from 'react-native';
import messaging from '@react-native-firebase/messaging';
import App from './App';

// Register background handler
messaging().setBackgroundMessageHandler(async remoteMessage => {
  console.log('Message handled in the background!', remoteMessage);
});

AppRegistry.registerComponent('app', () => App);
Integrating FCM in React Native is easy and fast. With the above code, your app is ready to handle FCM notifications. You can check this repo for the full implementation.
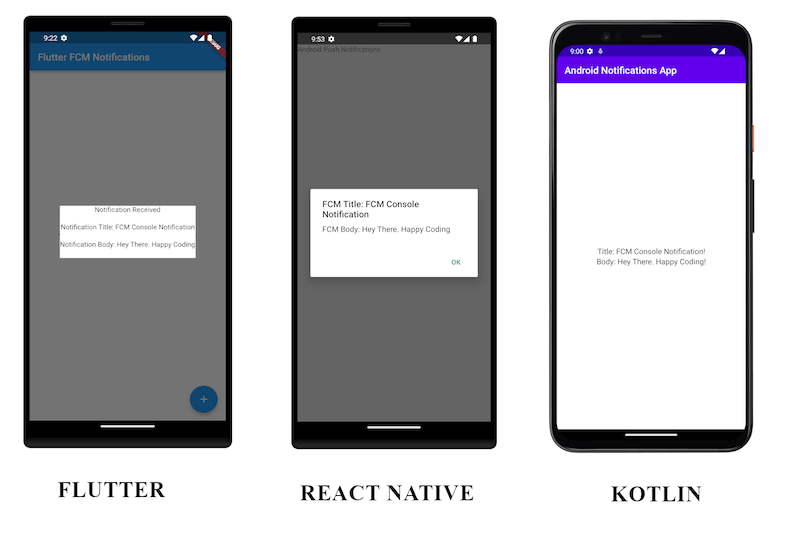
Your FCM notifications for the previous examples should look like this:
Expo
Expo is an open-source framework used to build cross-platform apps utilizing the Javascript and TypeScript programming languages.
Pros of Expo
- It’s easy to set up and start using notifications.
- It has APIs and a push notification tool to send push notifications to devices.
Cons of Expo
- Push notifications don’t work on an emulator.
How to Implement Expo
To start using notifications on Expo, run npm i expo-device and npm i expo-notifications to install the necessary dependencies.
Before you can receive messages, you need to request the user’s permission and then get an ExpoPushToken:
1
2
3
4
5
6
7
8
9
10
11
12
13
14
15
16
17
18
19
20
21
22
23
24
25
26
27
28
29
30
31
32
33
34
35
36
37
38
39
40
import React from 'react';
import { Text, View } from 'react-native';
import * as Device from 'expo-device';
import * as Notifications from 'expo-notifications';

Notifications.setNotificationHandler({
    handleNotification: async () => ({
        shouldShowAlert: true,
        shouldPlaySound: false,
        shouldSetBadge: false,
    }),
});

registerForPushNotificationsAsync = async () => {
  if (Device.isDevice) {
    const { status: existingStatus } = await Notifications.getPermissionsAsync();
    let finalStatus = existingStatus;
    if (existingStatus !== 'granted') {
      const { status } = await Notifications.requestPermissionsAsync();
      finalStatus = status;
    }
    if (finalStatus !== 'granted') {
      alert('Failed to get push token for push notification!');
      return;
    }
    const token = (await Notifications.getExpoPushTokenAsync()).data;
    console.log(token);
  } else {
    alert('Must use physical device for Push Notifications');
  }

  if (Platform.OS === 'android') {
    Notifications.setNotificationChannelAsync('default', {
      name: 'default',
      importance: Notifications.AndroidImportance.MAX,
      vibrationPattern: [0, 250, 250, 250],
      lightColor: '#FF231F7C',
    });
  }
};
To handle received notification messages, you can use notification event listeners as shown here:
1
2
3
4
5
6
7
8
9
10
11
12
13
14
15
16
17
18
19
20
export  default  function  App() {
const [expoPushToken, setExpoPushToken] = useState('');
const [notification, setNotification] = useState(false);
const  notificationListener = useRef();
const  responseListener = useRef();
useEffect(() => {
registerForPushNotificationsAsync().then(token  =>  setExpoPushToken(token));
notificationListener.current = Notifications.addNotificationReceivedListener(notification  => {
console.log(notification);
setNotification(notification);
});
responseListener.current = Notifications.addNotificationResponseReceivedListener(response  => {
console.log(response);
});
return () => {
Notifications.removeNotificationSubscription(notificationListener.current);
Notifications.removeNotificationSubscription(responseListener.current);
};
}, []);
}
As you can see, it’s a straightforward process to integrate push notifications into your Expo app, and thanks to the notification tool, you can test your application with ease. You can see the full code in this repo.
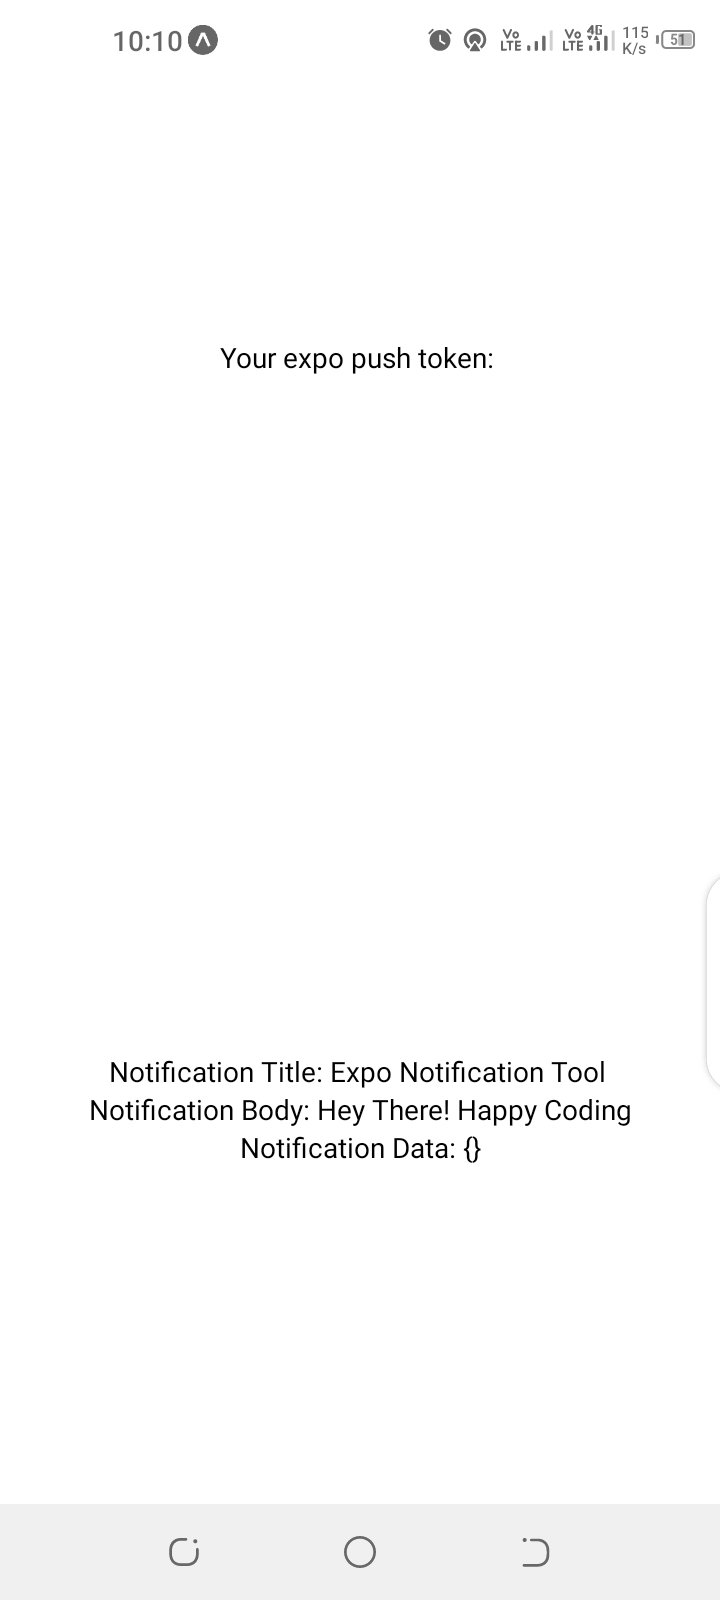
Your Expo notification should look something like this:
Multi-Channel Push Notifications with Courier
Courier facilitates sending push notifications to devices through multiple providers under a multi-channel setup. It can easily be integrated with APNs, Firebase FCM, Expo, OneSignal Push, Airship, and more.
Pros of Courier
- It supports a huge variety of integrations with push notification providers.
- It enables you to design and send push notifications from a central place through its Automations Designer.
- It provides REST APIs and client libraries to send notifications.
Cons of Courier
- The Courier interface layout can be challenging to use for the first time.
How to Implement Courier
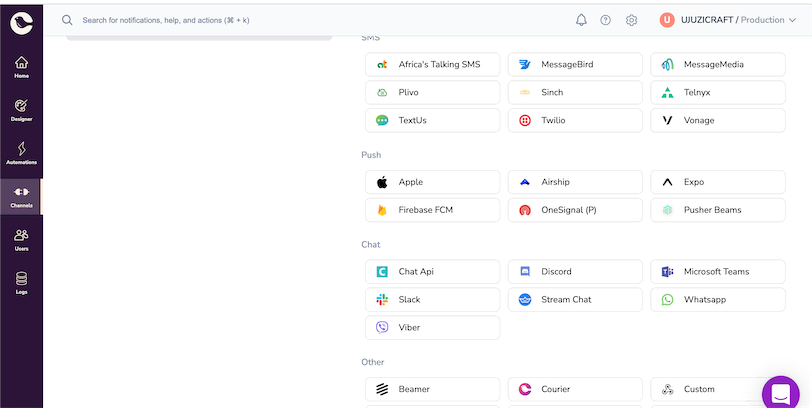
To get started with Courier, sign up for a free account. Once that’s up and running, you’ll need to configure a push notification provider.
Select the Channels option on the left pane and find the listed push notification providers. Select the ones you need and follow the setup guide for each. For this tutorial, select Expo.
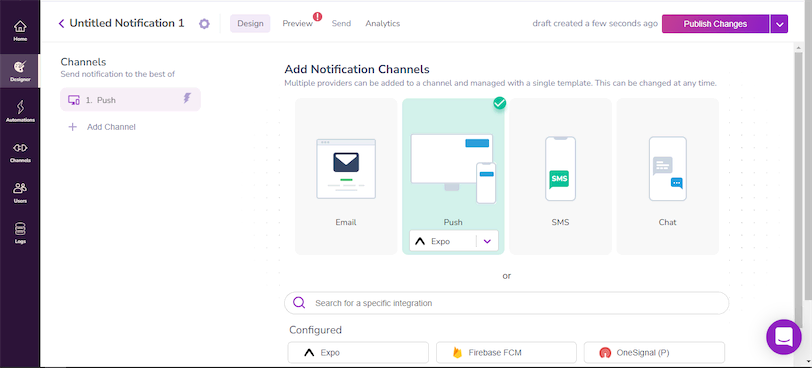
There are multiple ways to send push notifications to your users with Courier. In this tutorial, you’ll use the Automations Designer. Select the Designer tab on the left pane and then click on Create Notification.
You should see an interface like the one below. Select the Push channel and choose Expo as the provider.
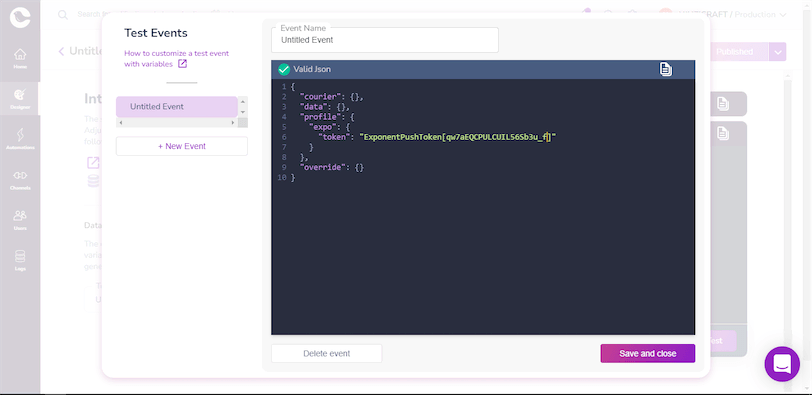
After designing your notification, select the Preview tab on the top bar and create a Test Event. You’ll need an ExpoPushToken from a user’s device, which is generated after integrating notifications in an Expo app, as detailed in a previous section of this tutorial.
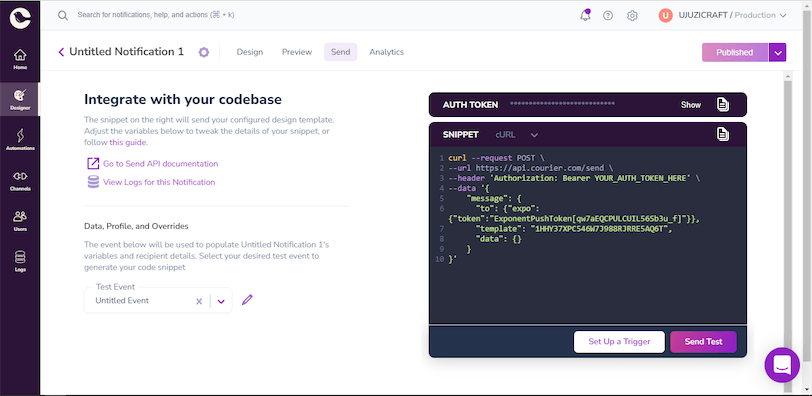
Next, select the Send tab on the top bar and then click Publish to finalize your request.
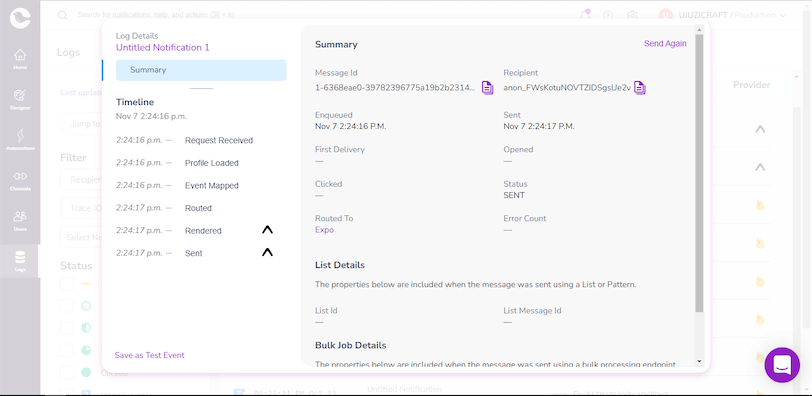
To view the status of your notification request, navigate to the Logs section from the left panel, where you’ll see a list of your sent notifications and their statuses. Select any to view more details.
To send notifications from your code, you can integrate various language-specific Courier SDKs depending on your needs and implementation.
For instance, here’s a simple Python SDK implementation that can be used to send a notification to a user’s device:
1
2
3
4
5
6
7
8
9
10
11
12
13
14
15
16
17
18
19
# Install Courier SDK: pip install trycourier
from trycourier import Courier

client = Courier(auth_token="use-your-auth-token")

resp = client.send_message(
  message={
    "to": {
      "expo": {
        "token": "ExponentPushToken[Your-Expo-Push-Token-Here]",
      },
    },
    "template": "1HHY37XPC546W7J988RJRRE5AQ6T",
    "data": {
    },
  }
)

print(resp['requestId'])
That’s all you need to integrate push notifications with Courier. With their Automations Designer, you can build and send visually appealing notifications with ease.
Conclusion
Integrating push notifications can make a big difference in making your app more valuable to your users. Whether you’re alerting users of pending tasks or informing them of actions happening in real-time, push notifications are a great way to keep users engaged.
Courier supports multiple push notification service providers, making it easy for you to manage and send notifications to users from a central place or using a single API. This makes the integration simple and concise without compromising on reliability. With a generous free tier of 10,000 notifications a month, get started with Courier today and take your app to the next level.
Author: Dedan Ndungu
