
SendGrid

Introduction

This step-by-step guide will walk you through sending an email notification using Courier and SendGrid. You will:

Prerequisites

You will need both Courier and SendGrid accounts to complete this tutorial. If you don't have accounts already, sign up before proceeding.

Add the SendGrid Integration

Once logged in to Courier, navigate to the "Integrations" page. Click on the SendGrid Integration to configure it.

Courier Integrations each require different pieces of information based on the needs of the Integration provider (see the requirements for each in the "Provider Documentation" section of the sidebar to the left). In the case of SendGrid, we need a SendGrid "API Key" and a "From Address."

SendGrid API Key

Once logged in to SendGrid, navigate to "Settings" → "API Keys". On this page, you can create an API key, name it, and give it appropriate permissions.

SendGrid API Key Page

API permissions can be complicated, but very little is needed for this guide (you can visit the "API Keys" section of the SendGrid Knowledge Center for further details).

To send a message, your API key needs only "Mail Send" permissions. You can select “Restricted Access” and toggle on only this “Mail Send” setting for now.

Creating a SendGrid API Key

Creating a SendGrid API Key

Copy your API key from SendGrid, and paste it into the "API Key" field on the Courier Integration page.

Add a SendGrid API Key to Courier

SendGrid From Address

Next, add an email address to the "From Address" field. This will usually be an address such as noreply@mydomain.com, news@mydomain.com, or mail@mydomain.com, but any address you control is fine. Once both fields are complete, click the “Add Integration” button, then click "Save.”

Add a SendGrid From Address to Courier

Create a Notification

Navigate to the Courier Notifications page and click “Create Notification.” Click on “Untitled Notification” to rename your notification — for this tutorial, call it “Test Appointment Reminder.” From your list of configured Integrations, click on the SendGrid button. Then, click the “SendGrid” box that has been added to the sidebar in order to bring up an email template.

You can add message blocks to the template by clicking one of the three icons on the mock-up email. The paper icon adds a text block. The hand icon adds a link. The list icon adds a repeatable list.

Courier Notification Template

These text blocks can include variables using a mustache-like template syntax. Surround text with a single set of curly braces and that text will be interpreted as a variable (it will also be highlighted in green). For example, you may want to include a {name} variable (we'll cover the source of this variable data later in this tutorial).

Be sure to set the subject line for your email as well (click “New Subject” to edit it). You can also choose a different From Address — this will override the From Address in your SendGrid Integration settings.

Finish populating the email template with whatever text you want to send. You can also copy the example below, which contains a few variables for demonstration.

Text
Hello {name},

This is an appointment reminder from Courier. We look forward to seeing you on {apt_date} at {apt_time}.

If you need to change your appointment for any reason, please contact us at least 24 hours in advance at {support_url} or {support_phone}.

Best regards,

Courier
Courier Notification Template with Sample Message

When you are finished, click Publish in the upper right corner and give it a Publish Message of "Initial notification."

Send a Message

Courier passes messages to Integrations via the Send endpoint. For this tutorial, we will send our messages with cURL, but you can use your preferred language and HTTP library. You can also use an API testing tool such as Postman or Insomnia. For additional code samples, see the "Courier API Reference".

Authorization

Courier supports both basic and token authorization. For this tutorial, we will use token authorization. You can read more about authorization in Courier's "Authorization Overview".

We must send an Authorization header with each request. The Courier Send API also requires an event. The authorization token and event values are the "Auth Token" and "Notification ID" we see in the detail view of our “Test Appointment Reminder” event. Click the gear icon next to the Notification's name to reveal them.

Courier Authorization Credentials

As a best practice, let's assign these values to environment variables. In a Bash terminal, you can add the variables by typing VARIABLE_NAME="<value>". Some examples are provided below. Note that the values are just examples. Do not copy them — be sure to use the tokens associated with your account instead.

Courier Auth Token Variable

COURIER_AUTH_TOKEN="YpW2yEaMDyNg6agN9yGkc9ycEg8MxiKVTiiu2WVc8"

Notification ID

COURIER_NOTIFICATION_ID="YpW2yEaMDyNg6agN9yGkc9ycEg8"

These variables will persist for as long as your Bash session remains alive. If you quit your terminal, you will need to recreate them. However you handle your authorization tokens, keep them secure, and never add them to source control.

To verify that you created the variables correctly, you can see them by typing echo $VARIABLE_NAME. For example, typing echo $COURIER_AUTH_TOKEN will print the Courier Auth Token value to the terminal.

Building the cURL Request

We want to send a POST request to https://api.courier.com/send. Let's build our cURL request line-by-line. First, we'll tell cURL this is a POST request.

curl --request POST

Next, add the Authorization header using the COURIER_AUTH_TOKEN variable we set earlier. We send this as a Bearer Token.

curl --request POST \
--header "Authorization: Bearer $COURIER_AUTH_TOKEN" \

We also have a Content-Type header, which is application/json.

curl --request POST \
--header "Authorization: Bearer $COURIER_AUTH_TOKEN" \
--header "Content-Type: application/json" \

We will pass the body of our request using the cURL --data option. You will often send this data in JSON format. To improve working with cURL, Courier also supports a custom urlencoded format that can be used in the place of JSON. This format allows nested data values using square bracket syntax. This guide provides examples in both formats, so feel free to use the format that you like best.

Our --data option must also contain an event and recipient. Additionally, we will send profile and data objects.

The event value, for this example, is the "Notification ID" that we assigned to our COURIER_NOTIFICATION_ID environment variable earlier.

A recipient should be a unique identifier that does not change. This prevents duplicate entries in the event that a recipient changes their email or some other identifying value. We do not have any recipients in this tutorial, so we can enter any string value. Something like “katherine_pryde” will work.

The profile information is an object that includes any key-value pairs required by our Integrations. In the case of SendGrid, we need an email key and value. This is the address where our message will be delivered. You can find the required keys for any Integration by selecting an Integration on the "Integrations" page. See the "Integration Provider Requirements" for details.

Lastly, we define message variables inside the data object. Remember the variables we set in the visual template editor? This is where we provide the values. Our example message had name, apt_date, apt_time, support_phone, and support_url variables. For this tutorial, we can assign example strings to each.

Our --data option should look like this:

{
"message": {
"template": "$COURIER_NOTIFICATION_ID",
"to": {
"email": "kpryde@xavierinstitute.edu"
},
"data": {
"name": "Katherine Pryde",
"apt_date": "July 31, 2019",
"apt_time": "11:00 AM",
"support_phone": "555-555-5555",
"support_url": "https://courier.com/docs"
}
}
}

Now add the Send URL, https://api.courier.com/send, to complete the cURL request.

Complete cURL Request in both Formats

curl --request POST \
--header "Authorization: Bearer $COURIER_AUTH_TOKEN" \
--header "Content-Type: application/json" \
--data '{
"message": {
"template": "'"$COURIER_NOTIFICATION_ID"'",
"to": {
"email": "kpryde@xavierinstitute.edu"
},
"data": {
"name": "Katherine Pryde",
"apt_date": "July 31",
"apt_time": "11:00 AM",
"support_phone": "555-555-5555",
"support_url": "https://courier.com/docs"
}
}
}' \
https://api.courier.com/send

Before sending this request, be sure to replace the kpryde@xavierinstitute.edu value with an email address you can access. Also, note the "'"$COURIER_NOTIFICATION_ID"'" formatting in the JSON formatted --data option. The quotes are necessary to escape the JSON quotes and access the COURIER_NOTIFICATION_ID variable.

Paste your complete cURL request in either format in your terminal and hit "Return." You should receive a response like {"messageId":"<message id string>"}. You will also receive an email at the address you specified in the request body. Be sure to check your spam folder if the message doesn’t arrive in your inbox.

Send the cURL Request
Delivered Email

Congratulations, you’re on your way to crafting a better notification strategy that your audience is sure to appreciate.

Overrides (Advanced)

Overrides can be used to change the request body that Courier uses to send an email. Overrides are useful when a field is not yet supported by Courier or you would like to override the value that Courier generates. You can override any of the fields supported by SendGrid's /mail/send endpoint (see all v3 mail send request body fields here). Below is an example of overriding the subject and adding an attachment:

JSON
{
"message": {
"template": "<COURIER_NOTIFICATION_ID>",
"to": {
"email": "kpryde@xavierinstitute.edu"
},
"data": {
"name": "Katherine Pryde"
},
"providers": {
"sendgrid": {
"override": {
"body": {
"attachments": [
{
"content": "eyJmb28iOiJiYXIifQ==",
"type": "application/json",
"filename": "SENDGRID_ATTACH.json"
}
]
}
}
}
}
}
}

Profile Requirements

To deliver a message to a recipient over SendGrid, Courier must be provided the recipient's email address. This value should be included in the recipient profile as email.

JSON
{
"message": {
// Recipient Profile
"to": {
"email": "example@example.com"
}

// ... rest of message definition
}
}

Email Activity Tracking

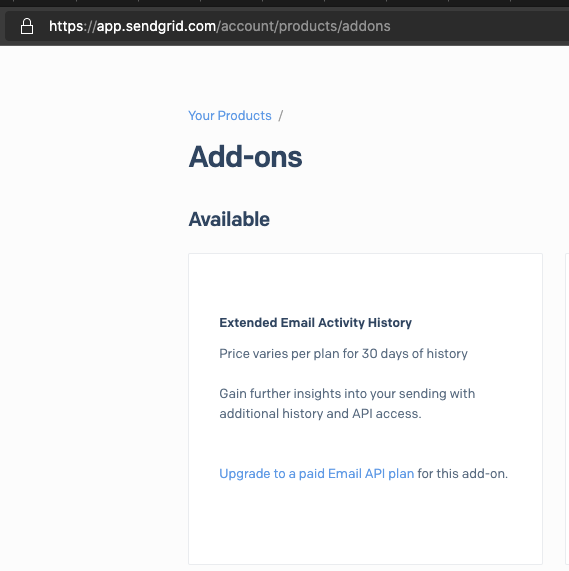
For the SendGrid configuration, the toggle, Enable Email Activity Tracking via Polling, will allow Courier to use SendGrid’s Email Activity API to periodically check on the delivery status of sent emails. The API Key must have Read Access to the Email Activity, and the SendGrid account must have the additional email history add-on enabled. See the documentation for API Keys and Email Activity to ensure the SendGrid account is set up correctly.
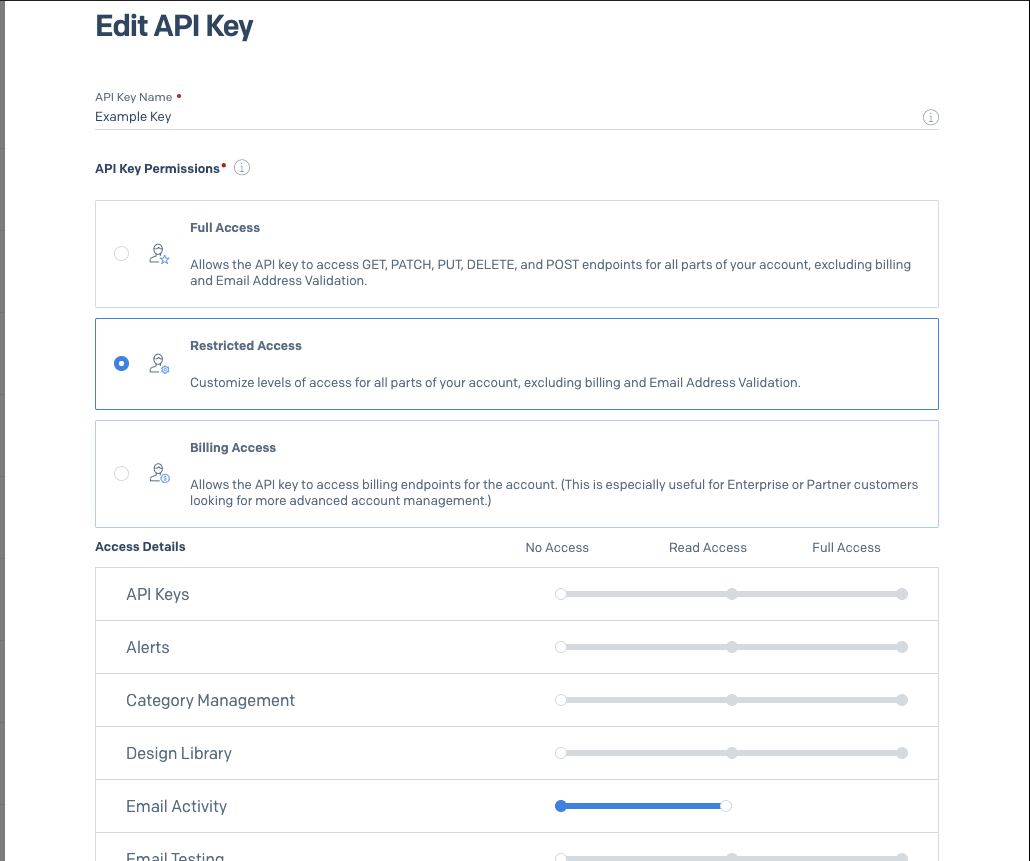
Enable read access to Email Activity on the API Key.
Upgrade the plan to include extended email activity history.

Override

Overrides can be used to change the request body that Courier uses to send an email. Overrides are useful when a field is not yet supported by Courier or you would like to override the value that Courier generates. You can override any of the fields supported by SendGrid's /mail/send endpoint (see all v3 mail send request body fields here). Below is an example of overriding the subject and adding an attachment:

JSON
{
"message": {
"template": "<COURIER_NOTIFICATION_ID>",
"to": {
"email": "kpryde@xavierinstitute.edu"
},
"data": {
"name": "Katherine Pryde"
},
"providers": {
"sendgrid": {
"override": {
"body": {
"subject": "Requested file - lockheed.json",
"attachments": [
{
"content": "eyJmb28iOiJiYXIifQ==",
"type": "application/json",
"filename": "lockheed.json"
}
]
},
"config": {
"apiKey": "<your API Key>"
}
}
}
}
}
}

Template Import

You can import your SendGrid templates to use with Courier from the SendGrid configuration page.

info

You will need to provide your SendGrid credentials in the configuration page to retrieve your saved templates from SendGrid.

Templates ready for import will appear as selectable checkboxes that you can choose to import.
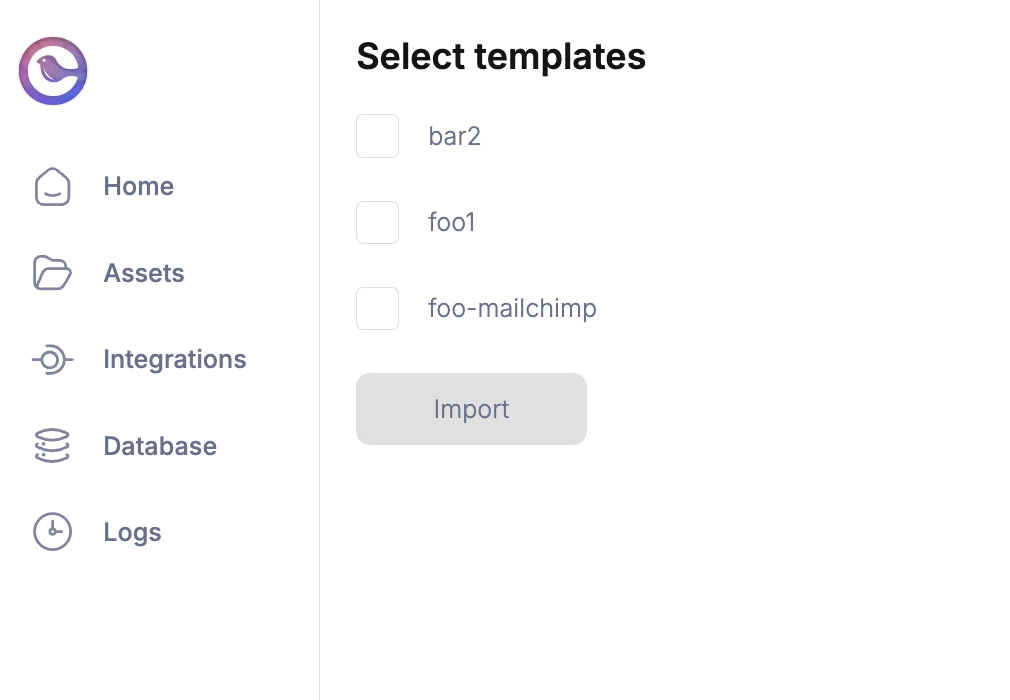
Template Import Page

SendGrid API Key Permissions

Before you can successfully import SendGrid Dynamic Templates, you will need to make sure of the following:

SendGrid API Key Permissions

Once your SendGrid API key has the appropriate permissions, you will be able to see your templates ready for import from the template import tool.

Setup mailhooks for delivery status updates

By default, after we send a message, Courier will poll Sendgrid periodically to find out if the message was delivered successfully or not. To get faster status updates, you can setup a webhook so Sendgrid can report delivery status directly to Courier.

To start, login to Courier and visit the Sendgrid provider configuration screen (from the Channels menu on the left side). There, you will find a Webhook URL.
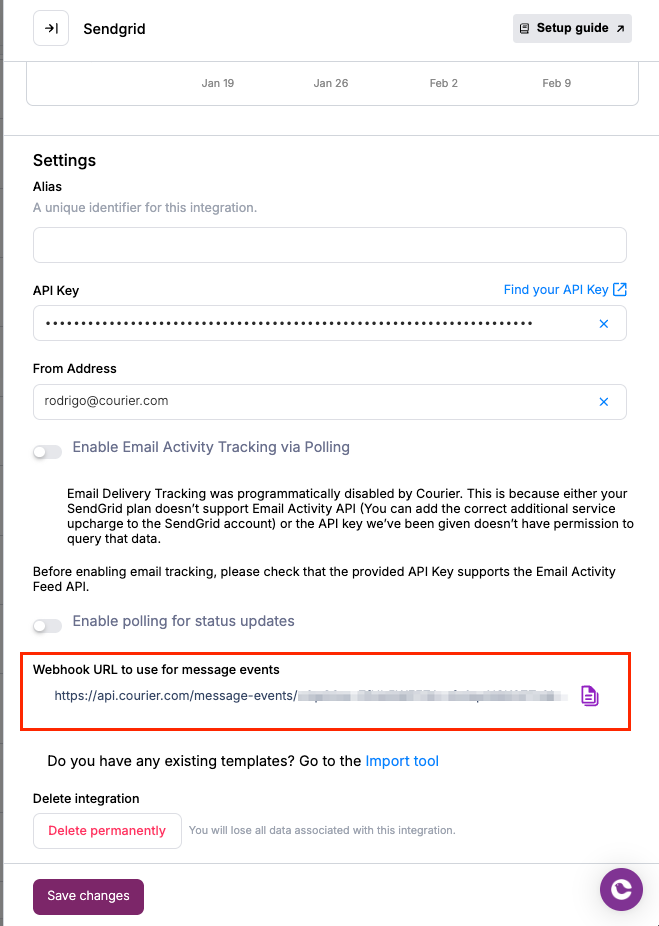
Copy this URL, then login to Sendgrid. On the left side, choose Settings, then Mail Settings. Next, clink on the Event Webhooks link.

On the next page, click the Create new webhook button. Then fill out the form.

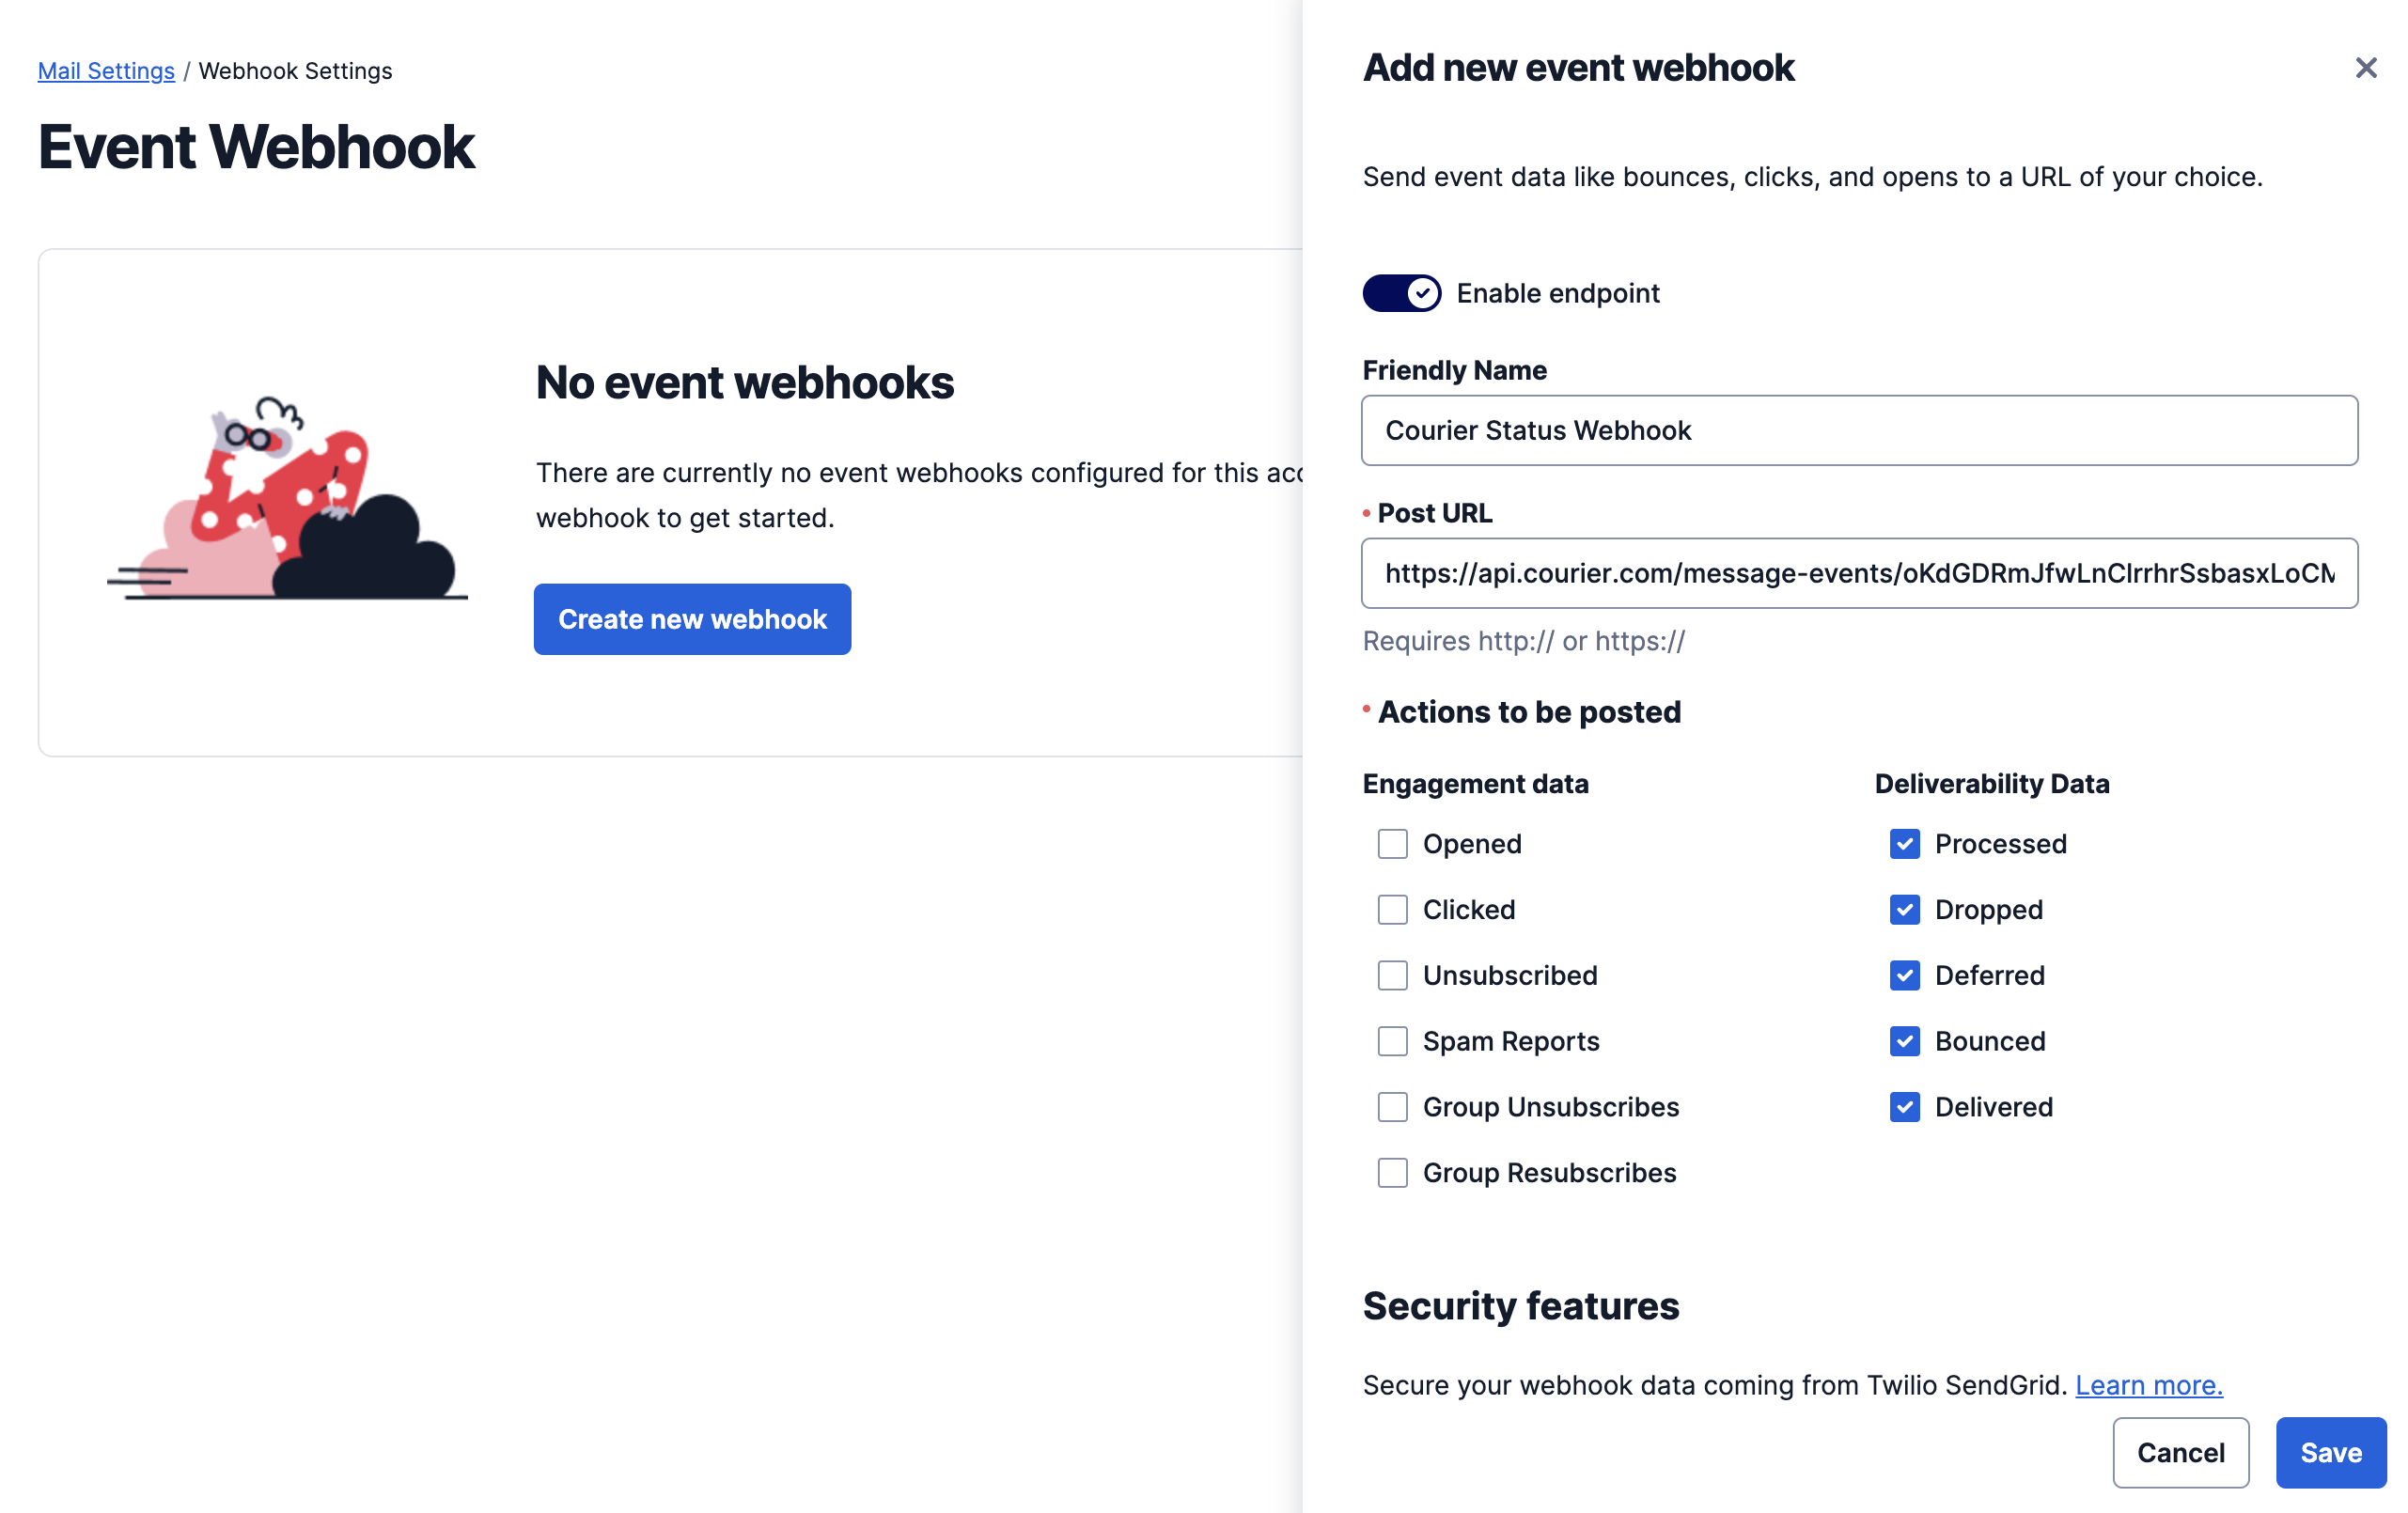
  • Friendly Name - Whatever you like
  • Post URL - Paste the URL you copied earlier from Courier's website.
  • Deliverability Data - Check all 5 boxes.
  • Security features - You can leave these disabled. The HTTPS URL you pasted includes a cryptographic token that Courier can use to verify incoming events belong only to you.

Hit the Save button.

Now that the webhook is configured, you will no longer need Courier to poll for status updates. We recommend waiting about an hour before disabling polling in order to make sure there is no gap in status reporting of any messages already in-flight. When you are ready, return to the Courier Sendgrid configuration screen. Flip the toggle switch labeled "Enable polling for status updates" into the off position. Then, press the Save button at the bottom of the screen.

Troubleshooting

Dealing with SendGrid requests can result in some errors. You can find them below to help you troubleshoot. You can also check the Courier Logs to help debug any provier errors you may encounter. For anything else, you may contact Courier Support.

SendGrid API Key Access Forbidden

This error occurs when the request you are trying to perform is not listed under the allowed actions of the SendGrid API key that you are using.
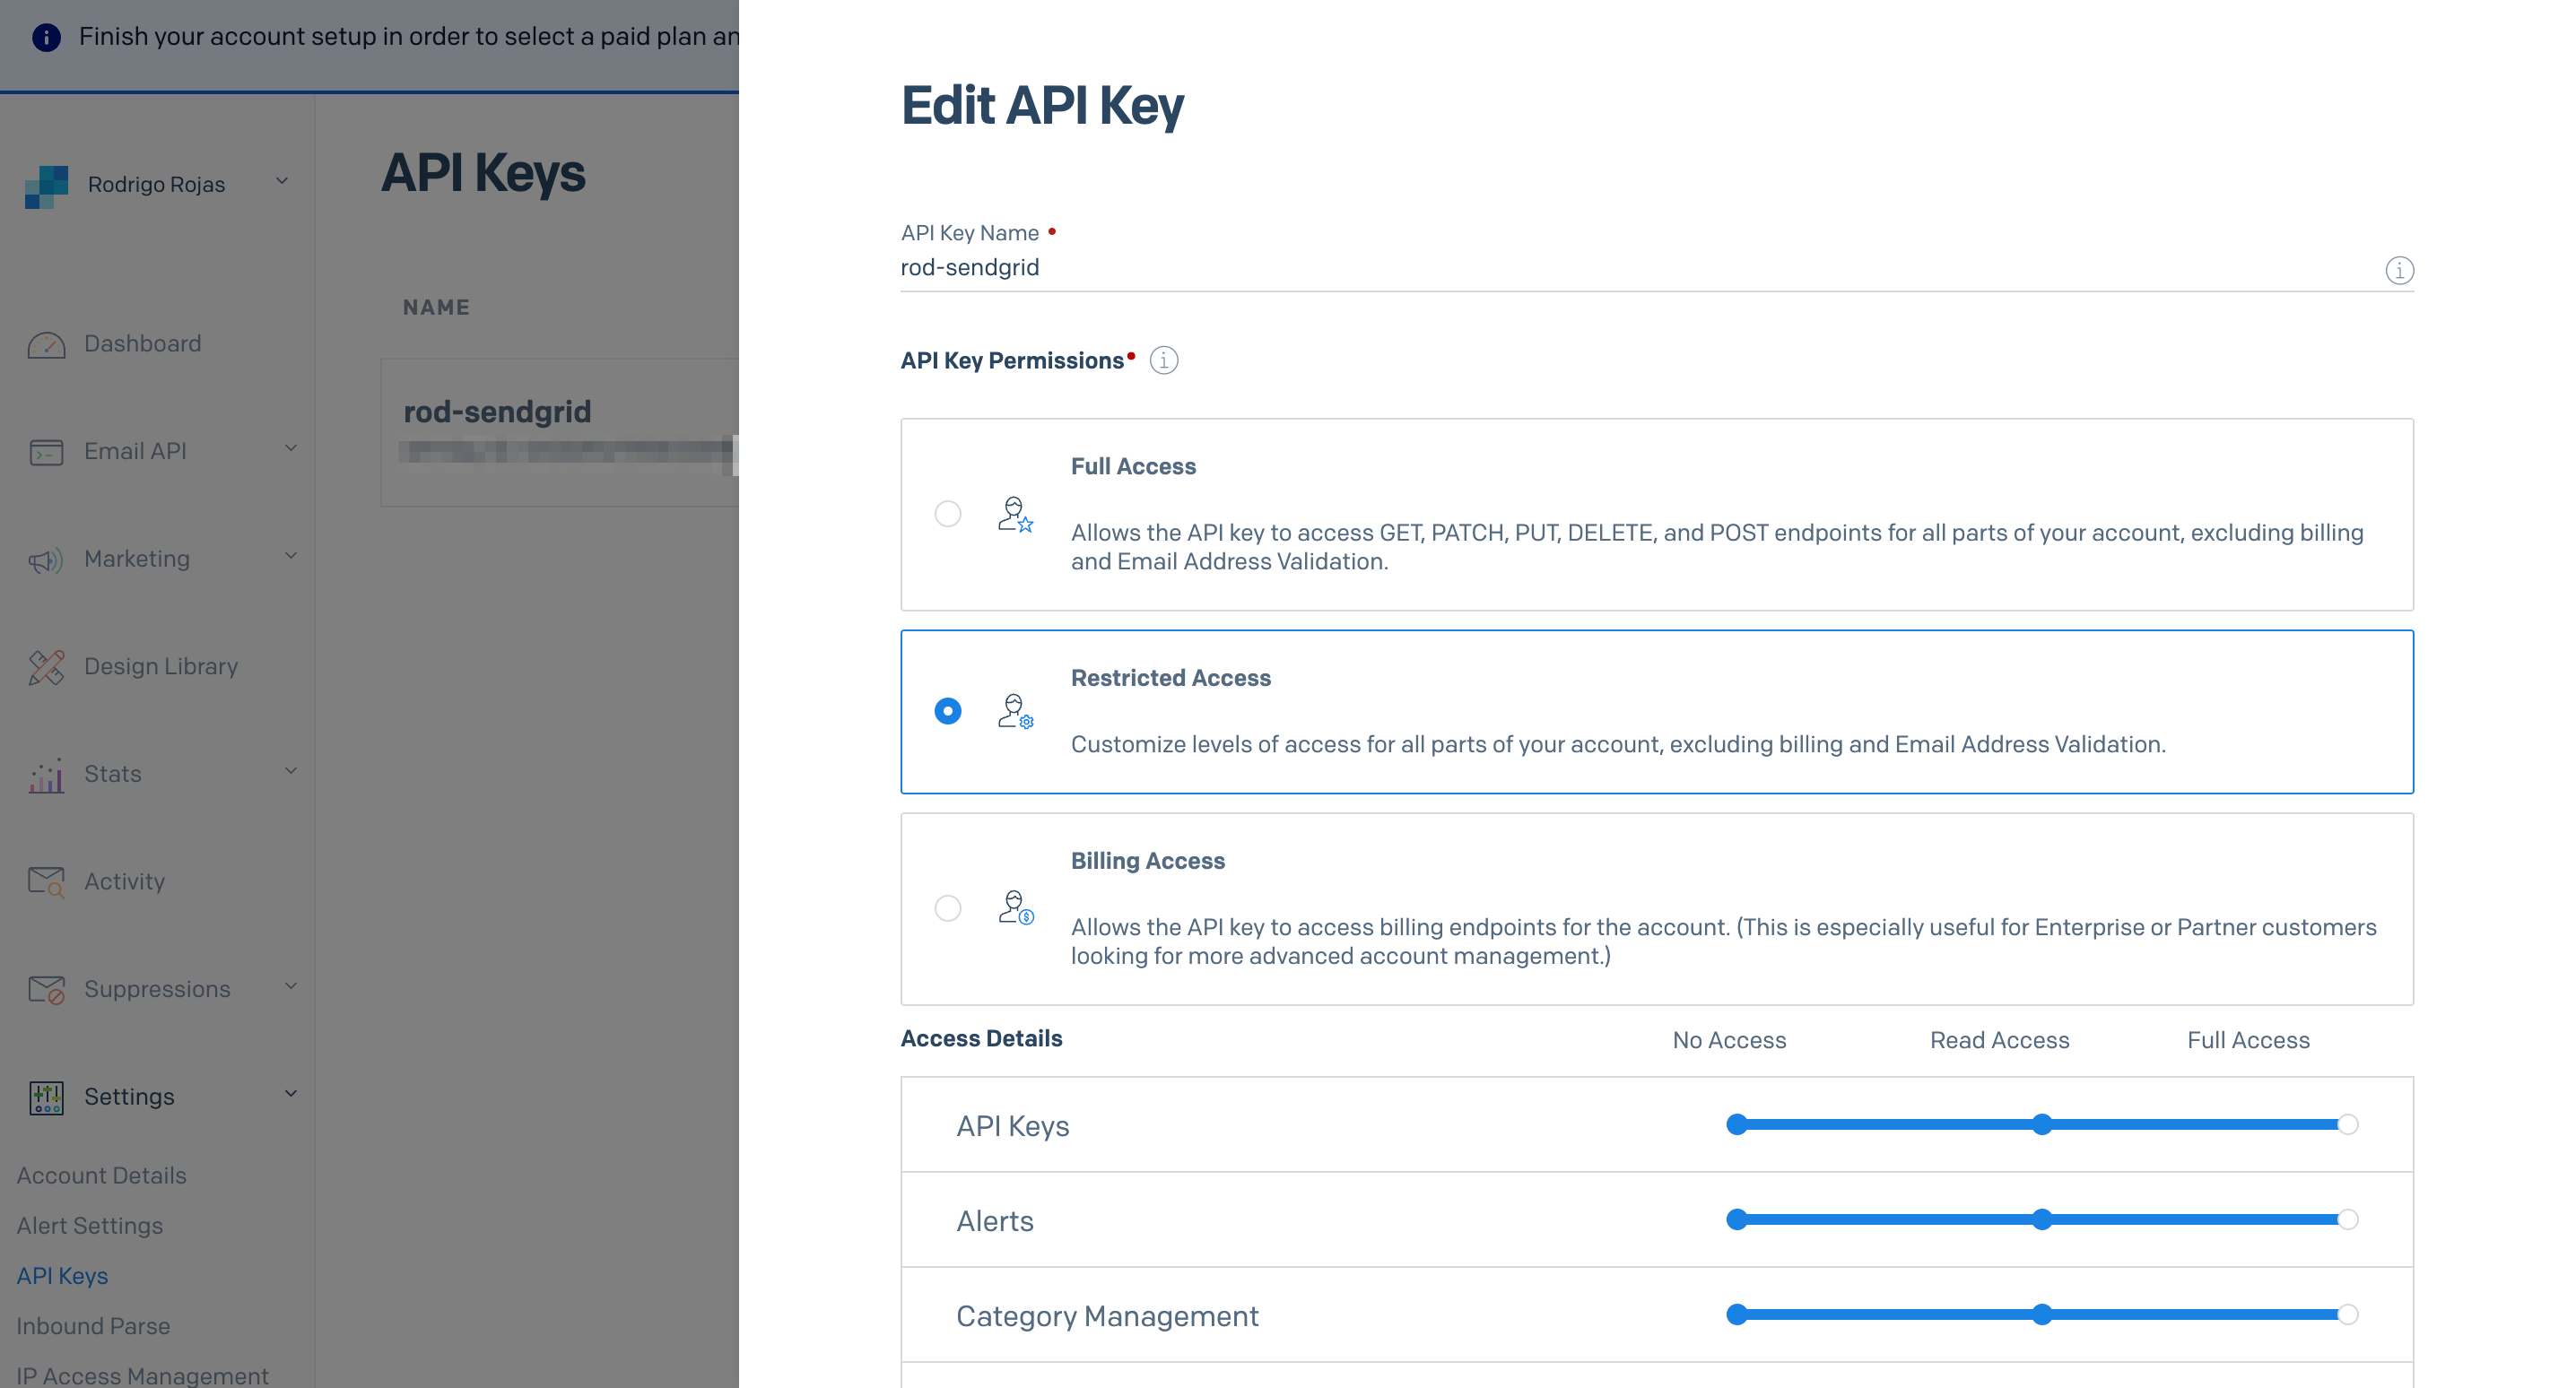
Solution

You can do one of the following.

  1. You can perform actions allowed by the API key you generated.
  2. Create a new SendGrid API key that allows the actions you wish to execute.

Creating the new SendGrid API key with desired permissions

When creating the SendGrid API key, you can select the permissions that you need in the setup guide. To do so, visit the SendGrid API keys console and select "Create API Key." It displays the figure shown below.

Creating a new SendGrid API key

As illustrated above, SendGrid allows you to select three permission scopes:

  • Full Access
  • Restricted Access
  • Billing Access.

In addition, you can select the access levels that you require for your API Key based on your requirements.

Error: sendgrid invalid email

Whenever you try to send an email to an address that does not comply with internet email formatting standards, or if the email does not present on the recipient's mail server, you will get an invalid email error. This response might originate from either your server or the receiver's mail server.

SendGrid checks the email address format before sending it to ensure that it is legitimate. If the receiver server cannot locate the address, it will return a 550 bounce, indicating that the email address is invalid.

Inactive recipients who don't connect with your content have invalid email addresses. In addition, for a variety of reasons, unengaged email addresses may be invalid:

  • Invalid emails may contain typos or misformatting, preventing them from reaching a legitimate inbox.

  • An email can become invalid if the user's email address changes, leaving the prior email address empty. The biggest cause of emails being invalid is inactivity or lack of engagement.

  • When an inbox provider, such as Earthlink, goes out of business or a server goes down for good, all email domains under that provider become "dead." The emails linked to this defunct domain are similarly invalid.

Solution

  • Email verification for cleaning or "scrubbing" email lists to increase email deliverability and engagement rates using a variety of digital email verification tools.

  • Sort your email list by why each address signed up for your newsletter. You can use this method to see if your emails are relevant to your readers. If your email communications are irrelevant or out-of-date, it can affect your total engagement rate by lowering open and click-through rates.

  • Contacts can be divided into groups based on their level of interaction. Double-check that it is still legitimate if you come across an email that appears to be graymail. If not, add the address to the unsubscribe or opt-out list.

  • Create a sunset policy. A sunset policy's purpose is to discover disengaged contacts regularly and remove or re-engage them from your email lists.

Maximum Credits Exceeded SendGrid

SendGrid credits denote the number of emails that you can send. SendGrid uses one credit per email, and these credits get renewed at the start of every month. Therefore, you will run into this error if you exceed the maximum number of emails your SendGrid account can send.

Solution

You will have to wait until your quota gets renewed to resolve this error. If this is not an option for you, you can upgrade your SendGrid plan and get more credits based on your requirements.

SendGrid 535 Authentication Failed Bad Username Password

This error can happen due to the below reasons:

  • Username and password are incorrect. Error 535 occurs when the username and password entered in the Email client are incorrect. Using the incorrect mail server can potentially result in authentication difficulties.

  • The account has been disabled. Accounts might be disabled for a variety of reasons, including past-due payments or spamming difficulties.

  • SMTP Authentication error can occur if your email client does not have SMTP authentication enabled.

Solution

  • Check your username and password, billing plans, and account status.

  • Check whether you have confirmed your email address.

  • Configure SMTP Authentication.

  • Your API Keys should be saved as environment variables. This is a far safer technique, with the additional benefit of only having to change them once rather than searching for them every time they're used.

  • Set up sender authentication for domains so that SPF and DKIM can be set up. This functionality enables you to use industry-standard email authentication protocols to authenticate your domains with the Twilio SendGrid account.

Sendgrid From Field Not Working

This indicates that the from address does not correspond to a verified Sender Identity. This error prevents an email from being sent until it is fixed.

Solution

Customers are asked to authenticate their sender identities in order to sustain the highest attainable sender reputations and to maintain legal sending behavior. The address your receivers will view as the sender of your emails is represented by a sender identity. You can use Domain Authentication or Single Sender Verification to authenticate one or more Sender Identities.