Most Popular
Get started sending notifications with Courier in minutes, not days!
We have SDKs in Ruby, Go, Python, Javascript, Node.js, and React.
Sign up
Sending Password Reset Notifications with Firebase and Courier
Setting up a password reset workflow inside your web application can be challenging. At a minimum, you need to build the logic to update the user’s password with a new hash, send the appropriate emails with the right content, and manage different user sessions across browsers.
If you’re responsible for managing password reset emails, it’s likely that you also have to manage all aspects of authentication and password management for your application. For those of us who are not security experts, it can be a much simpler and safer option to outsource this work to a system like Google Firebase.
Using Firebase with Courier gives the added advantage of full-featured notification infrastructure that integrates with your other product notifications and handles all the backend logic around delivery status, automation, template customization and management, internationalization, user preferences, email provider failover, analytics, and more.
This tutorial explains how to set up password reset notifications using Firebase and Courier. The examples are in Node.js, using the firebase-admin module and the Courier Node.js SDK; however, you should note that Courier provides SDKs for a number of different languages.
What is Firebase?
Firebase is a series of back-end cloud computing services for mobile app development, and the service we will be looking at here is Firebase Authentication. Firebase Authentication includes a built-in identity and access management system, and can help you implement a password reset workflow in no time.
Although Firebase Authentication allows you to send password reset emails, the email templates are limited when it comes to customization, and it doesn’t provide useful analytics about its notifications, such as which messages failed to send or how many were opened.
What is Courier?
Courier is a multi-channel notification service that allows developers to compose the entire notification experience across every available channel (email, SMS, Slack, MS Teams, push notifications, in-app notification inbox, etc). It provides a powerful REST API that can be integrated with any web or mobile application along with prebuilt UI components and a web studio to manage and customize notifications so they’re always on-brand and appropriate for the message-type and audience.
Implementation — sending the password reset notification
We will use Node.js to integrate Firebase with the Courier password reset workflow, using two packages:
- firebase-admin: Provides server-side access to Firebase services. It allows developers to perform admin-related operations on all Firebase services accounts.
- courier: Provides the module for using Node.js with Courier’s REST API, enabling access to Courier’s entire notification infrastructure and ability to work across any channel, including email, SMS, push, Slack and Courier’s full-featured web and mobile notification center that you can customize and drop into your app.
Step 1. Configure an email service provider in Courier
If you don’t have a Courier account, create one now.
Before you can send emails using Courier, you must configure an email service provider. In the Courier app, navigate to Channels and select your email service provider from the Provider Catalog. For this tutorial, we will be using Gmail.
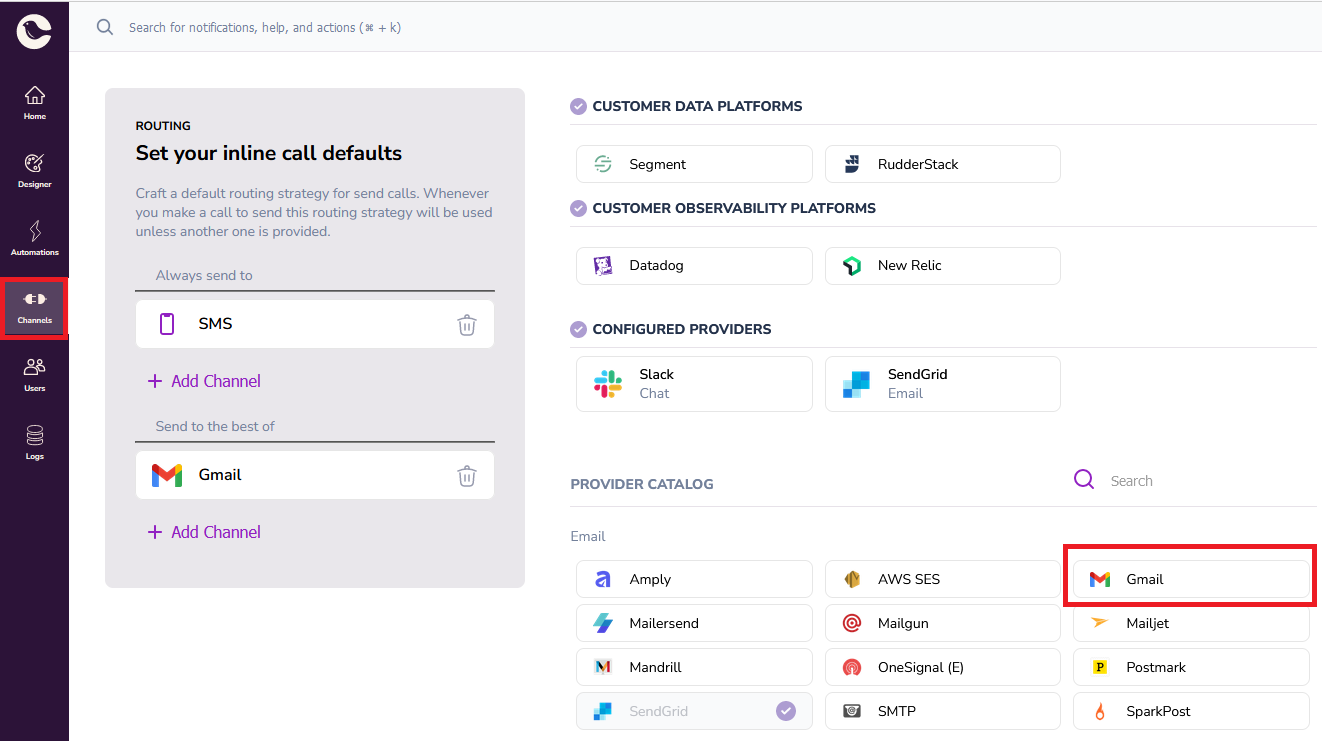
Next, select Sign in with Google and give Courier access to your Google account. Now you have configured Gmail as an email provider.
Note that Courier does offer channel failover (eg. to SMS) or provider failover in the event that the primary email provider (in this case, Gmail) fails.
Step 2. Design your password reset notification template in Courier
In this step, you will create your email notification template, which you will use to send the password reset email.
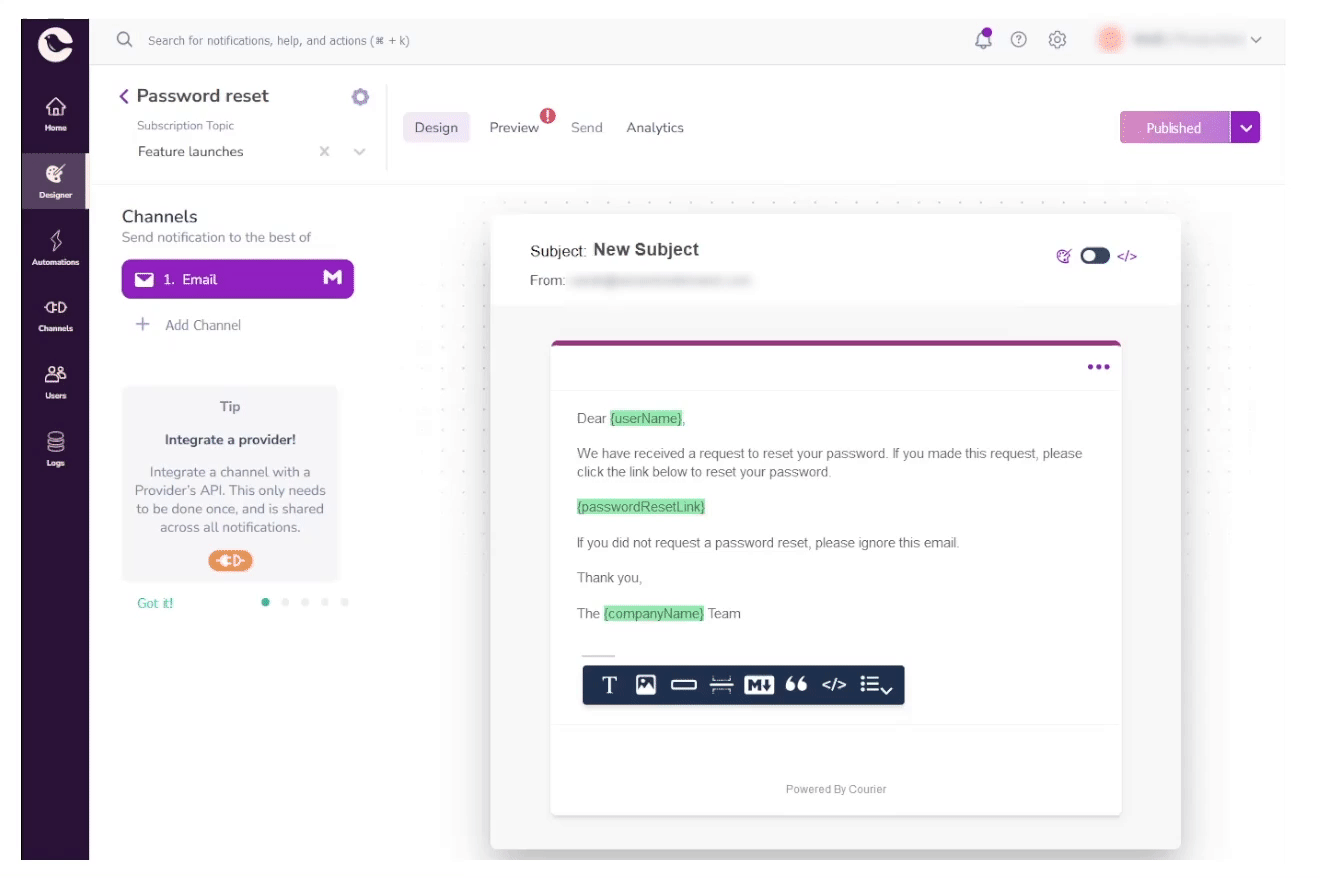
Navigate to Designer in Courier, and click the Create Template button to create a new template. Name it Password reset. If you check the box Use AI to generate notification content, an email template will be generated for you, based on your notification name. Click Create Template again.
You will now be asked to configure at least one notification channel. Select Email, and choose Gmail as the provider in the drop-down box. Click on the Email channel to begin writing your notification template, using Courier’s no-code editor. You can add variables to your template inside curly braces, which Courier highlights in green. Once you have created the content, click Publish Changes.
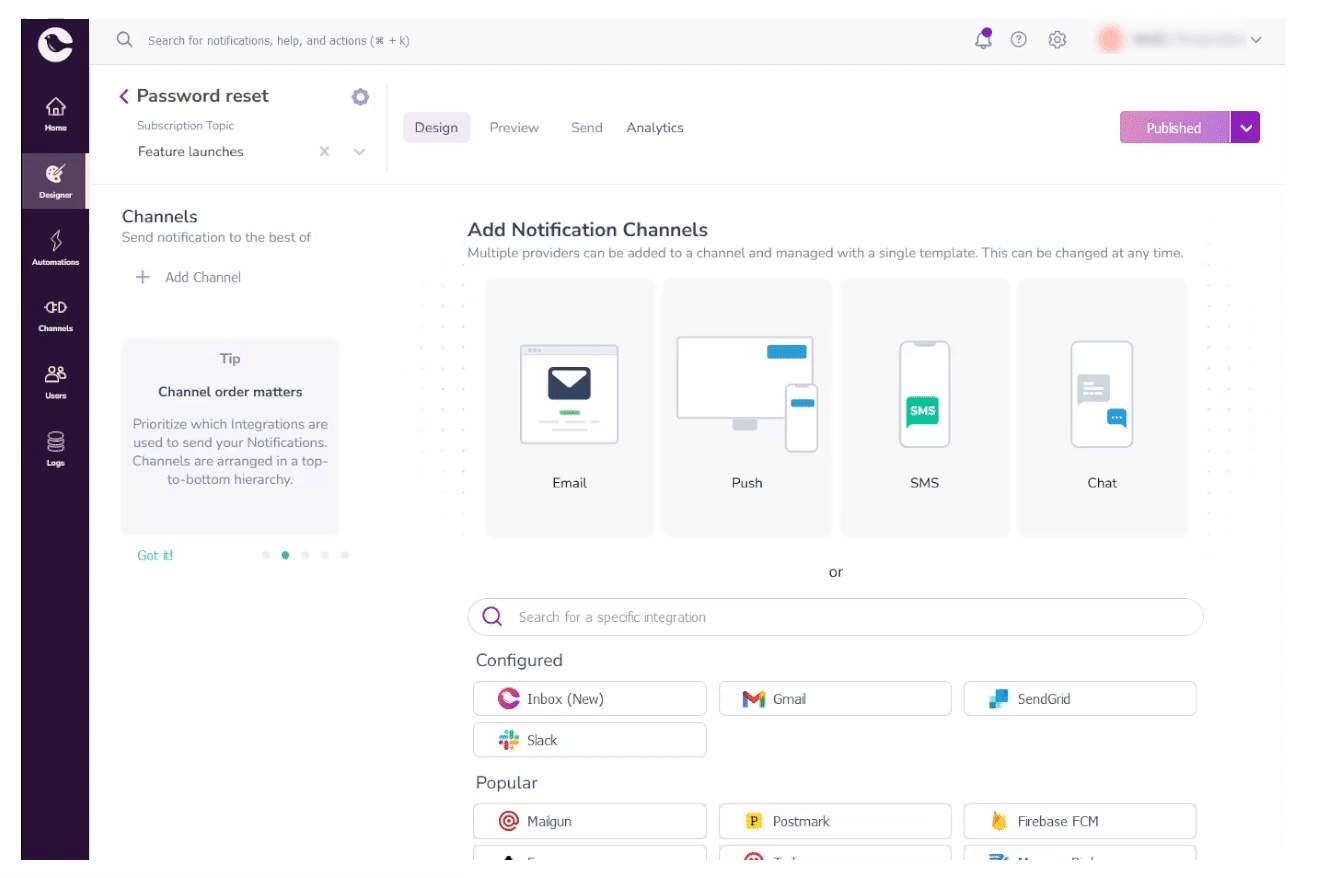
You can view your notification template ID by going to your notification's settings. You will need this later to refer to your notification template when sending notifications from your application.
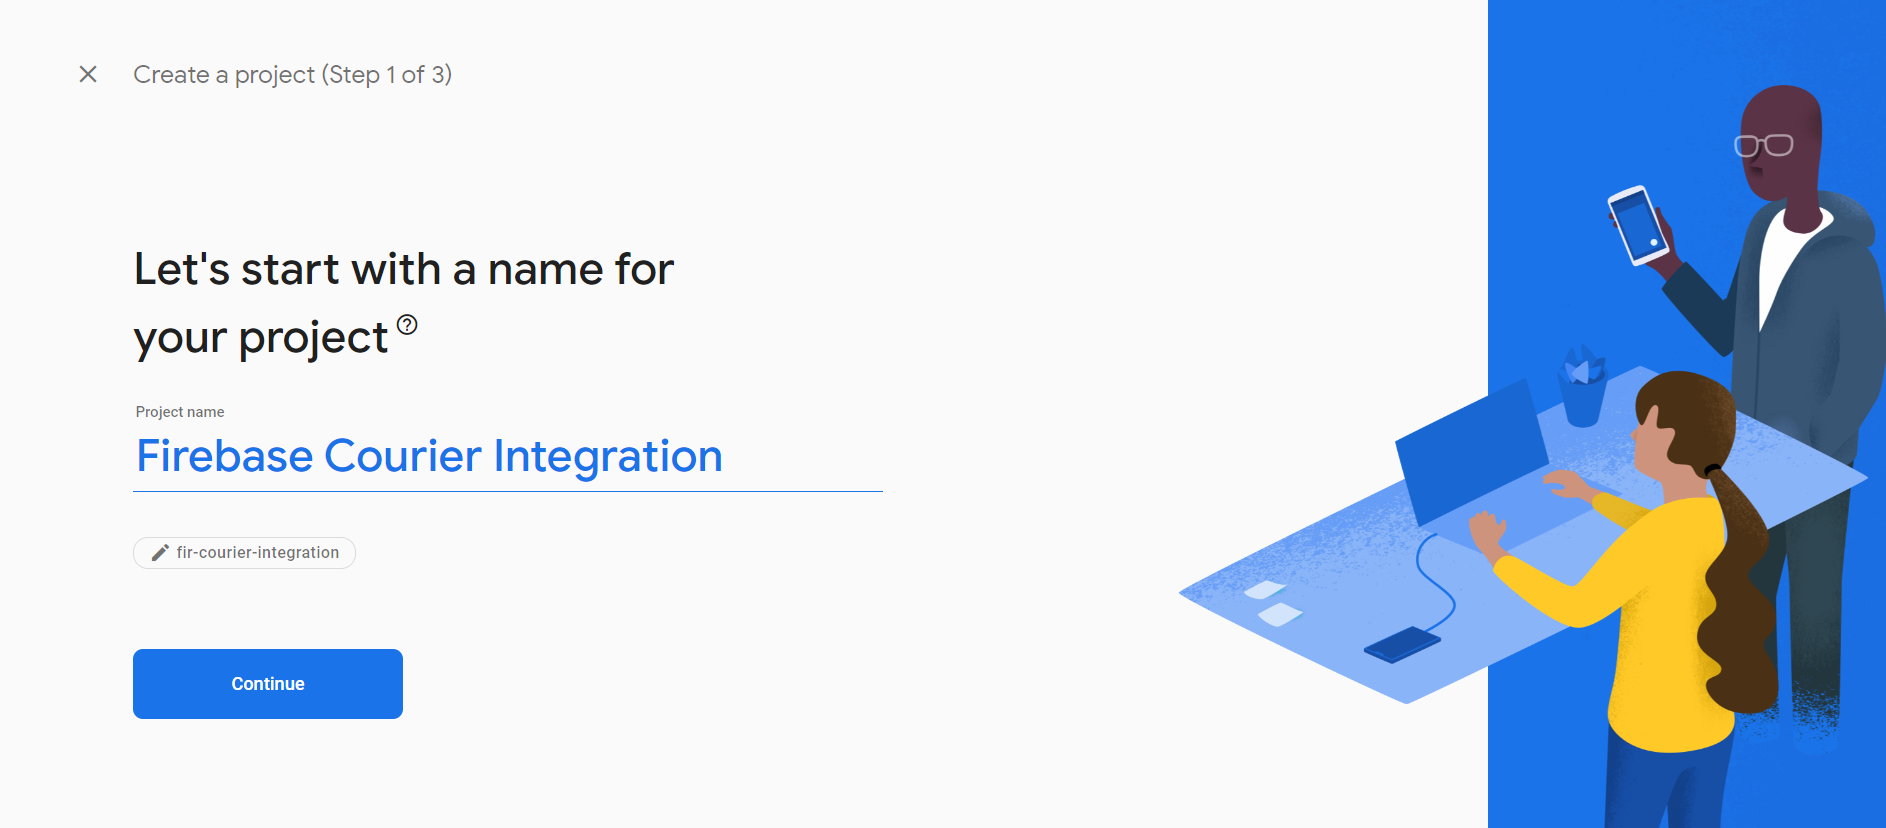
Step 3. Create a project in Firebase
First, create a Firebase account and log in. Then, create a new Firebase project from the Firebase console.
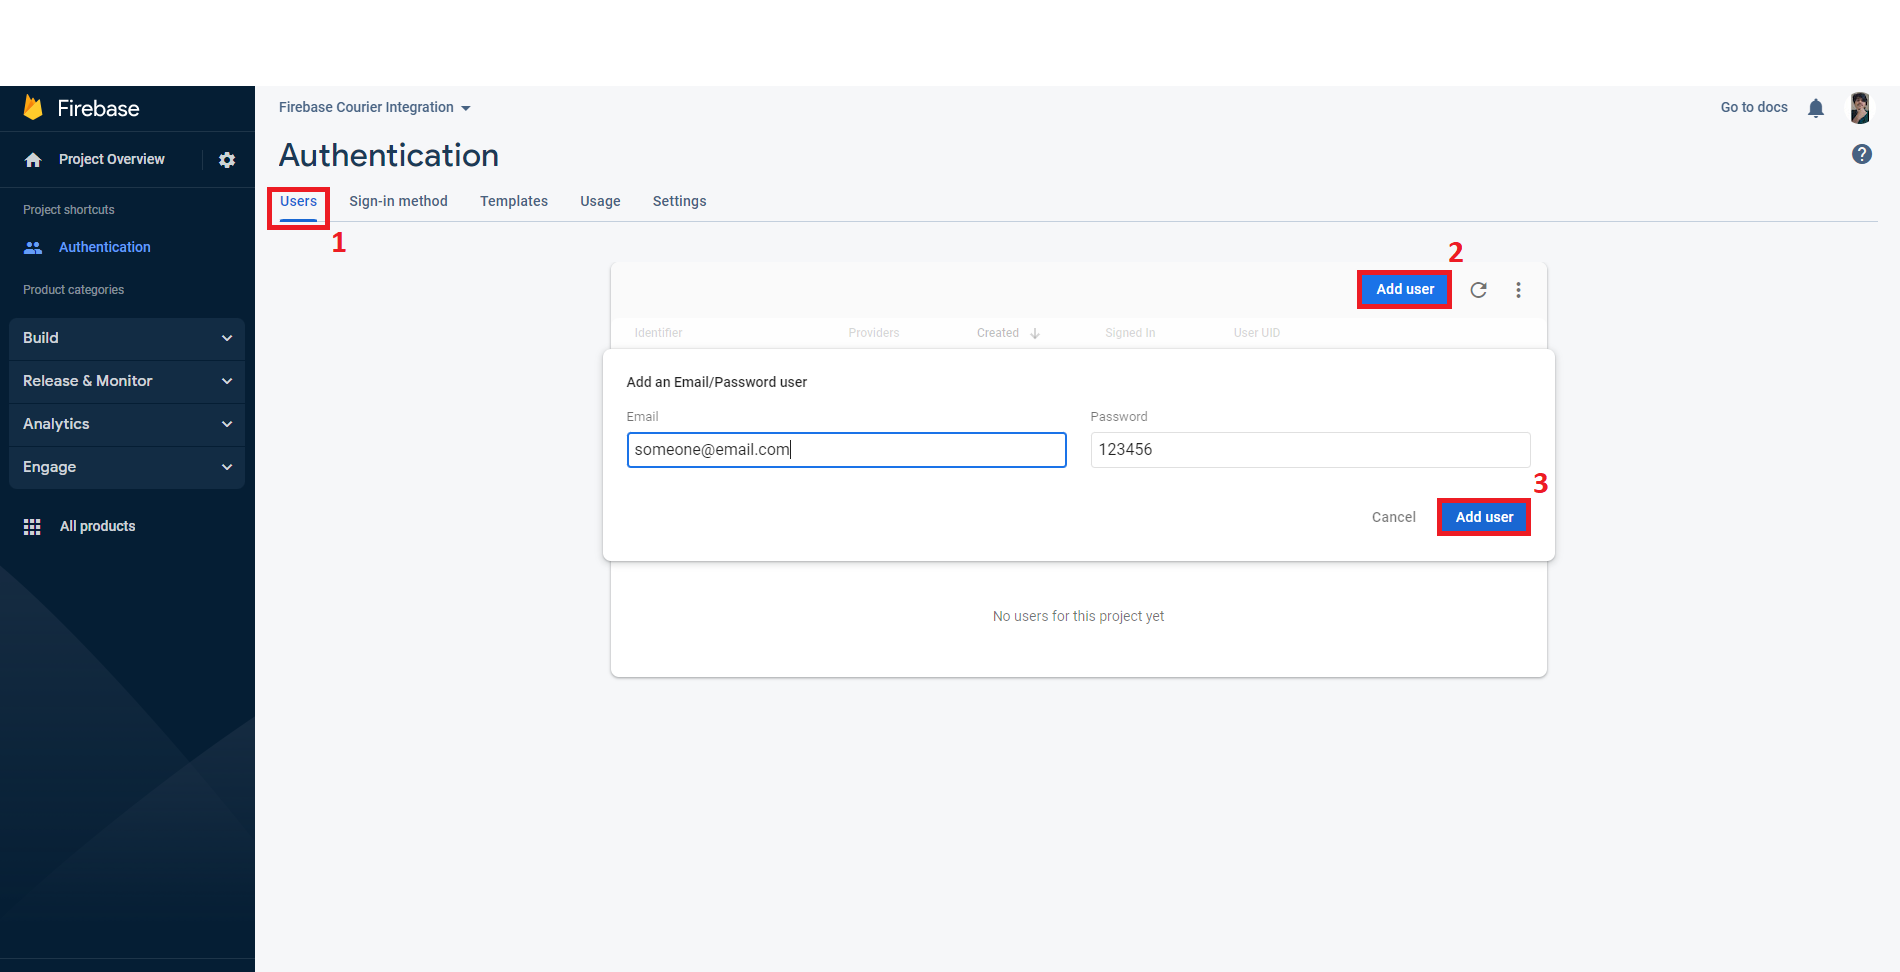
After creating the project, you'll be redirected to the Project Overview page, where you can set up Firebase Authentication by clicking on the Authentication card.
Now you will want to add some users so you can manage them. First, you must set up a sign-in method — this could be Email/Password, social media accounts such as Facebook, or other authentication providers such as OpenID Connect. For this tutorial, choose Email/Password as your sign-in method.

Now it's time to create a new user, which will be used later to test your Courier-Firebase integration. You can add new users to the project in the Users tab. Make sure you add your own email address here, so that you can later check if the messages that Courier has sent have been received.
Step 4. Create a Node.js project
First, install Node.js and npm. Then, create a directory for your Node project, and add a single file called index.js inside the directory. Use npm to install the firebase-admin Node module for interacting with Firebase, and the Courier Node module for interacting with Courier:
1npm i firebase-admin @trycourier/courier
Step 5. Connect to Firebase using Firebase Admin
The file index.js is where you’ll write your code. You will need to first import the Firebase Admin package, and then initialize your Firebase app. To initialize your app, pass some configuration details to Firebase Admin, including the name of the project in Firebase that you are initializing, as well as some extra details like your private key.
It is simplest to store all your Firebase authentication details as configuration in a JSON file; the details of how to do this are explained fully in the Firebase Admin documentation. Create a file called serviceAccountKey.json and paste in the JSON generated by Firebase, and then reference this file when initializing your Firebase app:
1const firebaseAdminServiceAccount = require("./serviceAccountKey.json");2const firebaseAdmin = require('firebase-admin');3firebaseAdmin.initializeApp({4credential: firebaseAdmin.credential.cert(firebaseAdminServiceAccount)5});
Step 6. Connect to the Courier SDK
Add this code snippet to your index.js file to connect to Courier:
1const { CourierClient } = require("@trycourier/courier");2const courier = CourierClient({ authorizationToken: "<YOUR_COURIER_API_KEY>" });
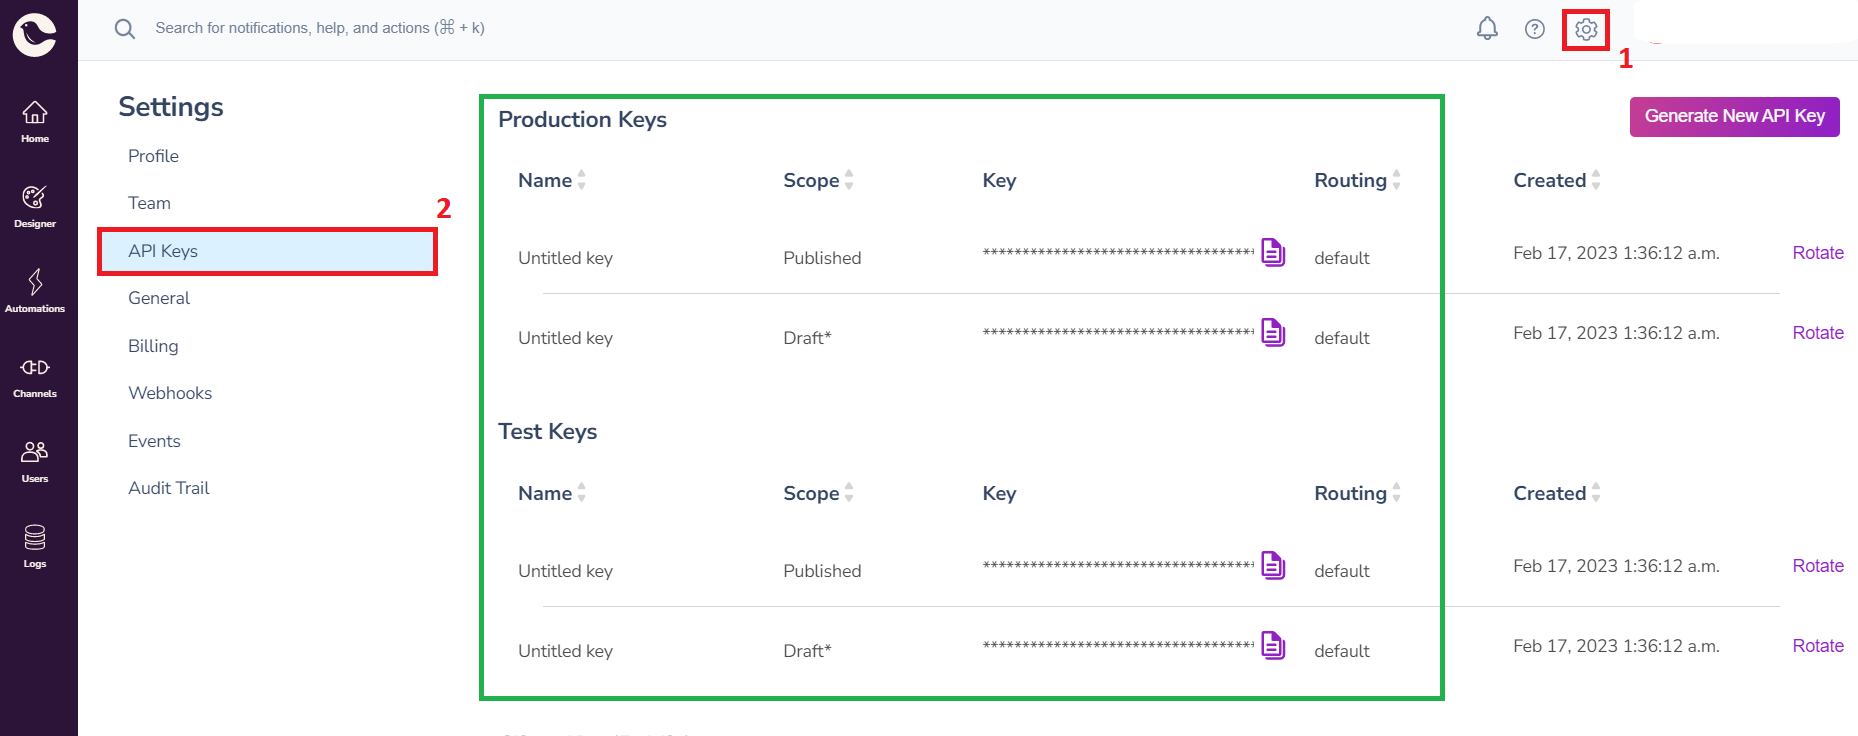
You must replace <YOUR_COURIER_API_KEY> with your actual Courier API key. This can be found in the Courier app by going to Settings -> API keys:
Step 7: Generate the password reset link using Firebase
Use Firebase Admin to generate the password reset link. Once this is generated, pass it to a function sendResetEmail (which you will define in step 8) to take care of sending the email:
1firebaseAdmin.auth().generatePasswordResetLink(email)2.then(async (link) => {3return await sendResetEmail(email, name, JSON.stringify(link), companyName)4})5.catch((error) => {6console.log('Error fetching user data:', error);7});
Step 8: Send the password reset email
You need to fill in the sendResetEmail function so that it actually sends the email. This function will use the Courier SDK to get Courier to handle the sending:
1const sendResetEmail = async (email, name, link, companyName) => {2return await courier.send({3message: {4template: "<NOTIFICATION_TEMPLATE_ID>",5to: {6email: email7},8routing: {9method: "single",10channels: ["email"]11},12data: {13userName: name,14passwordResetLink: link,15companyName:companyName16}17},18});19}
You’ll need to replace the <NOTIFICATION_TEMPLATE_ID> with the ID of your notification template. To do this, navigate to your password reset notification template, go to the notification template settings, and copy the Notification ID.
Full code example
Below is a working example of some code that calls Firebase and Courier to get the password reset link and send the email. Simply paste this into your index.js file.
1const firebaseAdmin = require('firebase-admin');2const firebaseAdminServiceAccount = require("./serviceAccountKey.json");34const { CourierClient } = require("@trycourier/courier");5const courier = CourierClient({ authorizationToken: "<COURIER_AUTH_TOKEN>" });67const email = 'someone@email.com';8const name = 'John Doe';9const companyName = 'Acme';1011firebaseAdmin.initializeApp({12credential: firebaseAdmin.credential.cert(firebaseAdminServiceAccount)13});1415firebaseAdmin.auth().generatePasswordResetLink(email)16.then(async (link) => {17return await sendResetEmail(email, name, JSON.stringify(link), companyName)18})19.catch((error) => {20console.log('Error fetching user data:', error);21});2223const sendResetEmail = async (email, name, link, companyName) => {24return await courier.send({25message: {26template: "<NOTIFICATION_TEMPLATE_ID>",27to: {28email: email29},30routing: {31method: "single",32channels: ["email"]33},34data: {35userName: name,36passwordResetLink: link,37companyName:companyName38}39},40});41}
Testing — verify that emails are getting sent
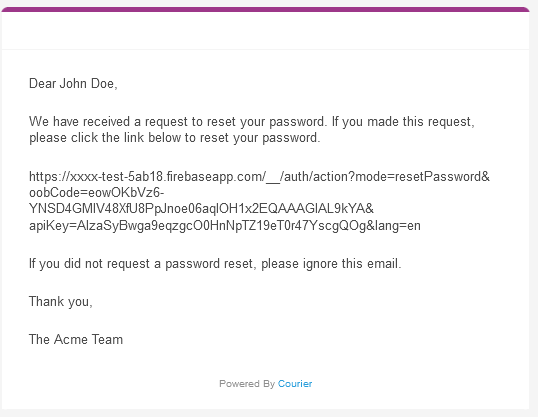
Testing this code is simple. All you need to do is enter the correct values for the placeholders <COURIER_AUTH_TOKEN> and <NOTIFICATION_TEMPLATE_ID>, enter your own values for variables in the data object, such as name ,link and companyName, and replace email with your own email address.
Now, run node index.jsto run your code, and then check your email. You should receive an email that looks something like this:
Conclusion
Integrating Firebase Authentication with Courier for sending password reset notifications provides a robust and convenient solution and it’s only scratching the surface of what’s possible with Courier. This gets you started with the foundation for sending password reset emails to your users, but please reach out to Courier if this is part of a larger infrastructure project around notifications that we can help you think through.
Firebase Authentication offers the functionality to send password reset emails, but it’s not designed to deliver the core functionality required for a production use case. By integrating Courier, you can leverage its extensive feature set with things like template customization, internationalization, provider failover, automation across channels, user preferences, and delivery analytics (such as delivery failures and open rates). Using Courier means you can manage all email templates in one centralized platform.
Overall, the combination of Firebase and Courier offers a powerful solution for managing password reset notifications, simplifying the development process, and enhancing the user experience. Please contact us if you want to further discuss your project and unique requirements.
Get started sending notifications with Courier in minutes, not days!
We have SDKs in Ruby, Go, Python, Javascript, Node.js, and React.
Sign up
More from Tutorial
How to Set Up Automatic Push Notifications Based on Segment Events
Push notifications have carved their own niche as a powerful tool for continuous user engagement. Regardless of whether an app is actively in use, they deliver your messages straight to your user's device. Two key players that can combine to enhance your push notification strategy are Segment and Courier. In this tutorial, we show you how to set up Courier to listen to your Segment events and then send push notifications to an Android device based on data from these events.
Sarah Barber
November 17, 2023
How to Send Firebase Notifications to iOS Devices Using Courier
This tutorial explains how to send push notifications to iOS devices from your iOS application code using Firebase FCM and Courier’s iOS SDK.
Martina Caccamo
November 01, 2023
Free Tools
Comparison Guides
Build your first notification in minutes
Send up to 10,000 notifications every month, for free.
Get started for free

Build your first notification in minutes
Send up to 10,000 notifications every month, for free.
Get started for free
© 2024 Courier. All rights reserved.