Okta SSO and SCIM provisioning are available on the Enterprise plan. Contact Sales or Courier Support to get started.
How It Works
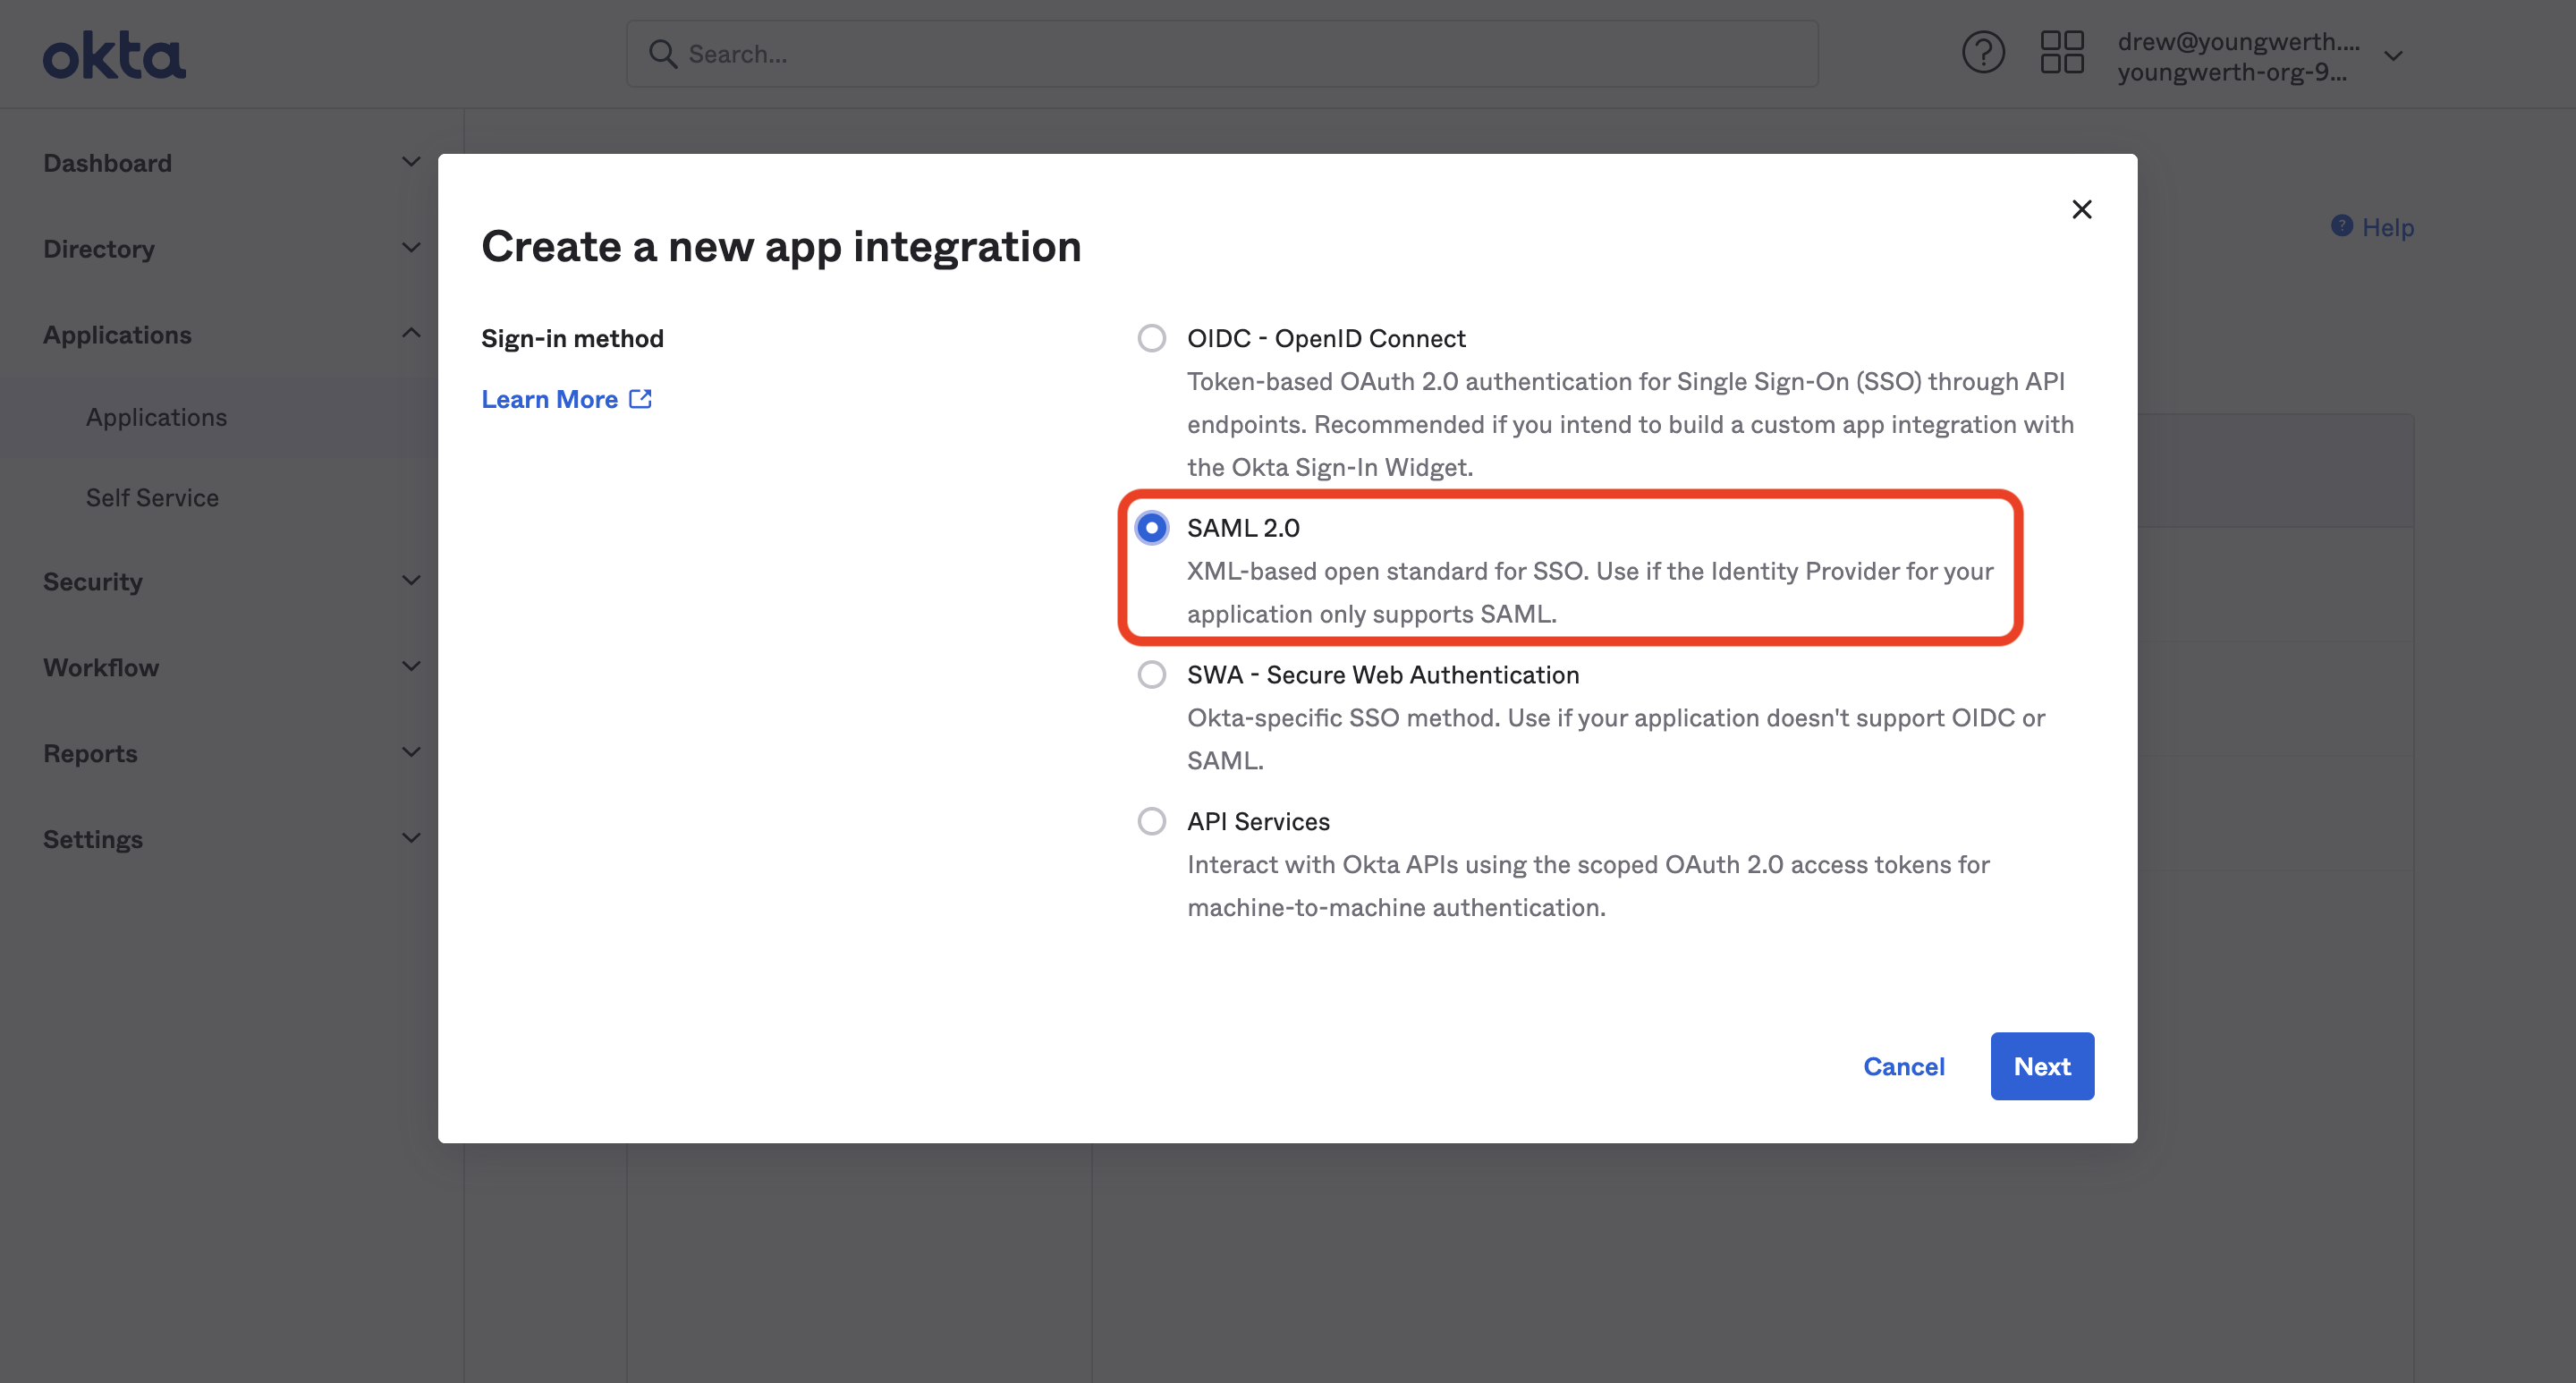
Okta SSO for Courier uses SAML 2.0 through AWS Cognito. Setup is a joint process between your team and Courier:- You create a SAML 2.0 app in Okta using the values provided below.
- You send the SAML metadata URL and your email domain(s) to Courier Support.
- Courier configures the backend to recognize your identity provider and maps your domain(s) to Okta.
- You test SSO login and set up the bookmark app for your team.
Prerequisites
- An Okta account with Admin privileges.
- A list of users who will access Courier and their intended roles (e.g., Administrator, Developer, Designer, Analyst). You’ll assign these when provisioning users through Okta.
- Contact Courier Support before starting so your backend configuration can be coordinated with the steps below.
Create the App Integration in Okta
Open the Applications page
Navigate to the Applications > Applications section of the Okta admin panel and hit the “Create App Integration” button.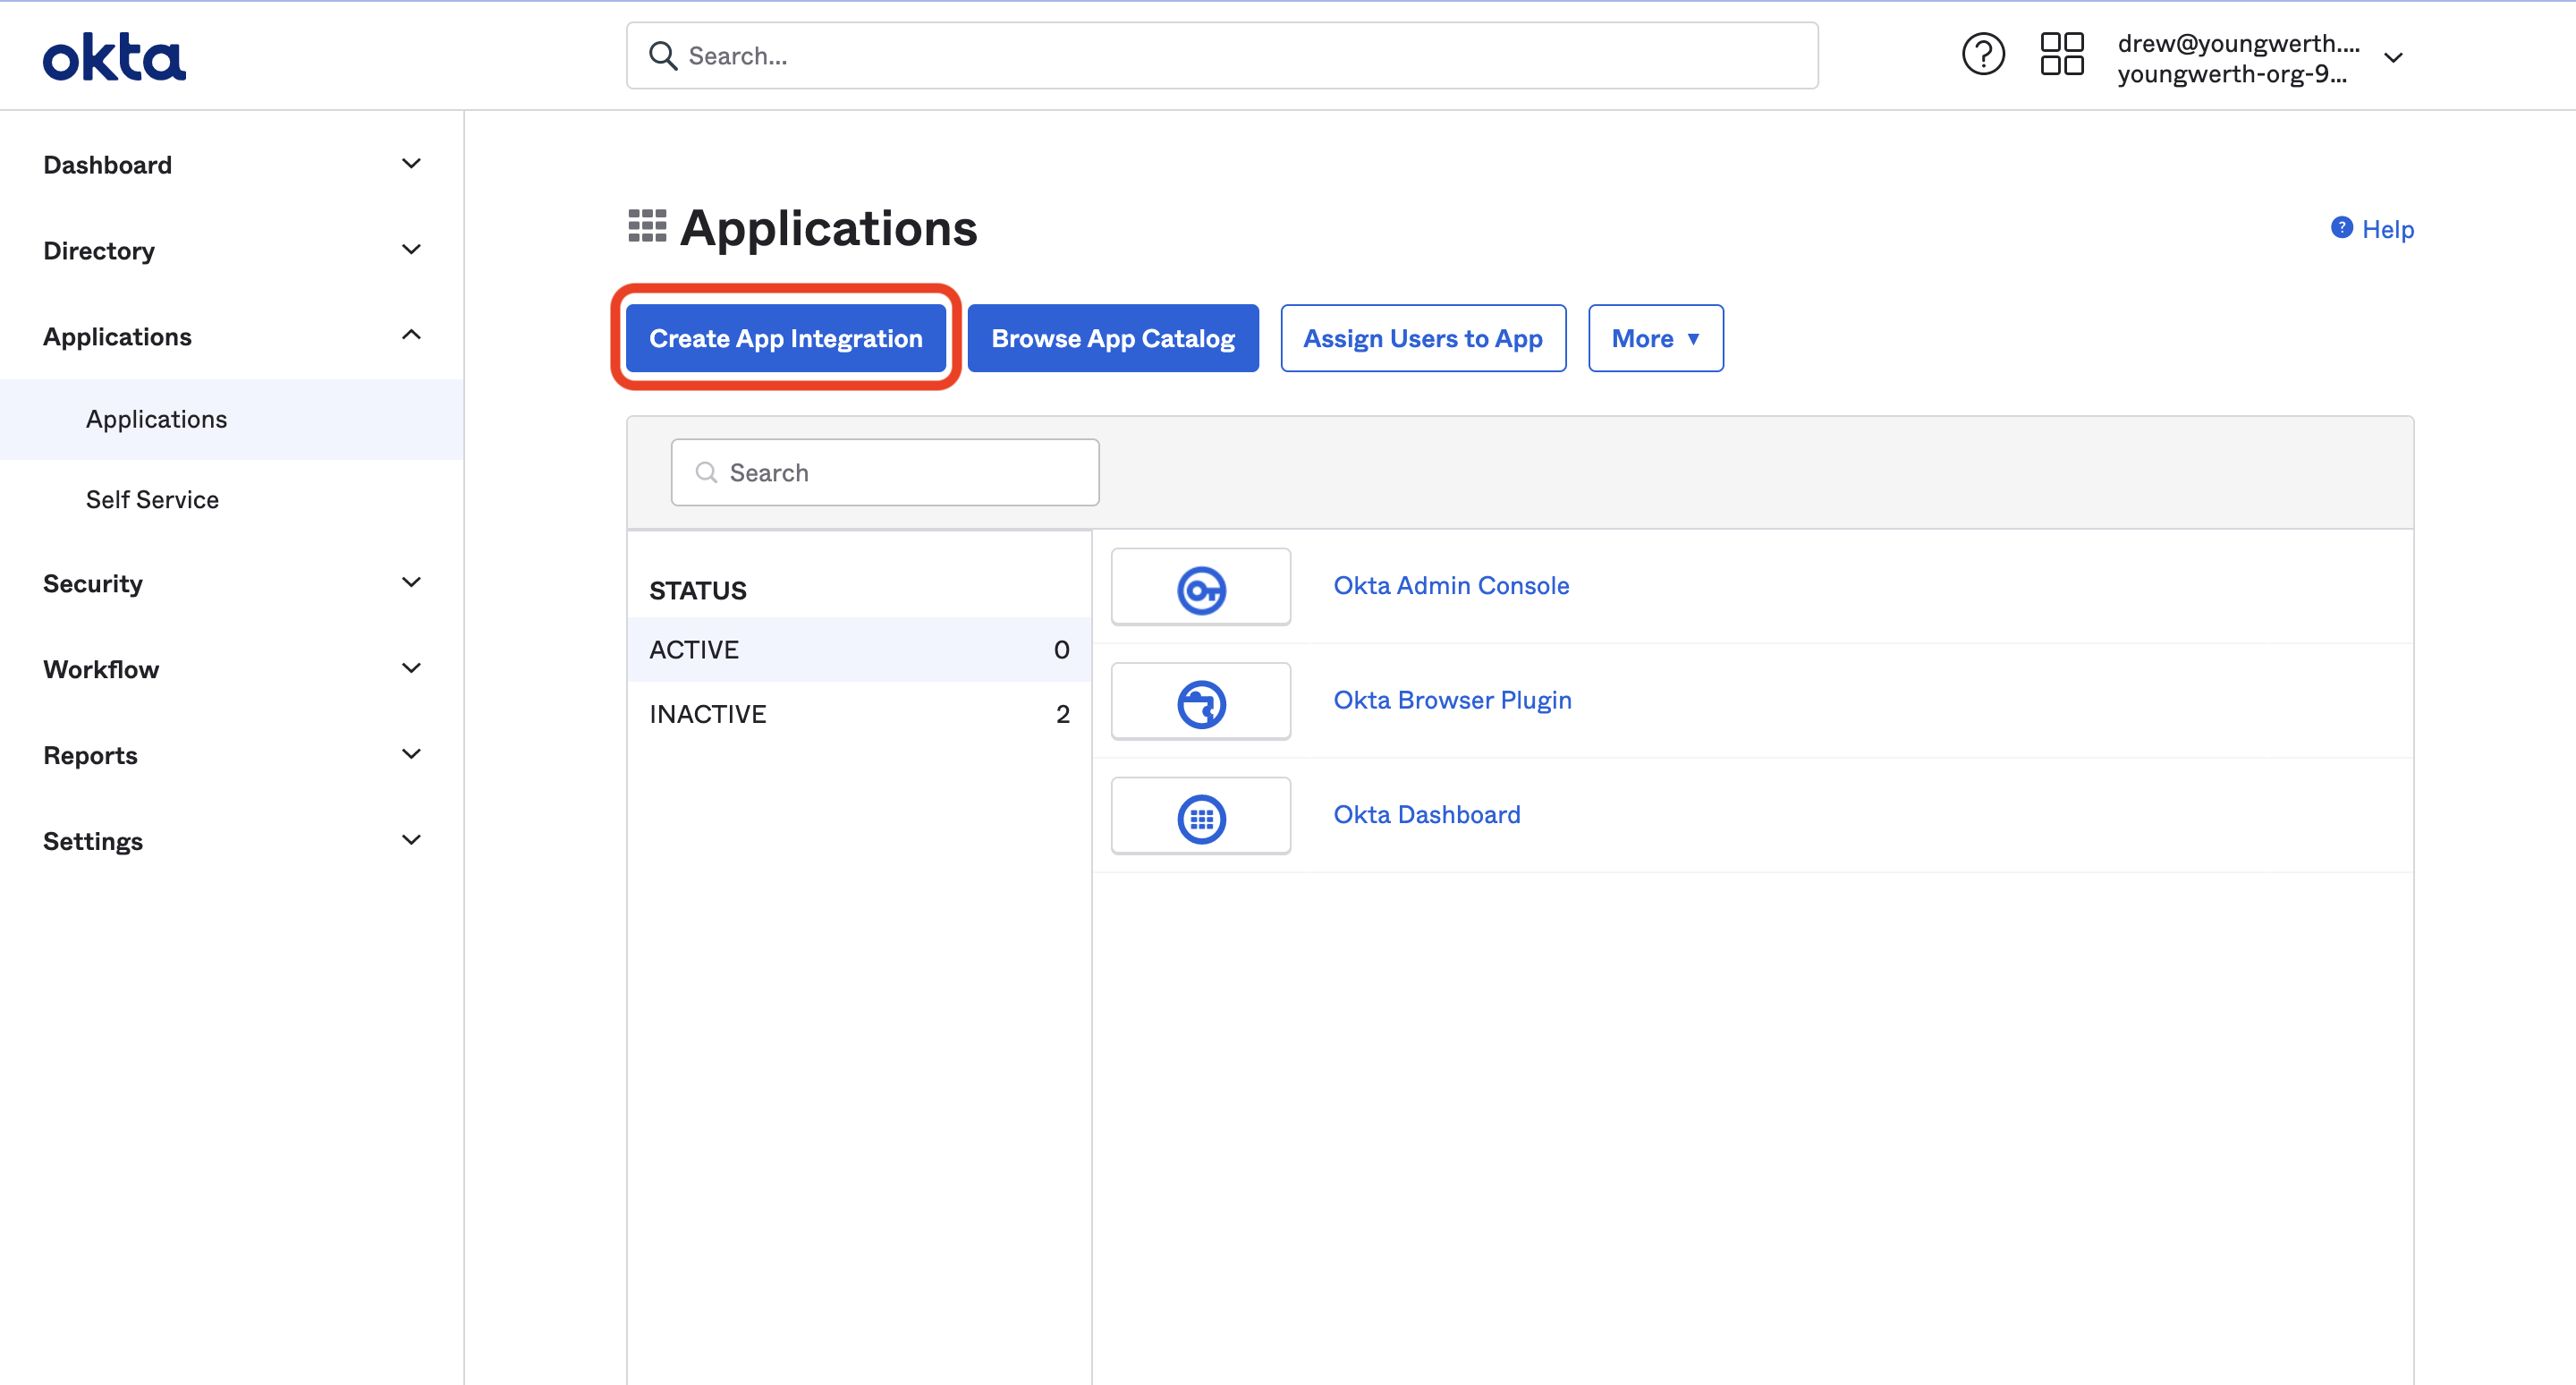
Name your app
Enter 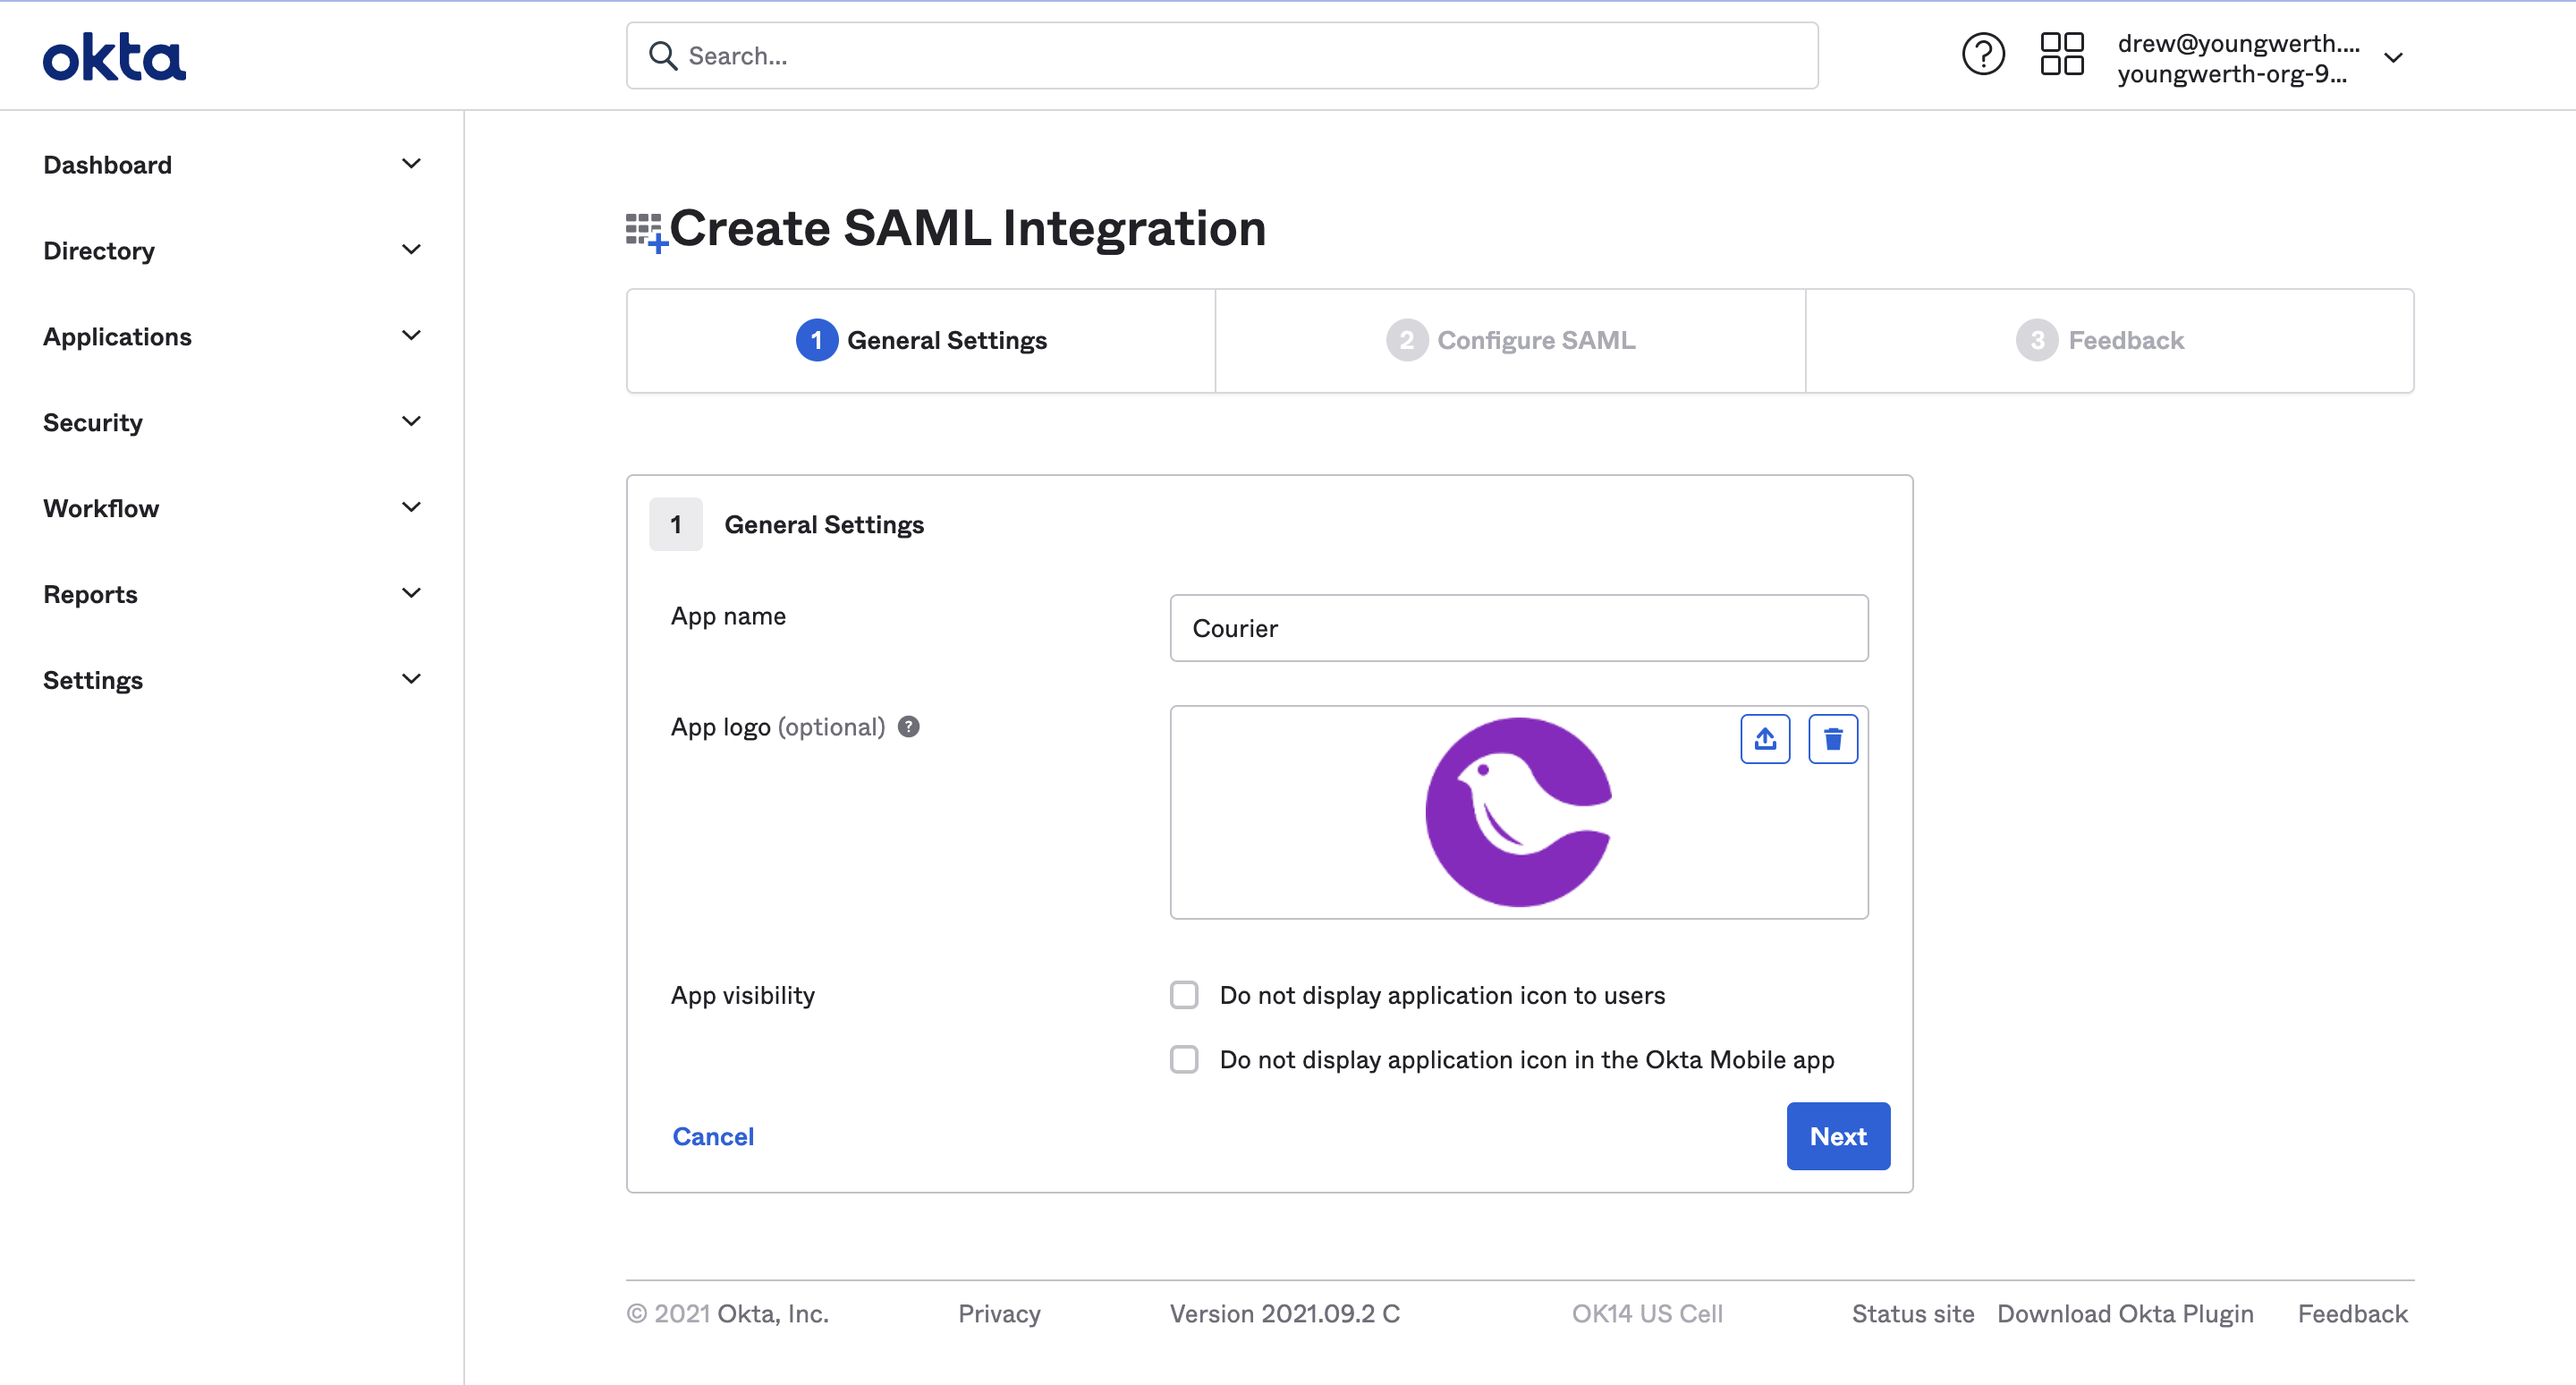
Courier as the app name and optionally provide the Courier logo, then click “Next”.You can optionally upload the Courier logo. Download it here.
Enter SAML settings
Enter the following values in their respective fields under SAML settings: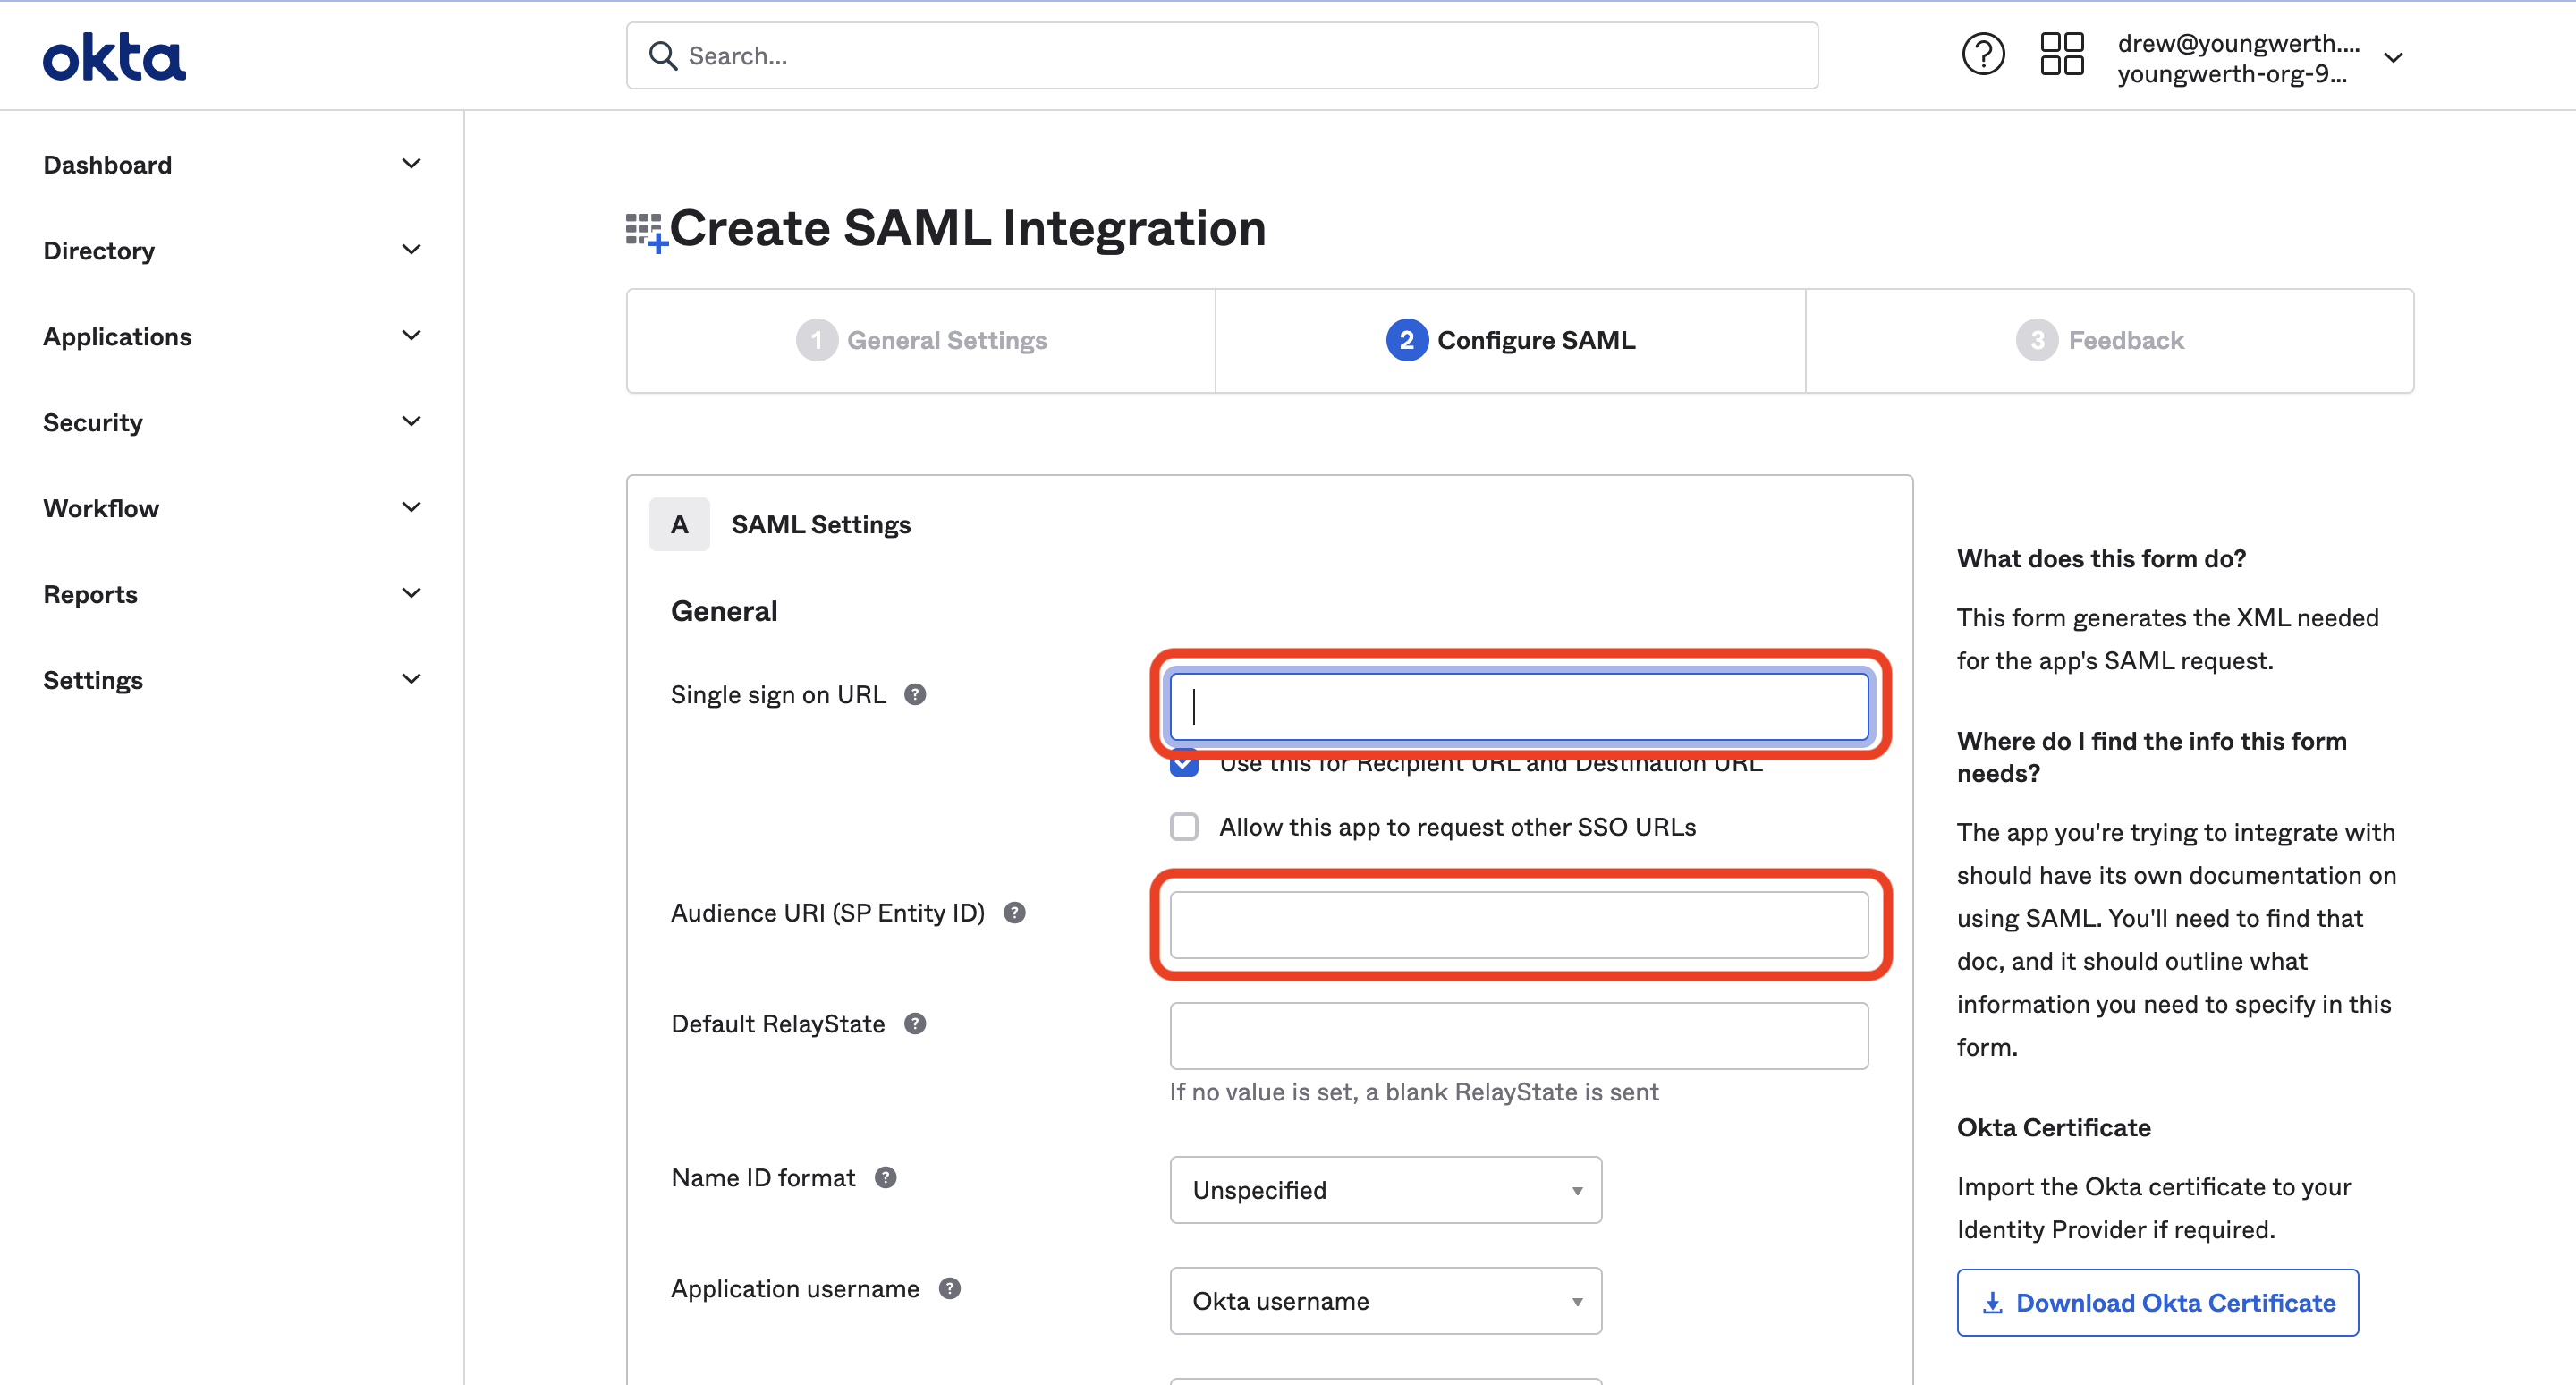
- Single sign-on URL:
https://courier.auth.us-east-1.amazoncognito.com/saml2/idpresponse - Audience URI (SP Entity ID):
urn:amazon:cognito:sp:us-east-1_ptbRzqiLw
Configure attribute statements
In the Attribute Statements section, enter the following information:
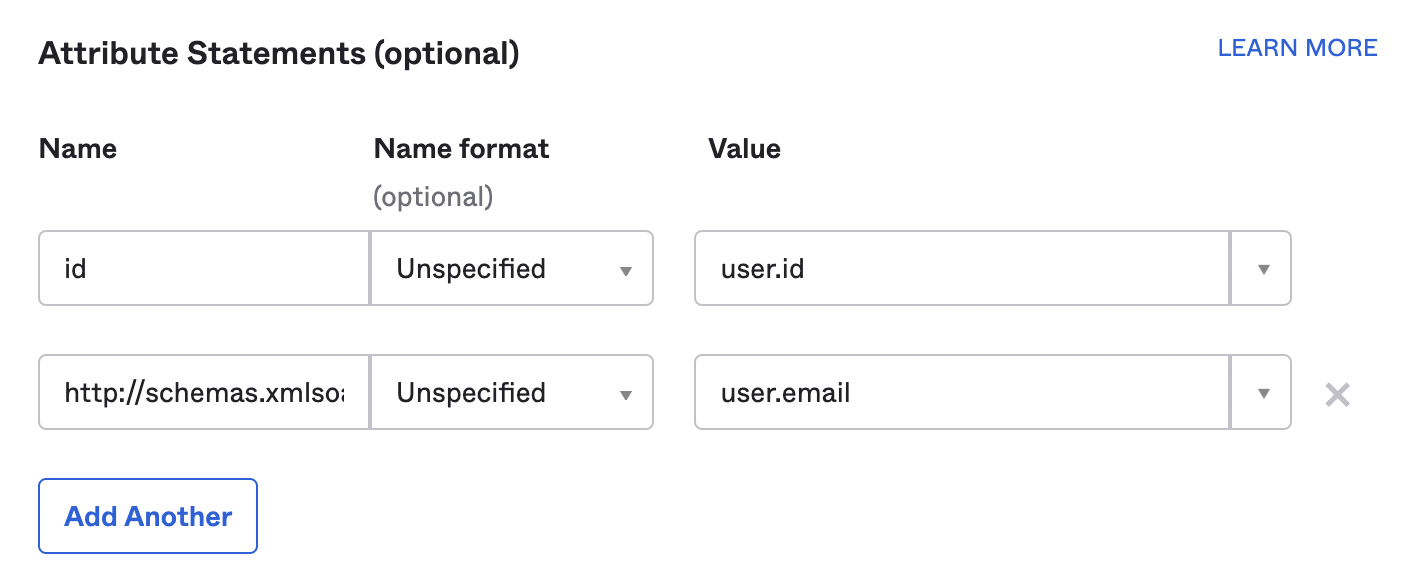
| Name | Name Format | Value |
|---|---|---|
id | Unspecified | user.id |
http://schemas.xmlsoap.org/ws/2005/05/identity/claims/emailaddress | Unspecified | user.email |
Finish the app creation
Hit “Next”, then under “Application Feedback” select “I’m an Okta customer adding an internal app” and hit “Finish”.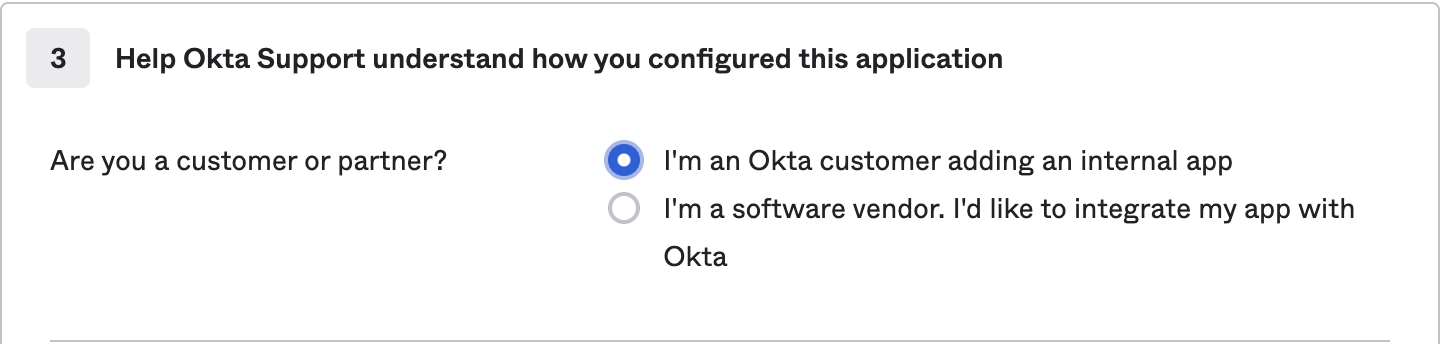
Send the Metadata URL to Courier
From the “Sign On” tab of the new Courier application integration, find the Metadata URL. Copy the link address and send it to the Courier support team member.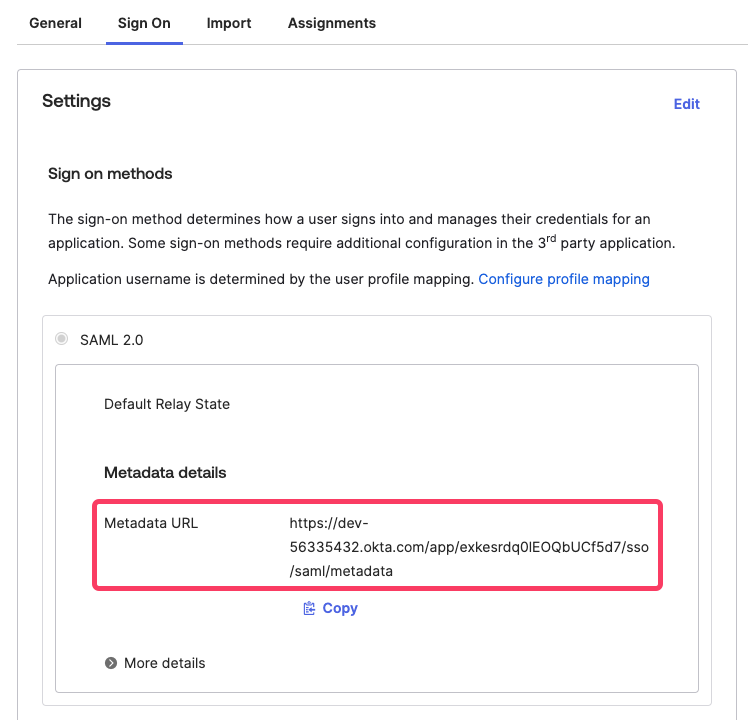
Creating a Courier Bookmark App
Courier does not support IdP-initiated login, so users cannot launch Courier by clicking an app tile in Okta. Instead, create a bookmark app that points to your SSO login URL. Once Courier Support has configured your SSO backend, your bookmark URL will follow this pattern (replaceYOUR_PROVIDER_NAME with the provider name Courier gives you):
Courier Support will provide your specific provider name (e.g.,
OktaYourCompany) and the complete bookmark URL after backend configuration is complete.Open the Okta admin panel
Log in to the Okta admin panel as an Admin and go to Applications > Applications.
Configure the bookmark
Enter an app name (e.g. 
Courier Login) and paste the bookmark URL from Courier Support into the URL field.Migrating Users to Okta
Enabling Okta SSO does not automatically switch existing users to Okta. Users who signed up with email or Google will continue using their original login method until they are re-invited. To migrate them:Check Google SSO settings
From the Settings > Team page in Courier, confirm that “Require Google SSO” is not checked.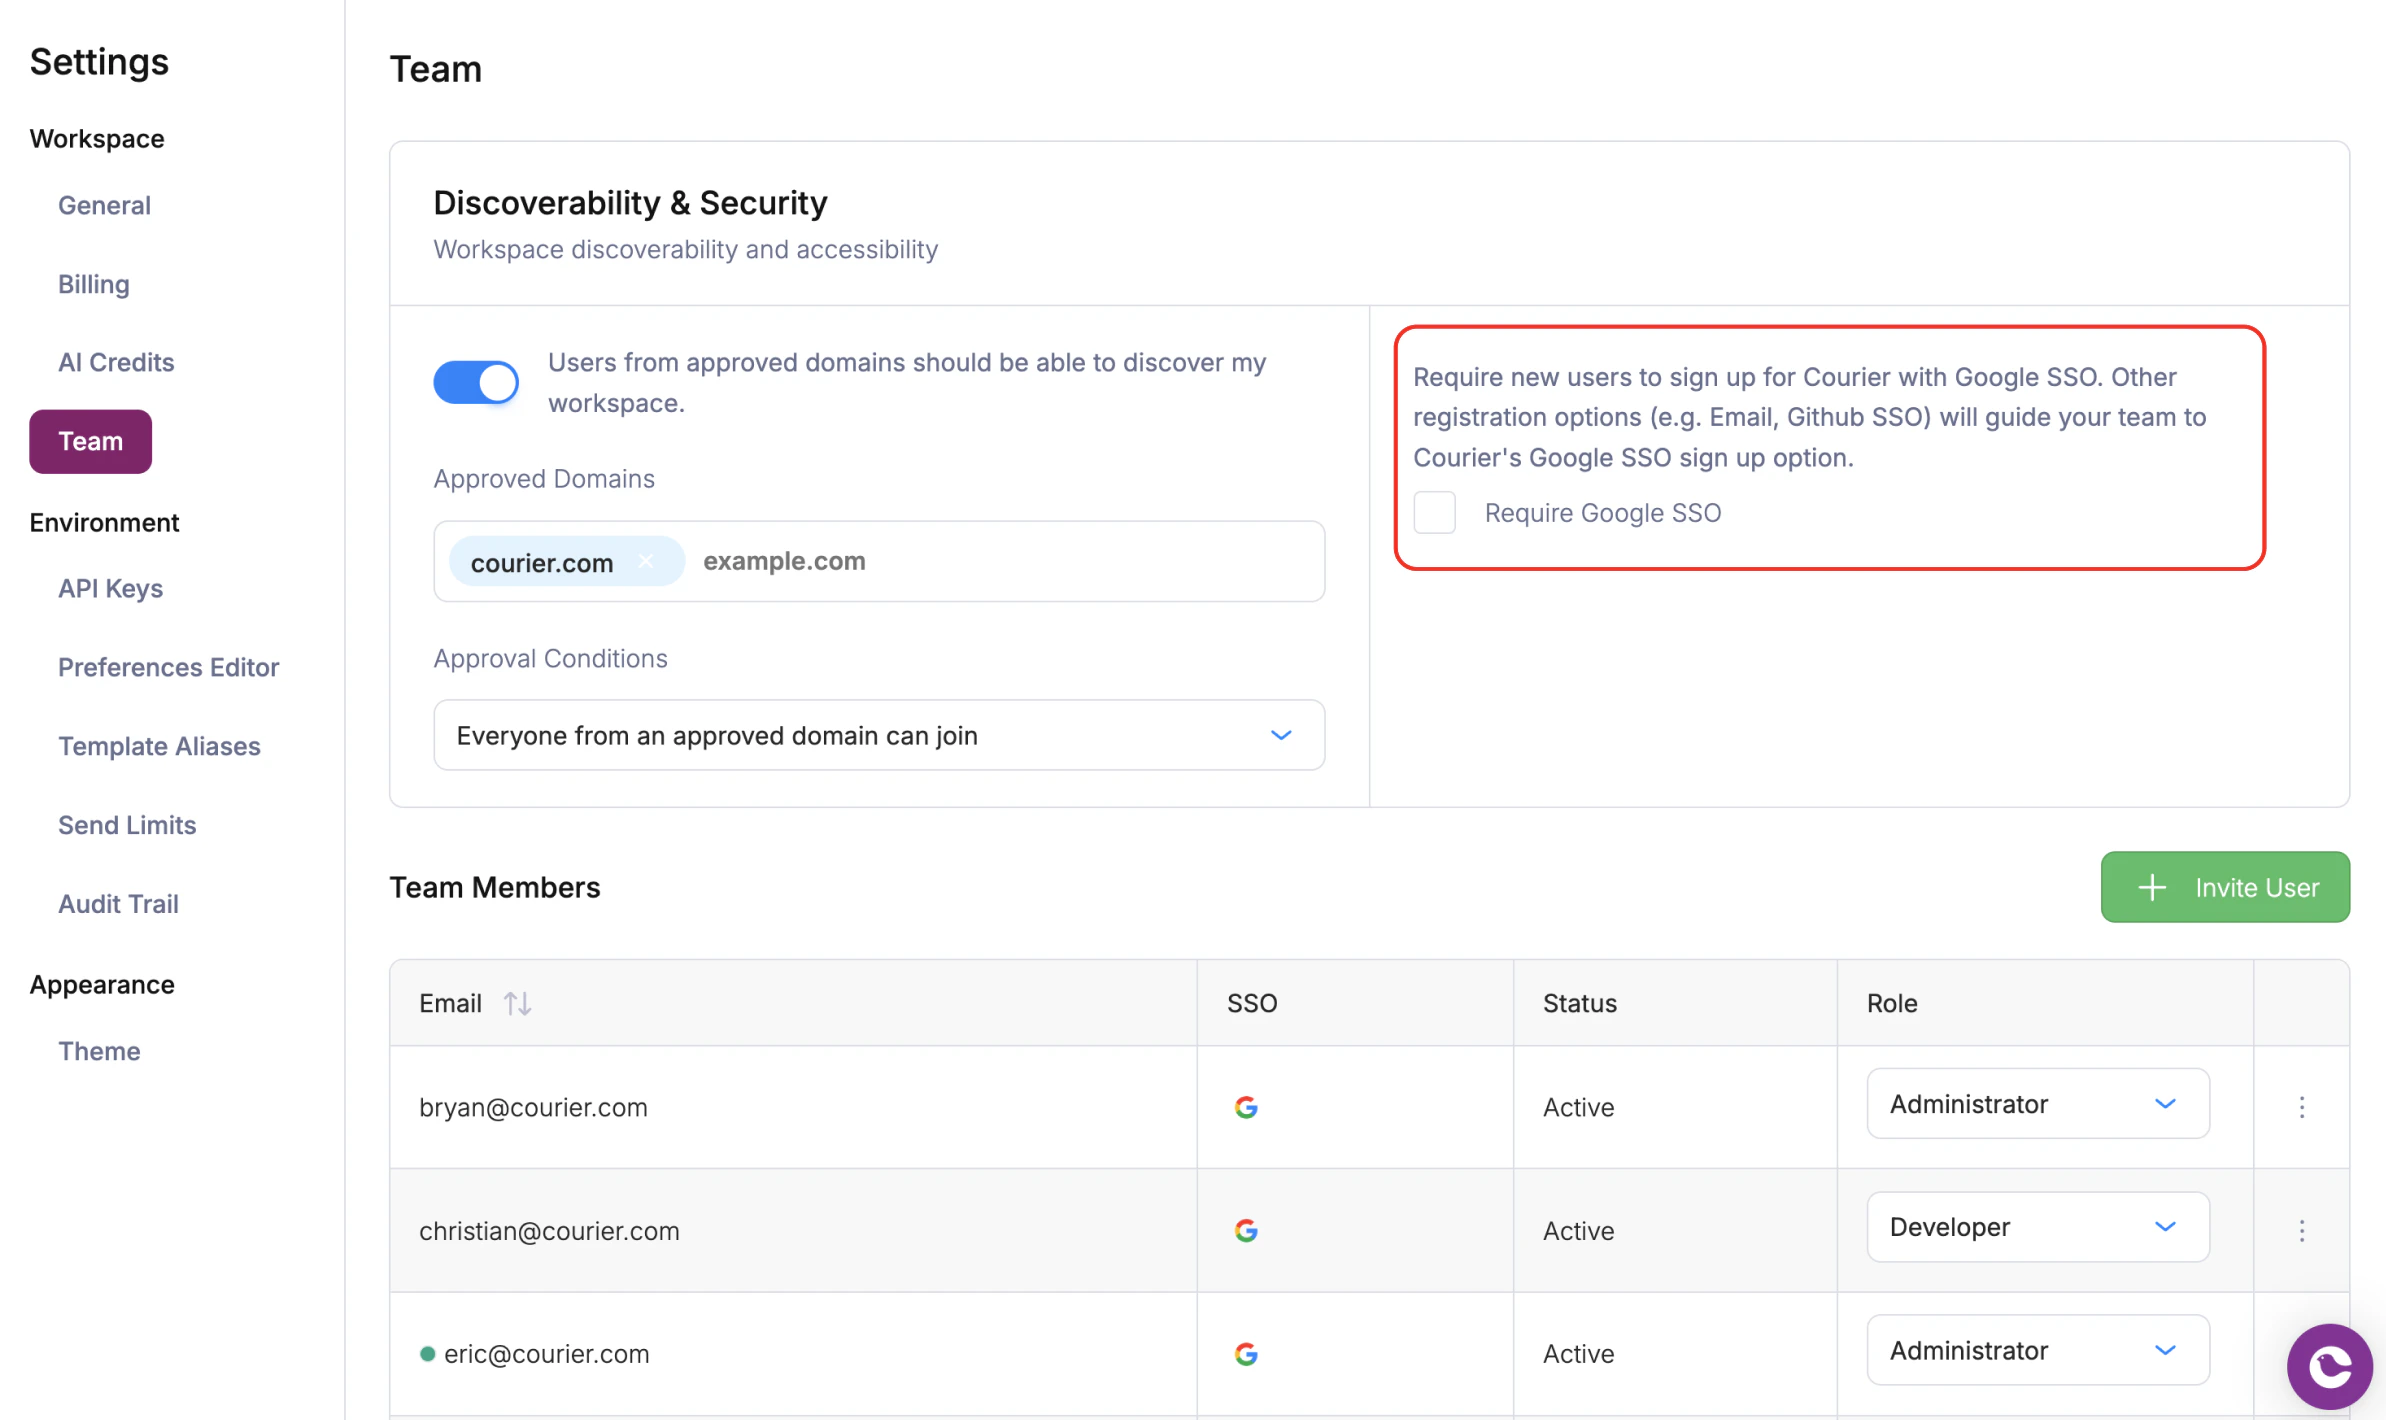
Accepting an Okta Invitation

User Provisioning with Okta SCIM v2
Open provisioning settings
Navigate to the Courier App from the Okta admin panel, go to the provisioning tab, and click “Edit”.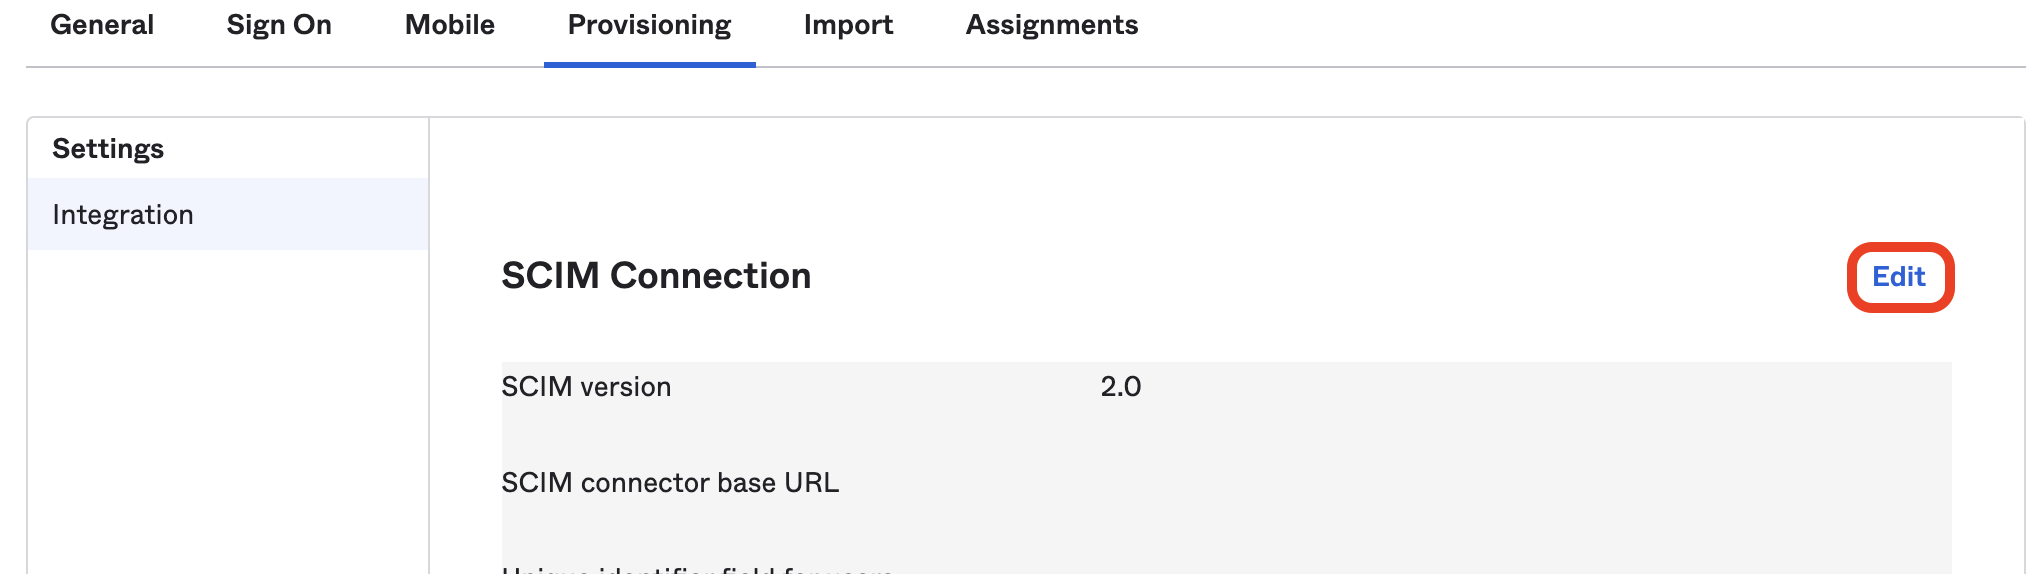
Configure the SCIM connector
Enter the following settings: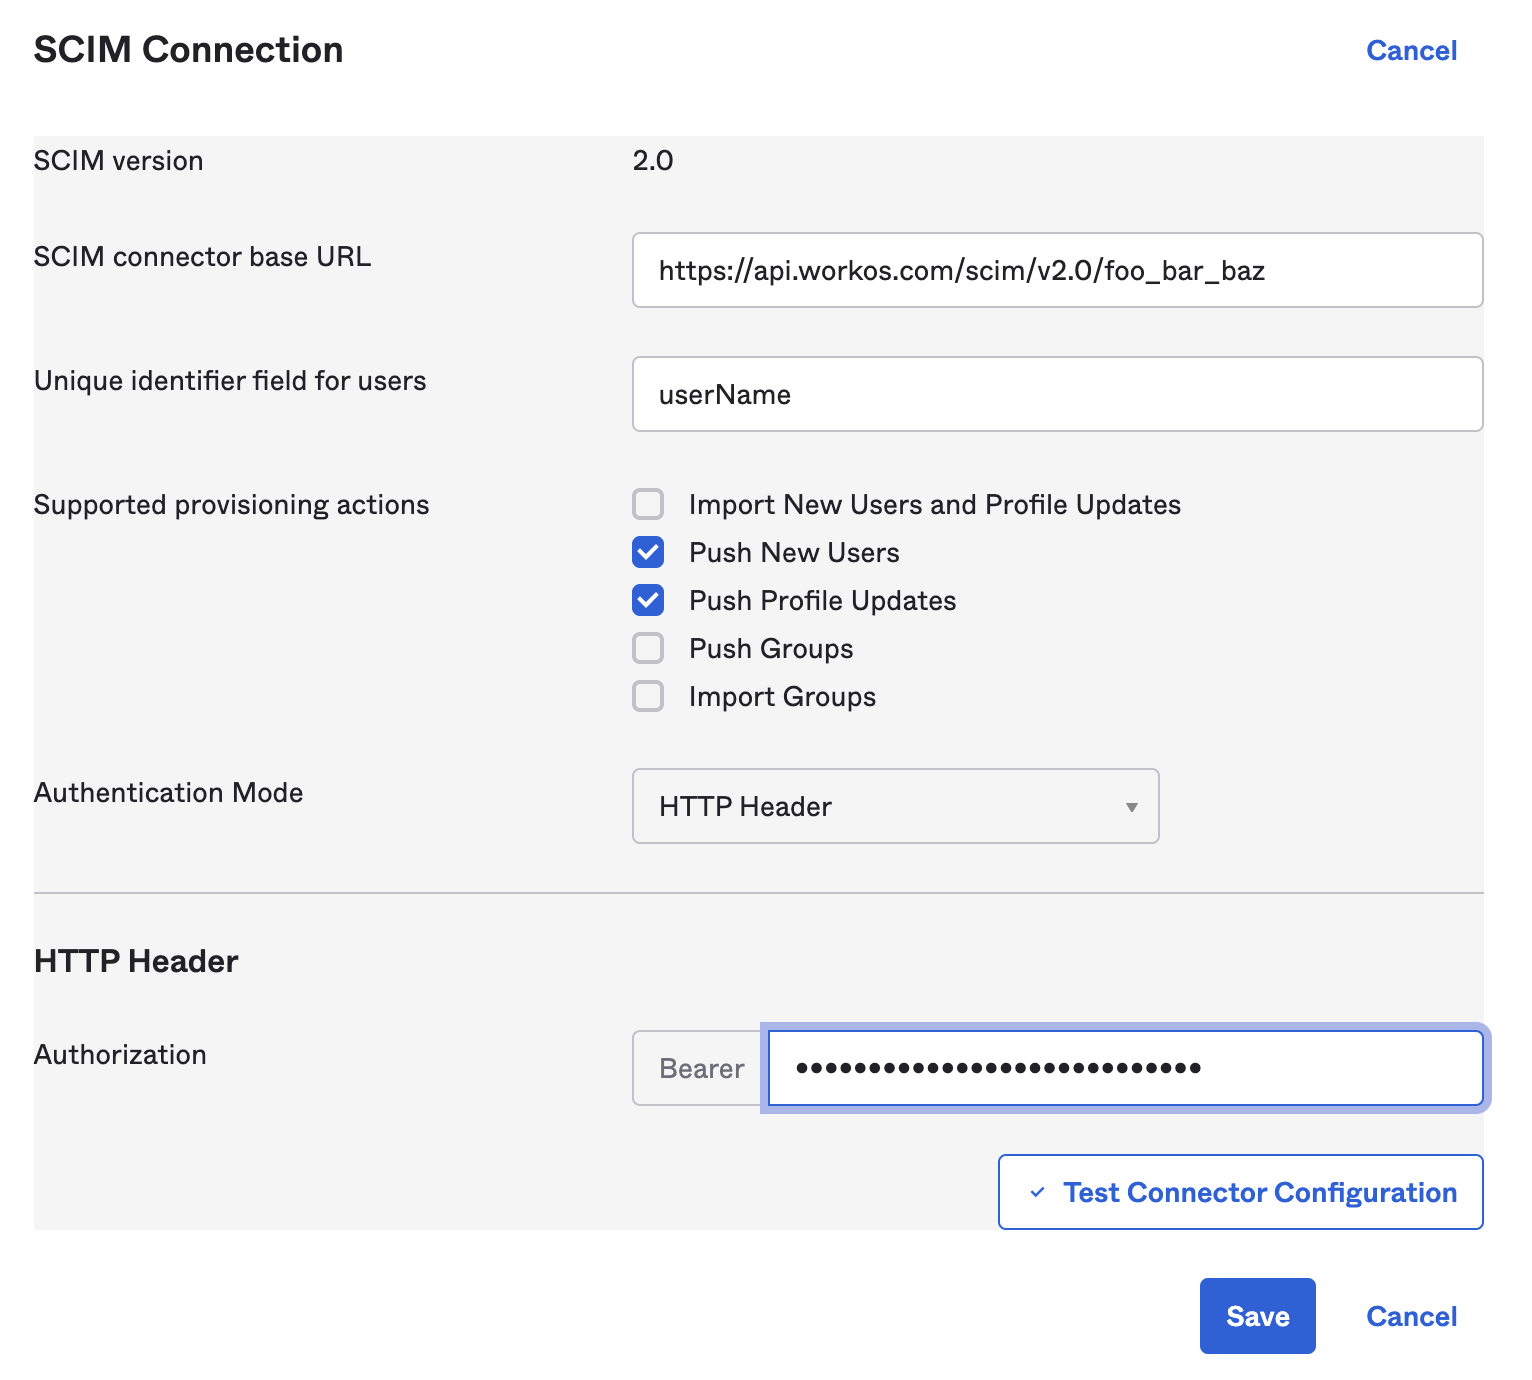
- SCIM connector base URL: the URL provided by Courier
- Unique identifier field for users:
userName - Supported provisioning actions: check “Push New Users” and “Push Profile Updates”
- Authentication Mode:
HTTP Header - Bearer token: the token provided by Courier
Enable provisioning to app
After 30 seconds the provisioning tab should have a “To App” section on the left. If it doesn’t, try refreshing the page. Once it appears, select it and hit the “Edit” button. Check “Create Users”, “Update User Attributes”, and “Deactivate Users”, then hit save.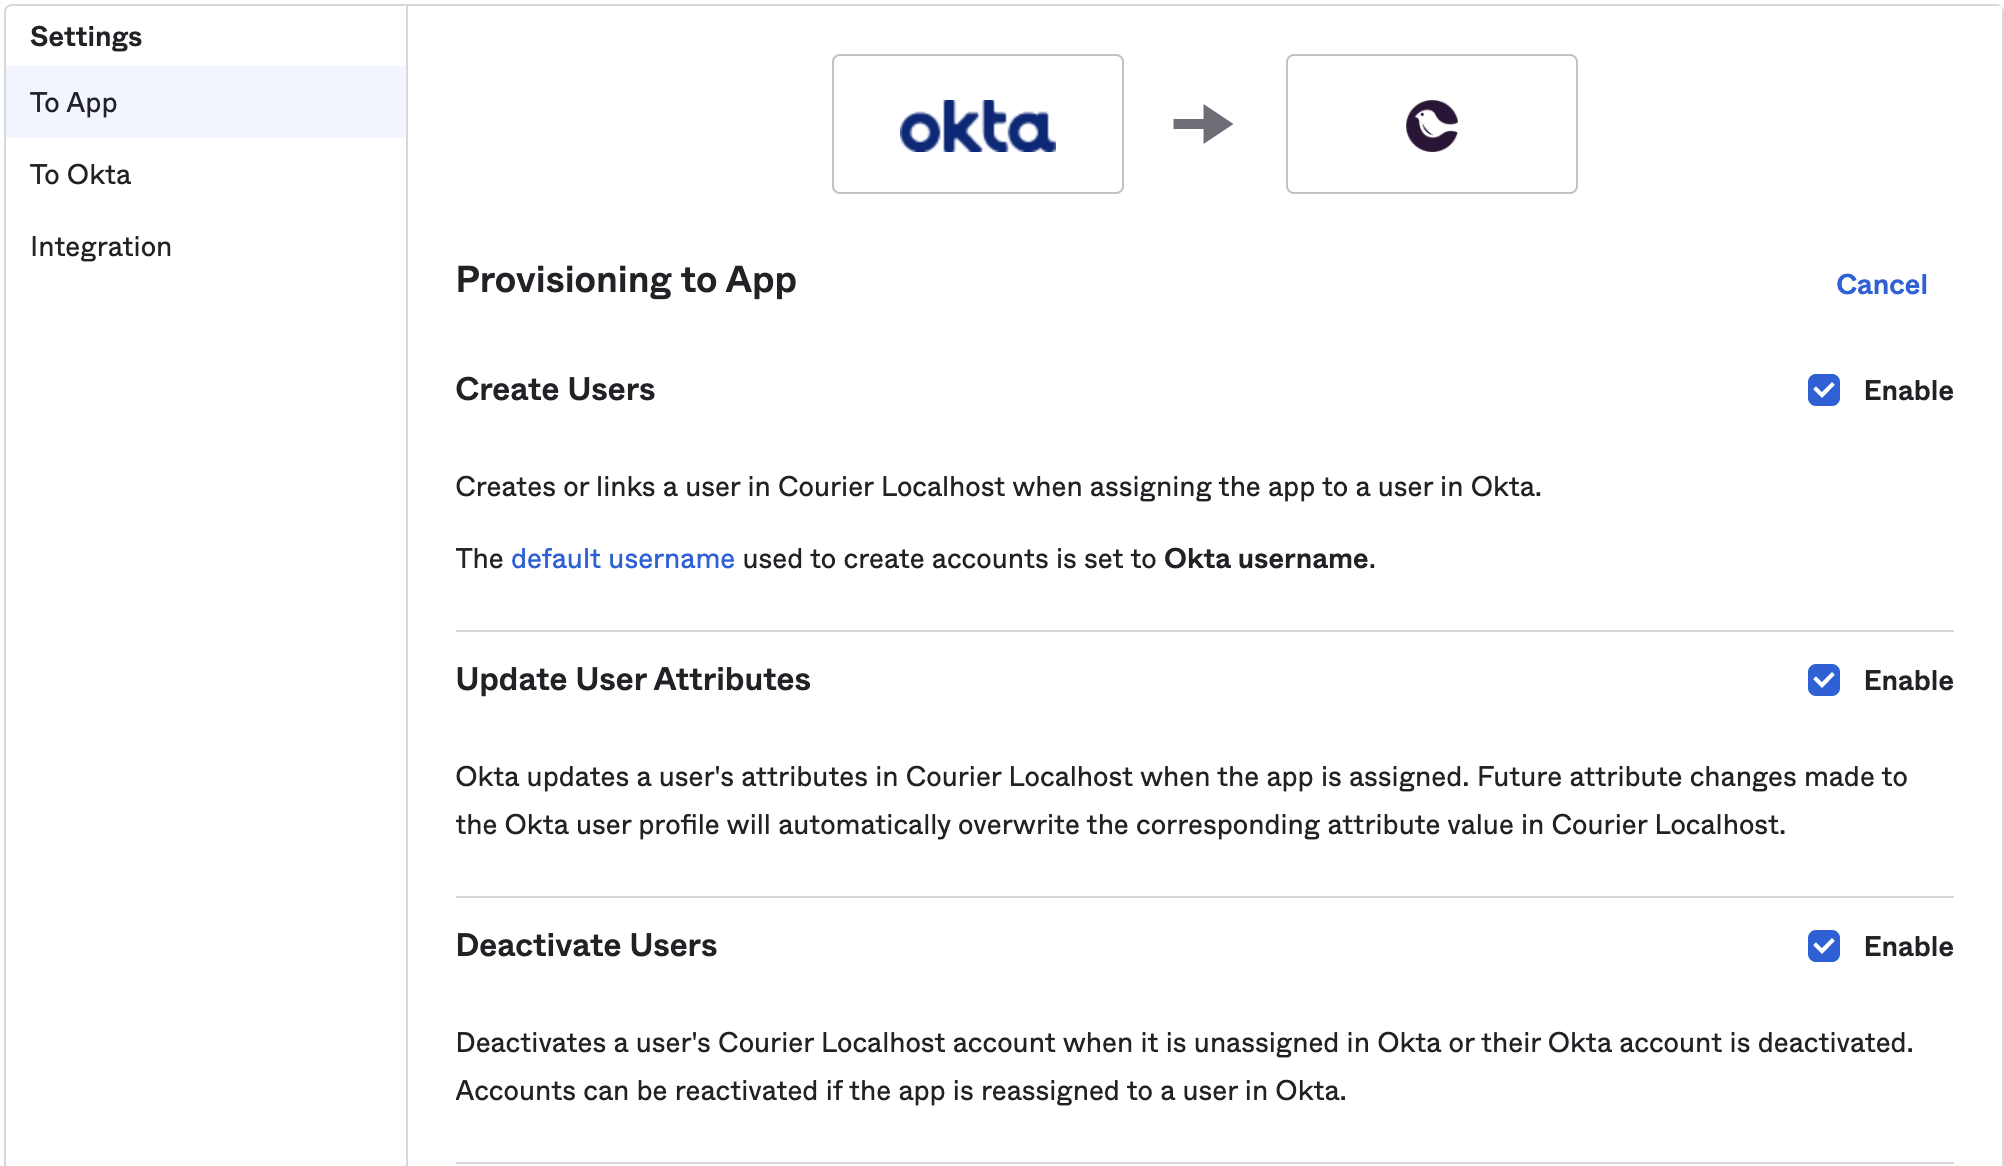
Open the Profile Editor
Using the side menu, navigate to Directory > Profile Editor and hit the edit profile button of the Courier App.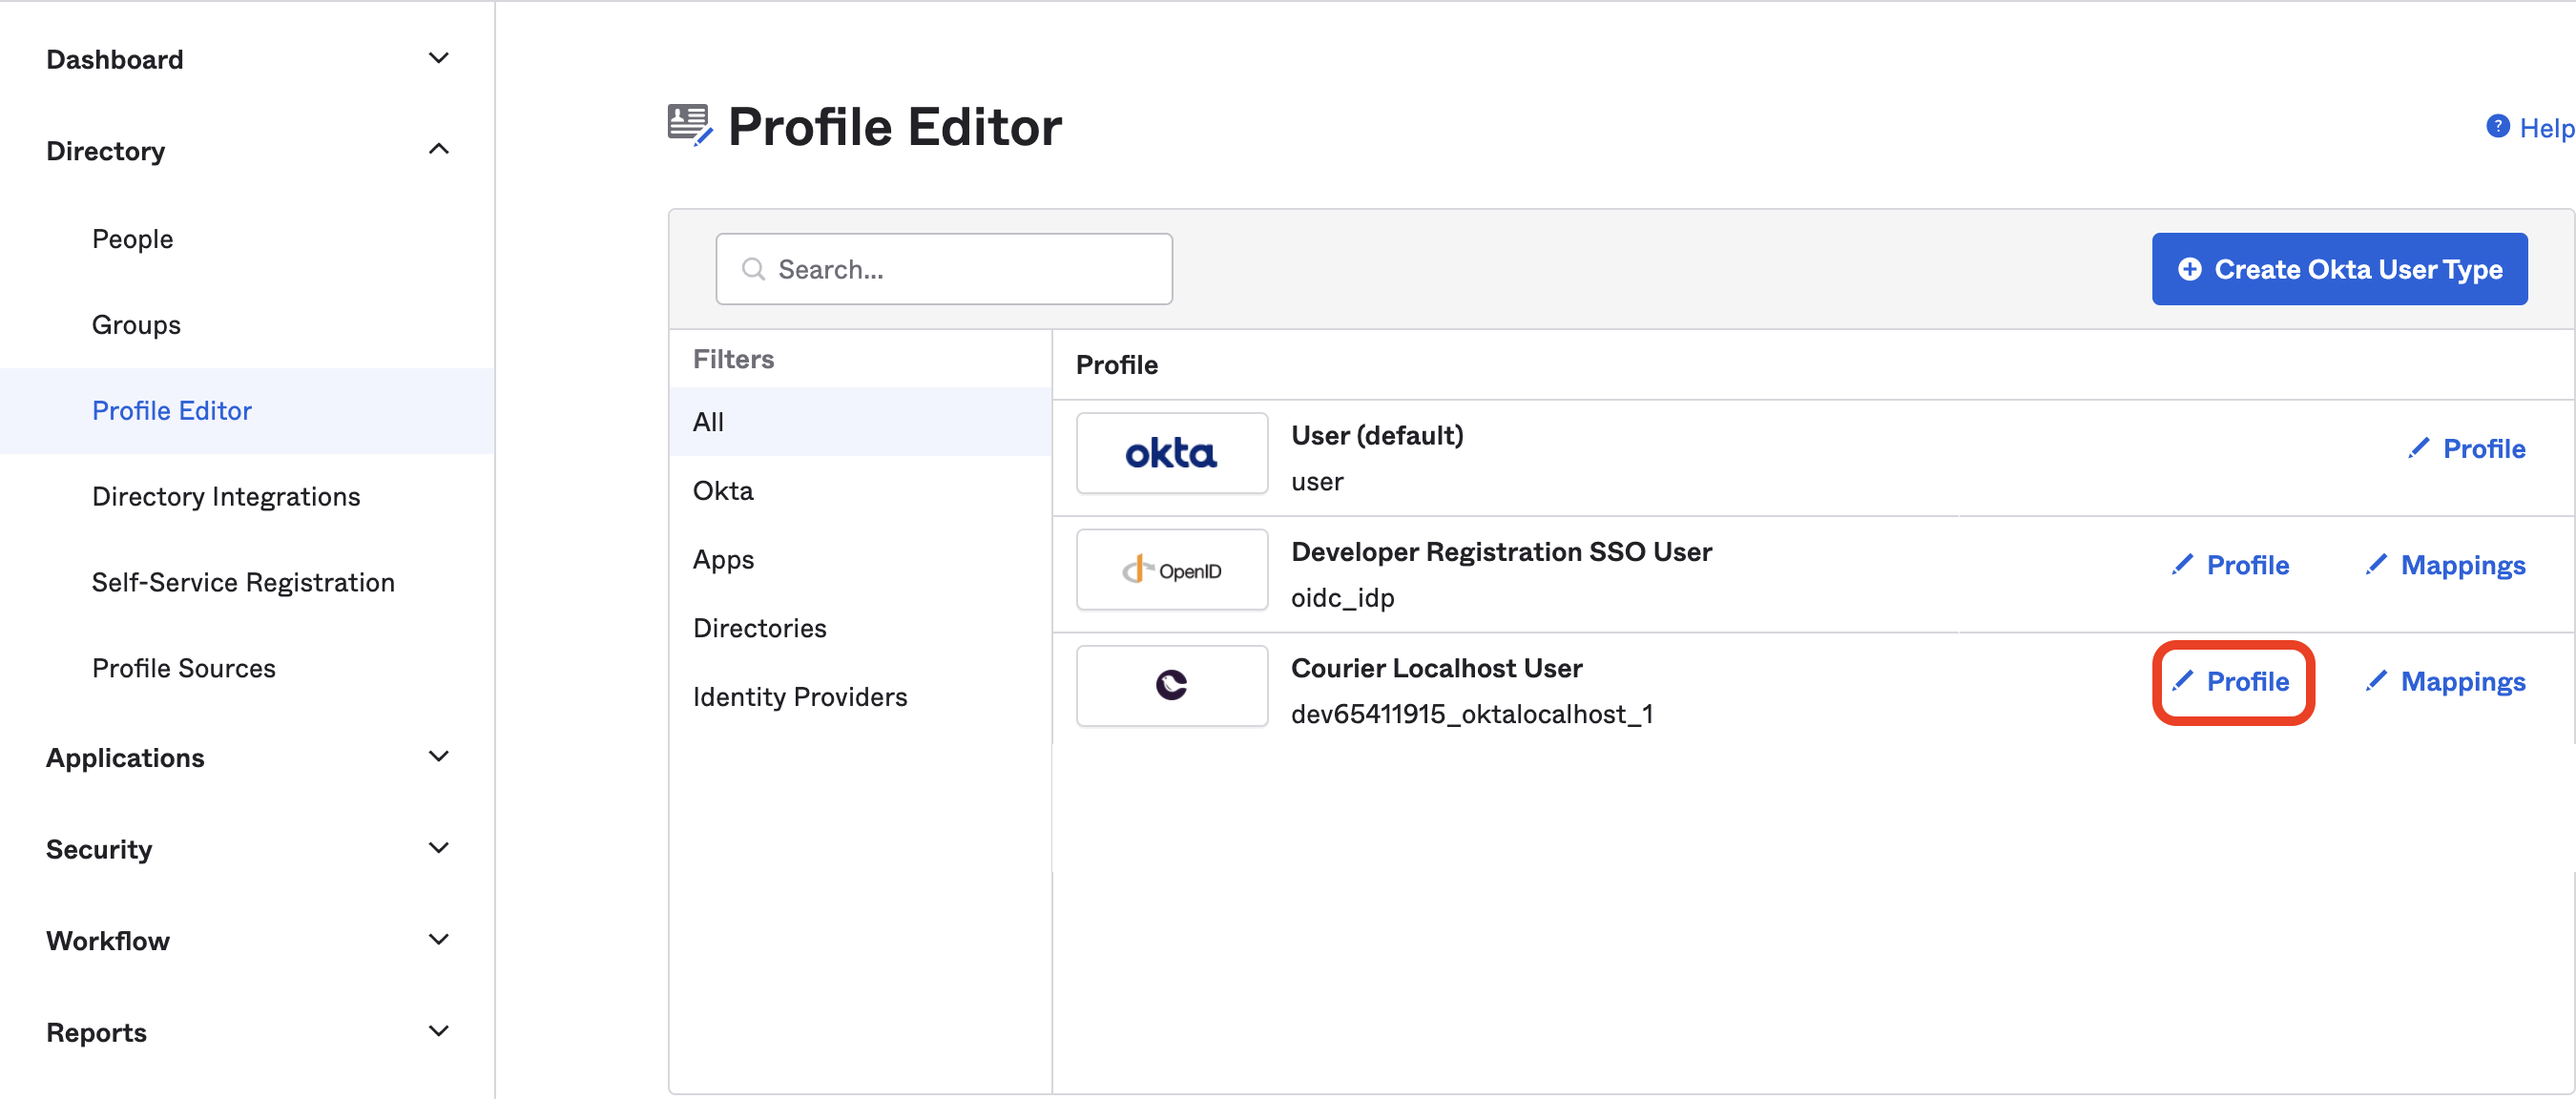
Add the role attribute
Hit the “Add Attribute” button and enter the following values: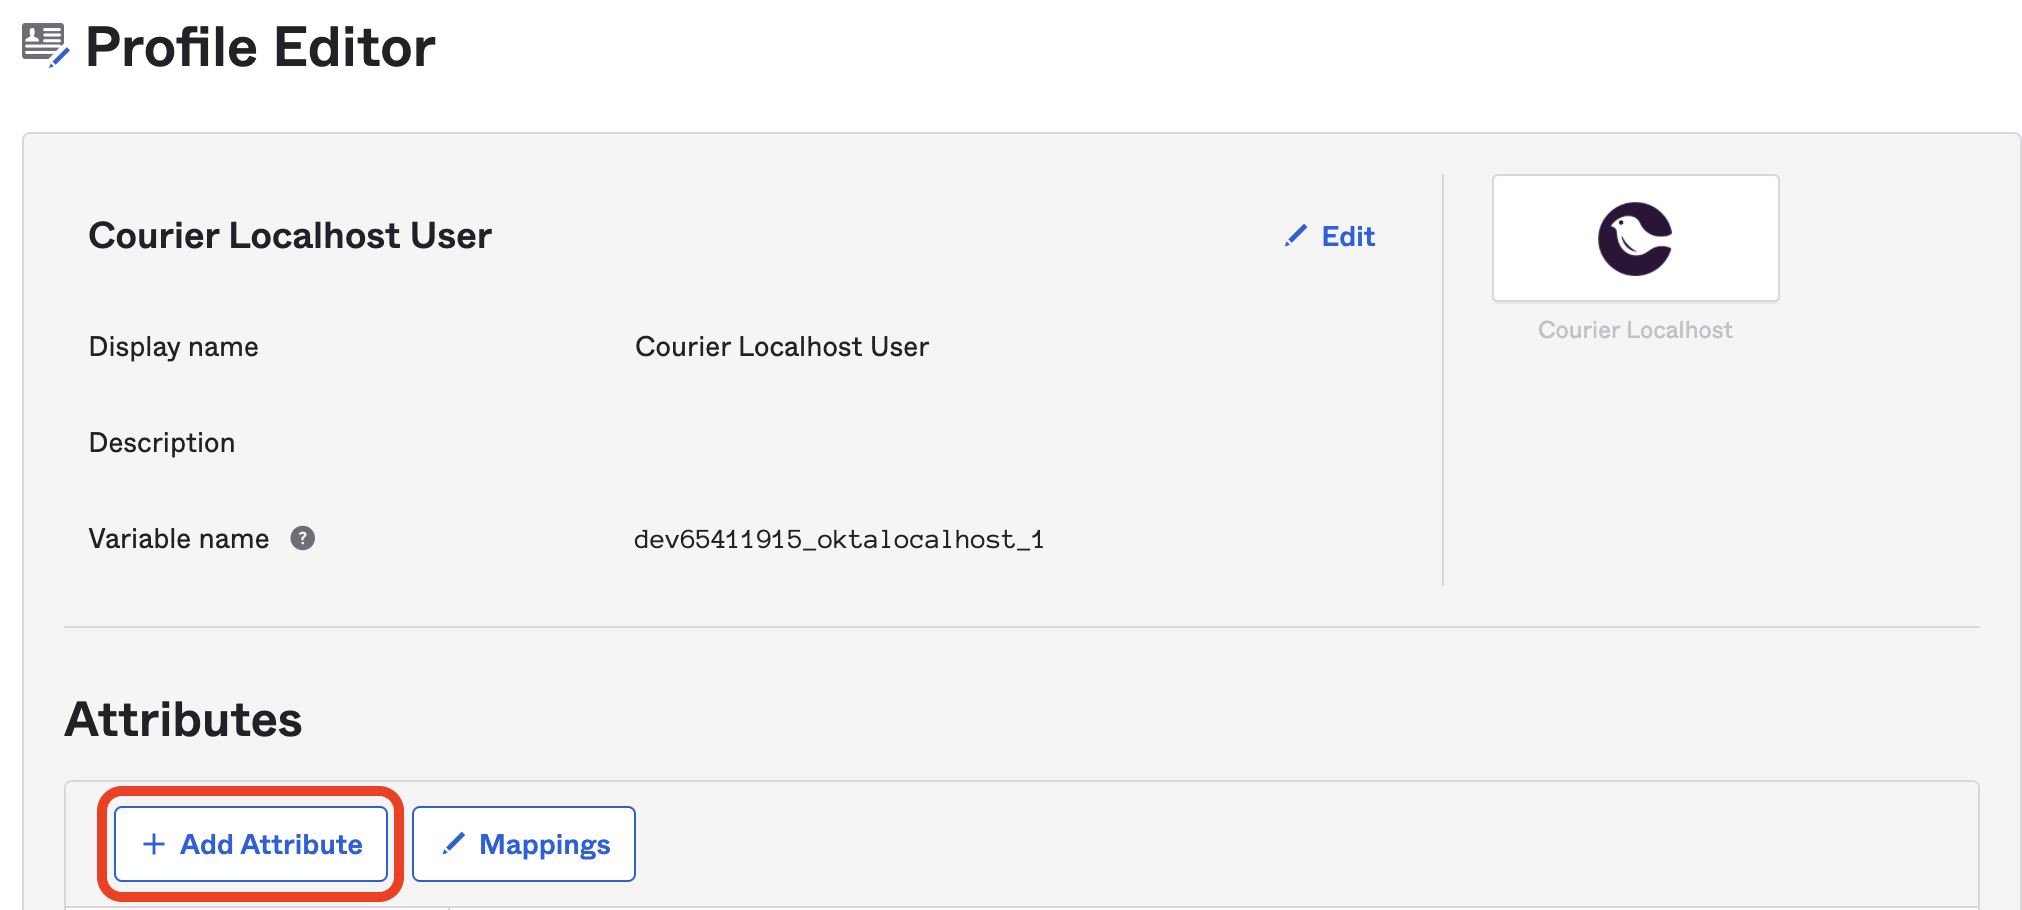
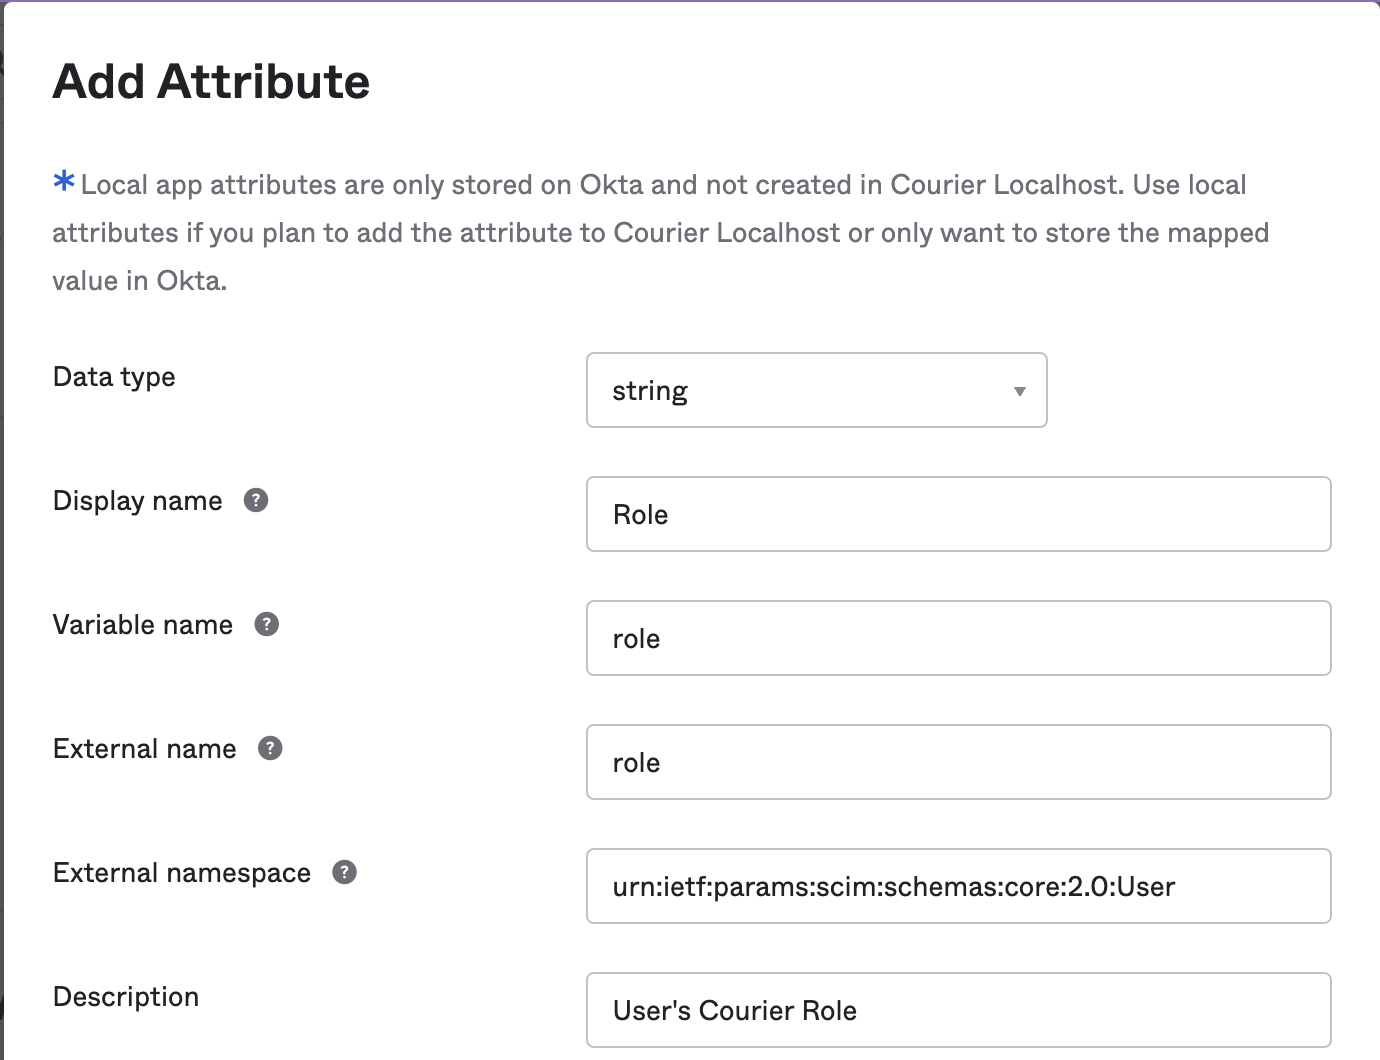
- Data type:
string - Display name:
Role - Variable name:
role - External name:
role - External namespace:
urn:ietf:params:scim:schemas:core:2.0:User - Description:
Courier Role
Define role values
Check the “Define enumerated list of values” checkbox and enter the following values: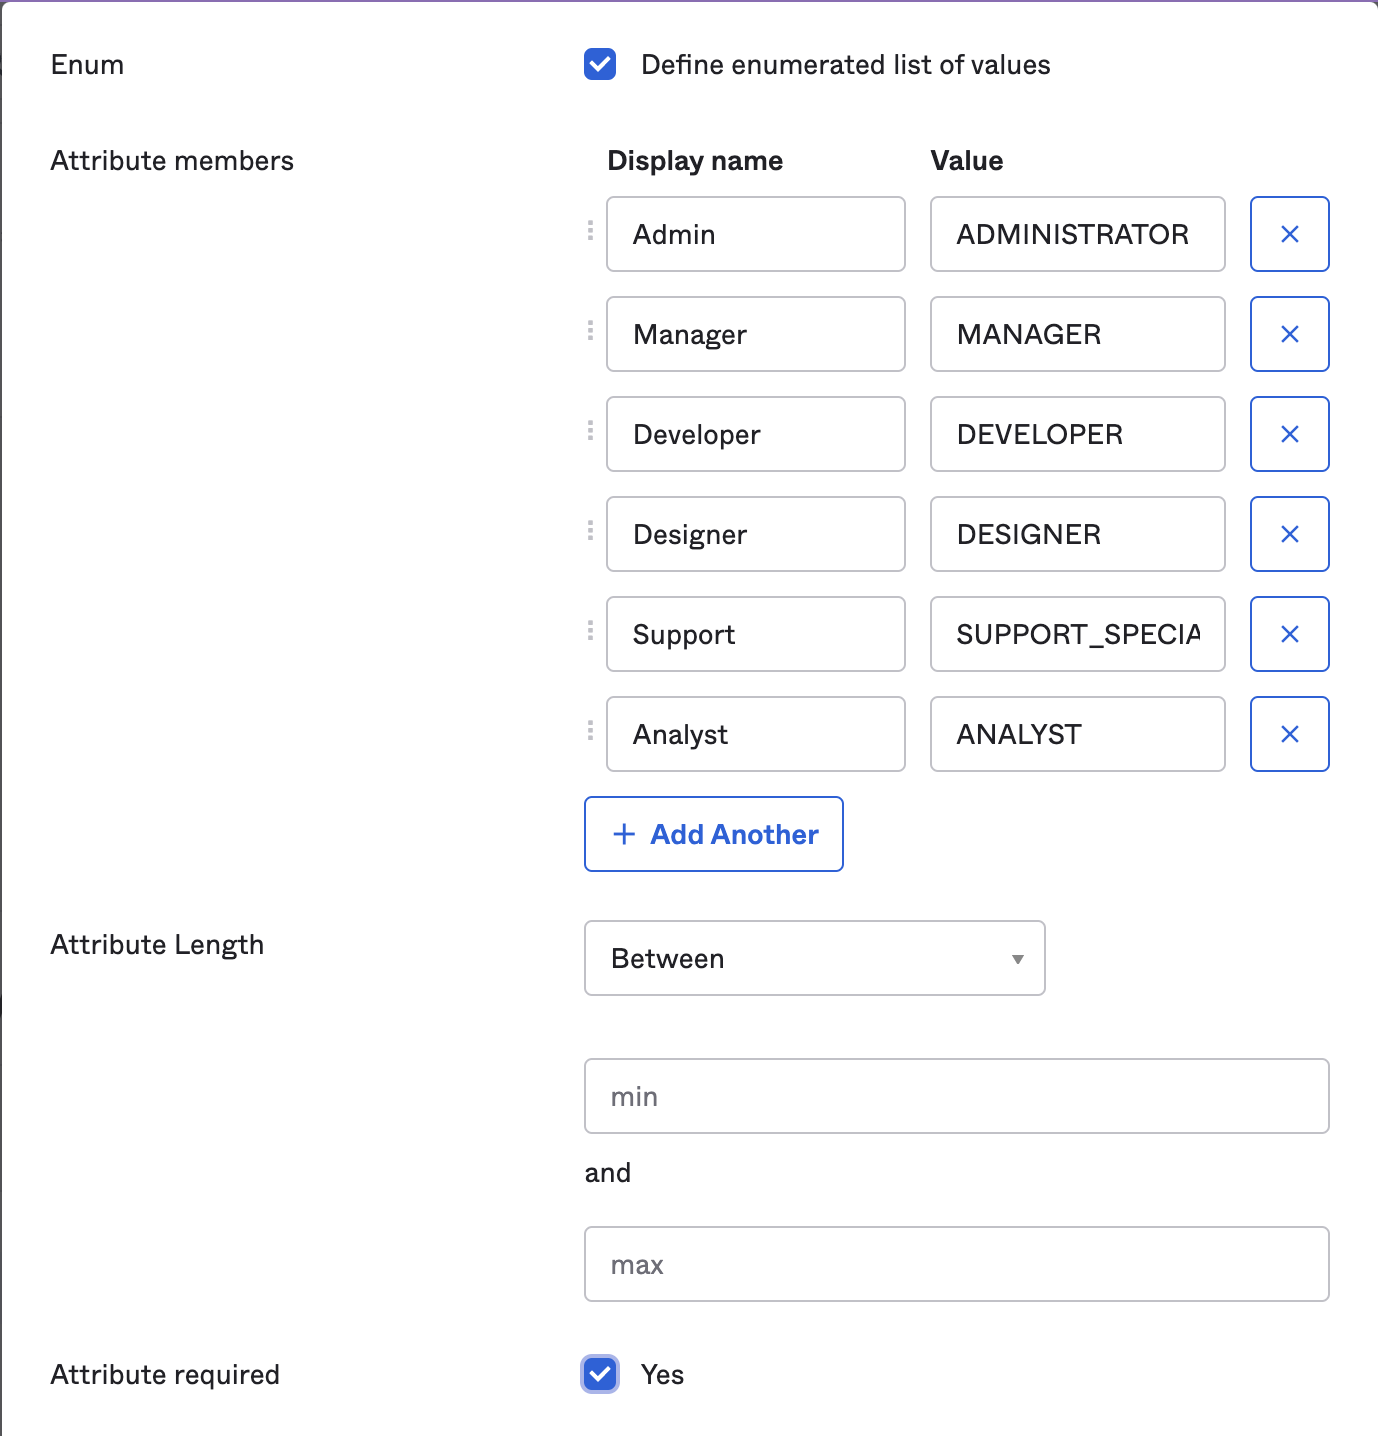
- Display Name:
Admin, Value:ADMINISTRATOR - Display Name:
Manager, Value:MANAGER - Display Name:
Developer, Value:DEVELOPER - Display Name:
Designer, Value:DESIGNER - Display Name:
Support, Value:SUPPORT_SPECIALIST - Display Name:
Analyst, Value:ANALYST
If users were already assigned to the Courier app before you set up provisioning, edit their assignment and update their role.
Finalizing User Provisioning
- Changes to user assignments in the Courier Okta app will automatically be reflected in the Courier Workspace.
- Users will receive an invite via email to Courier when added.
- Users are automatically removed from the Courier Workspace when no longer assigned in Okta.
Troubleshooting
| Symptom | Cause | Fix |
|---|---|---|
| ”You must be signed in with an SSO provider” message in Courier | You’re logged in via email or Google, not Okta SSO. The SSO management page only appears for SSO-authenticated sessions. | Log out and sign in again through the Okta bookmark app or via email login flow. |
| All users showing as Analyst role | The role attribute is not set on their Okta app assignments. | Edit each user’s assignment in Okta and set the role value. Consider setting a default in the Profile Editor. |
| Workspace shows “Free plan” | This is a display artifact of the Analyst role’s reduced permissions. The actual plan is tied to the workspace, not the user. | Restore the user’s intended role (e.g., ADMINISTRATOR) via their Okta assignment. |
| Can’t click Courier tile in Okta to log in | Courier’s auth provider (AWS Cognito) does not support IdP-initiated login. | Use the bookmark app instead. |
| SCIM-provisioned users can’t accept invites | Invite verification codes expire after 14 days. If users don’t accept in time, subsequent SCIM syncs find stale invitation objects and skip re-sending. | Delete the stale invitation objects, then re-push users from Okta (remove and re-assign). Note: Okta group membership changes may not trigger SCIM events; use app-level assignment changes. |
| ”Invite User” button missing in Courier | SCIM provisioning is enabled, which hides manual team management. | Manage users through Okta app assignments instead. |