Build a WebAssembly Language for Fun and Profit: Parsing

Drew Youngwerth
August 25, 2022

In the last post of this series on how to build a WebAssembly programming language, we constructed a lexer. In this post, we’ll cover the next phase of our compiler, parsing. Parsing is the portion of our compiler that takes the token stream generated by the lexer and converts it into an abstract syntax tree (AST).
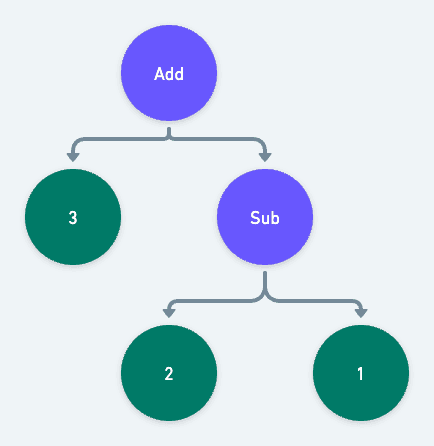
An AST is a tree-like data structure that organizes the tokens into a logical hierarchy that can more easily be translated into machine code. Thankfully, because wispy is an S-expression language, our code is essentially already an AST. Take the following stream of tokens:
“(“, “add”, “3”, “(“, “sub”, “2”, “1”, “)”, “)”
Each set of parentheses represents a subtree, where the first token is the operator node and the following tokens are its operands. If we run into another opening parenthesis before the current set is closed, we know it represents an operand that itself is a subtree. The above stream of tokens would be organized into a tree that looks like this:
If you're interested in writing a parser for a more complex C-like syntax, see my previous Building A Programming Language series.
More About AST
As we did with the lexer, we'll start by defining our types. These types will define the structure of our AST. Each type represents a “Node”, the circle from our diagram in the intro. Here are the basic nodes. We'll gloss over them, as they aren't a lot different from the tokens we defined in the lexer:
// src/types/ast.mtsexport type IntNode = {type: "int";value: number;};export type FloatNode = {type: "float";value: number;};export type IdentifierNode = {type: "identifier";identifier: string;};export type TypedIdentifierNode = {type: "typed-identifier";// Note that here, we break down the identifier into its componentsidentifier: string;typeIdentifier: string;};
A new concept to the AST is the BlockNode. A BlockNode is an expression made up
of a group of other nodes.
For example, (add 1 2) is a block of three nodes:
- An identifier that evaluates to a function,
add. - An Int that simply evaluates to the number
1. - An Int that simply evaluates to the number
2.
How the block itself gets evaluated is up to the compiler. We'll get to that in the next post.
Here's the definition:
// src/types/ast.mtsexport type BlockNode = {type: "block";expressions: AstNode[];};
Finally, we define the AstNode. Like the Token type from the lexer, AstNode is a discriminated union that can be one of any other node we previously defined:
export type AstNode = IntNode | FloatNode | IdentifierNode | TypedIdentifierNode | BlockNode;
You may have noticed that BlockNode has an array of AstNodes, Since AstNode can be a BlockNode, BlockNodes can contain child BlockNodes. In other words, BlockNode is a recursive type. This ability to recursively represent children that can have children is the foundation of our AST. It's where the tree in AST is allowed to form.
At this point src/types/ast.mts is finished and should look like this file.
Now export the types from src/types/index.mts as we did with the token types:
// src/types/index.mtsexport * from "./token.mjs";export * from "./ast.mjs";
Constructing the AST
Now that we've defined the AST, it's time to build one.
Create a new src/parser.mts file and add all the imports we'll use:
// src/parser.mtsimport {Token,IdentifierNode,TypedIdentifierNode,IdentifierToken,TypedIdentifierToken,FloatToken,FloatNode,IntToken,IntNode,AstNode,BlockNode,} from "./types/index.mjs";
Now we can define our top level parse function. The parse function takes the tokens
generated by the lexer and returns a BlockNode that acts as our tree’s root.
// src/parser.mtsexport const parse = (tokens: Token[]): BlockNode => {const blocks: BlockNode[] = [];// This loop is run as long as there are tokens to consumewhile (tokens.length) {// consumeTokenTree converts an array of tokens into a tree of tokens, more on that later.const tree = consumeTokenTree(tokens);// parseBlock turns our new tree of tokens into an actual BlockNode, recursively. More on that later as well.blocks.push(parseBlock(tree));}// Finally we return the top level BlockNodereturn {type: "block",expressions: blocks,};};
Next we define the consumeTokenTree function. consumeTokenTree converts a flat array of tokens, into a tree of tokens.
Given this wispy expression:
(add (sub 3 1) (sub 5 2))
The lexer will produce this array of tokens:
// Note: I've simplified the Token format to just be strings to keep things short["(", "add", "(", "sub", "3", "1", ")", "(", "sub", "5", "2", ")", ")"];
consumeTokenTree will take that flat array and turn it into a tree. This is as simple
as putting every token in between a set of bracket tokens () into an array. So our
token array from above becomes this token tree:
["add", [, "sub", "3", "1"], ["sub", "5", "2"]];
Here's the actual definition of consumeTokenTree:
// src/parser.mts// This is token besides for the bracket tokensexport type NonBracketToken = Exclude<Token, "parenthesis" | "square-bracket">;// The token tree is made of NonBracketTokens and other TokenTreesexport type TokenTree = (NonBracketToken | TokenTree)[];const consumeTokenTree = (tokens: Token[]): TokenTree => {const tree: TokenTree = [];// Ensures the first token is a left bracket and then discards it, defined below this function.consumeLeftBracket(tokens);while (tokens.length) {// Preview the next tokenconst token = tokens[0];// Check to see if the next token is a left bracket.if (token.type === "bracket" && getBracketDirection(token) === "left") {// If it is, we just ran into a sub-TokenTree. So we can simply call this function within// itself. Gotta love recursion.tree.push(consumeTokenTree(tokens));continue;}// Check to see if the next token is a right bracketif (token.type === "bracket" && getBracketDirection(token) === "right") {// If it is, we just found the end of the tree on our current leveltree.shift(); // Discard the right bracketbreak; // Break the loop}// If the token isn't a bracket, it can simply be added to the tree on this leveltree.push(token);// Consume / discard the token from the main tokens arraytokens.shift();}// Return the tree. Don't forget to check out the helper functions below!return tree;};const consumeLeftBracket = (tokens: Token[]) => {const bracketDirection = getBracketDirection(tokens[0]);if (bracketDirection !== "left") {throw new Error("Expected left bracket");}return tokens.shift();};const getBracketDirection = (token: Token): "left" | "right" => {if (token.type !== "bracket") {throw new Error(`Expected bracket, got ${token.type}`);}// If we match a left bracket return leftif (/[\(\[]/.test(token.value)) return "left";// Otherwise return rightreturn "right";};
Now that we have a token tree, we need to turn it into a block. To do so, we create a
parseBlock function that takes the tree as its input and returns a BlockNode:
const parseBlock = (block?: TokenTree): BlockNode => {return {type: "block",// This is where the recursive magic happensexpressions: block.map(parseExpression),};};
As you may have noticed, parseBlock maps each item of the tree with a yet to be written
parseExpression function. parseExpression takes either a TokenTree or a NonBracketToken and transforms it to its corresponding AstNode type.
Here's the definition:
const parseExpression = (expression?: TokenTree | NonBracketToken): AstNode => {// If the expression is an Array, we were passed another TokenTree, so we can// pass the expression back to the parseBlock functionif (expression instanceof Array) {return parseBlock(expression);}// The mapping here is pretty straight forward. Match the token type and pass the// expression on to a more specific expression parser.if (isTokenType(expression, "identifier")) return parseIdentifier(expression);if (isTokenType(expression, "typed-identifier")) return parseTypedIdentifier(expression);if (isTokenType(expression, "float")) return parseFloatToken(expression);if (isTokenType(expression, "int")) return parseIntToken(expression);throw new Error(`Unrecognized expression ${JSON.stringify(expression)}`);};
Let's define the isTokenType function. This function is pretty neat and demonstrates
one of the most powerful features of TypeScript, custom type guards. Simply put, isTokenType tests the expression and narrows down the type to a specific TokenType. This allows TypeScript to be certain we are passing the correct tokens to their corresponding parser functions down the line.
Here's the definition:
export const isTokenType = <T extends Token["type"]>(item: TokenTree | NonBracketToken | undefined,type: T): item is Extract<Token, { type: T }> => {return isToken(item) && item.type === type;};const isToken = (item?: TokenTree | NonBracketToken): item is NonBracketToken => {return !(item instanceof Array);};
There's a lot happening there, so let's walk through it. First up, we have a generic definition,
<T extends Token["type"]>. This is essentially saying that T must be one of the possible values
of the Token.type field. Typescript is smart enough to know that means T must be one
of "int" | "float" | "identifier" | "typed-identifier" | "bracket.
The next interesting piece of code is the return type predicate item is Extract<Token, { type: T }>. This predicate tells TypeScript that if the return value of isTokenType is true, then item must be the Token whose type matches the string passed as the type parameter.
In practice that means that if we were to pass an unknown Token to isTokenType, typescript
will be able to correctly narrow the value to a more specific token, like IntToken.
Now that we have our custom type guard defined, we can define the actual token parsers. The first three are simple; they essentially just return a copy or slightly modified copy of the token:
const parseFloatToken = (float: FloatToken): FloatNode => ({ ...float });const parseIntToken = (int: IntToken): IntNode => ({ ...int });const parseIdentifier = (identifier: IdentifierToken): IdentifierNode => {return {type: "identifier",identifier: identifier.value,};};
The final parser is the parseTypedIdentifier. Remember that a typed identifier takes the form
identifier:type. Parsing it is as simple as splitting the string by the colon. The first value
of the returned array is the identifier, the second is the type.
Here's the definition:
const parseTypedIdentifier = (identifier: TypedIdentifierToken): TypedIdentifierNode => {const vals = identifier.value.split(":");return {type: "typed-identifier",identifier: vals[0],typeIdentifier: vals[1],};};
That's all the code required for a working parser. Before we move on, let's update the main
src/index.mts file to view the output of the parser:
// src/index.mts#!/usr/bin/env nodeimport { readFileSync } from "fs";import { lex } from "./lexer.mjs";import { parse } from "./parser.mjs";const file = process.argv[2];const input = readFileSync(file, "utf8");const tokens = lex(input);const ast = parse(tokens);console.log(JSON.stringify(tokens, undefined, 2));
Build and run project:
npx tscwispy example.wispy
If all goes well, the output should look like this.
With that, the parser is finished. We can now convert the stream of tokens from the lexer into an AST. In the next post, we can get into the juicy bits: generating and running machine-readable code.
Similar resources

The real cost of notifications at scale
The sticker price of a notification platform is never the real price. Cost scales with both message volume and user count, and the biggest expense is often the one nobody invoices: owning and running whatever you built yourself. Here's a clear way to model what notifications cost at scale and the levers that actually control it.

Email open tracking and consent: the new rules in Europe
Regulators in Europe are treating the email open-tracking pixel like a cookie, which means it needs consent before it fires. Here's what changed, who's actually in scope, what compliance requires, and how to keep sending while gating tracking on consent, including how to wire it up in Courier.

You can build anything now. That's exactly why you shouldn't build this.
AI made building software cheap, so the temptation is to build everything. But owning infrastructure is a permanent draw on your scarcest resource, attention. The value lives at two ends, the systems everything runs on and the product only you can make; the move is to build less, buy the opinionated platform, and let an agent operate it.
© 2026 Courier. All rights reserved.