Cookbook: Multichannel Onboarding
Kyle Seyler
September 05, 2025
Table of contents
Table of Contents
Introduction
What You'll Build
What You'll Need
Part 1: Event-Driven Onboarding
Part 2: Multi-Step Sequences
Part 3: Smart Channel Routing
Part 4: Personalization and Segmentation
Part 5: In-App Tasks with Courier Inbox
Part 6: Multi-Tenant Configuration
Part 7: Analytics and Observability
Testing Your Onboarding
Conclusion
Resources
Building Multi-Channel Onboarding with Courier
TL;DR
This guide shows you how to build a sophisticated onboarding system using Courier that automatically triggers based on user actions, routes messages through multiple channels (email, push, SMS, in-app), personalizes content by user segment, and escalates high-value accounts to your team. Instead of building complex state machines and managing multiple providers, you'll use Courier's visual automation builder, multi-channel templates, and built-in analytics to create onboarding flows that adapt to user behavior in real-time.
Table of Contents
- Introduction
- What We'll Build
- Setup
- Part 1: Event-Driven Onboarding
- Part 2: Multi-Step Sequences
- Part 3: Smart Channel Routing
- Part 4: Personalization and Segmentation
- Part 5: In-App Tasks with Courier Inbox
- Part 6: Multi-Tenant Configuration
- Part 7: Analytics and Observability
- Testing Your Onboarding
- Conclusion
- Resources
Introduction
You've built something people want to use. Now you need to help them actually use it. Good onboarding is what turns signups into active users, but building it right means coordinating multiple notification channels, tracking user progress, personalizing content based on user type, and making it all work consistently across web and mobile.
The traditional approach involves stitching together email providers, building state machines for multi-step flows, implementing retry logic, and creating branching logic for different user paths. This guide details the way to build a complete onboarding system using Courier's platform which can handle all the complex orchestration while you focus on the user experience.
What You'll Build
We'll create an onboarding system that:
- Triggers automatically based on user actions (signup, invites, first project)
- Sends multi-step sequences that adapt to user behavior
- Routes through the right channels (email, in-app, push, SMS)
- Personalizes content based on user traits
- Escalates to your team when high-value accounts fall through the cracks
- Tracks what's working through built-in analytics
Throughout this guide, we'll use patterns apply to any product that needs sophisticated onboarding. You'll see real Courier SDK code that you can adapt to your needs, along with explanations of why each piece matters for your users.
What You'll Need
First, let's get the foundations in place. Install the Courier SDK for your platform:
Copied!
npm install @trycourier/react-inbox # React Inbox
Now initialize Courier with your authentication token:
Copied!
const { CourierClient } = require("@trycourier/courier");const courier = new CourierClient({authorizationToken: process.env.COURIER_AUTH_TOKEN});
See the authentication docs for more setup options.
Required Capabilities and Provider Setup
This onboarding system uses several Courier capabilities that require initial configuration:
Event Integration
- Twilio Segment: Connect your Segment workspace to Courier for event-driven triggers
- Setup: Go to Integrations → Segment in your Courier dashboard and follow the connection flow
- Required for: User event tracking (
analytics.track,analytics.identify) that powers automation triggers
Notification Channels
- Email Provider: Configure at least one email provider (SendGrid, Mailgun, SES, etc.)
- SMS Provider (optional): Set up Twilio, AWS SNS, or similar for critical alerts
- Push Notifications (optional): Configure FCM for Android and APNs for iOS
- Slack Integration (optional): For team escalation alerts
- Setup: Navigate to Integrations in your Courier dashboard and configure your chosen providers
Multi-Tenant Configuration (if applicable)
- Brands: Set up different brand configurations for customer segments
- Tenants: Configure organizational hierarchy if you serve multiple organizations
- Setup: Use the Brands and Tenants sections in your Courier dashboard
Analytics and Monitoring
- Built into Courier - no additional setup required
- Optional: Configure webhooks to send engagement data back to your analytics stack
Start with email and Segment integration for a basic implementation, then add additional channels as needed.
Part 1: Event-Driven Onboarding
Why Events Matter
Traditional onboarding sends emails on a fixed schedule - day 1, day 3, day 7. But your users don't follow schedules. Some dive in immediately and need advanced features explained. Others sign up and disappear for a week. Event-driven onboarding responds to what users actually do, creating a more relevant experience.
When you track user events, you can:
- Send the right message at the right time
- Skip irrelevant steps for power users
- Re-engage dormant users with targeted content
- Build user profiles that inform future communications
In this example we will use our Twilio Segment integration with events:
analytics.group
analytics.identify
analytics.track
Building Your Event System
To begin, we're interested in using the analytics.track method to trigger different flows based on sign-up, login, and project_start. Using Segment, you can pull in these events for behaviour-based messaging automation.
Copied!
// track the key eventsanalytics.track("sign-up", {productType: "saas",segment: "midmarket"});// Later when user takes actionsanalytics.track("login", { user_id: userId });analytics.track("project_start", { user_id: userId, project_name: "My First Project" });
Building Rich User Profiles
Every event updates the user profile, creating a complete picture of their journey. This accumulated data helps you make smarter decisions about what to send next:
- Behavioral data: Track actions like last_login, projects_created, team_invites_sent
- Segment data: Store plan_type, company_size, industry for personalization
- Progress data: Monitor onboarding_status, activation_date, feature_usage
These profiles become the foundation for all your routing and personalization decisions.
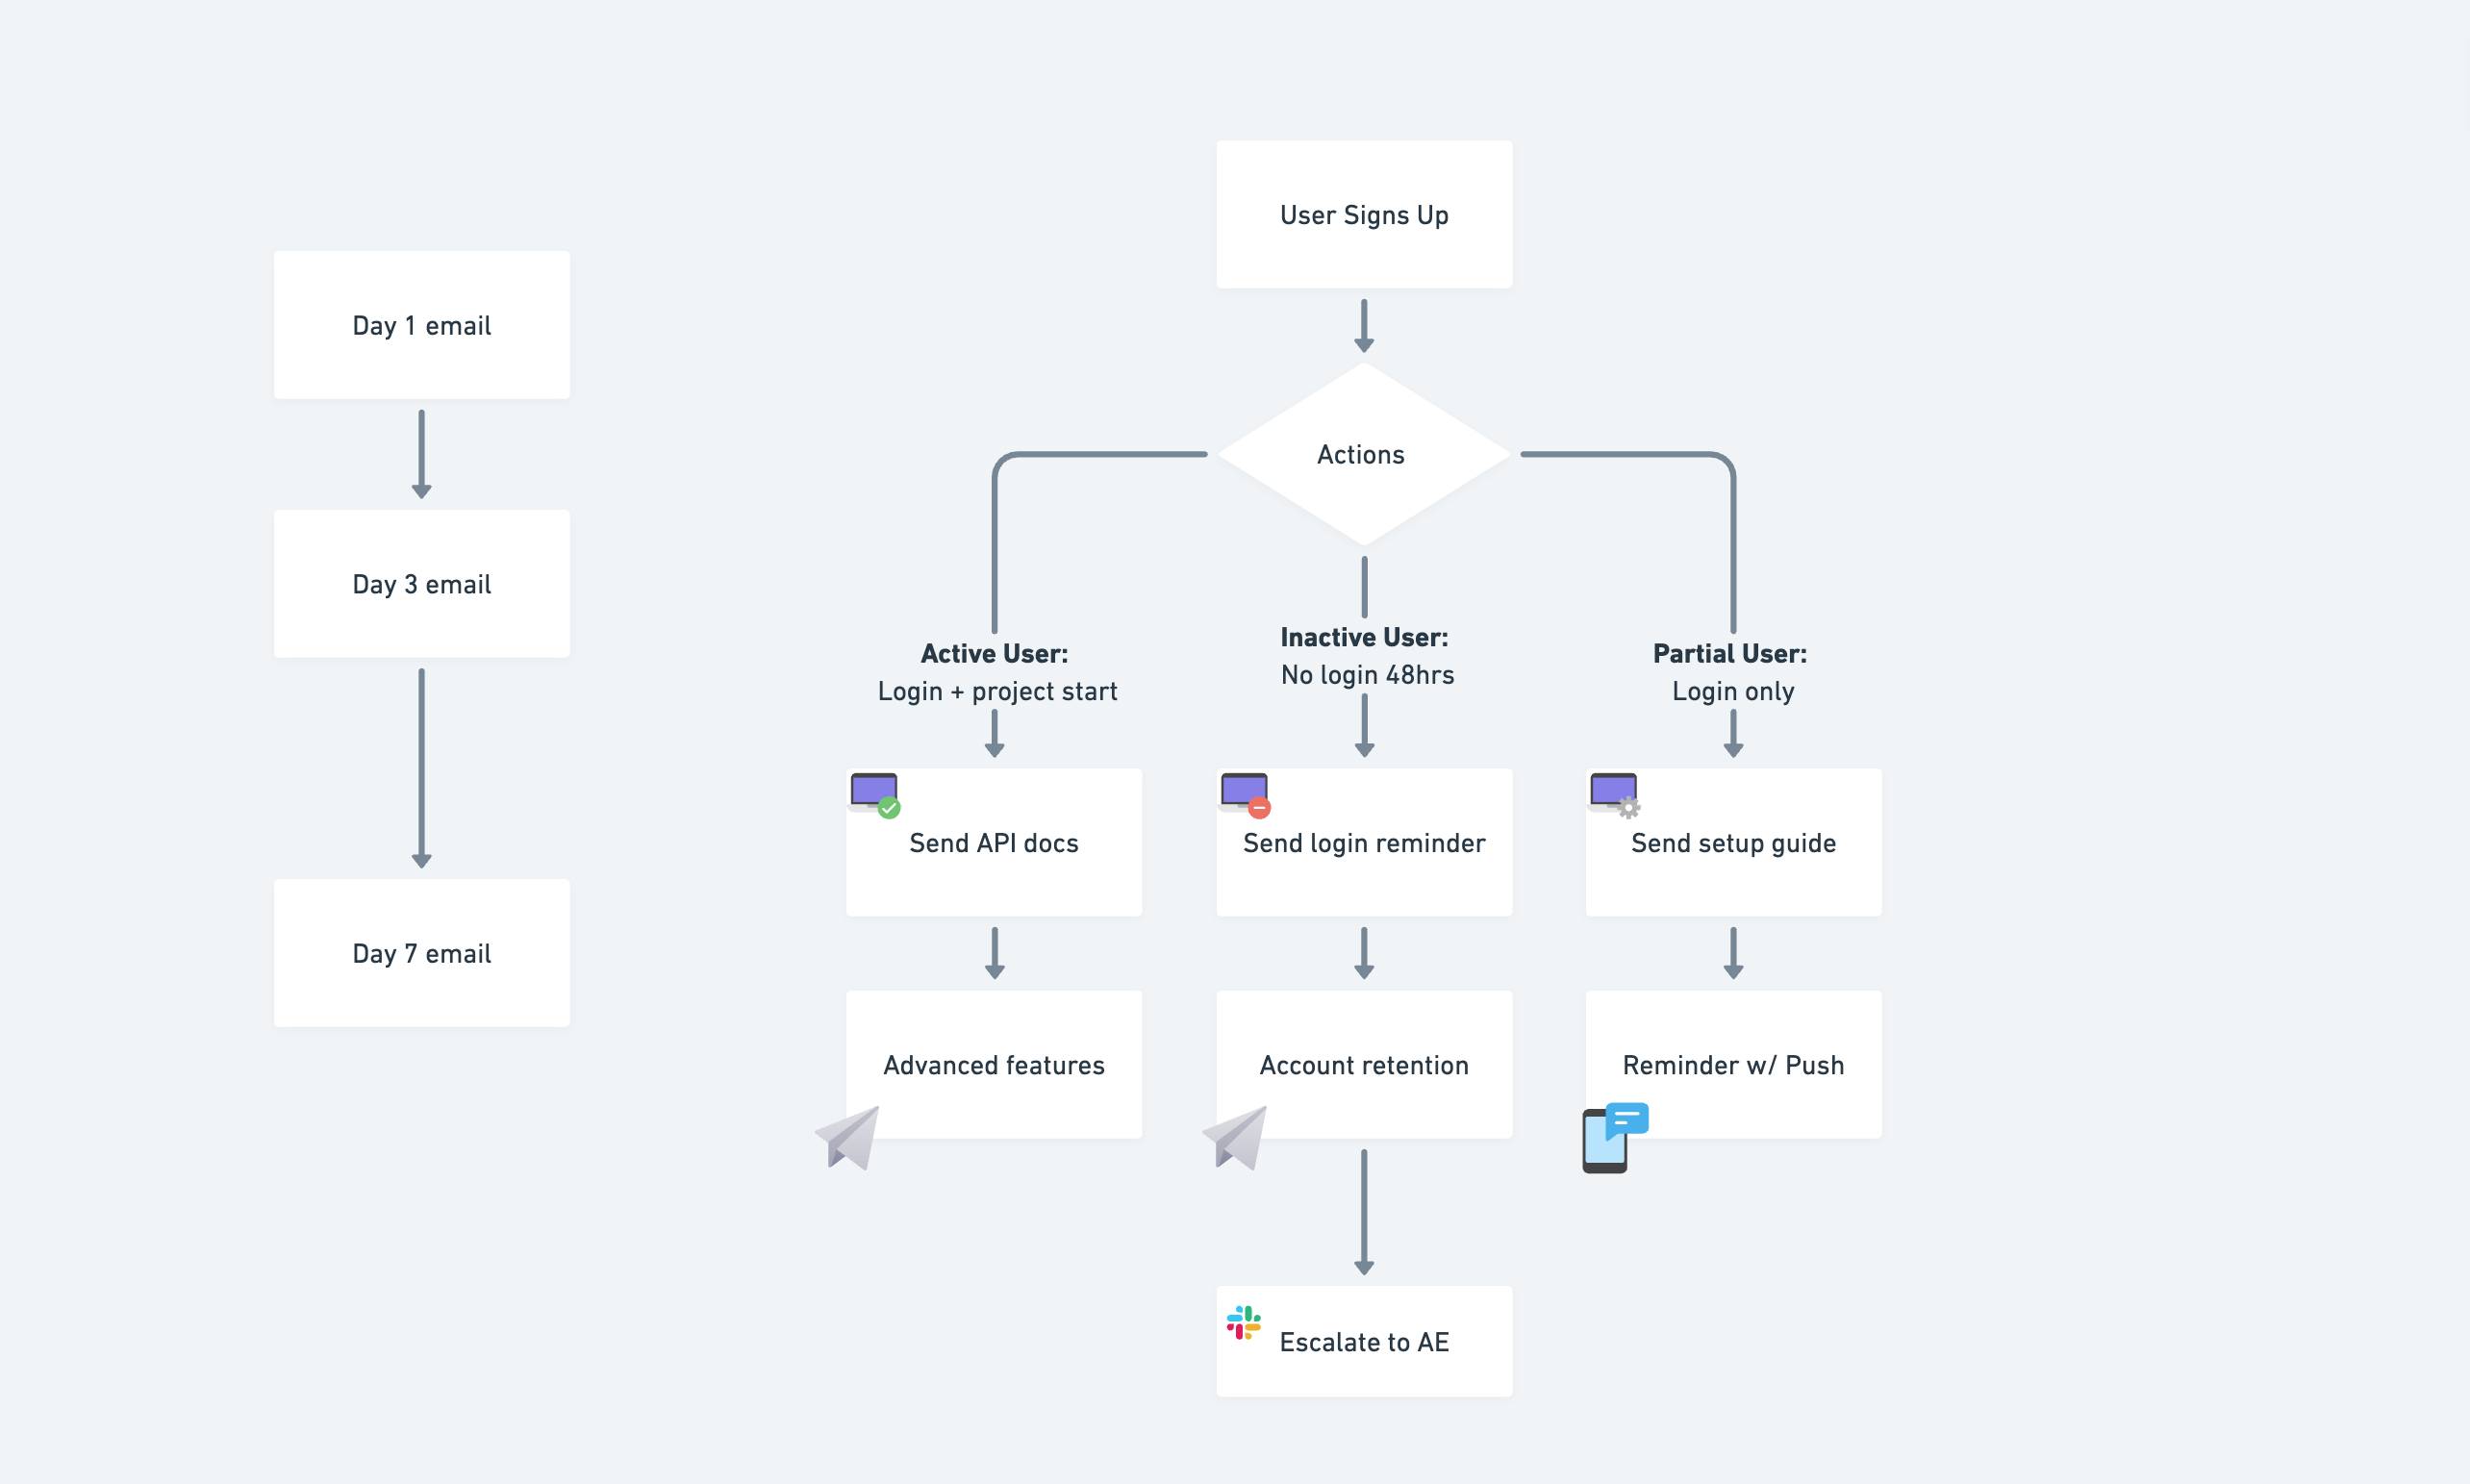
Part 2: Multi-Step Sequences
Creating Adaptive Flows
Your onboarding shouldn't be a one-size-fits-all drip campaign. Users progress at different speeds, and your sequences need to adapt. Courier's automations let you combine time-based delays with behavioral triggers, creating flows that feel personalized without building separate systems for each user type.
The key is balancing:
- Time-based steps: "Wait 24 hours" gives users time to explore
- Behavioral checks: "If user has logged in" ensures relevance
- Conditional paths: Different messages for different user states
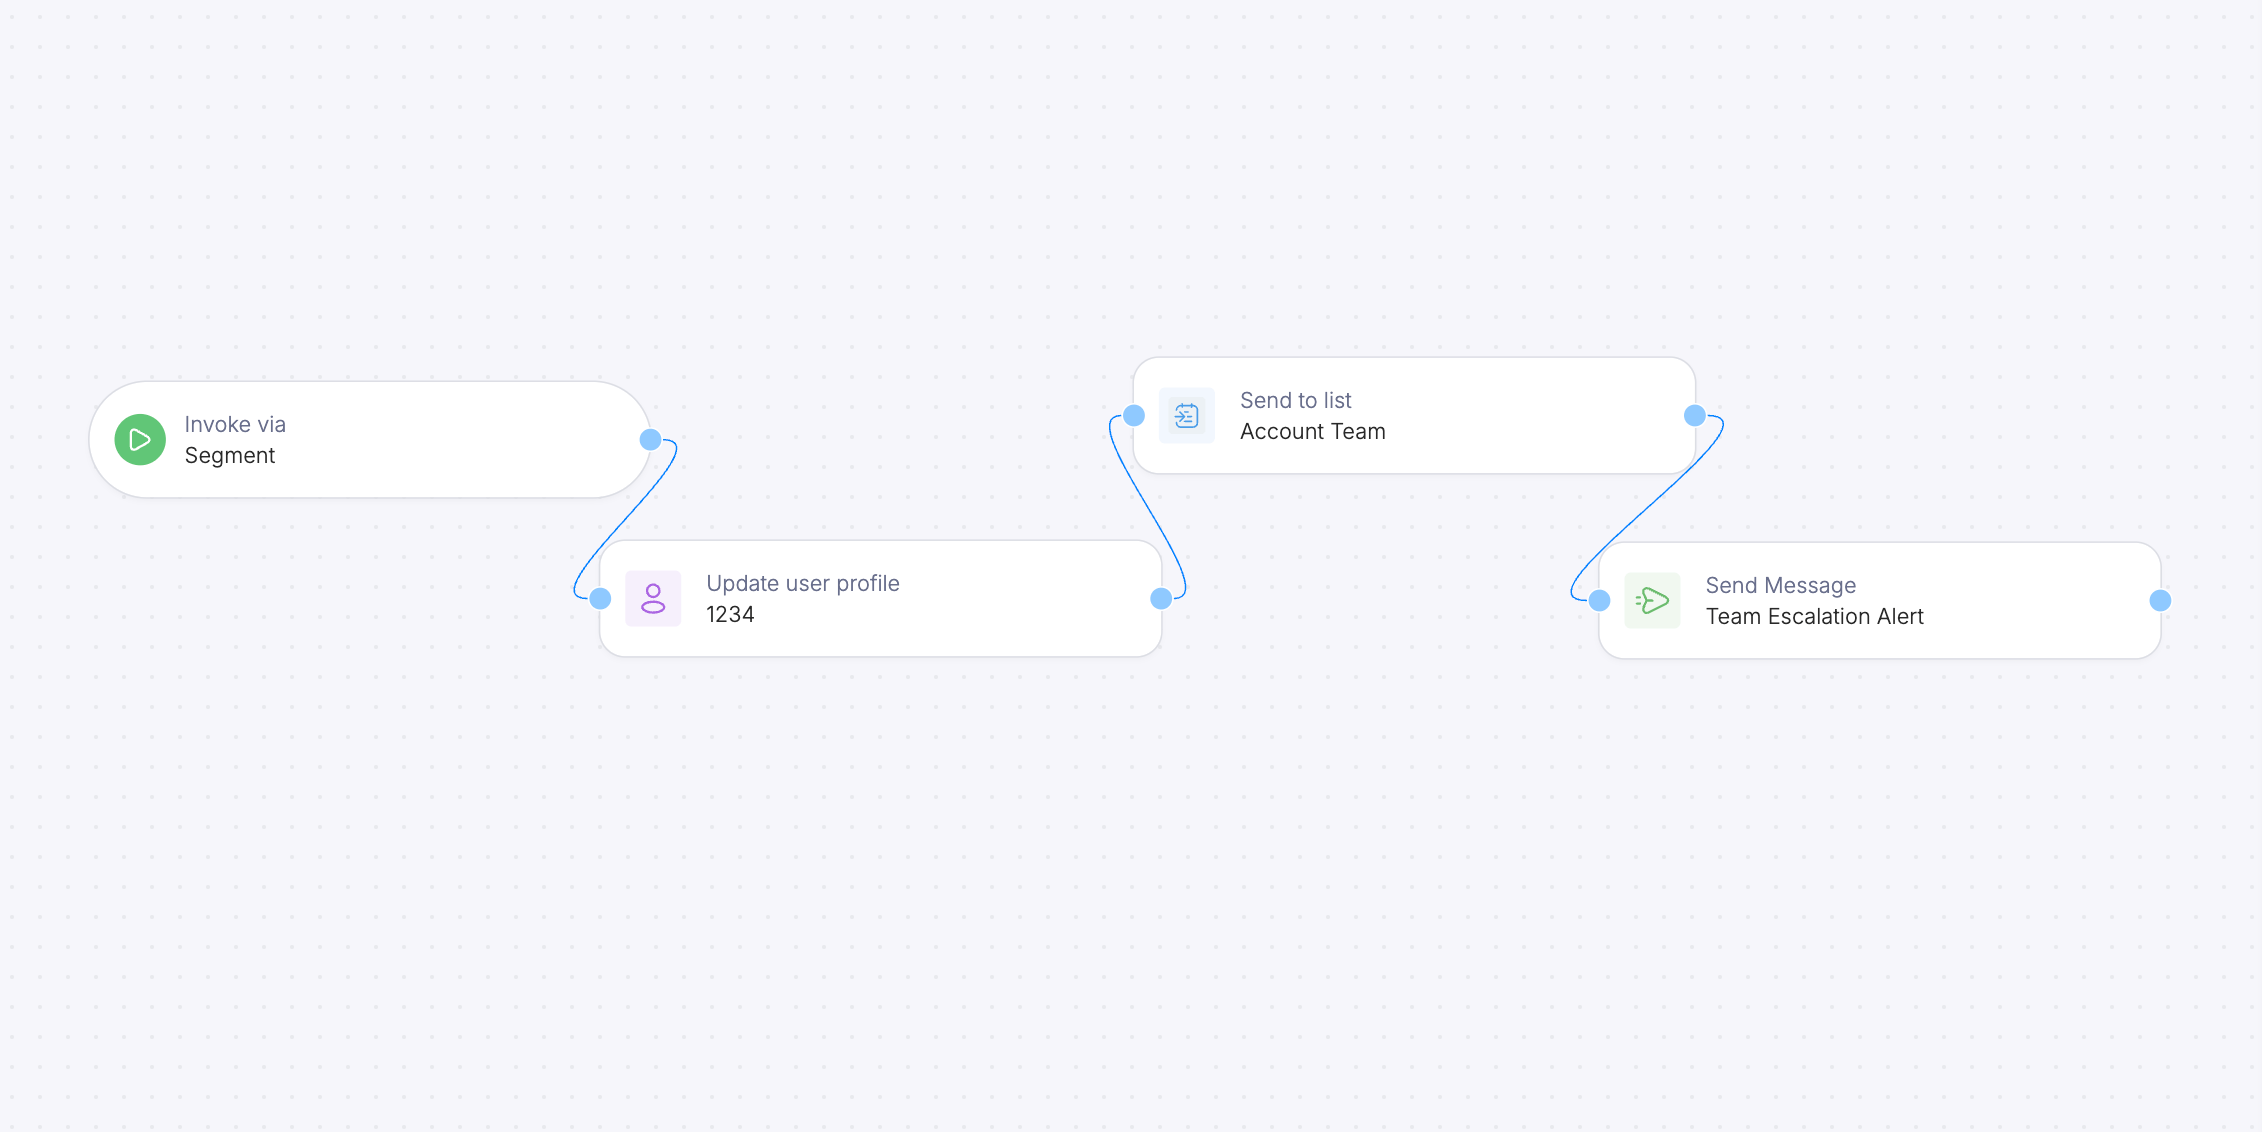
[PLACEHOLDER: Visual flow showing a multi-step sequence with branches based on user behavior]
Building Your First Automation
Here's a practical automation that adapts to user behavior, built with drag-and-drop tools in the Courier app.
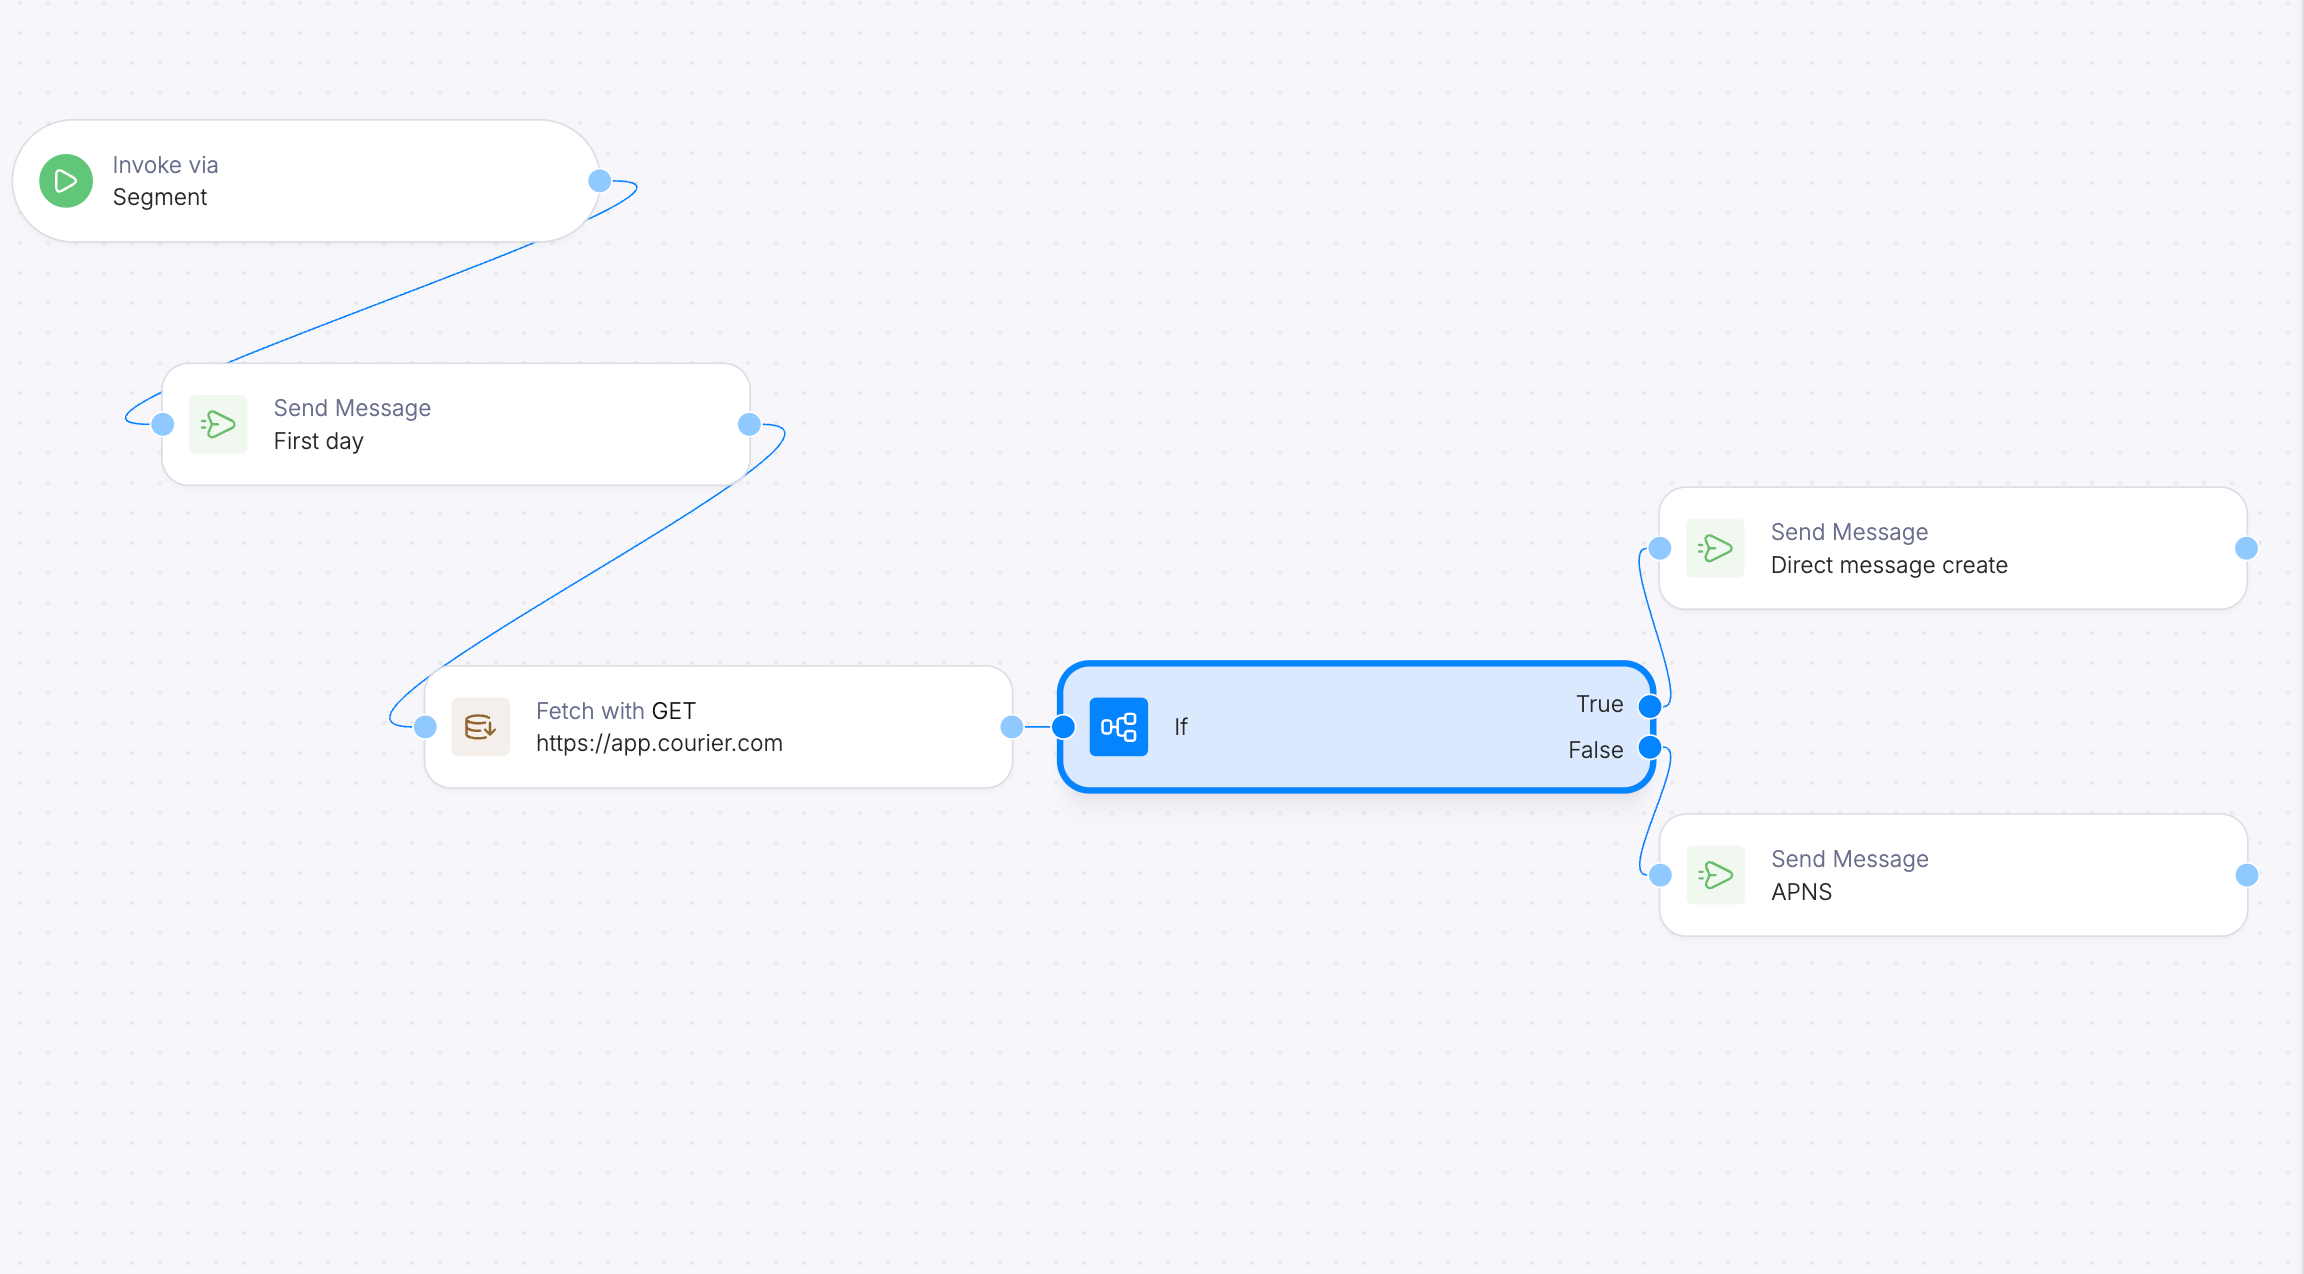
Smart Timing Options
Courier supports various timing strategies to respect user preferences:
- Simple delays: wait: "24 hours" - straightforward and effective
- Business hours: Send during work hours in user's timezone
- Batched delivery: Group notifications to reduce noise
- Smart send times: Use engagement data to find optimal delivery windows
Escalation for High-Value Accounts
Your sequences can also include escalation logic for when automation isn't enough. For enterprise customers or high-value accounts, you might want human intervention when they get stuck. This can be built right into your automation flows.
How it works in Courier: You add escalation as conditional steps in your automation. After a wait period or activity check, add a send step with an if condition to evaluate the user's status. If they meet your escalation criteria (enterprise plan + no activation), the step triggers a notification to your team:
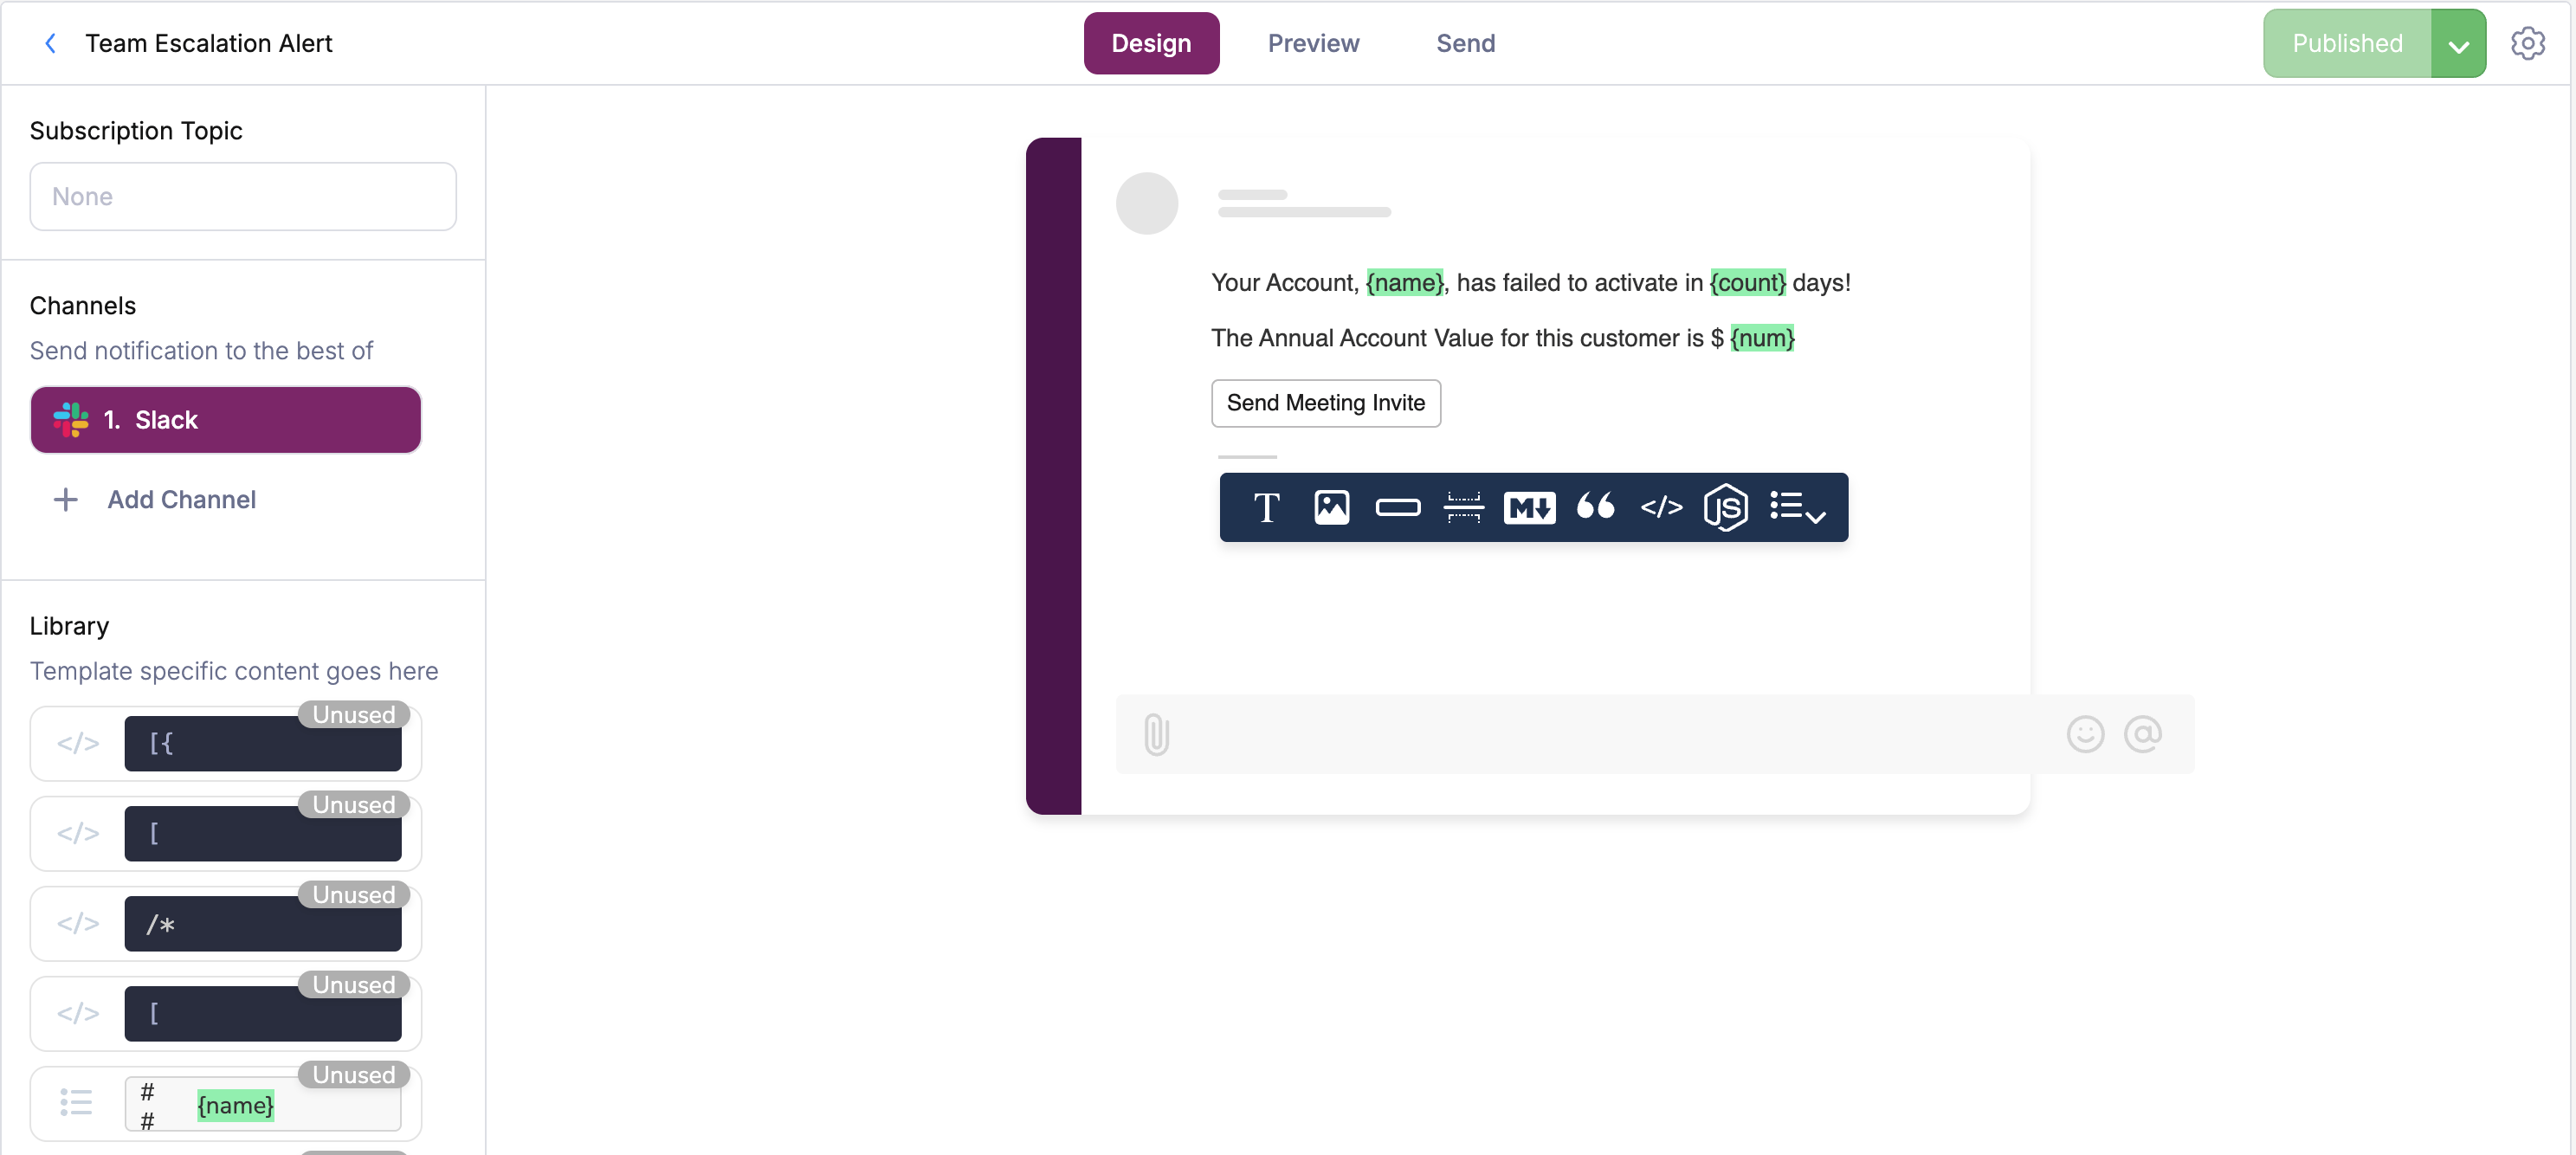
Copied!
{"action": "send","template": "team-escalation-alert","recipient": "success-team","if": "profile.plan === 'enterprise' && profile.activated === false","profile": {"slack": {"access_token": "xoxb-xxxxx","channel": "success-alerts"}}}
The key is being selective about what triggers escalation - account value, time since signup without key actions, or explicit help requests are good indicators. Your Slack message includes all the context your team needs: customer details, their progress, and direct links to help them.
This approach keeps high-value customers from falling through the cracks while avoiding alert fatigue from lower-priority users. You can also route different segments to different teams - enterprise to success managers, mid-market to support, etc.
See the automation documentation for more complex flow examples including escalation patterns.
Part 3: Smart Channel Routing
Why Channel Strategy Matters
Not every message should go to email. Your power users might prefer Slack notifications. Mobile users need push notifications. Some messages are urgent enough for SMS. The challenge is routing each message through the right channel without building complex if/else logic throughout your codebase.
Courier's routing engine handles this complexity for you. You define your routing strategy once, and Courier automatically:
- Checks which channels are available for each user
- Respects user preferences
- Falls back to alternative channels if delivery fails
- Prevents channel fatigue with smart throttling
How Preferences and Routing Work Together
Here's where Courier gets really powerful. Your users can set their notification preferences (through Courier's embeddable preference center or your own UI), and these preferences automatically influence routing decisions. Courier gives both developers and users control over the channels they want to allow for each topic and urgency level.
Think of it as a two-layer system:
- User preferences: "I prefer email for updates, push for urgent stuff"
- Your routing logic: "Try their preferred channel first, then fallback"
When a message is sent, Courier evaluates both layers. If a user has explicitly opted out of email, Courier won't even attempt that channel - it'll skip straight to your fallback options.

Here's a look at the embeddable user preference center.

Single vs. All Channel Routing
The method parameter in your routing config is crucial:
Copied!
// SINGLE: Try channels in order until one succeedsrouting: {method: "single",channels: ["email", "push", "sms"]}// Result: Sends to email. If that fails/bounces, tries push.// If push fails, tries SMS. Stops at first success.// ALL: Send to every available channel simultaneouslyrouting: {method: "all",channels: ["email", "push", "inbox"]}// Result: User gets the message in email AND push AND inbox// Great for critical alerts where redundancy matters
Understanding Failover
Courier's failover is smarter than just "try the next channel." Here's what actually happens:
- Provider-level failover: If SendGrid is down, Courier can automatically switch to your backup email provider (if configured)
- Channel-level failover: If email bounces or isn't available, move to the next channel in your list
- Timeout handling: Each channel gets a time window to succeed before moving on
Here's a complete example showing how it all works together:
Copied!
const { requestId } = await courier.send({message: {to: {user_id: userId,email: "user@example.com",phone_number: "+1234567890"},routing: {method: "single", // Try channels in orderchannels: ["email", "inbox", "sms"]},timeout: {channel: 3600000, // Wait up to 1 hour per channelprovider: 300000 // Wait up to 5 min per provider},providers: {// Optional: specify backup providersemail: {override: "sendgrid",if_unavailable: "smtp"}}}});
What happens in this flow:
- Courier checks user preferences - are they okay with email?
- Tries SendGrid first (primary email provider)
- If SendGrid fails within 5 minutes, tries SMTP backup
- If email completely fails within 1 hour, moves to inbox
- If inbox fails, tries SMS as last resort
- Each step respects user preferences and availability
Channel Best Practices
| Channel | Best For | Avoid For | User Expectation |
|---|---|---|---|
| Detailed content, records | Urgent alerts | Check periodically | |
| Push | Time-sensitive updates | Long content | Immediate attention |
| SMS | Critical alerts only | Marketing | Very urgent only |
| In-app | Task lists, history | Time sensitive alerts | Check when in app (web/mobile) |
| Slack | Team notifications | Personal data | Work context |
Remember: Start simple with email + in-app, then add channels as needed. See the routing documentation for advanced patterns.
Part 4: Personalization and Segmentation
Making Onboarding Feel Personal
Generic onboarding frustrates everyone. Enterprise customers expect white-glove treatment. Developers want API docs upfront. Small teams need quick wins. The solution isn't building separate flows for each segment - it's creating one smart system that adapts.
With Courier, you can personalize based on:
- Company attributes: Size, industry, plan type
- User role: Admin, developer, end user
- Behavior patterns: Fast mover vs. cautious explorer
- Progress markers: Where they are in the journey
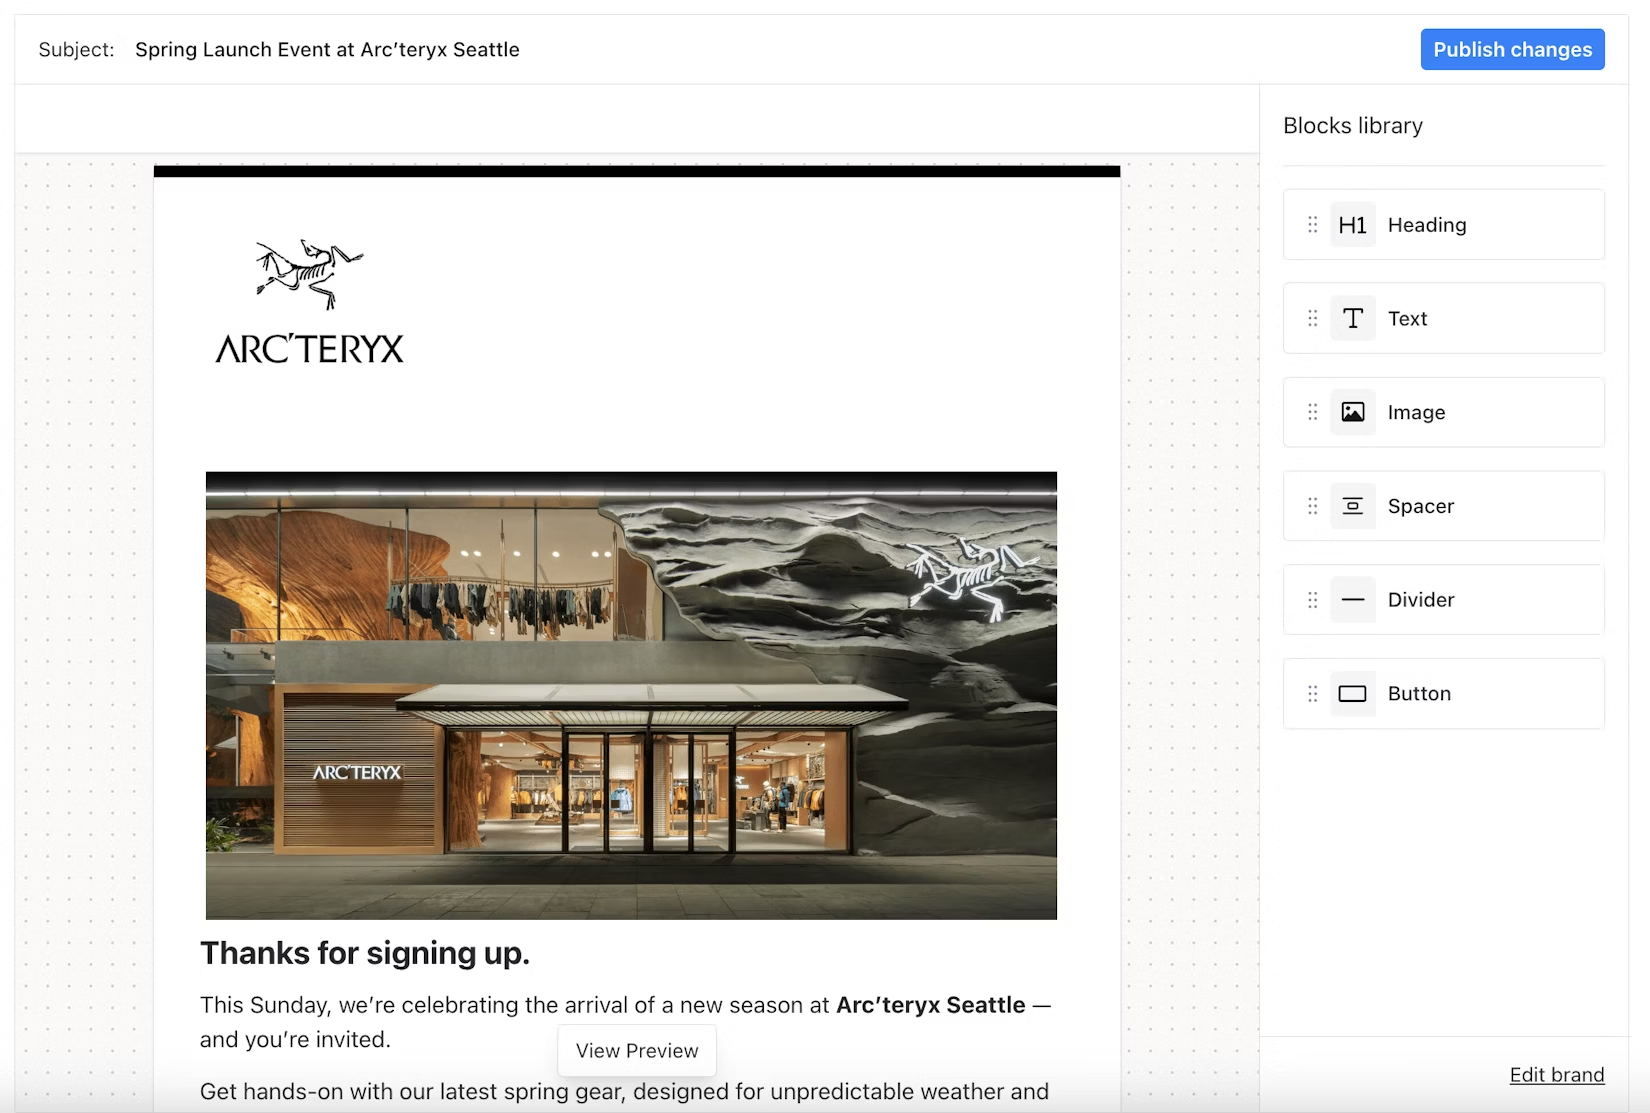
Creating Multi-Channel Templates
Courier is both a developer-friendly tool and a platform for non-technical teams. The visual template designer typifies this contrast better than most features. Instead of writing HTML, CSS, and channel-specific code, you can drag and drop components to build beautiful, responsive templates that automatically work across email, push notifications, SMS, and in-app messages. Developers can set up the data connections and conditional logic, while designers and product managers can iterate on the visual design and copy without touching code. This collaboration speeds up your onboarding development significantly.
What makes it special:
- Multi-channel by design: Create once, deploy everywhere
- Real data preview: See exactly how templates render with actual user data
- Version control: Track changes and rollback if needed
- Brand consistency: Reusable components ensure consistent styling
Here's how to build a personalized template that works across all your channels:
Design in the Visual Editor In Courier's template designer:
- Drag text blocks, buttons, and images for your layout
- Add Handlebars placeholders directly in the visual editor: {{name}}, {{company}}
- Set up conditional blocks: {{#if is_enterprise}}...{{/if}}
- Configure channel-specific versions (email gets full content, push gets summary)
Map Segment Data to Template Variables When Segment sends user traits, they automatically fill your template placeholders:
Copied!
// Segment sends this dataanalytics.identify(userId, {name: "Sarah Chen",company: "TechCorp",plan: "enterprise",industry: "fintech"});
Your template in the visual designer uses these traits: ```handlebars Hi {{analytics.traits.name}},
Welcome to our platform! Since {{analytics.traits.company}} is in the {{analytics.traits.industry}} space, here are some relevant resources...
{{#if (eq analytics.traits.plan "enterprise")}} Your dedicated success manager will reach out within 24 hours. {{else}} Here are three quick wins to get started: {{/if}} ``` Trigger Your Onboarding Flow Once you've designed your templates, you set up an automation in Courier that defines the sequence and timing. Then when a user signs up (or hits other milestones), that event triggers the automation to start. From there, Courier handles everything, from sending the welcome email and waiting for user activity, to checking conditions and routing to the right channels.
The workflow runs automatically using the templates you designed and the real user data from Segment. One template design works across all channels, and the whole sequence adapts based on what each user actually does.
Part 5: In-App Tasks with Courier Inbox
Beyond Email: Interactive Onboarding
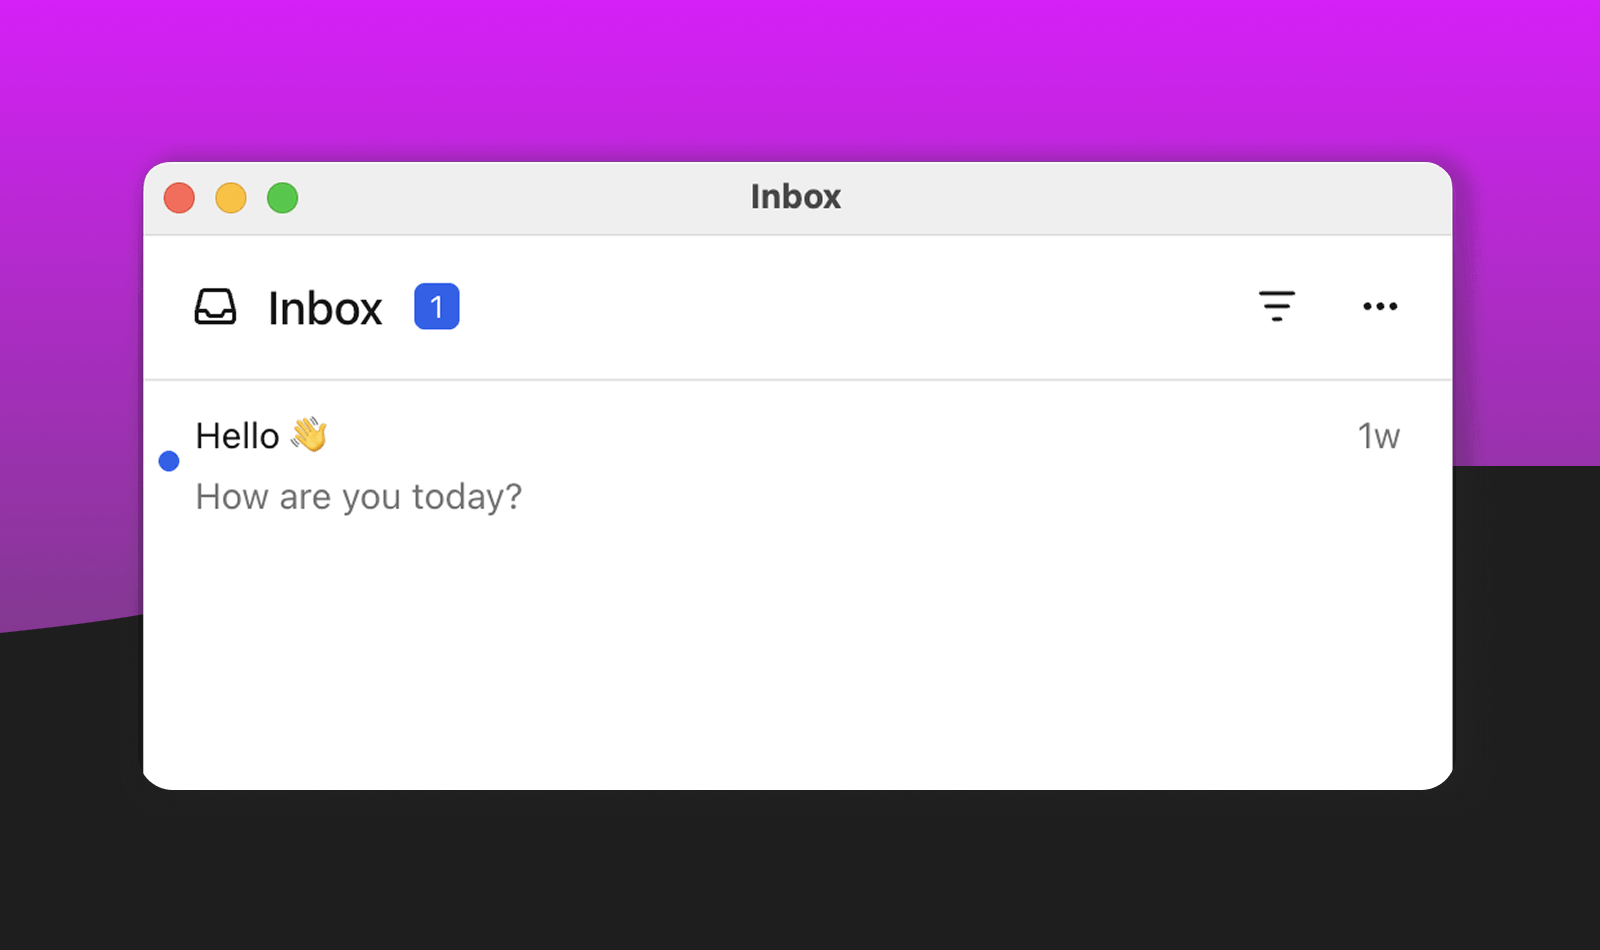
Emails get lost. Users forget what they need to do. There's no sense of progress. That's why modern products include in-app task lists for onboarding - giving users a persistent checklist they can work through at their own pace.
Courier Inbox is essentially a notification center that lives inside your application. Think of it like the notifications you see in Facebook or Slack, but embedded in your product. Users can see all their messages, mark them as read, archive them, and take actions directly from the interface. The best part is that it syncs in real-time across all platforms, like when you mark something as read on web and it's instantly read on mobile too.
Courier Inbox provides this out of the box:
- Tasks appear instantly in your app
- Read/unread states sync across devices
- Users can mark items complete or archive
- Progress is visible and motivating
- Everything integrates with your existing notifications (ex. email read = inbox read state)
Most teams create their onboarding tasks through Courier's platform interface, then simply embed the Inbox component in their React or React Native apps. The Inbox automatically pulls in all messages sent to the "inbox" channel, handles state management, and provides a clean Gmail-like interface for users.
Setting Up Onboarding Tasks
After sending tasks to the inbox from your backend (using courier.send() with channels: ["inbox"]), display them in your application using our easy to install Courier-Inbox SDK. In the case below, just a handful of code in the front end gets you a popup notification center.
Copied!
import { useEffect } from 'react';import { CourierInbox, useCourier } from '@trycourier/courier-react';export default function App() {const courier = useCourier();useEffect(() => {// Generate a JWT for your user (do this on your backend server)const jwt = 'eyJhbGciOiJIUzI1NiIsInR5cCI6IkpXVCJ9...'; // Replace with actual JWT// Authenticate the user with the inboxcourier.shared.signIn({userId: $YOUR_USER_ID,jwt: jwt,});}, []);return (<div style={{ padding: '24px' }}><CourierInboxPopupMenu /></div>);}
The beauty of this approach is that you can customize tasks based on user types. Enterprise users might see "Schedule onboarding call" and "Configure SSO" while developers get "Generate API keys" and "Review webhook docs." When users complete tasks, you can track their progress in user profiles and trigger success messages or next-step automations when they finish their onboarding checklist.
The Inbox component handles all the complexity - real-time updates, persistence, and state management. Your users get a Gmail-like experience for their onboarding tasks. Not only does it work on web but it translates seamlessly to mobile using our iOS, Android, Flutter, and React Native SDKs.
Cross-platform benefits:
- Tasks created on web appear instantly in mobile app
- Progress syncs in real-time across all platforms
- Push notifications can complement in-app tasks
- Same data, native experience on each platform
See the Inbox documentation for styling and customization options.
Part 6: Multi-Tenant Configuration
One System, Many Experiences
If you're building B2B SaaS, you know that different customer segments need different experiences. Enterprise customers expect their branding, custom workflows, and dedicated support. Startups want self-service and community. Trial users need convincing.
Courier's tenant system lets you create these differentiated experiences without maintaining separate codebases:
- Each tenant can have custom branding
- Different email templates and messaging
- Unique automation flows
- Specific channel preferences
Understanding Tenant Hierarchy
Courier's tenant system supports complex organizational structures that mirror how businesses actually operate:
Copied!
Organization (tenant0)└── Workspace (tenantQ)└── Team (tenantP)├── Project (tenantR1)│ └── Environment (tenantR1D1)└── Project (tenantR2)├── Environment (tenantR2D1)└── Environment (tenantR2D2)
This hierarchy enables several powerful features:
Inheritance: Settings flow from parent to child with override capabilities. An organization might set default branding that workspaces inherit, but teams can override with their specific colors.
Scoped notifications: Send to all members of a tenant and its children using audience targeting. A workspace-level alert automatically reaches all teams and projects within it.
Context preservation: Maintain organizational boundaries in notification delivery through user profiles, ensuring the right people get the right messages with appropriate branding.
Multi-Dimensional Users
Users exist in multiple contexts simultaneously. A developer might receive notifications as an individual (personal preferences), a team member (team notifications), and a workspace participant (organization-wide alerts). When sending notifications, you specify the tenant context to ensure the right preferences and branding are applied:
Copied!
{"message": {"to": {"user_id": "user1","context": {"tenant_id": "production-workspace"}},"content": {"title": "Deployment completed","body": "Your app in {$.tenant.name} is now live"}}}
Setting Up Your Tenant Strategy
You'll configure your tenant brands and segments through Courier's platform interface. This lets you set up custom logos, colors, messaging tone, and channel preferences for each level of your organizational hierarchy without writing code. Once configured, your templates and automations automatically use the right branding based on the tenant context.
When organizing your tenant strategy, think about how each customer segment should experience your product. Enterprise customers typically expect custom logos and colors, formal messaging, dedicated success managers, and premium channels like Slack integration. Growth customers might get standard branding with some customization, friendly educational messaging, priority support queues, and email plus in-app notifications. Trial users often receive default branding, value-focused urgent messaging, self-service support, and email-only communications.
Practical Tenant Patterns
| Use Case | Implementation | Benefit |
|---|---|---|
| White-label | Custom brand per customer | Feels native to their product |
| Tier-based | Brand per pricing tier | Differentiated experience |
| Regional | Brand per geography | Localized messaging |
| Industry | Brand per vertical | Relevant examples/terms |
Start simple - maybe just enterprise vs. everyone else. You can always add more granularity as you grow.
See the tenant documentation for advanced patterns.
Part 7: Analytics and Observability
Measuring What Matters
Instead of stitching together data from multiple tools, Courier provides comprehensive analytics for your notification infrastructure. You get message performance, channel effectiveness, and provider reliability all in one place - while your product analytics handle the broader user journey.
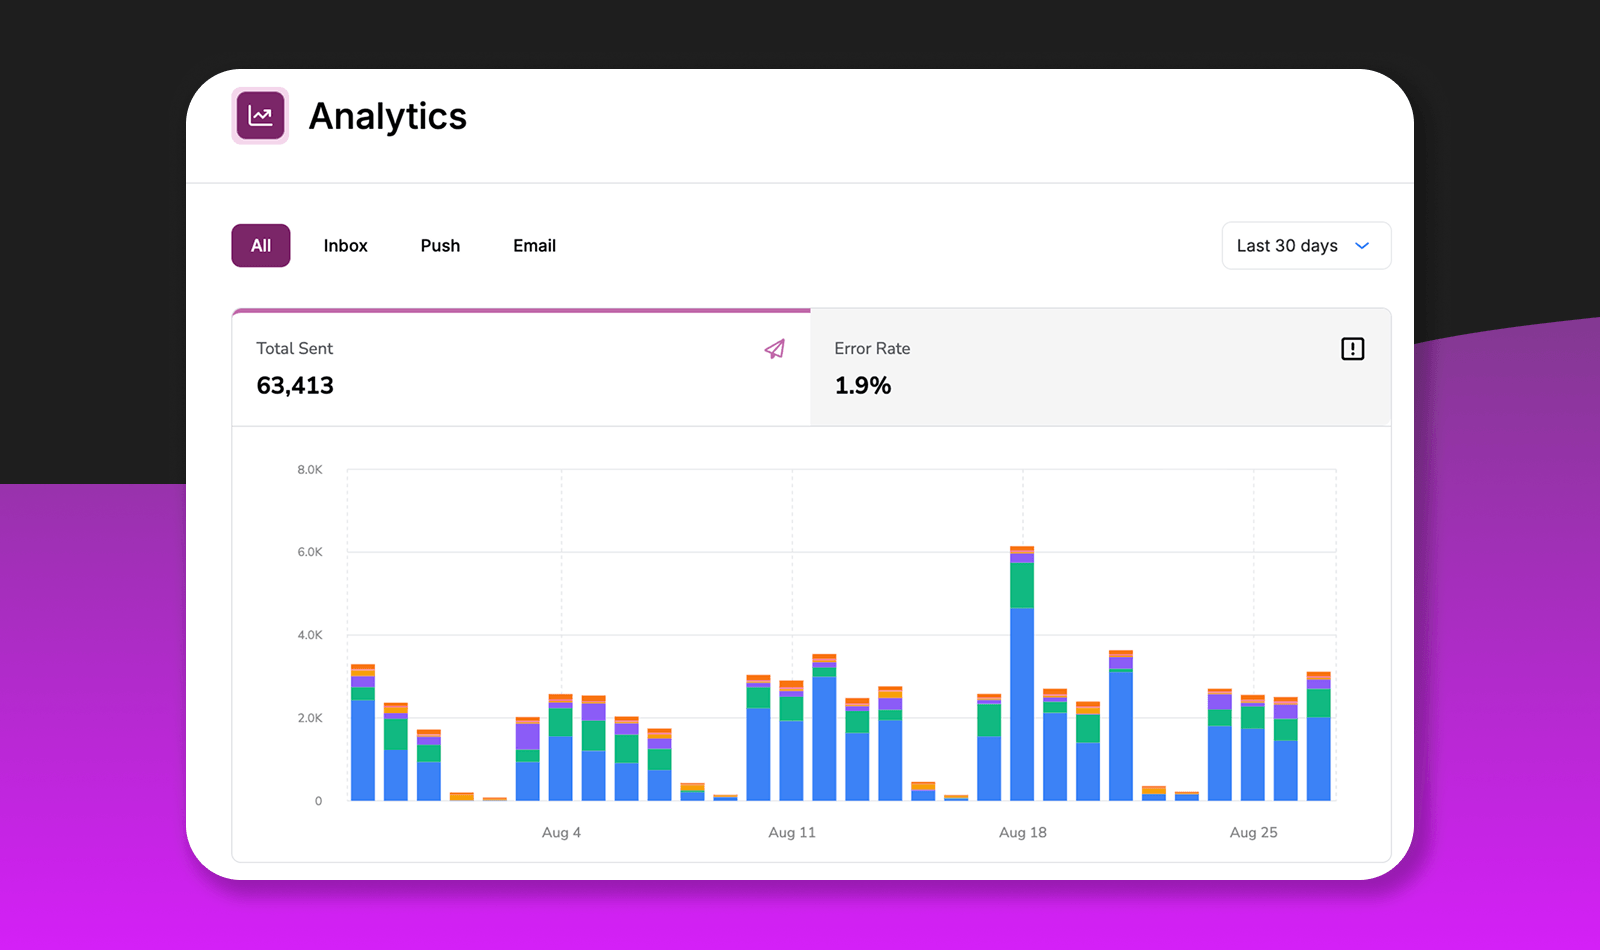
What Courier Tracks
Message and Channel Performance Every message is automatically tracked across all channels - deliveries, opens, clicks, and bounces. You'll see which templates work best, how each channel performs (email open rates, push engagement, SMS delivery), and where issues occur. Real-time monitoring shows delivery rates and system health at a glance, critical for catching onboarding failures before they impact activation.
Provider Monitoring Track provider reliability to know when SendGrid is having issues or when backup providers are needed. The platform shows performance trends over time, filtered by message type or user segment.
Integration with Your Analytics Stack Courier can send engagement events (opens, clicks) back to tools like Segment, connecting message performance to your broader user activation metrics. This gives you the complete picture of how onboarding messages impact retention.
Optimizing Your Onboarding
Key metrics to watch:
- Template performance: Low open rates = subject line issues; high opens with low clicks = content problems
- Channel effectiveness: Find which channels work best for different segments and adjust routing accordingly
- Delivery health: Spot provider issues early and know when to activate backup options
Remember: Courier handles notification metrics while your product analytics track the full user journey. Together, they show you exactly where to optimize.
See the analytics documentation for more details on available metrics and reporting features.
Testing Your Onboarding
Using Courier's Test Environment
Courier provides a complete test environment where you can validate your entire onboarding flow before going live. Here's how to test each component effectively:
Testing with Segment Events
To test your Segment-triggered automations:
Send test events from Segment:
- Use Segment's Event Tester to send sample events to Courier
- Include all the user traits your templates expect (
name,company,plan, etc.) - Watch the Events tab in Courier to confirm receipt
Use Courier's test event builder:
- Go to your automation and click "Debug"
- Select "Create Test Event" and populate with sample Segment data
- This simulates exactly what Segment would send
Test different user paths:
- Create test events for each segment (enterprise, trial, developer)
- Verify the right automation branch triggers for each user type
- Check that conditional logic evaluates correctly
Testing Automations End-to-End
Running test automations:
- Use the "Debug" tab in the automation designer
- Create multiple test runs with different user profiles
- Click "Run Again" to execute test runs and watch each step
- Verify delays by checking timestamps in the run logs
Testing Slack escalation:
- Create a test Slack workspace or dedicated test channel
- Set profile data to trigger escalation (enterprise + not activated)
- Verify the alert appears with correct formatting and data
- Click the CRM button to ensure links work
- Test at different times to verify business hours logic
Testing Channel Routing
Verify routing rules:
- In the template designer, use "Preview" with different recipient profiles to see channel selection
- Use the "Send" tab to test actual delivery across channels
- Test routing scenarios by configuring different channel setups:
- Single channel routing (email only)
- Multi-channel routing (email → push → SMS)
- User preference scenarios (if user opts out of email)
- Check the message logs in Analytics to see which channels were attempted
Test provider failover:
- Configure backup providers in your integration settings
- Test failover by sending messages during provider maintenance windows
- Use invalid provider configurations to force failover in test
- Check logs to confirm failover reason and timing
Testing Templates on Client
Web Inbox testing:
- Implement the Courier Inbox component in a test environment
- Send test messages tagged for onboarding using the Send Tab
- Verify task cards render correctly in your browser
- Test click actions and mark-as-read functionality using the Inbox APIs
Mobile testing:
- Build the Courier Inbox into your development app using the React Native SDK
- Send test push notifications to real devices (not simulators) using the Send Tab
- Verify deep linking works from push to in-app
- Test Inbox sync between web and mobile platforms
Preview across channels:
- Use the template designer's Preview tab to see messages across different channels
- Test with different user profiles using test events
- Verify responsive email design on different devices
- Check SMS character counts and truncation in the preview
Validating with Analytics
After running your tests, verify everything in Courier's analytics:
Check delivery metrics:
- Go to the Analytics section and review template-level performance
- Filter by test period to isolate your test messages
- Verify delivery rates match expectations across channels
- Look for any bounces, failures, or routing issues
Monitor engagement:
- Track opens and clicks for test emails and push notifications
- Verify Inbox read/unread states sync correctly
- Check message status in the message logs
Review automation performance:
- Use the automation debugger to trace test runs step-by-step
- Check timing of delays and conditional logic execution
- Verify each step completed successfully in the run logs
Provider health check:
- Review provider performance in template analytics
- Check channel performance tables for delivery rates by provider
- Look for any provider errors in the message logs
Testing Checklist
Before going live, ensure:
- All user segments receive appropriate content
- Segment events trigger the right automations
- Channel routing and fallbacks work as expected
- Slack escalation fires for high-value accounts
- Templates render correctly across all channels
- Inbox tasks appear and sync properly
- Mobile push reaches real devices
- Analytics track all key metrics
- Provider failover handles outages gracefully
Conclusion
What You've Built
You now have a sophisticated onboarding system that would typically take months to build from scratch. Your system:
- Responds intelligently to what users actually do, not just fixed schedules
- Routes through multiple channels with automatic fallbacks
- Personalizes content based on user segments without separate codebases
- Escalates appropriately when high-value users need help
- Works across platforms with tasks and progress syncing everywhere
- Provides clear metrics so you know what's working
More importantly, you've built this in a way that's maintainable and extensible. Your product team can now iterate on flows through Courier's visual tools. Your success team gets actionable alerts. Your mobile team has native experiences that just work.
What You Didn't Have to Build
The real value is in what Courier handles for you:
- No state machines for multi-step flows
- No retry logic or failure handling
- No channel-specific integrations
- No synchronization between platforms
- No custom analytics pipelines
- No complex routing engines
This lets you focus on what actually matters: helping your users succeed with your product.
Next Steps
Start simple and iterate:
- Launch with basics: Email + in-app tasks for all users
- Add segmentation: Different paths for different user types
- Expand channels: Add SMS/Slack where it makes sense
- Optimize with data: Use analytics to improve activation rates
- Scale gradually: Add more sophisticated flows as you learn
Resources
- Courier Quickstart
- Get up and running
- Automations Guide
- Build complex flows
- Inbox Documentation
- In-app notifications
- API Reference
- Complete API details
- SDKs
- Language-specific libraries
Remember: Great onboarding is iterative. Start with something good, measure what works, and keep improving. Your users (and your metrics) will thank you.
Similar resources
© 2026 Courier. All rights reserved.