Three Ways to Send Emails Using Python With Code Tutorials

Milan Bhardwaj
March 04, 2021

For software products of every scale, emails are the de facto standard for notifying your users. It’s a fast, cost-effective, and readily accessible channel for reaching your users, especially if you’re sending transactional emails or generating event-driven alerts.
In this post, I’ll go over three ways to send emails with Python. Apps can leverage Python for sending emails for an array of use cases. For example, you can generate alarms if things go south in production, send confirmation emails to new users, or notify users of new activity in your app.
3 ways to send emails from your Python app
There are three main options for sending email with Python: SMTP, a transactional email service, and a multichannel notifications service.
Below, I’ll review the pros and cons for each option. Then, in the next section, I’ll walk you through three different code tutorials for using each option to send emails with Python.
1. Using SMTP
Python has a built-in module for sending emails via SMTP, which makes getting started with email a piece of cake.
Pros of using SMTP
Easy to set up
Highly cost-effective
Platform agnostic
Cons of using SMTP
Less secure
No built-in analytics
Longer send times
Long-term maintenance and uptime burden
2. Using a transactional email service
You can also easily integrate third-party transactional email APIs like SendGrid, Mailgun, and AWS SES. If you are planning to send a high volume of emails or need to ensure deliverability, a hosted email API can be a great option and many providers offer a free or low-cost plan to start.
Pros of transactional email services
Feature-rich, e.g. analytics
High email delivery rates
Better email delivery speeds
Scalability and reliability
Cons of transactional email services
Learning curve for new API
Dependent on third-party intermediary
3. Using a multichannel notifications service
Finally, if you’re planning to notify users on more than one channel, you can use a multichannel notifications service. Courier, for example, gives you one uniform API to notify users over email, SMS, push, and chat apps like Slack and WhatsApp. Plus, you’ll get a drag-and-drop template builder and real-time logs and analytics for all your channels.
Even if you’re only sending emails today, multichannel notifications services can save you time and money. With a platform like Courier, you can easily add new channels, switch email service providers, or even add backup providers without writing any additional code. You get a complete notifications system that can scale with your product’s growth.
Pros of multichannel notifications services
Single API for multiple channels
Easy to manage cross-channel delivery
Less code to write and maintain
Cons of multichannel notifications services
- Additional third-party intermediary
Tutorial: How to send emails using SMTP in Python
You can use Python’s built-in smtplib module to send email using SMTP (Simple Mail Transfer Protocol), which is an application-level protocol. Note that the module makes use of RFC 821 protocol for SMTP. I’ll show you how to use Gmail’s SMTP server for this walkthrough.
1. Set up a Gmail account for sending your emails. Since you’ll be feeding a plaintext password to the program, Google considers the SMTP connection less secure.
2. Go to the account settings and allow less secure apps to access the account. As an aside, Gmail doesn't necessarily use SMTP on their internal mail servers; however, Gmail SMTP is an interface enabled by Google's smtp.gmail.com server. You might find smtp.gmail.com in email clients like Thunderbird, Outlook, and others.
3. Import smtplib. Since Python comes pre-packaged with smtplib, all you have to do is create a Python file and import smtplib into it.
4. To create a secure connection, you can either use SMTP_SSL() with 465 port or .starttls() with 587 port. The former creates an SMTP connection that is secured from the beginning. The latter creates an unsecured SMTP connection that is encrypted via .starttls().
To send email through SMTP_SSL():
import smtplibgmail_user = 'your_email@gmail.com'gmail_password = 'your_password'sent_from = gmail_userto = ['person_a@gmail.com', 'person_b@gmail.com']subject = 'Lorem ipsum dolor sit amet'body = 'consectetur adipiscing elit'email_text = """\From: %sTo: %sSubject: %s%s""" % (sent_from, ", ".join(to), subject, body)try:smtp_server = smtplib.SMTP_SSL('smtp.gmail.com', 465)smtp_server.ehlo()smtp_server.login(gmail_user, gmail_password)smtp_server.sendmail(sent_from, to, email_text)smtp_server.close()print ("Email sent successfully!")except Exception as ex:print ("Something went wrong….",ex)
To send email through .starttls():
import smtplibtry:#Create your SMTP sessionsmtp = smtplib.SMTP('smtp.gmail.com', 587)#Use TLS to add securitysmtp.starttls()#User Authenticationsmtp.login("sender_email_id","sender_email_id_password")#Defining The Messagemessage = "Message_you_need_to_send"#Sending the Emailsmtp.sendmail("sender_email_id", "receiyer_email_id",message)#Terminating the sessionsmtp.quit()print ("Email sent successfully!")except Exception as ex:print("Something went wrong....",ex)
Now that you've initiated a secured SMTP connection, you can move forward and write your message and pass to .sendmail().
Tutorial: How to send emails using a transactional email service in Python
If you need to send a high volume of transactional emails or optimize deliverability, consider using a transactional email service. There are many to choose from, including Amazon SES, Mailgun, and Postmark, and the vast majority support Python.
In this tutorial, I’m going to use SendGrid, one of the most popular email APIs. What sets a service like SendGrid apart from SMTP are the out-of-the box features. SendGrid offers easy integration with a simple API, email analytics, round-the-clock support, and high deliverability rates.
Setting up SendGrid with Python is a fairly simple process:
Create an account with SendGrid. SendGrid’s free plan includes 100 emails per day.
Generate and store a SendGrid API key and provide full access to Mail Send permissions.
Create a Python script and start using the API.
To begin using SendGrid’s API via Python, follow these steps:
1. To install the sendgrid package on your machine, refer to SendGrid's GitHub installation guide or directly install via pip install sendgrid.
2. To use the package in a Python script:
import sendgridimport osfrom sendgrid.helpers.mail import Mail, Email, To, Content
3. To assign your API key to the SendGrid API client:
my_sg = sendgrid.SendGridAPIClient(api_key = os.environ.get('SENDGRID_API_KEY'))
4. To send email, create the body and generate JSON representation. Refer to SendGrid’s complete code block:
import sendgridimport osfrom sendgrid.helpers.mail import Mail, Email, To, Contentmy_sg = sendgrid.SendGridAPIClient(api_key=os.environ.get('SENDGRID_API_KEY'))# Change to your verified senderfrom_email = Email("your_email@example.com")# Change to your recipientto_email = To("destination@example.com")subject = "Lorem ipsum dolor sit amet"content = Content("text/plain", "consectetur adipiscing elit")mail = Mail(from_email, to_email, subject, content)# Get a JSON-ready representation of the Mail objectmail_json = mail.get()# Send an HTTP POST request to /mail/sendresponse = my_sg.client.mail.send.post(request_body=mail_json)
Note that you can easily set up SendGrid and send up to 10,000 exclusive mail requests every second with your Django and Flask web applications.
Tutorial: How to send emails using a multi-channel notifications service in Python
If you’re looking to scale your application’s notification capabilities while keeping your codebase clean, you should consider a multichannel notifications service like Courier. Courier allows you to bring your own email provider, including support for SMTP and most popular transactional email APIs.
I’ll walk you through setting up Courier and sending notifications in the following steps.
1. Sign up for Courier and go through the Google authentication flow to give Courier permission to send email on your behalf from your Gmail account. You can skip this step if you’re planning on using a different ESP.
2. Once you complete the Google Auth flow, you’ll see a sample API request. You can copy and paste the code as a cURL command, or click into the Python tab for a version of the API call (pasted below) in Python and execute the code in your environment to test the integration. You should see the email in your inbox once you’ve finished and the web page will take you into the application.
from trycourier import Courierclient = Courier(auth_token="pk_prod_ZN043V85VAM138K22DMK8G8Y2F8Y")resp = client.send(event="courier-quickstart",recipient="aman@courier.com",data={"favoriteAdjective": "awesomeness"},profile={"email": "aman@courier.com"})
Congratulations! You’re all set-up to start sending programmatic emails using Gmail with Courier.
3. Design and preview your email in Courier
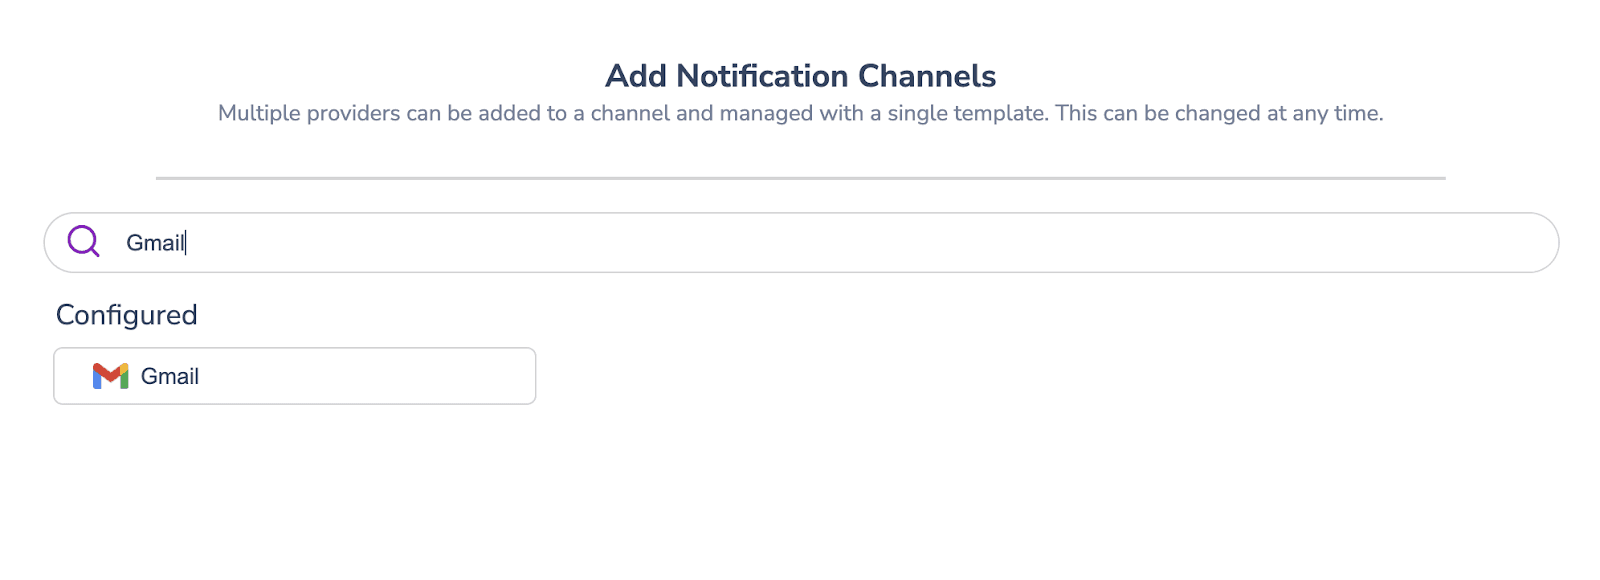
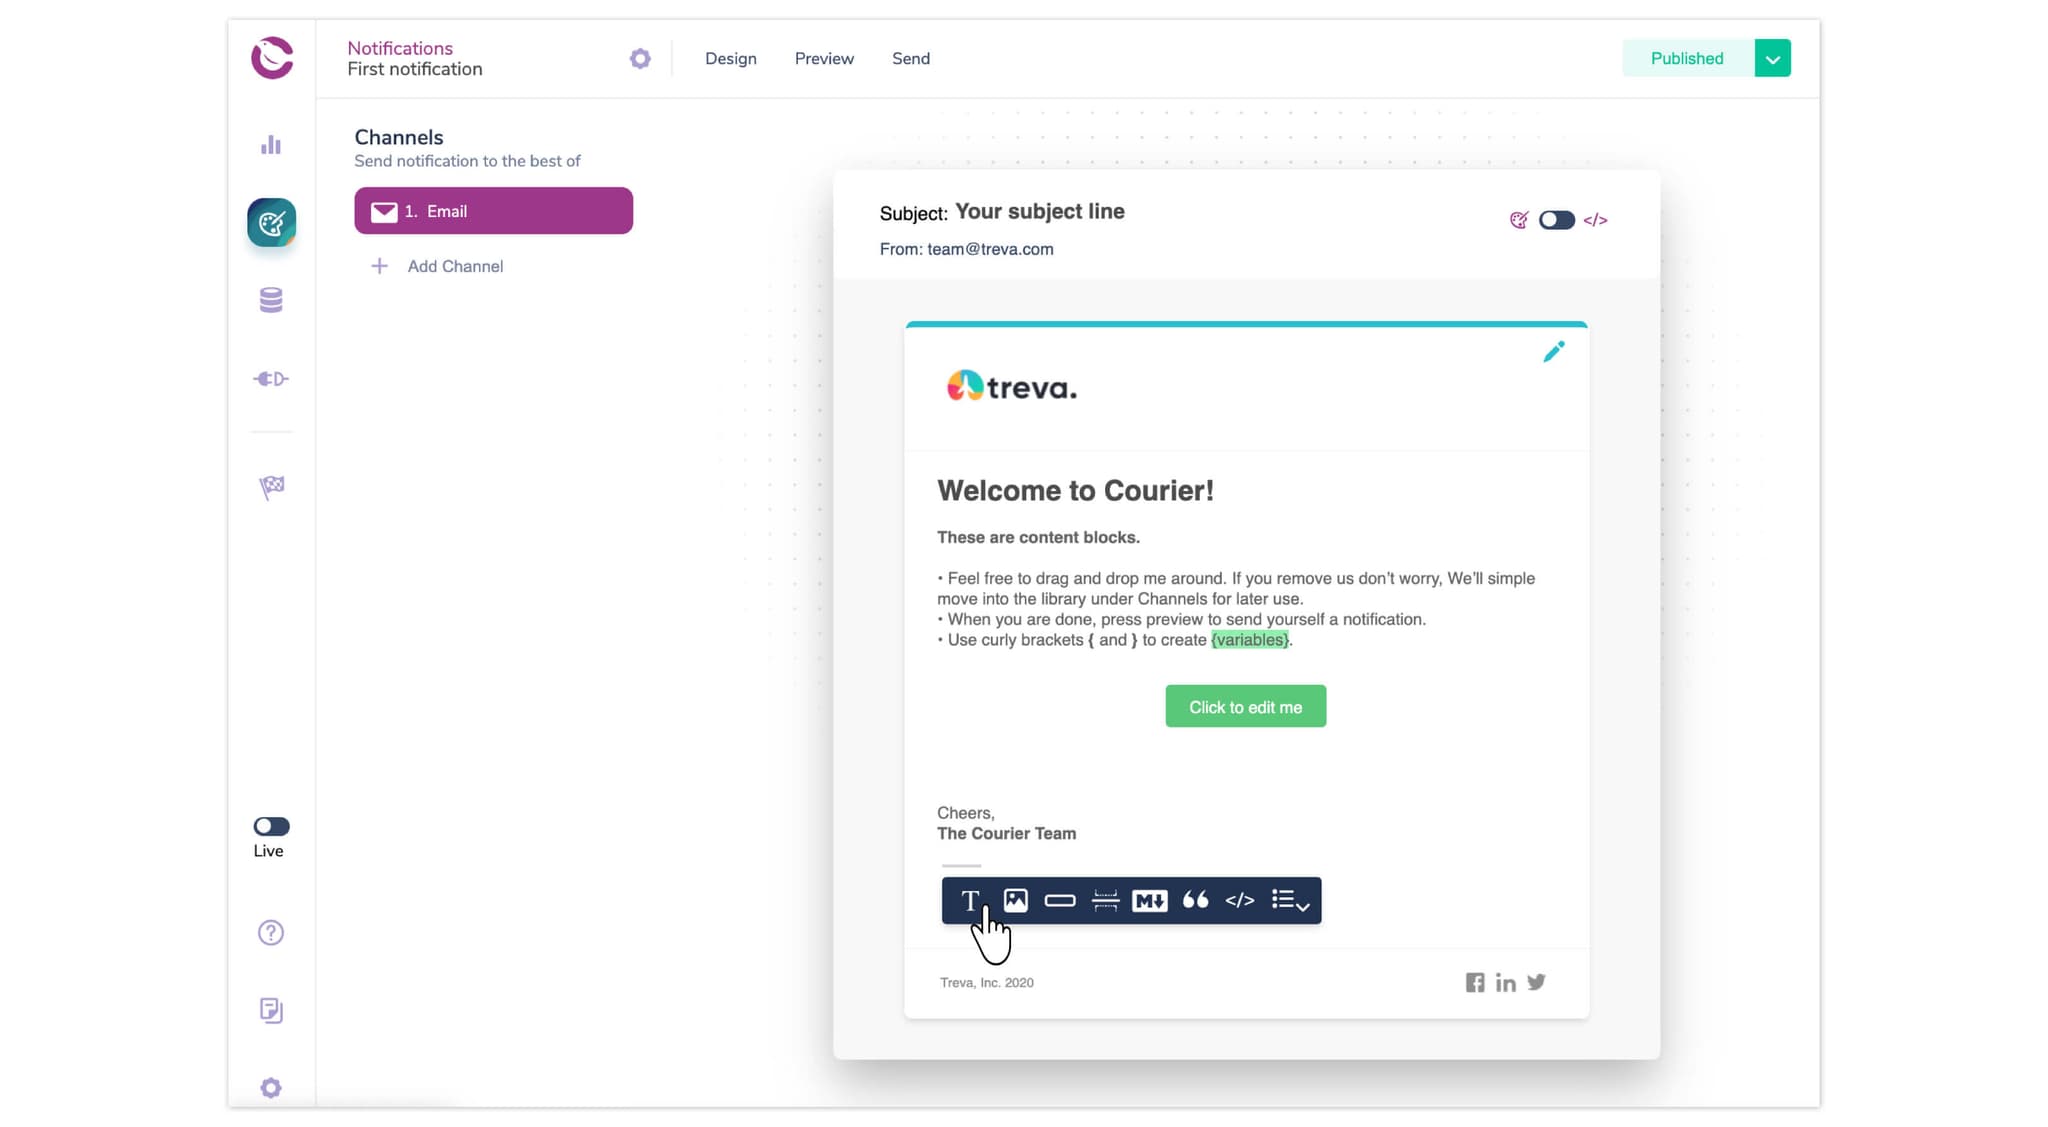
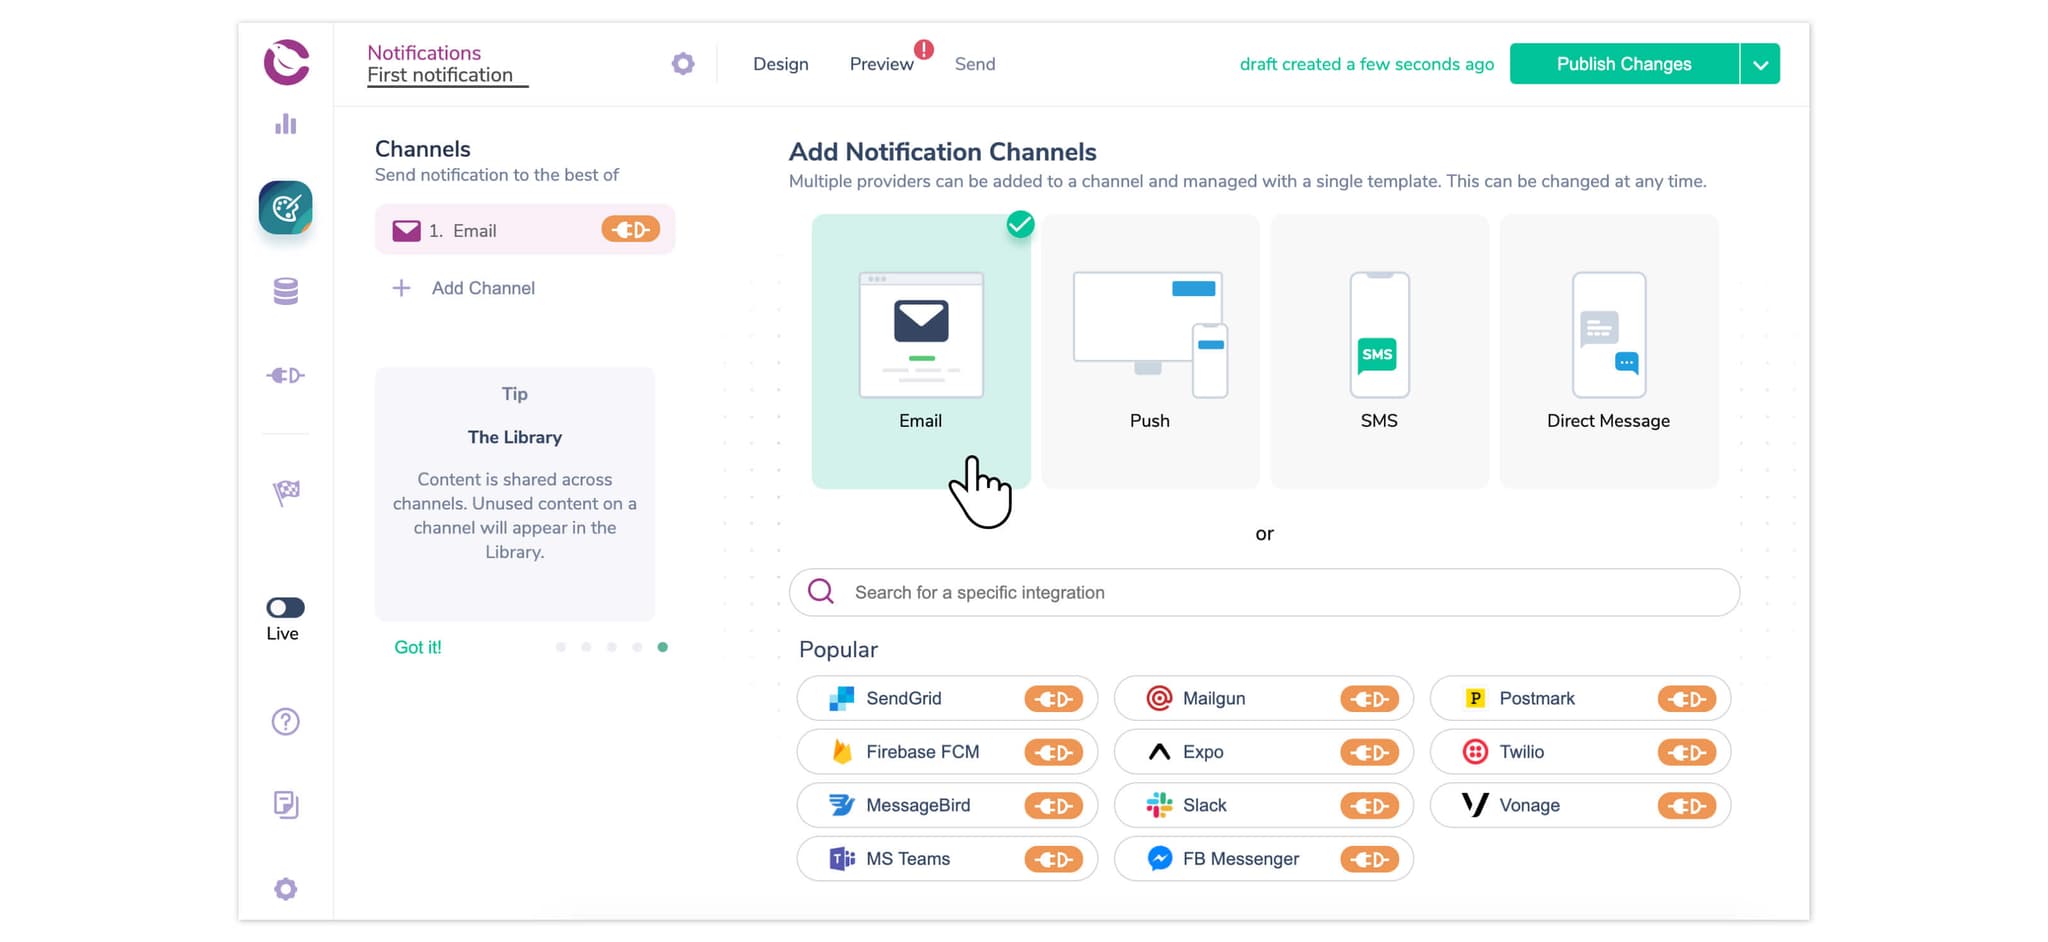
Now, let’s design and preview your email using Courier. Once you’ve created your email, you or anyone working on your app can come back and edit it – without shipping any more code. For this tutorial, we’ll walk you through creating an account activation email for your Python app. Hit the “Design a template” block on the welcome page and select “Create a Notification” on the top-right of the next screen.
Use the visual editor to design your email
Using Courier’s notifications designer, you can set the subject line and drag and drop content blocks to compose your email. You can easily add text, images, lists, buttons, and more. If you want to add custom code, you can either add a handlebars snippet or override the entire email.
You can also reference external data in your email using variables. Just use braces {} to add the variables to your email. In this case, we’ll include the person’s username and the date that they activated their account. We recommend creating a test event – which we explain below – to ensure you’re referencing the correct variable names before you publish your email.
Customize your brand
Courier will automatically create a default Brand for your emails, which you can customize to match your company’s brand. You only need to set your Brand once to use it in all future emails you create. To edit your Brand, click on the brush icon in the top right corner of your email.
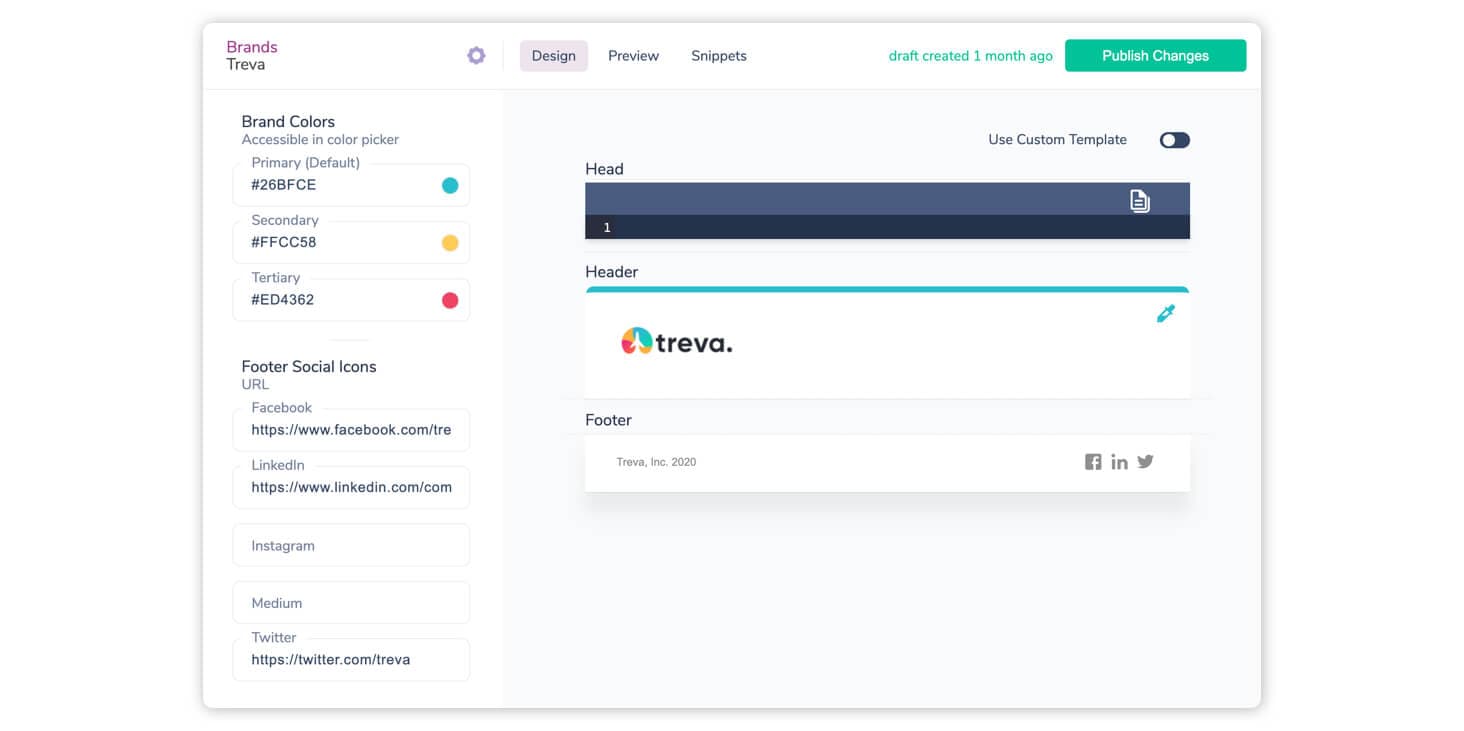
From here, you can upload your logo, set your brand color, and add text and social links to your footer. If you want to send whitelabeled emails, you can do that by creating multiple Brands.
Create a test event
Next, create a test event for your email. Test events allow you to preview and validate variables that you’ve included in your email using example data. To create a test event, click the Preview button in the top nav and, from this screen, select the link to View Test Events.

You should now see the JSON data for your test event. You can add variables to either the data or profile object. In order for variables to work, you must include this data when you integrate the email into your Python app, which we explain in the next step. For our account activation email, we’ll add username and date to the data object and set values for them.
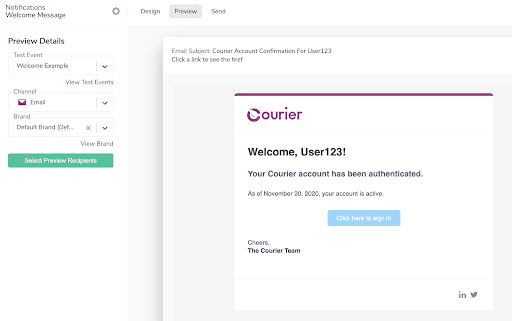
Preview your email
After you’ve finished designing your email, you can preview it in Courier using the Preview tab. You can also send yourself a test email using Select Preview Recipients.
Publish your email
Once you’re happy with your email, click Publish Changes. Now we’re ready to integrate your new email notification into your Python app and start sending.
4. With your Courier account configured, create a Python script. You can download Courier’s Python Package via pip install trycourier.
5. Once you’ve published your notification, Courier will automatically generate a code snippet for you to use. Copy-paste the code snippet and make an API call with the following script:
from trycourier import Courierclient = Courier(auth_token="Courier_Authentication_Token")response = client.send(event="your-notification-id" #Your notification ID from Courierrecipient="your-recipient-id" #Usually your system's User IDprofile={"email": "user@example.com" #The recipient’s email address},data={"Lorem Ipsum": "dolor sit amet" #The message you wish to send})print(response['messageId'])
How to send emails with attachments in Python
To include attachments with in your email notifications, you can add an optional 'override' parameter as follows:
from trycourier import Courierclient = Courier(auth_token="Courier_Authentication_Token")response = client.send(event="your-event-id",recipient="your-recipient-id",profile={"email": "recipient_id","phone_number": "recipient_number"},data={"Loredm Ipsum": "dolor sit amet"},override={} #Pass the override here)print(response['messageId'])
Pass the following override to the override parameter to equip your emails with attachment functionality:
"override": {“channel”: {“email”: {"attachments": [{"filename": "sample_file.txt","contentType": "text/plain","data": "SGk="}]}}}
Wrapping it up
This article was essentially three tutorials in one, covering methods for sending emails with Python via SMTP, a transactional email service (SendGrid), and a multichannel notifications service (Courier). With basic Python knowledge, you should now be able to choose your preference among the three solutions and easily extend your web application’s functionality when it comes to transactional emails and notifications.
Author: Milan Bhardwaj
Similar resources

Email open tracking and consent: the new rules in Europe
Regulators in Europe are treating the email open-tracking pixel like a cookie, which means it needs consent before it fires. Here's what changed, who's actually in scope, what compliance requires, and how to keep sending while gating tracking on consent, including how to wire it up in Courier.

You can build anything now. That's exactly why you shouldn't build this.
AI made building software cheap, so the temptation is to build everything. But owning infrastructure is a permanent draw on your scarcest resource, attention. The value lives at two ends, the systems everything runs on and the product only you can make; the move is to build less, buy the opinionated platform, and let an agent operate it.

I redid every cover image on our blog in an afternoon with Claude, Ideogram, and Contentful
I refreshed 81 blog covers, two years of posts, in a single afternoon. Claude Code orchestrated the pipeline, Ideogram generated the art, and the Contentful MCP moved every post in and out. Here is the stack, and why it only took an afternoon.
© 2026 Courier. All rights reserved.