Most Popular
Start Routing Notifications Today!
Courier is a notification service that centralizes all of your templates and messaging channels in one place which increases visibility and reduces engineering time.
Sign-up
How to Send Email with Ruby
Introduction
In this tutorial, we’ll show you an easy way to add email functionality to your Ruby app. This guide focuses on the most common use case for sending email: transactional notifications. These are emails triggered by user events like account activation, password reset, billing confirmation, and general product messages.
You’ll learn how to set up your email service, design your email template, and test and preview your email before publishing it to production. You’ll also find sample code you can use to quickly start sending emails in your Ruby program.
Table of contents
Requirements
Set up your transactional email service
Set up the email channel in Courier
Design and preview your email
Send emails from your Ruby app
Requirements to send email with Ruby
To start sending transactional emails in your Ruby app, you will need:
- A registered domain, e.g. myapplication.com.
- An email service like SendGrid, Mailgun, or an SMTP server.
- A Courier account – it’s free to sign up and includes 10,000 notifications per month.
If you don’t already have an email service or a Courier account, we’ll show you how to set them up. While most email service providers have their own API that you can integrate directly into your app, using Courier allows you to design and manage your templates outside of your source code. Courier also provides you with critical functionality like automatically retrying failed sends and tracking deliverability and user engagement – without having to build it yourself.
In this tutorial, we’ll use Courier’s full-featured visual editor to design and preview the email, and we’ll use Courier’s integration with the email service to actually deliver your notification.
Ready? Let’s dive in.
1. Set up your transactional email service
The first step is to select an email service for your Ruby app. There are two options: you can either send directly via SMTP or use a hosted email API service. We recommend using an email service provider (ESP) to ensure a high rate of email deliverability and fast delivery times.
If you already have an email service set up for your domain, you can skip ahead to the next step and set up your email channel in Courier, including integrating with your ESP.
Select your email service provider
There are many email service providers you can choose from. Here are the most popular ESPs that integrate directly with Courier:
You can see the full list of supported providers in Courier here.
Next, we’ll show you how to sign up for an ESP and configure your account. We’ll use SendGrid as an example, since they’re a well-known provider with a free plan. You can send up to 100 emails per day with SendGrid’s free plan, which should be enough to get you started.
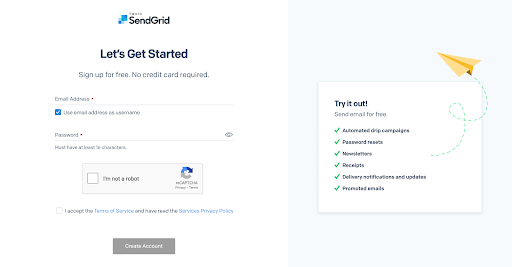
Create your SendGrid account
First, create your free SendGrid account. After creating your account, don’t forget to activate it by clicking the link key that they send to your email address.
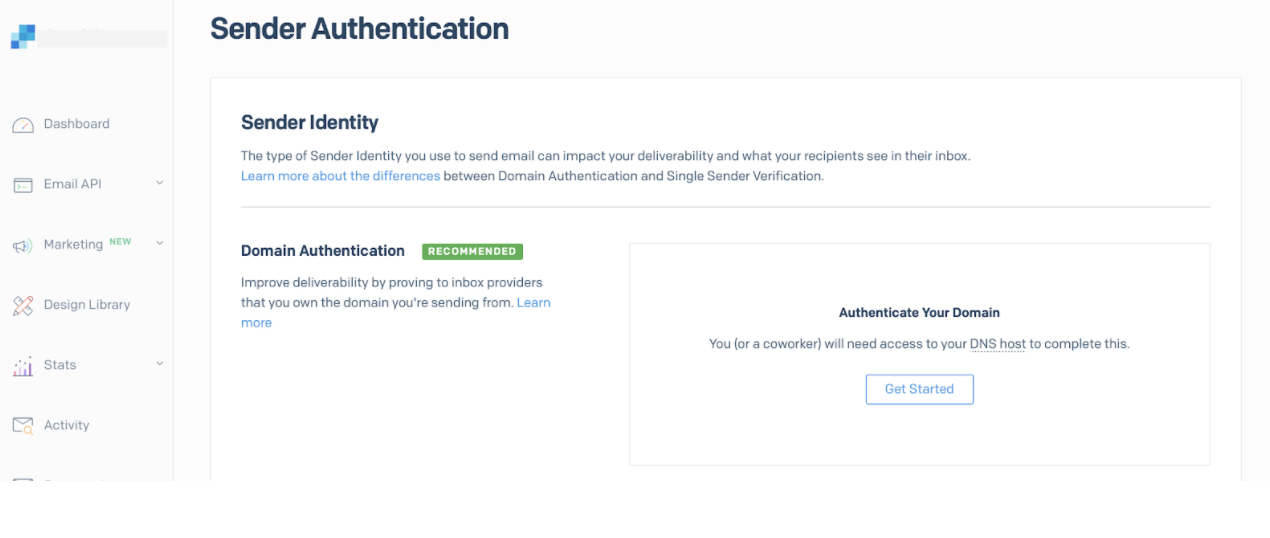
Authenticate your domain in SendGrid
Next, you need to create and verify a sender identity. You can do this either by authorizing a Single Sender using an email address you control or by authenticating your domain.
We highly recommend authenticating your domain, which will improve your sending reputation and email deliverability. Domain authentication also removes the “via sendgrid.net“ message that some inbox providers append to your emails.
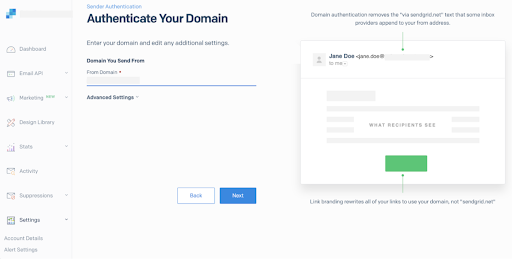
To authenticate your domain as a sender, go to Settings > Sender Authentication and then click on Get Started. You’ll need access to your DNS host to complete the authentication. Your DNS host is where you registered your domain, e.g. Rackspace, Cloudflare, Google Cloud.
On the next screen, select your DNS host and choose whether you want to brand your tracking links with your domain instead of sendgrid.net. Implementing link labeling helps ensure your emails will make it through spam filters.
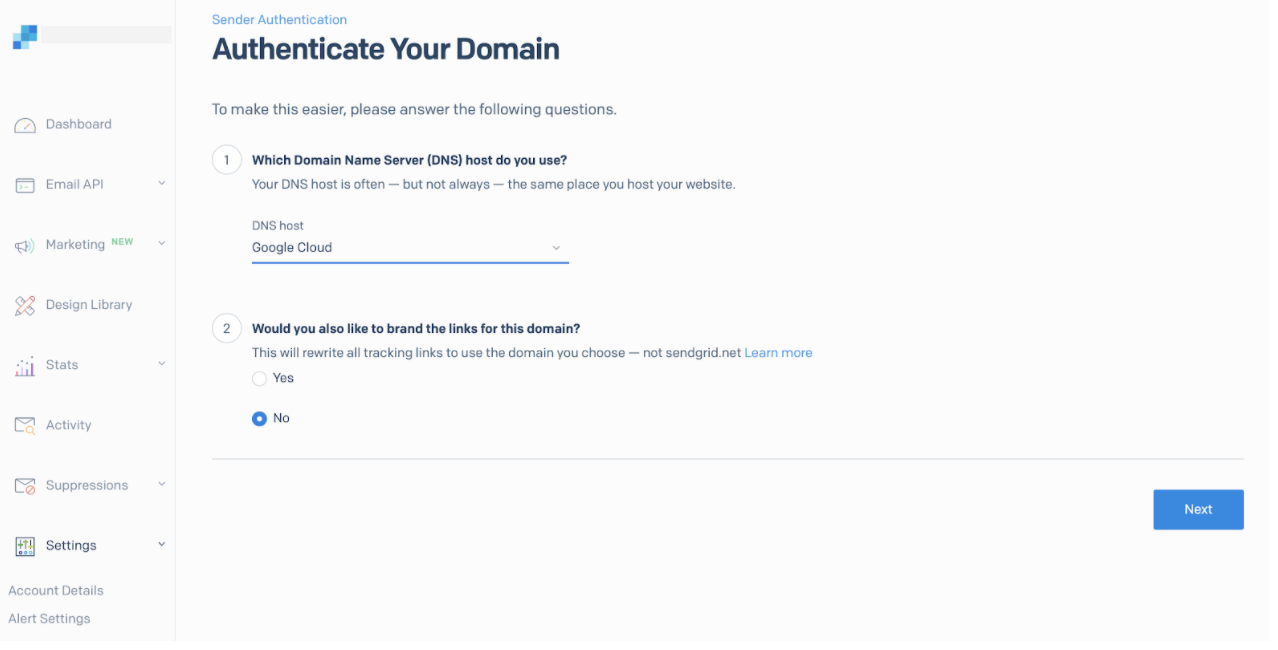
Enter the domain name that you want to send emails from. Your domain needs to match the domain of the From address on the emails you’re sending out.
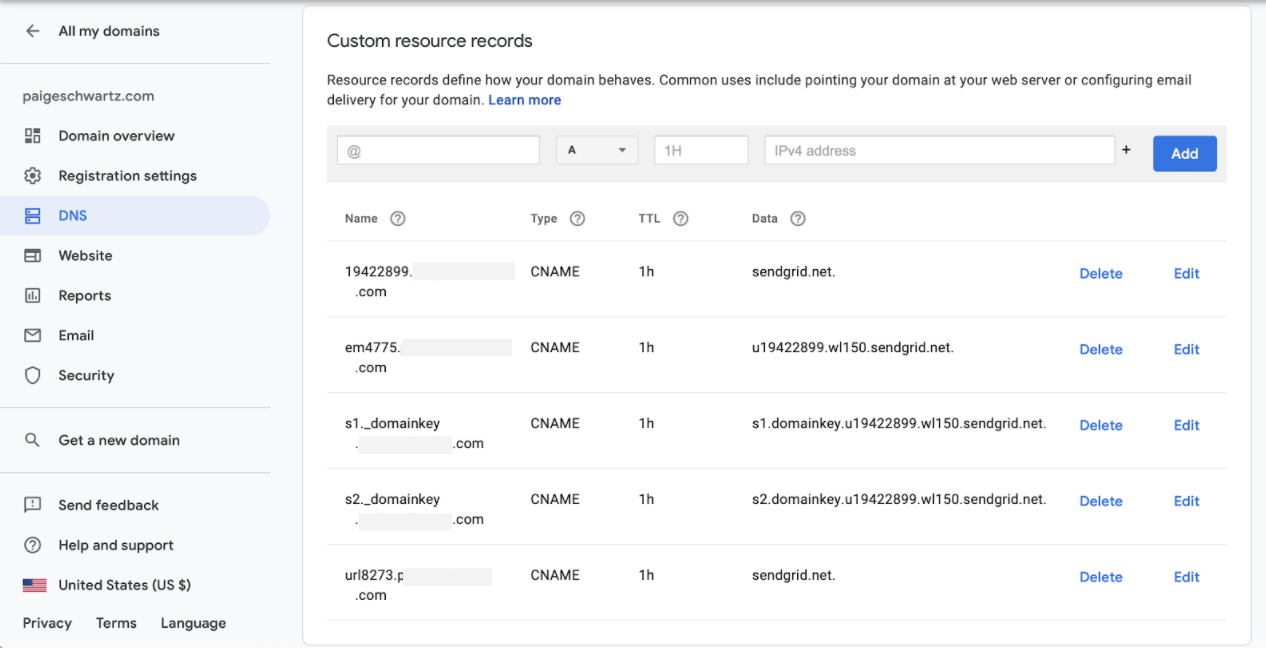
You’ll see the CNAME records that SendGrid wants to add to your DNS host. To complete your domain authentication, install these records with your DNS host and then click Verify.
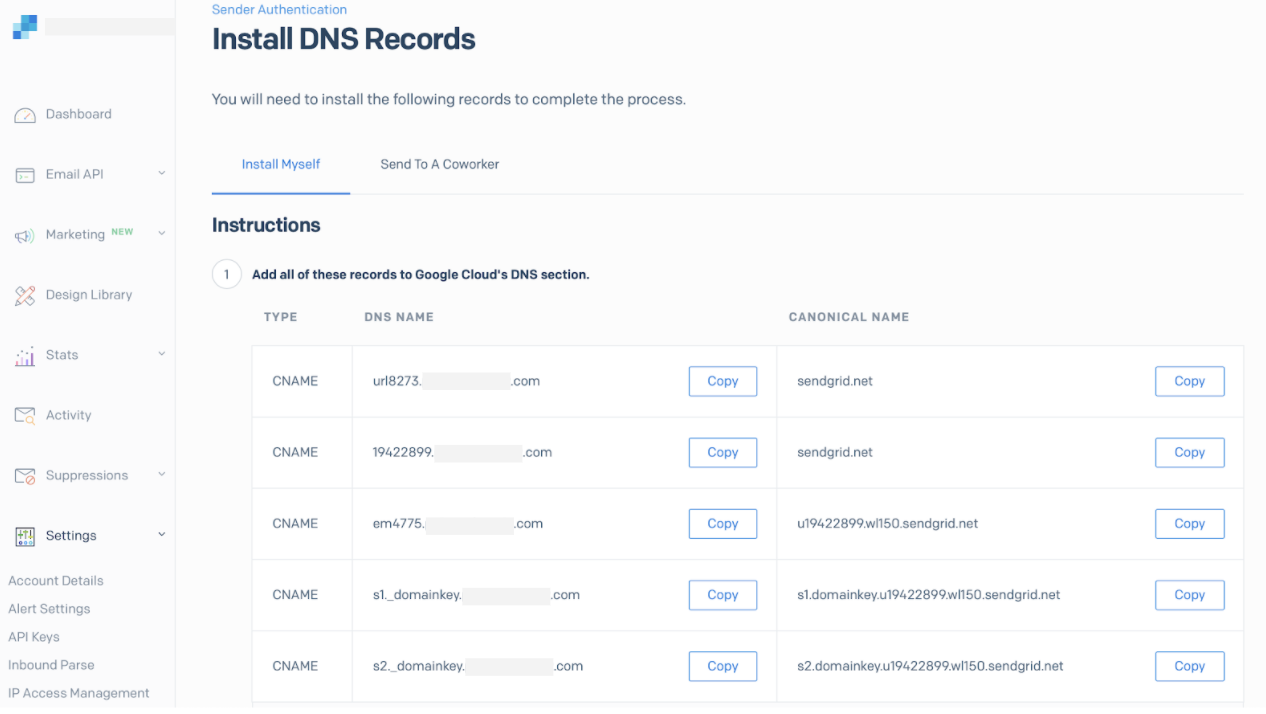
Here’s an example of adding the records to Google Cloud Domains:
Create your SendGrid API key
Finally, let’s create an API key. We’ll use this API key to integrate SendGrid with Courier in the next step. Go to Settings > API Keys and click on Create API Key in the upper right.
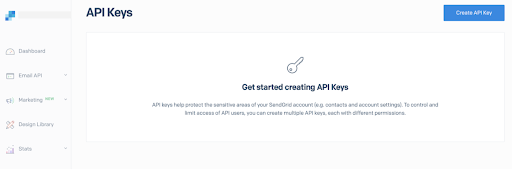
Name your API key – we recommend picking something that’ll be easy to identify later like “Courier App” – and choose Restricted Access. Courier needs full access to Mail Send and read access for Email Activity in order to send and track emails using SendGrid.
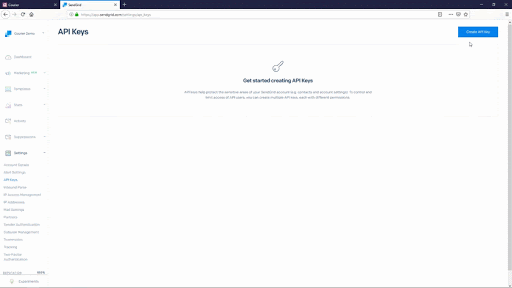
Now you should see your API key. Keep this window open because you’ll need it in a moment.
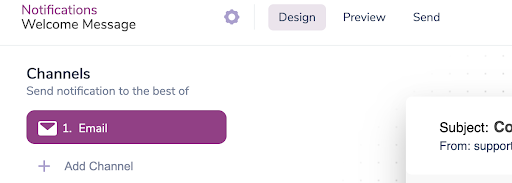
2. Set up the email channel in Courier
The next step is to set up your email channel in Courier. We’ll use Courier’s full-featured visual editor to design and preview the email. We’ll also use Courier to send a test email before we put it into production. We won’t cover it in this tutorial, but you can use Courier to set custom send logic, track delivery and engagement, and quickly integrate new notification channels, including SMS, push, and messaging apps like WhatsApp, Slack, and Microsoft Teams.
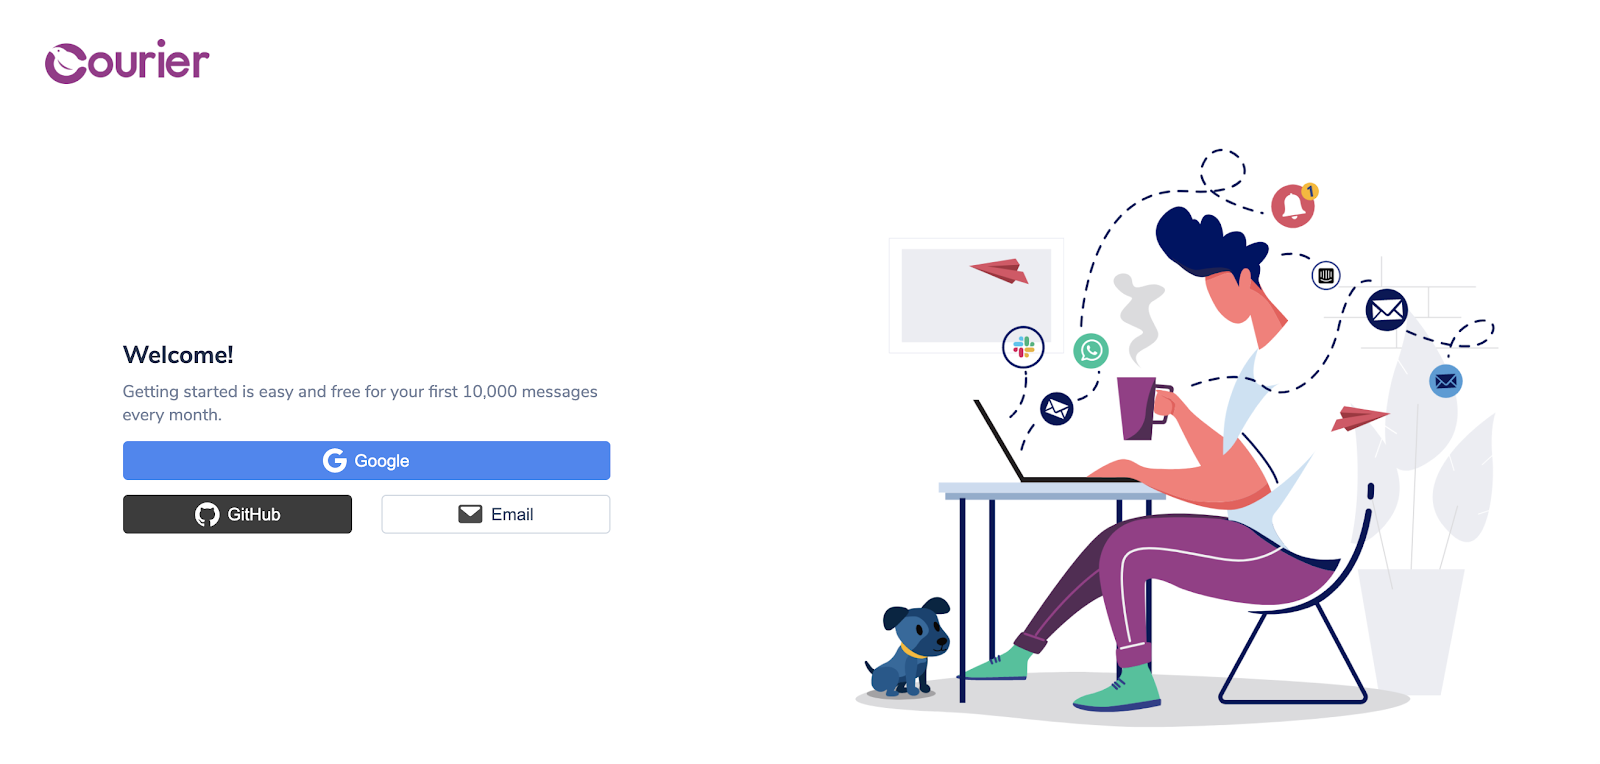
Sign up for Courier
If you don’t have one already, sign up for a Courier account (no credit card required). Courier’s free plan includes 10,000 notifications per month, which more than covers the 100 free emails per day that you can send through SendGrid.
Integrate your email service provider
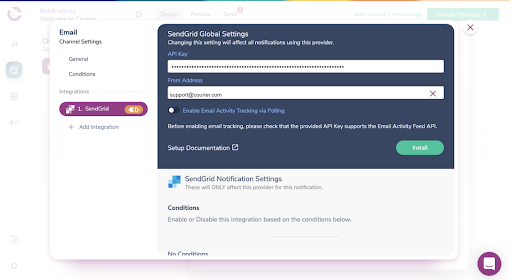
On the welcome page, you will see a sample notification on the right, and a list of channels on the left. Under Channels, click the plug icon next to Email to integrate your email service.
In this case, select SendGrid and then input your API Key from the previous step along with your From Address. Make sure the From Address matches the domain you authenticated in SendGrid. Then click Install. That’s it – SendGrid is now fully integrated with Courier!
3. Design and preview your email in Courier
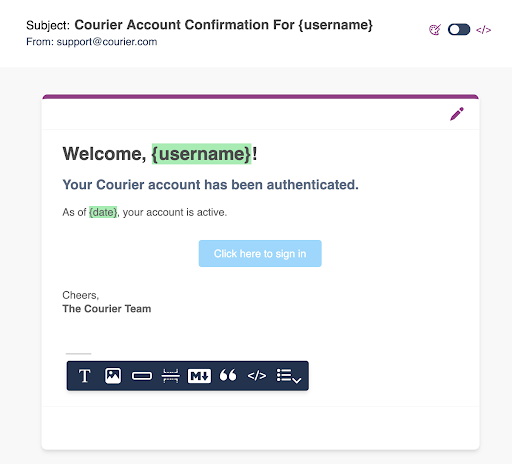
Now, let’s design and preview your email using Courier. Once you’ve created your email, you or anyone working on your app can come back and edit it – without shipping any more code. For this tutorial, we’ll walk you through creating an account activation email for your Ruby app.
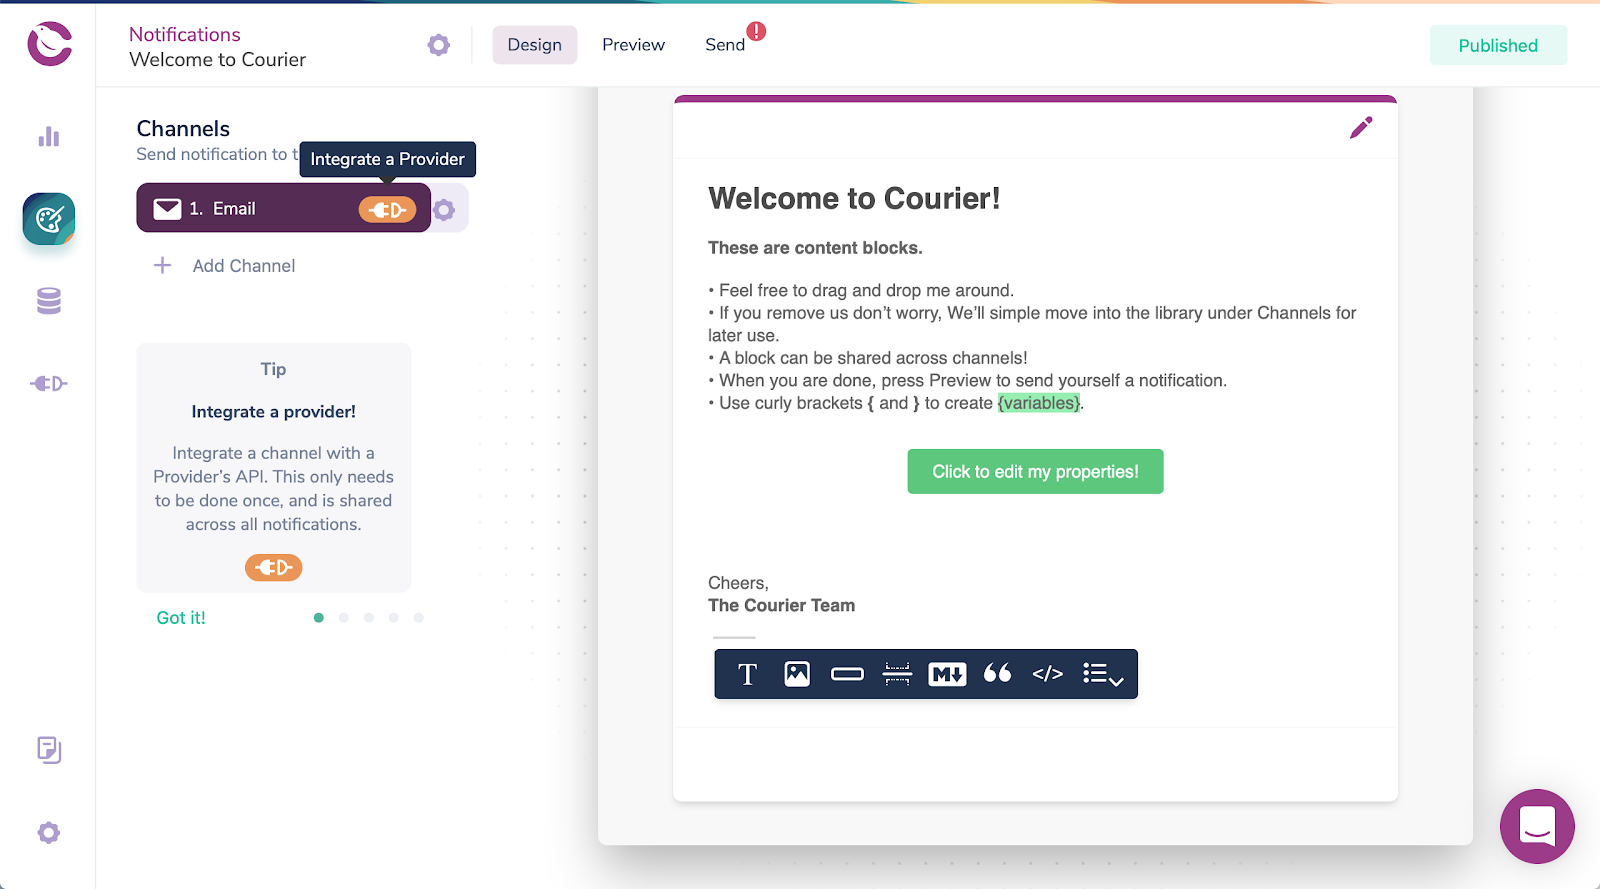
Use the visual editor to design your email
Using Courier’s notifications designer, you can set the subject line and drag and drop content blocks to compose your email. You can easily add text, images, lists, buttons, and more. If you want to add custom code, you can either add a handlebars snippet or override the entire email.
You can also reference external data in your email using variables. Just use braces {} to add the variables to your email. In this case, we’ll include the person’s username and the date that they activated their account. We recommend creating a test event – which we explain below – to ensure you’re referencing the correct variable names before you publish your email.
Customize your brand
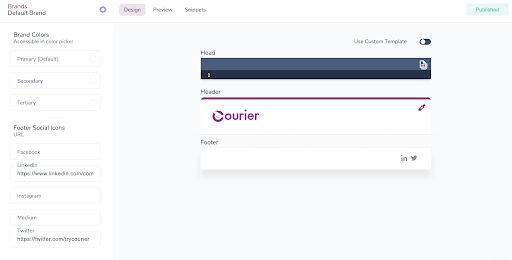
Courier will automatically create a default Brand for your emails, which you can customize to match your company’s brand. You only need to set your Brand once to use it in all future emails you create. To edit your Brand, click on the brush icon in the top right corner of your email.
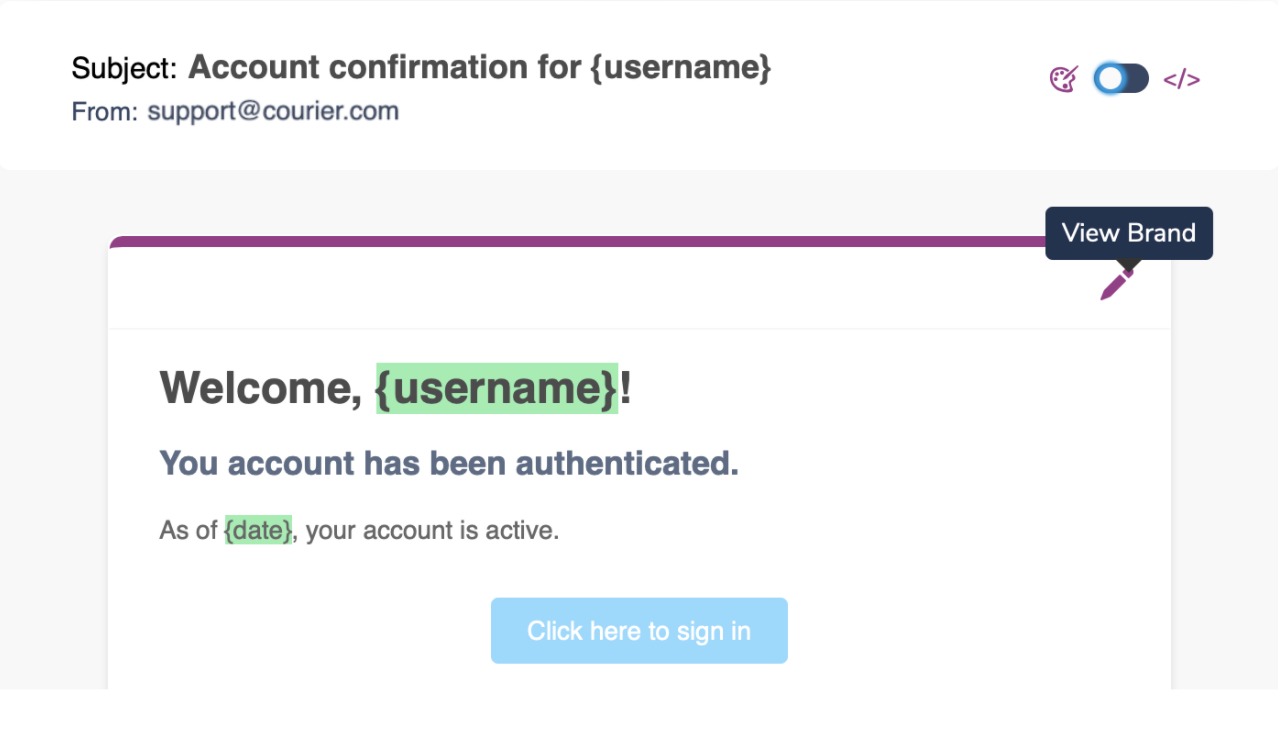
From here, you can upload your logo, set your brand color, and add text and social links to your footer. If you want to send whitelabeled emails, you can do that by creating multiple Brands.
Create a test event
Next, create a test event for your email. Test events allow you to preview and validate variables that you’ve included in your email using example data. To create a test event, click the Preview button in the top nav and, from this screen, select the link to View Test Events.
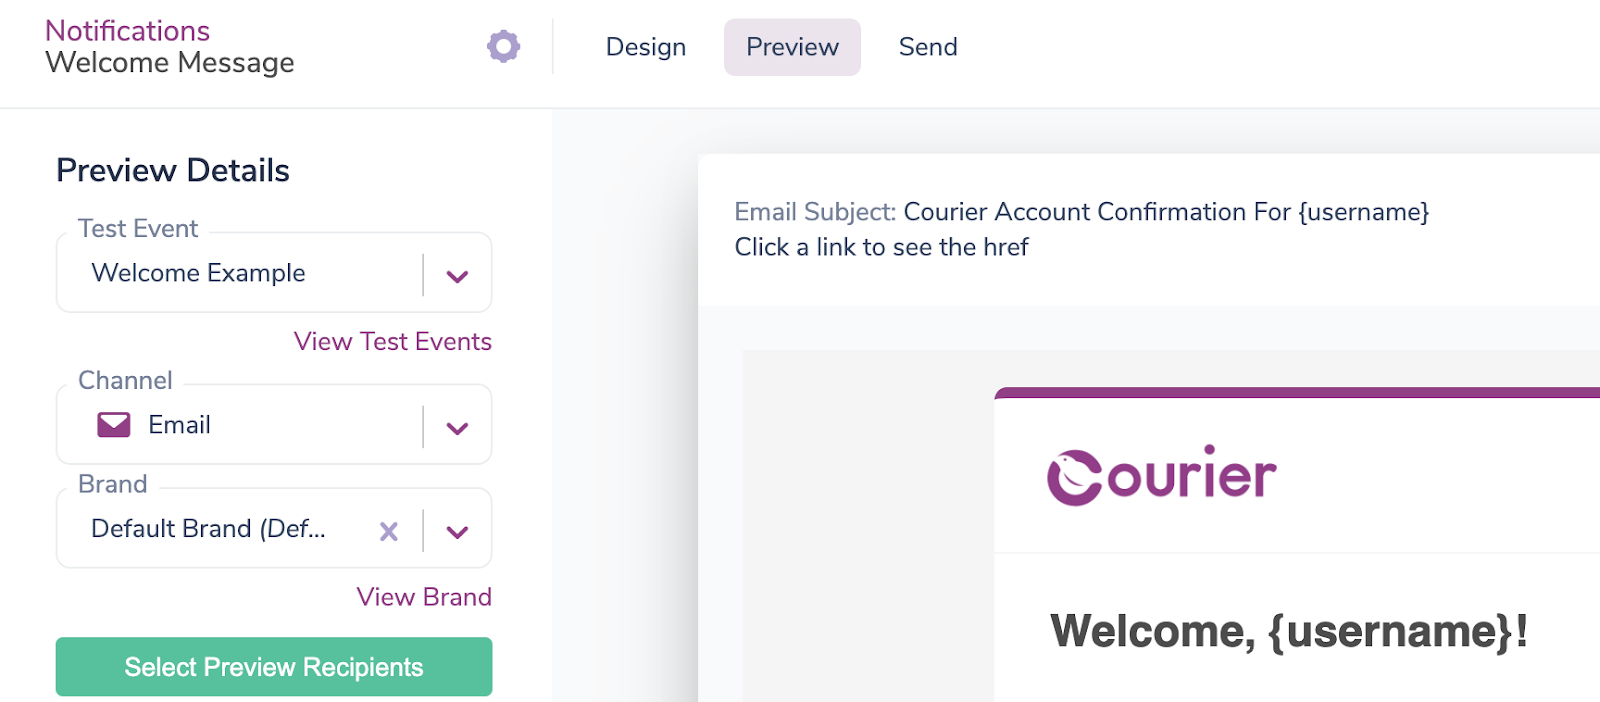
You should now see the JSON data for your test event. You can add variables to either the data or profile object. In order for variables to work, you must include this data when you integrate the email into your Ruby app, which we explain in the next step. For our account activation email, we’ll add username and date to the data object and set values for them.

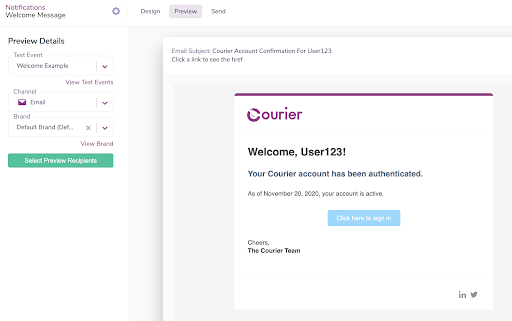
Preview your email
After you’ve finished designing your email, you can preview it in Courier using the Preview tab. You can also send yourself a test email using Select Preview Recipients.
Publish your email
Once you’re happy with your email, click Publish Changes. Now we’re ready to integrate your new email notification into your Ruby app and start sending.
4. Send emails from your Ruby app
Sending the email you just designed in Courier is easy. We’ll show you how to integrate your email into your Ruby program using the Courier Ruby Gem and the code snippet that Courier automatically generates for the email notification.
Install the Courier Ruby gem
Courier offers an SDK for Ruby. To install the gem, add this line to your application's Gemfile:
1gem 'trycourier'
And then execute:
1$ bundle install
Or install it yourself as:
1$ gem install trycourier
Set your environment variables
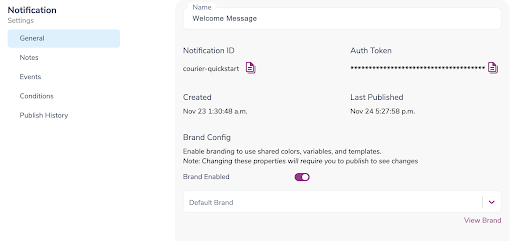
In order to send emails using the Courier API, you need to create an environment variable for COURIER_AUTH_TOKEN and assign its value to the Auth Token associated with your account. This token must be passed in an Authorization header with every request. You can find your account’s Auth Token by hitting the gear icon next to the Design tab.
Map your email notification to an event
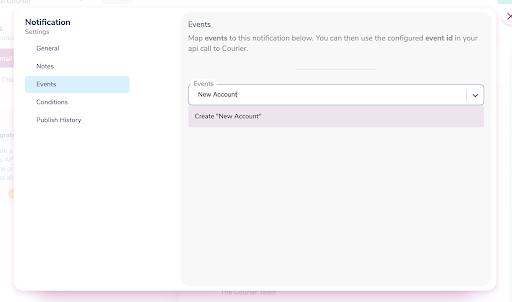
This step is optional, but we highly recommend mapping your notification to an Event ID. Your Event ID is a human-friendly string that describes when the notification will trigger – for this example, you might set the Event ID to New Account (which we’ll actually do in a moment).
Setting an Event ID will enable you to reference the string when making the API request instead of the Notification ID that Courier generates for you. Now, if you ever want to map this event to a different notification, you can do so inside Courier without shipping any new code. All you’d need to do is map the Event ID to the new notification using the same process we follow below.
To create an Event ID for your email, click Events under your Notifications Settings. Type in the name for your new event – in this case, New Account and click Create.
Copy-paste the code snippet from Courier
To integrate your new email notification, head over to the Send tab and select Ruby as your programming language to see the code snippet that Courier automatically generated for you.
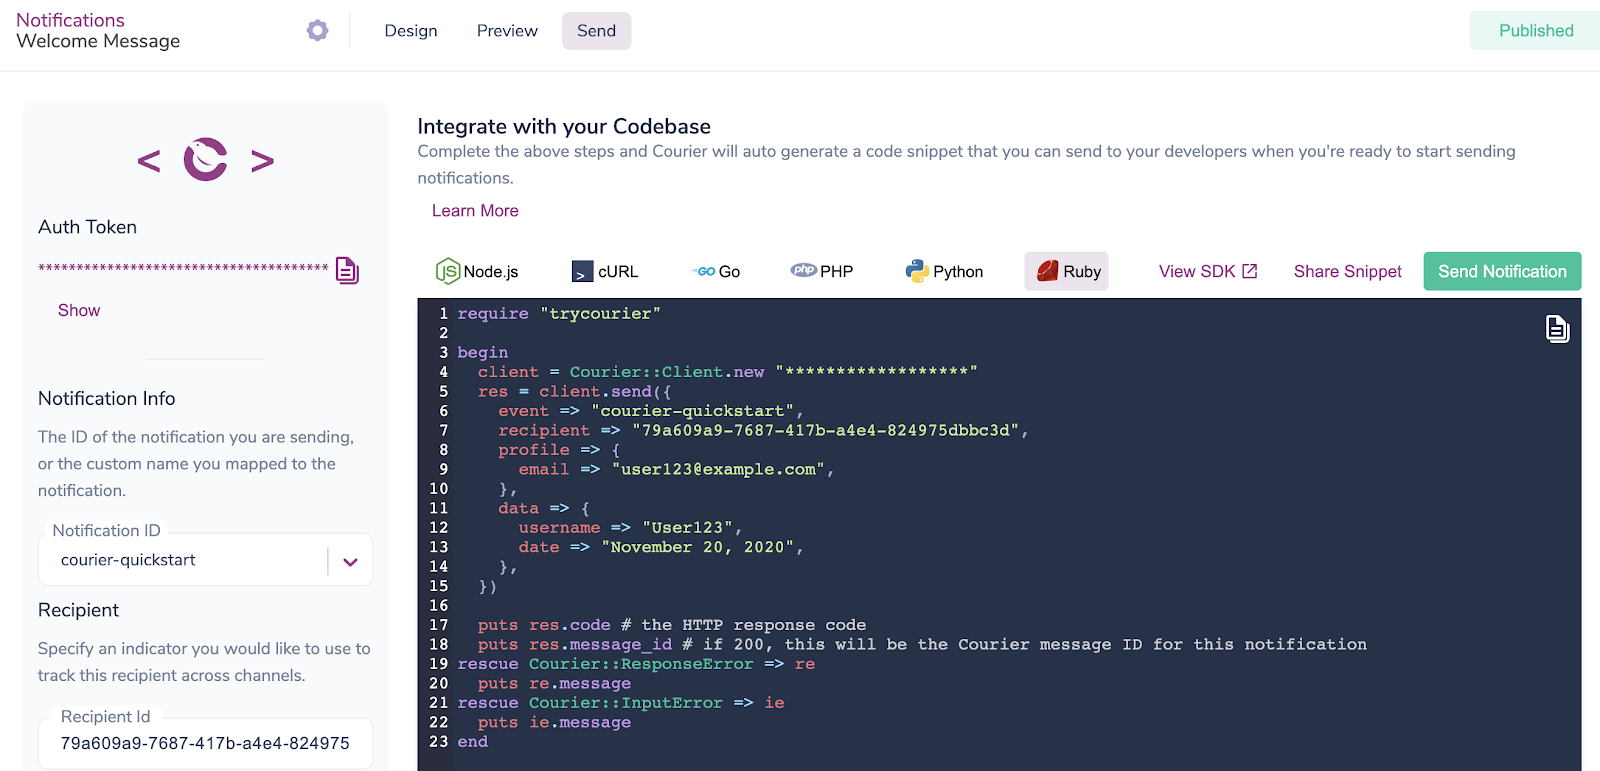
Next copy-paste the code into your Ruby app and, optionally, you can send another test email using the values from your test event. Your event value will be the Event ID you set up earlier – for this example, our Event ID is New Account. If you didn’t set up an Event ID, you can set the value to your Notification ID instead.
A recipient is a unique identifier for an individual user that doesn't change, such as their unique username in your database. Courier uses recipient to prevent you from sending duplicate notifications if, for example, a user changes their email or another identifying value. You can also use it later to check the status of all the notifications you’ve sent to a particular user.
The profile object should include any key-value pairs required by the integration – in this case, SendGrid requires an email key and value. The data object is where we define our variables. If you remember, that’s username and date for our account activation email.
The body of your request to Courier’s Send API should look like this:
1require "trycourier"23begin4client = Courier::Client.new5res = client.send({6"event" => "New Account",7"recipient" => "User123",89"profile" => {10"email": "user123@example.com",11},1213"data" => {14"username" => "User123",15"date" => "November 20, 2020"16}17})1819puts res.code # the HTTP response code20puts res.message_id # if 200, this will be the Courier message ID for this notification21rescue Courier::ResponseError => re22puts re.message23rescue Courier::InputError => ie24puts ie.message25end
Start sending emails from your Ruby app
Now you know how to set up a transactional email service, design and preview your email in Courier, and send emails from your Ruby app. If you have any trouble getting started, chat with us using the Intercom Messenger or send us an email at support@courier.com. We’d be happy to walk you through setting up SendGrid or another email service.
PS. We didn’t have time to cover everything in this tutorial, but you can also use Courier to manage your send logic, track delivery and engagement, and integrate additional channels like SMS, push, and messaging apps. See A Demo of Courier in action!
Start Routing Notifications Today!
Courier is a notification service that centralizes all of your templates and messaging channels in one place which increases visibility and reduces engineering time.
Sign-up
More from Engineering
Simplifying notifications with the Courier iOS SDK
Push notifications are a valuable tool for keeping users informed and increasing their engagement with your app. You can use push notifications to alert users about promotions, new content, or any other important updates. While push notifications are a powerful tool, setting up push notifications in iOS can be a daunting task that requires a significant amount of effort and time. Fortunately, the Courier iOS Mobile Notifications Software Development Kit (SDK) simplifies this process.
Mike Miller
March 23, 2023

Building Android push notifications with Firebase and Courier’s SDK
Push notifications have become an essential part of modern mobile apps, allowing you to keep your users engaged and informed. However, implementing push for different platforms can be a complex and time-consuming task, requiring developers to set up and handle token management, testing, and other logistical details.
Mike Miller
March 21, 2023
Free Tools
Comparison Guides
Build your first notification in minutes
Send up to 10,000 notifications every month, for free.
Get started for free

Build your first notification in minutes
Send up to 10,000 notifications every month, for free.
Get started for free
© 2024 Courier. All rights reserved.