Twitch Notifications (Part Two): How to Send Notifications When Your Twitch Stream Goes Live

Aydrian Howard
January 28, 2021
In this series, I explain how to use Twitch EventSub and Courier to automatically send notifications to multiple destinations – Slack, Discord, and more – when your Twitch stream goes live.
In part one, we built a Node.js app using Express.js to accept events from Twitch EventSub. Now, in part two, we’re going to listen for our event and trigger a notification using Courier.
Follow along with the series:
- Part one: How to handle real-time events from Twitch
- Part two (this post): How to send notifications when your stream goes Twitch live
- Part three: How to create and notify a list of subscribers using Courier
Need help getting started with sending notifications about your Twitch stream? Join our community on Discord – we’re happy to chat!
How to send notifications when your Twitch stream goes live
In this tutorial, I’ll show you how to take the Node.js and Express app that we built in part one and use it to listen for our events. From there, we’ll create and trigger a notification in Courier. I’ll demo sending an SMS notification with Twilio, but you can use Courier to send notifications to any channel, including popular chat apps like Discord and Facebook Messenger.
Prerequisites
To complete this tutorial, you'll need a few things:
- Node.js and Express.js app from part one
- Twitch Developer account
- Twitch CLI (v0.5.0+)
- Courier account – it’s free to sign up and includes 10,000 notifications per month
- Twilio account configured for SMS
If you’re using the Node.js and Express.js app we created in part one, it should either be deployed somewhere publicly accessible that supports HTTPS and port 443, or be running locally using ngrok.
We'll use a new or existing Twitch application from your Developer Console along with the Twitch CLI to subscribe to the stream.online event and point it to the /webhooks/callback route on our server. Then, we'll update our server code to capture that event and send it to Courier to create and send the notification.
Keep in mind that there could be around a 45 second delay before Twitch triggers the event from the time your stream goes online.
Step one: Subscribe to the Twitch EventSub online event
To begin receiving requests from Twitch EventSub, we first need to create a subscription. We'll use the Twitch CLI to create a Stream Online subscription type and give it the callback URL from our Node.js application. It's important that the application is running and publicly available because EventSub will attempt to validate the callback URL when creating the subscription.
Configure the Twitch CLI
First, we need to configure the Twitch CLI using a new or existing Twitch application. If you have already configured your Twitch CLI, you can skip this step.
Navigate to the Twitch Developer Console and create a new by clicking “Register Your Application” or open an existing application. Add [http://localhost:3000](http://localhost:3000) as an OAuth Redirect URL.
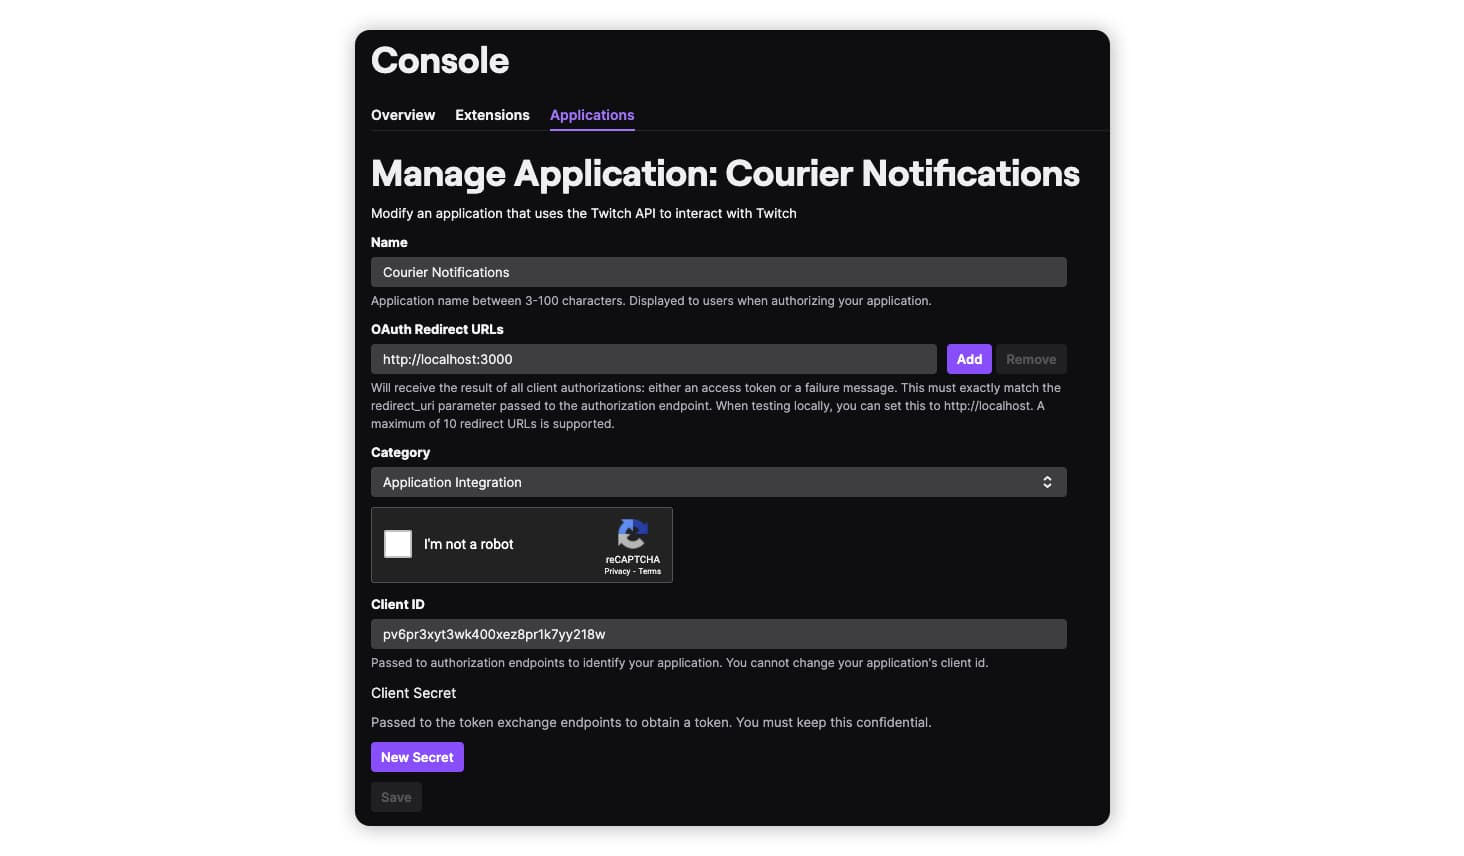
Take note of the Client ID, as we'll be using this shortly. You'll also need to generate a new Client Secret by clicking on the “New Secret” button. Be sure to save this somewhere safe because it won't be shown again. If you have an existing Client Secret for this application, you can use it. Generating a new secret will invalidate any existing secret.
Now, let's use these values to configure the Twitch CLI. In a terminal, run the following command:
twitch configure
You will be prompted to enter your Client ID and Secret. To fetch an access token, run the following command:
twitch token
You're now ready to start making Twitch API calls using the Twitch CLI.
Subscribe to the Stream Online Event
To create our Stream Online subscription, we'll use the Twitch CLI to POST to the EventSub Subscriptions endpoint. You'll need to provide the full URL for your webhook callback, the secret value set in the TWITCH_SIGNING_SECRET environment variable of your Node.js application, and your Twitch broadcaster user ID.
To find your broadcaster user ID, run the following command replacing trycourier with your Twitch login ID:
twitch api get users -q login=trycourier
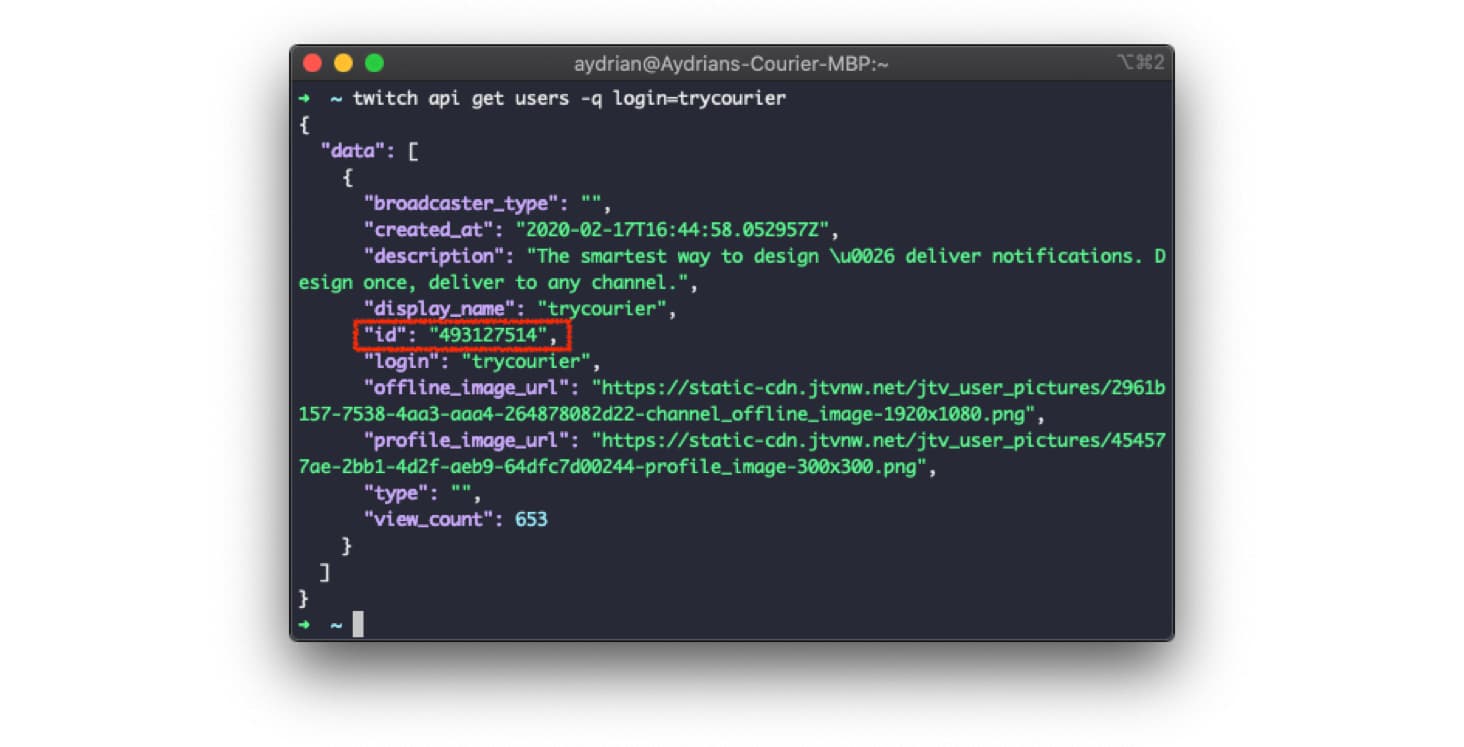
This will output your Twitch user object in JSON format. Your broadcaster user ID will be the ID.
Now let's create the subscription. Run the following command with the needed substitutions:
twitch api post eventsub/subscriptions -b '{"type": "stream.online","version": "1","condition": {"broadcaster_user_id": "YOUR_BROADCASTER_ID"},"transport": {"method": "webhook","callback": "https://EXTERNAL_URL/webhook/callback","secret": "YOUR_SECRET"}}'
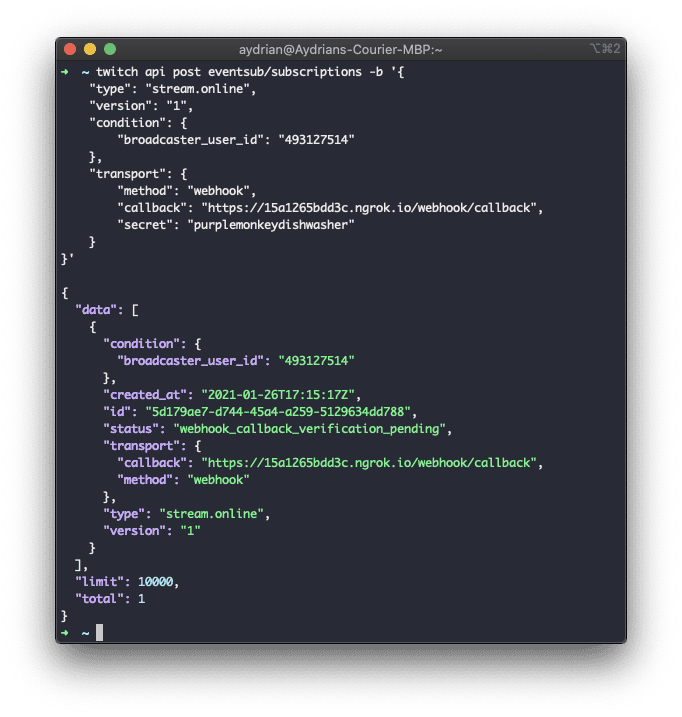
You should see “Verification successful“ in the console of your running application. Every time you go online, your application will now receive a POST with a payload similar to the following:
{"subscription": {"id": "5d179ae7-d744-45a4-a259-5129634dd788","type": "stream.online","version": "1","condition": {"broadcaster_user_id": "493127514"},"transport": {"method": "webhook","callback": "https://15a1265bdd3c.ngrok.io/webhook/callback"},"created_at": "2021-01-26T17:15:17Z"},"event": {"id": "9001","broadcaster_user_id": "493127514","broadcaster_user_login": "trycourier","broadcaster_user_name": "TryCourier","type": "stream.online"}}
Now we can update our application to accept and process this event.
Step two: Capture the event and send it to Courier
Now that we’ve created our Stream Online subscription, the next step is to send it to Courier, which we’ll use to create and deliver notifications about our Twitch stream. To do this, we need to add a call to Courier's Send API when a stream.online event comes in. We'll use the Courier Node.js SDK to do this. We'll also use the Twitch.js library to query the Twitch API to grab more details about the stream that we can send to Courier.
First, let's add these npm packages and configure the necessary environment variables.
Gather your environment variables
We've reached a point where we are using enough environment variables that we should use a better method of loading them. Let's create a .env file and use the dotenv package to load them when the application starts.
Create a .env file with the following:
TWITCH_SIGNING_SECRET=purplemonkeydishwasherTWITCH_CLIENT_ID=your-twitch-client-idTWITCH_CLIENT_SECRET=your-twitch-client-idCOURIER_AUTH_TOKEN=your-courier-auth-token
Use the Twitch values from step one of our tutorial. You can find your Courier Auth Token in Settings > API Keys in your Courier account. Use the Published Production Key.
Now let's install the dotenv package, along with the other packages mentioned above:
npm install dotenv @trycourier/courier twitch
And add the following line to the top of your index.js:
require("dotenv").config();
Now when you run your application, these values will be loaded and ready for your application to use.
Process the stream.online event
Let's continue updating our application by running a function when the type of the event is stream.online.
Just below the console.log in the /webhooks/callback handler, add the following:
if (type === "stream.online") {try {sendOnline(event);} catch (ex) {console.log(`An error occurred sending the Online notification for ${event.broadcaster_user_name}: `,ex);}}
Next, let's create sendOnline as an async function. This function will handle grabbing any additional information about the Twitch stream and sending it to Courier.
Add the following to the top of index.js with the rest of the require statements:
const { CourierClient } = require("@trycourier/courier");const courier = CourierClient();const { ApiClient } = require("twitch");const { ClientCredentialsAuthProvider } = require("twitch-auth");const authProvider = new ClientCredentialsAuthProvider(process.env.TWITCH_CLIENT_ID,process.env.TWITCH_CLIENT_SECRET);const twitch = new ApiClient({ authProvider });
This will create the Courier and Twitch clients we'll use in the sendOnline function. Add the following function to your application:
const sendOnline = async event => {const stream = await twitch.helix.streams.getStreamByUserId(event.broadcaster_user_id);const game = await stream.getGame();const { messageId } = await courier.send({eventId: "TWITCH_ONLINE",recipientId: "AYDRIAN10036",profile: {phone_number: "+12025550140"},data: {stream, game}});console.log(`Online notification for ${event.broadcaster_user_name} sent. Message ID: ${messageId}.`);};
This function will use the Twitch client to grab information about the stream such as the title and game info and then pass it to the call to Courier's Send API so it can be used in the creation of your notification. You'll also want to update the recipientId to a unique string – I used my name and zip in all caps without spaces: AYDRIAN10036 – and the phone_number with your phone number. You’ll need both of these in order to receive the notification we create in Courier.
The next time you go online, the stream.online event will flow into Courier. Next, we'll use the stream information to create a notification using Courier's template builder.
Step three: Create your notification in Courier
For this tutorial, we'll be creating a text notification for our Twitch stream. We'll explore other notification channels in the third part of this series.
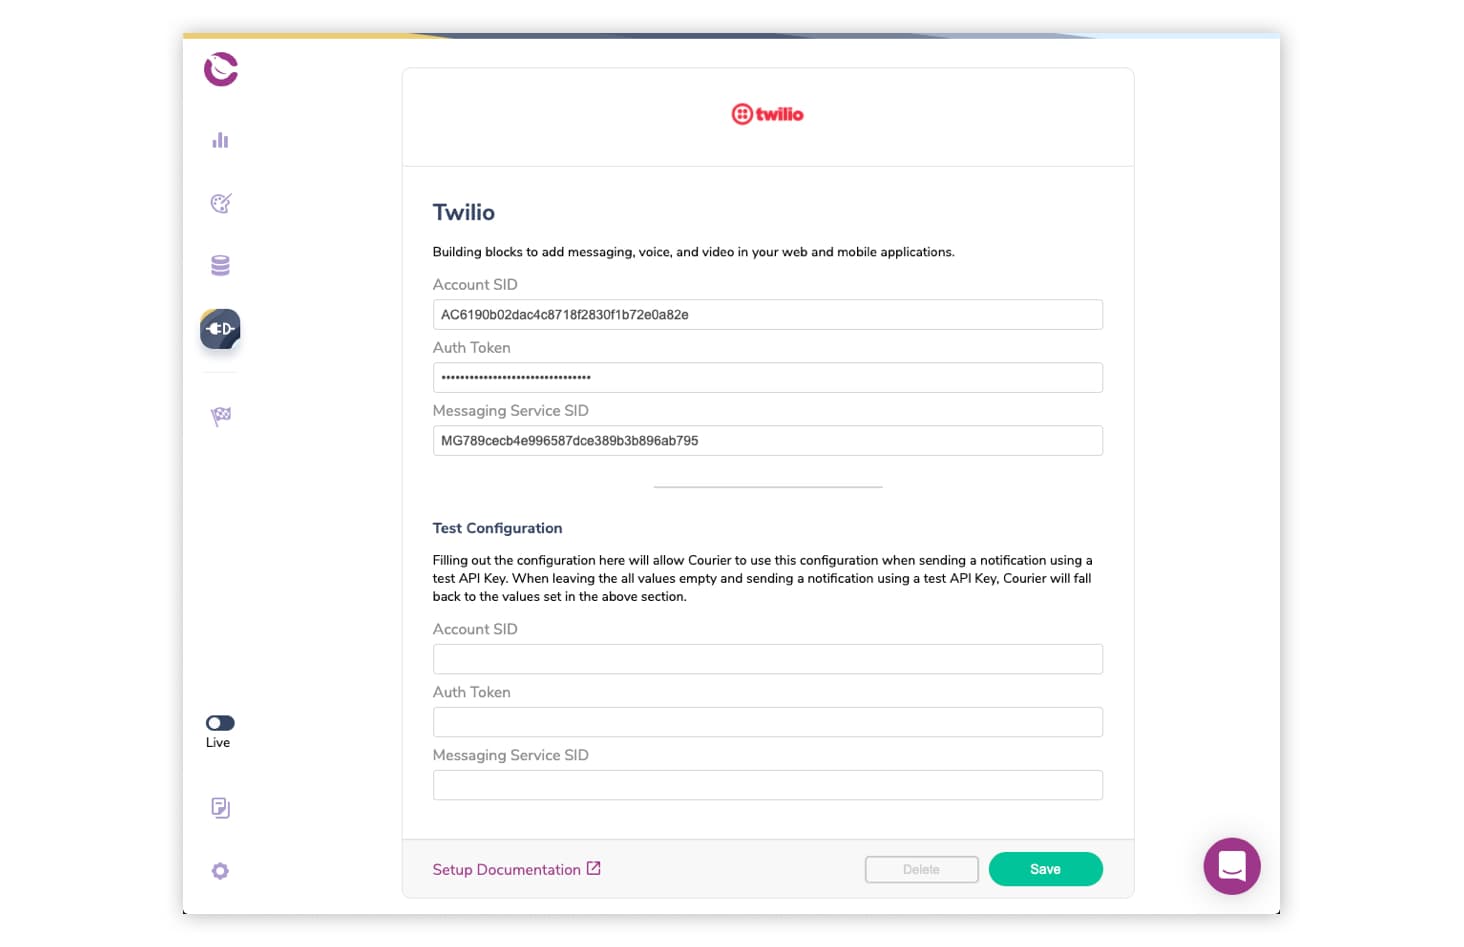
Configure Twilio as your SMS provider
Let's start by configuring the Twilio integration in Courier. This will require you to enter details about your Twilio account. Check out our Getting Started with Twilio guide for more details.
Design your SMS notification
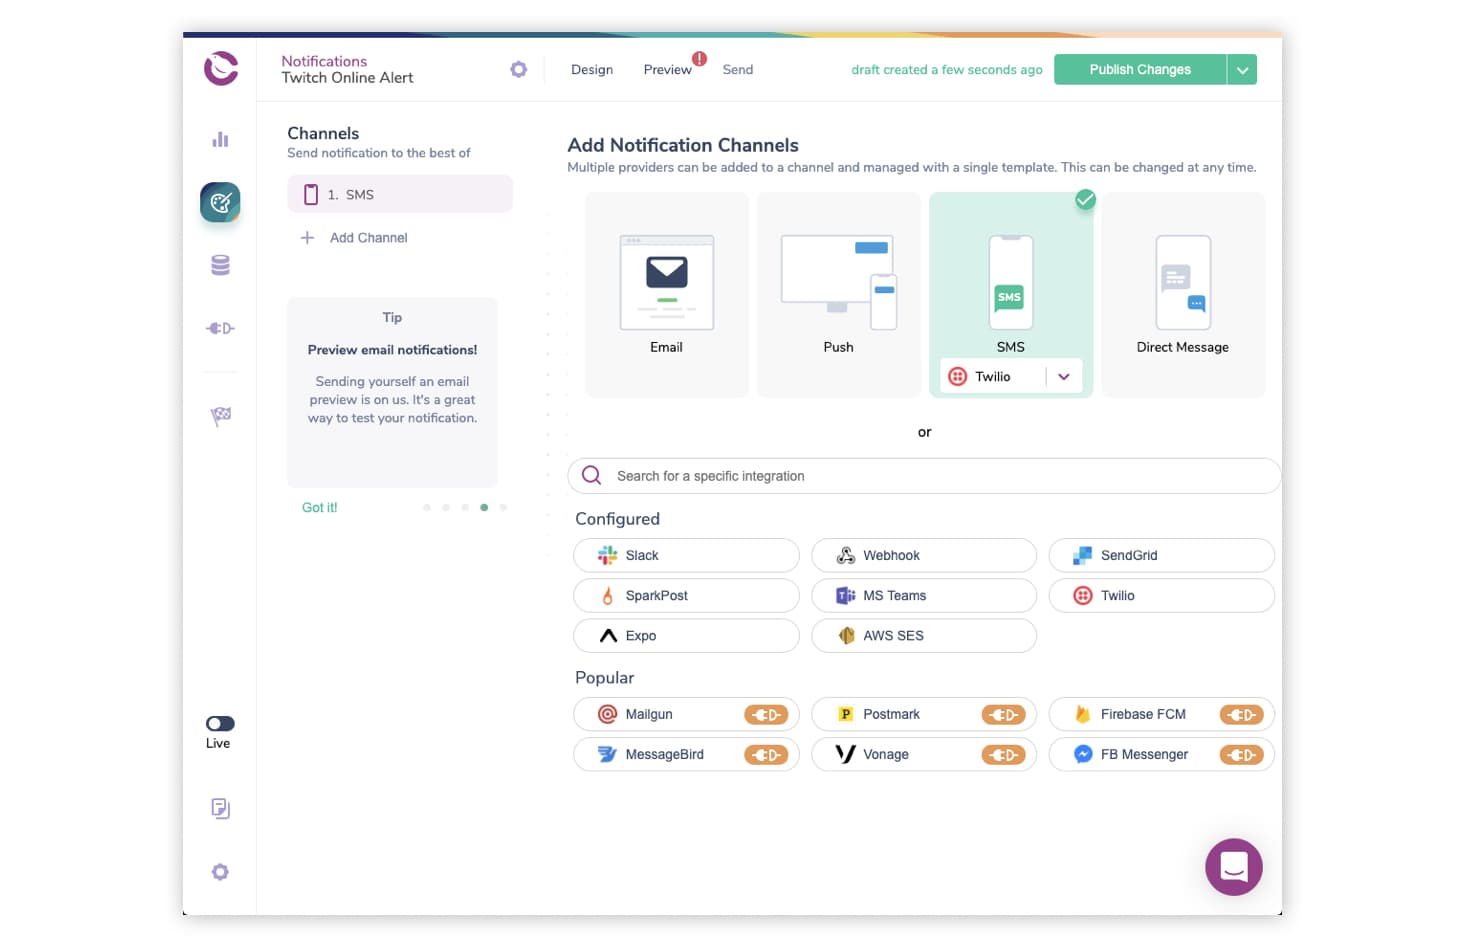
Now it's time to design the notification in Courier. Navigate to the Notification Designer and select “Create Notification.” Click “Untitled Notification” on the top left to give your notification a descriptive name – in this case, I’ve named mine “Twitch Online Alert.”
Now let's add SMS as a channel for our notification by selecting SMS and choosing Twilio from the dropdown. We can now select SMS under Channels to the left and start designing our notification.
We'll design a simple SMS notification. First, we'll use a text block – click the “T” on the toolbar – and add the following text: “{stream._data.user_name} is playing {game._data.name} on Twitch.“ Next, we'll add another text block with the following text: “{stream._data.title}.” And we'll add one more text block with the following text: “https://twitch.tv/{stream._data.user_name}“. We’re personalizing the SMS using the stream information, which we passed to the notification in the data object as part of calling the Courier API.
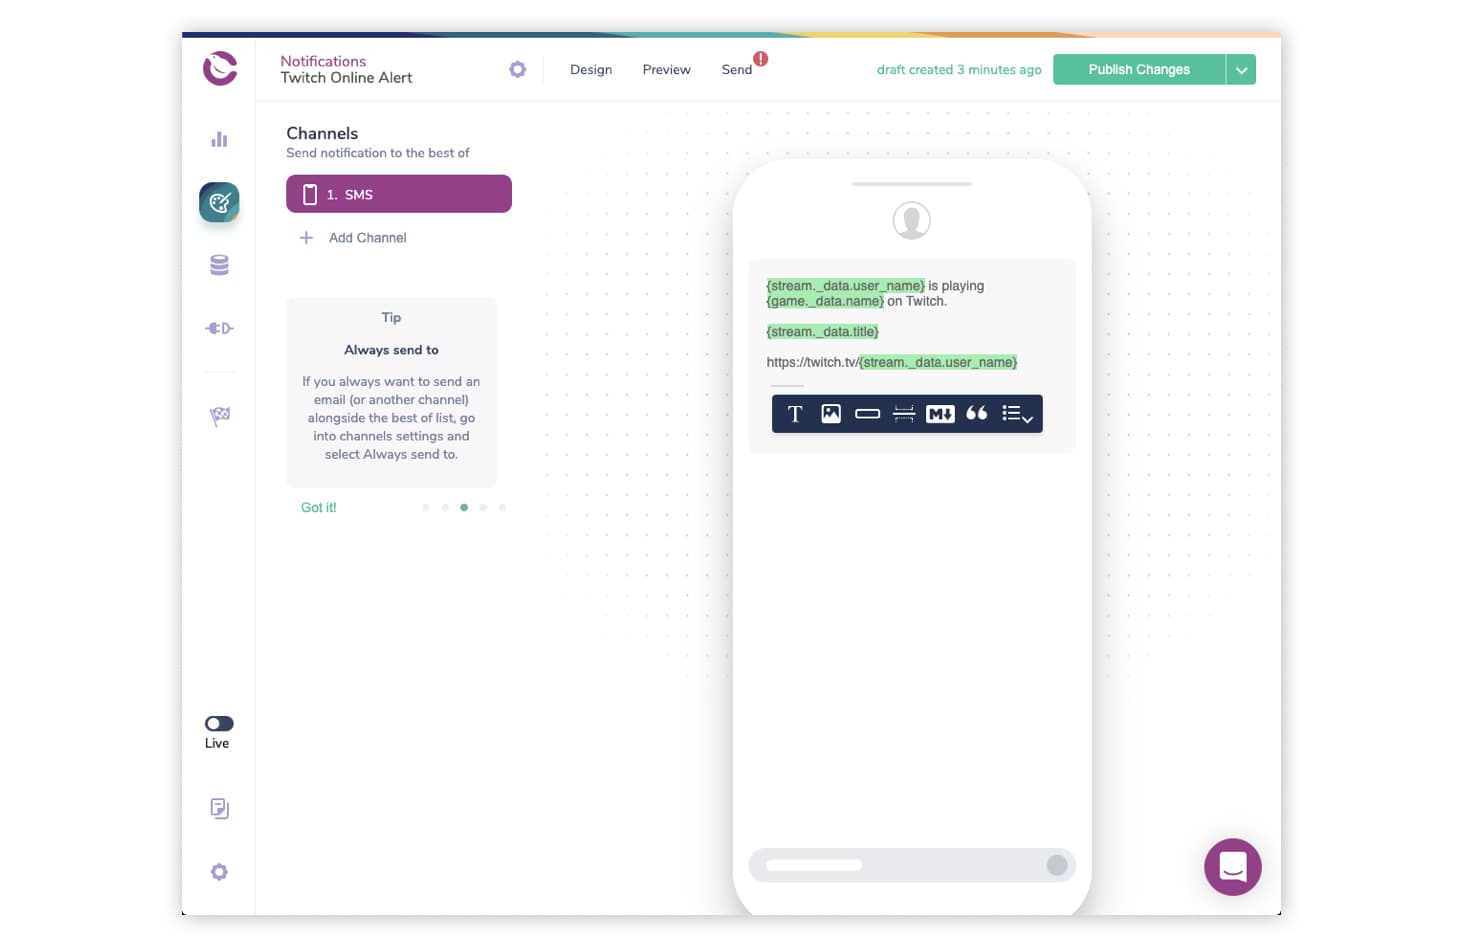
This is enough for now, but feel free to add more content blocks and continue designing the SMS message. When you’re finished, click “Publish Changes” in the upper righthand corner.
If you’d like, you can preview the email using the Preview tab and ensure your variables are templated properly. You'll be prompted to Create a Test Event and then you'll want to update the JSON object with the following example, replacing the phone_number with your own:
{"data": {"stream": {"_data": {"id": "40078987165","user_id": "493127514","user_name": "trycourier","game_id": "417752","game_name": "Talk Shows & Podcasts","type": "live","title": "Courier Live: Twitch EventSub and Courier","viewer_count": 0,"started_at": "2021-01-05T19:54:35Z","language": "en","thumbnail_url": "https://static-cdn.jtvnw.net/previews-ttv/live_user_trycourier-{width}x{height}.jpg","tag_ids": null}},"game": {"_data": {"id": "417752","name": "Talk Shows & Podcasts","box_art_url": "https://static-cdn.jtvnw.net/ttv-boxart/Talk%20Shows%20&%20Podcasts-{width}x{height}.jpg"}}},"profile": {"phone_number": "+12025550140"}}
Once you save your test event, you should see the name variable populate in the Preview tab with whatever value you’ve set.
Map your notification to the event specified in your Send call
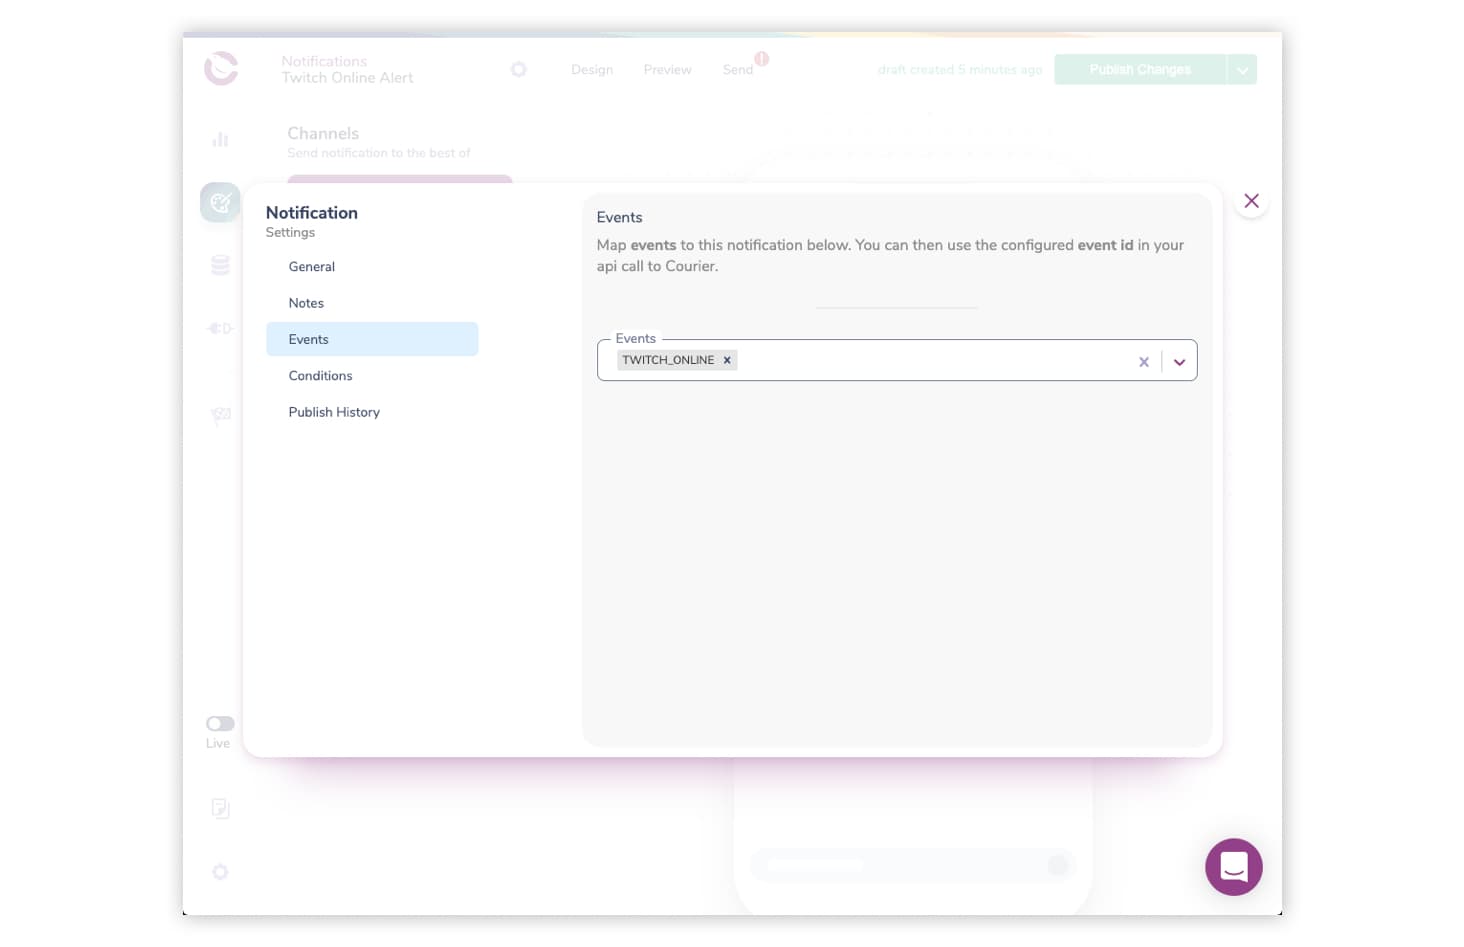
The last thing we want to do is to map the event we specified earlier in the Courier Send call to this notification. Next to the notification name, click the gear icon to launch the Notification Settings. Select Events from the left menu and enter “TWITCH_ONLINE” in the Events box.
Close the dialog and your notification is ready to send. If you don't want to wait for the next time you go online, you can test your notification using the Send Tab.
We can now test our application using the Twitch CLI. Run the following command with the needed substitutions:
twitch event trigger streamup --to-user YOUR_BROADCASTER_ID -F https://EXTERNAL_URL/webhook/callback -s YOUR_SECRET
This command will trigger an example stream.online event using your broadcaster id. You should see the event in the Courier Logs and receive an SMS message.
Putting it all together: Full application code
With all the new updates, your finished application should look like the following.
require("dotenv").config();const express = require("express");const crypto = require("crypto");const { CourierClient } = require("@trycourier/courier");const app = express();const port = process.env.PORT || 3000;const twitchSigningSecret = process.env.TWITCH_SIGNING_SECRET;const courier = CourierClient();const { ApiClient } = require("twitch");const { ClientCredentialsAuthProvider } = require("twitch-auth");const authProvider = new ClientCredentialsAuthProvider(process.env.TWITCH_CLIENT_ID,process.env.TWITCH_CLIENT_SECRET);const twitch = new ApiClient({ authProvider });app.get("/", (req, res) => {res.send("Hello World!");});const verifyTwitchSignature = (req, res, buf, encoding) => {const messageId = req.header("Twitch-Eventsub-Message-Id");const timestamp = req.header("Twitch-Eventsub-Message-Timestamp");const messageSignature = req.header("Twitch-Eventsub-Message-Signature");const time = Math.floor(new Date().getTime() / 1000);console.log(`Message ${messageId} Signature: `, messageSignature);if (Math.abs(time - timestamp) > 600) {// needs to be < 10 minutesconsole.log(`Verification Failed: timestamp > 10 minutes. Message Id: ${messageId}.`);throw new Error("Ignore this request.");}if (!twitchSigningSecret) {console.log(`Twitch signing secret is empty.`);throw new Error("Twitch signing secret is empty.");}const computedSignature ="sha256=" +crypto.createHmac("sha256", twitchSigningSecret).update(messageId + timestamp + buf).digest("hex");console.log(`Message ${messageId} Computed Signature: `, computedSignature);if (messageSignature !== computedSignature) {throw new Error("Invalid signature.");} else {console.log("Verification successful");}};const sendOnline = async (event) => {const stream = await twitch.helix.streams.getStreamByUserId(event.broadcaster_user_id);const game = await stream.getGame();const { messageId } = await courier.send({eventId: "TWITCH_ONLINE",recipient: "AYDRIAN10036",profile: {phone_number: "+12025550140"},data: { stream, game }});console.log(`Online notification for ${event.broadcaster_user_name} sent. Message ID: ${messageId}.`);};app.use(express.json({ verify: verifyTwitchSignature }));app.post("/webhooks/callback", async (req, res) => {const messageType = req.header("Twitch-Eventsub-Message-Type");if (messageType === "webhook_callback_verification") {console.log("Verifying Webhook");return res.status(200).send(req.body.challenge);}const { type } = req.body.subscription;const { event } = req.body;console.log(`Receiving ${type} request for ${event.broadcaster_user_name}: `,event);if (type === "stream.online") {try {sendOnline(event);} catch (ex) {console.log(`An error occurred sending the Online notification for ${event.broadcaster_user_name}: `,ex);}}res.status(200).end();});const listener = app.listen(port, () => {console.log("Your app is listening on port " + listener.address().port);});
Our application will now process stream.online events and pass them to Courier along with additional stream data. Courier will then create an SMS notification and send it.
So, what's next?
In the next post, we'll explore other types of notifications and how to use Courier to send to them all at the same time. In the meantime, take a look at the different integrations available in Courier and see if you can update your application to support a new one. Join our Discord community and let me know which one you're most interested in!
-Aydrian
Similar resources

You can build anything now. That's exactly why you shouldn't build this.
AI made building software cheap, so the temptation is to build everything. But owning infrastructure is a permanent draw on your scarcest resource, attention. The value lives at two ends, the systems everything runs on and the product only you can make; the move is to build less, buy the opinionated platform, and let an agent operate it.
By Thomas Schiavone
July 11, 2026

I redid every cover image on our blog in an afternoon with Claude, Ideogram, and Contentful
I refreshed 81 blog covers, two years of posts, in a single afternoon. Claude Code orchestrated the pipeline, Ideogram generated the art, and the Contentful MCP moved every post in and out. Here is the stack, and why it only took an afternoon.
By Thomas Schiavone
July 10, 2026

Inbox SDKs for Vue and Angular: a native in-app notification center
Courier now ships first-class inbox SDKs for Angular and Vue. Drop in a real-time notification center, toasts, and a preferences center with native components, an injectable service, and a composable, all backed by the same in-app inbox that already powers React and JavaScript apps.
By Mike Miller
June 19, 2026
© 2026 Courier. All rights reserved.