Sending Password Reset Notifications from Your Laravel PHP Framework
Sarah Barber
June 06, 2023
Table of contents
Step 1: Prepare your Laravel code environment
Step 2: Configure your email service provider in Courier
Step 3: Design your password reset notification template in Courier
Step 4: Write Laravel code using the Courier PHP SDK
Step 5: Run your code to send the password reset notification
Step 6: Verify that your notifications were sent
Conclusion
Resetting passwords is a critical way to make your app accessible to users, but setting up email notifications for password resets from scratch can be tedious and error-prone. While Laravel does support password reset email templates, Laravel emails can be unreliable and prone to being caught in spam filters, and the default email templates are not particularly customizable. It might also be desirable to set up a backup channel like SMS or a backup email provider in case the primary fails.
That’s where Courier comes in. Courier offers complete notification infrastructure with an API that simplifies some of the most complex notification logic, allowing you to notify customers across multiple channels (including email, SMS, push, chat apps, and more). You can also use Courier's no-code web tools to design templates and communication sequences, and make use of its analytics dashboard to monitor delivery and engagement metrics.
By using Courier to send Laravel notifications, you can send multi-channel alerts via email, SMS, push, and other channels based on your users’ preferences or actions, with the results all being reported back to one centralized analytics and logging console.
In this tutorial, we'll show you how to implement PHP Laravel password reset notifications the right way, using the Courier PHP SDK. The examples in this tutorial will use Gmail to send mail, but Courier supports a number of other email service providers as well.
Step 1: Prepare your Laravel code environment
- Ensure you have the latest versions of PHP, Composer, and Laravel installed.
The Courier SDK uses HTTPlug to send requests, which defaults to using the Guzzle HTTP client. Make sure that this is included as a dependency in your Laravel project by running:
Copied!
composer require guzzlehttp/guzzleAdd the Courier PHP SDK package to your Laravel project using Composer:
Copied!
composer require trycourier/courier --with-all-dependencies
Step 2: Configure your email service provider in Courier
If you don’t have a Courier account, create one now.
Before you can send emails using Courier, you must configure an email service provider. In the Courier app, navigate to Channels and select your email service provider from the Provider Catalog. For this tutorial, we will be using Gmail.
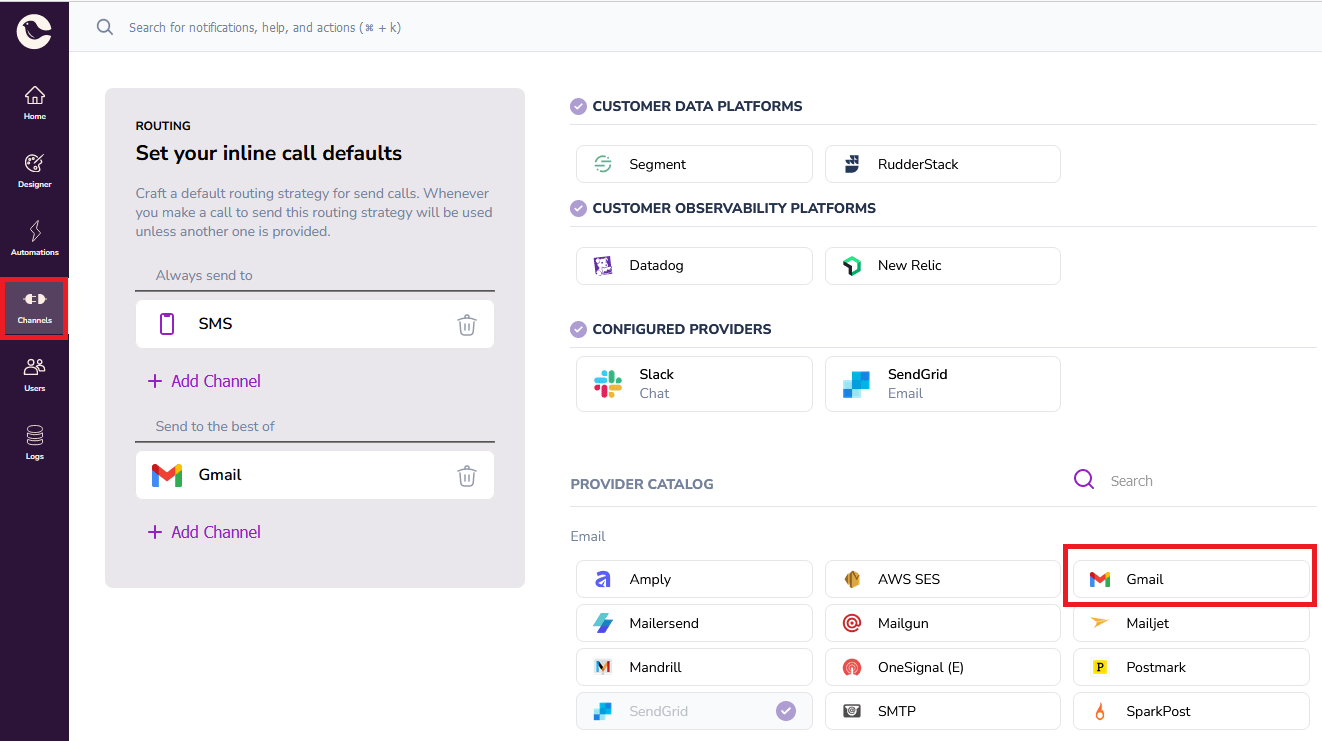
Next, select Sign in with Google and give Courier access to your Google account. Now you have configured Gmail as an email provider.
Note that Courier does offer channel failover (eg. to SMS) or provider failover in the event that the primary email provider (in this case, Gmail) fails.
Step 3: Design your password reset notification template in Courier
Navigate to Designer in Courier, and click the Create Template button to create a new template, and name it Reset password. If you check the box Use AI to generate notification content, an email template will be generated for you, based on your notification name. Click Create Template again.

You will now be prompted to select the notification channels you want to be able to send your notifications to. Select Email as your notification channel, and add Gmail as its provider in the drop-down box (which will be available to you if you configured this in step 2). Then, click on your new email channel on the left of your screen to start adding content to your notification template.
Use Courier’s template editor to write the content for your password reset notification. Courier allows variables in its email templates, which you can add using curly braces. Courier will highlight these variables in green for easy visibility.

Changing the branding of your email notification template
Click on the three dots icon on your notification template to edit your brand. You can add a brand logo, change your brand color scheme, and add headers, footers, and links to your company social network profiles.
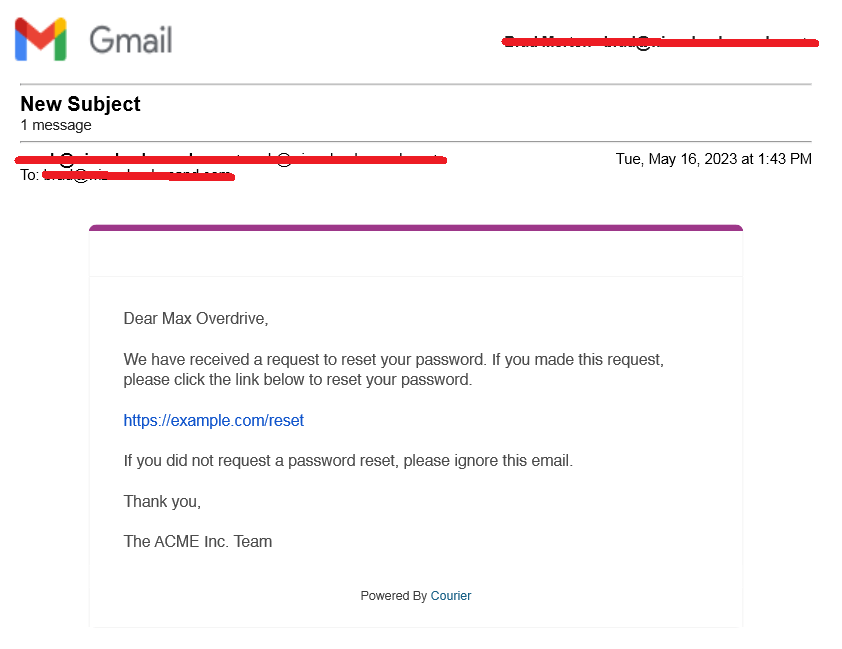
Changing your branding will result in the branding being changed on your password reset email when it is sent:

Finalizing your notification template
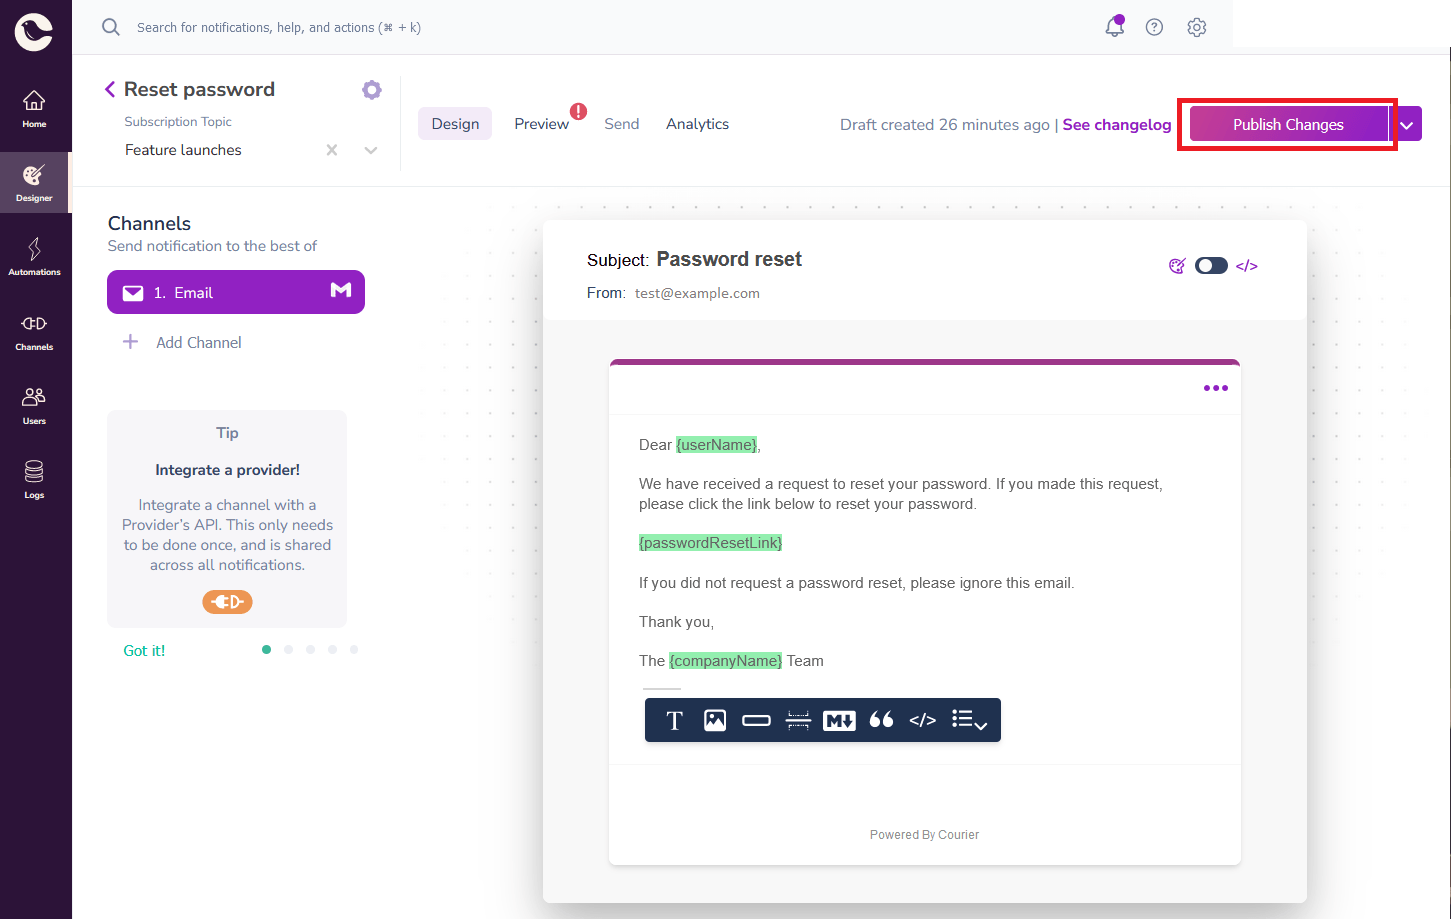
Now click Publish Changes to publish the new notification, and then click the settings button for your notification template, which is near the top left corner of the window.
In the settings, you will see a Notification ID, which is the ID of this template. You will use this later, to refer to this notification template inside your Laravel application.

Step 4: Write Laravel code using the Courier PHP SDK
For the purposes of this demonstration, we will trigger the Courier API from an HTTP controller. In production, you will most likely want to adapt this code to send from a custom notification channel or using a queued job.
Controller
Create a new controller in your Laravel project called NotificationController:
Copied!
php artisan make:controller NotificationController
Add the following code to this controller:
Copied!
<?phpnamespace App\Http\Controllers;use App\Http\Controllers\Controller;use Illuminate\Http\Request;use Courier\CourierClient;class NotificationController extends Controller{public function password_reset(){$courier = new CourierClient("https://api.courier.com/", "<YOUR_COURIER_AUTH_TOKEN>");$result = $courier->sendEnhancedNotification((object) ['to' => ['email' => "<RECEIVER_EMAIL>"],'template' => "<NOTIFICATION_ID>",'data' => ['userName' => "<USER_NAME>",'passwordResetLink' => "<RESET_PASSWORD_LINK>",'companyName' => "<COMPANY_NAME>",],],);return ["status" => 1,"data" => $result->requestId];}}
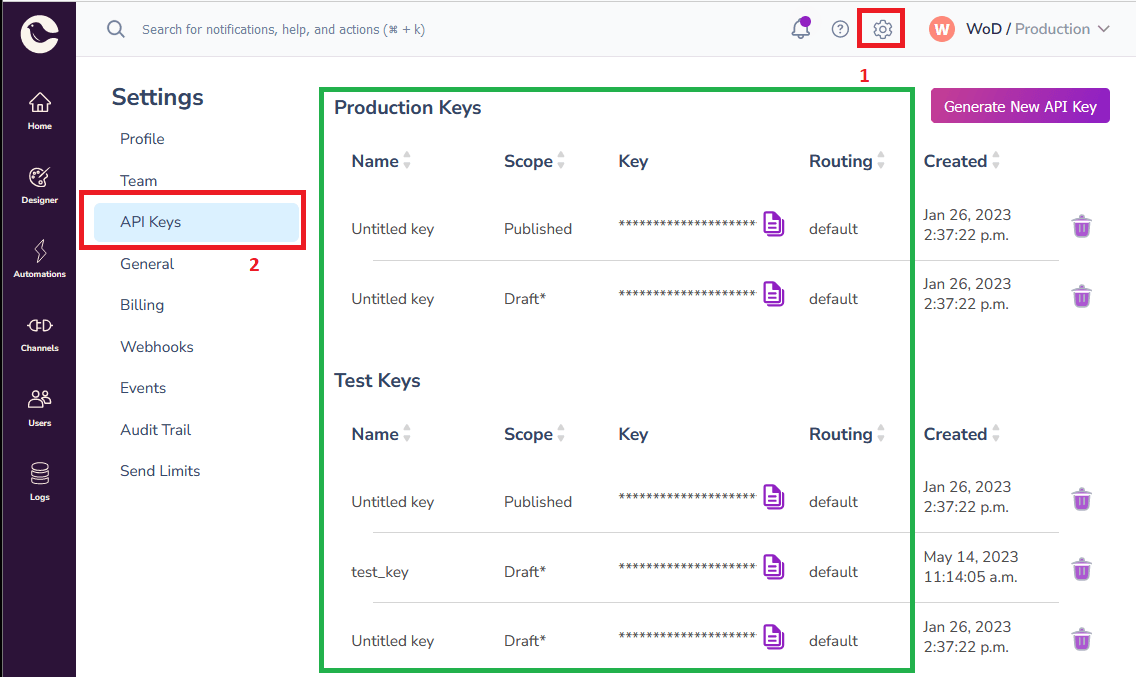
Replace <YOUR_COURIER_AUTH_TOKEN> with your Courier API key, which you can find in the Courier app by navigating to Settings → API Keys. Note that it is bad security practice to store an authorization token in a controller — this should only be done for testing purposes, and you should not store these credentials in source control. You should instead store tokens and credentials as environment variables and access them via the Laravel config.
Replace <NOTIFICATION_ID> with your template ID, which is in your notification template settings, as described above.
The data object should contain the variables that are used in the template. In this tutorial, our template contains three variables — userName, passwordResetLink, and companyName — however, you can include any variables you like, providing you set them in the data object in your code:
Copied!
'data' => ['userName' => "<USER_NAME>",'passwordResetLink' => "<RESET_PASSWORD_LINK>",'companyName' => "<COMPANY_NAME>"],
Replace <USER_NAME> with Max Overdrive, <RESET_PASSWORD_LINK> with https://example.com/reset, and <COMPANY_NAME> with ACME Inc.
Finally, replace <RECEIVER_EMAIL> with your own email address, so that when you run your Laravel code, you can verify the email was sent to you.
Route
Configure the Laravel route for your notifications by navigating to the routes/api.php file in your Laravel project and configure a new route for your NotificationController’s password-reset request:
Copied!
<?phpuse Illuminate\Http\Request;use Illuminate\Support\Facades\Route;use App\Http\Controllers\NotificationController;Route::get('password-reset', [NotificationController::class, 'password_reset']);
Step 5: Run your code to send the password reset notification
Run your Laravel application with the php artisan serve command. By default, your Laravel app is served on HTTP port 8000.
Now, send a GET request to your password reset URL by entering the following address into your browser:
Copied!
http://127.0.0.1:8000/api/password-reset
Or use curl to test from the command line:
Copied!
curl http://127.0.0.1:8000/api/password-reset
This should cause the password email to be sent. If you ensure that the value of the email key in the Laravel code is your own email address, you can test that the email is sent to you. If successful you will see a JSON response resembling:
Copied!
{"status":1,"data":"xxxxxxxxxxx"}
If you receive an error, you will receive a message to assist with debugging.
Check your email inbox, and you should find the password reset notification there.
Step 6: Verify that your notifications were sent
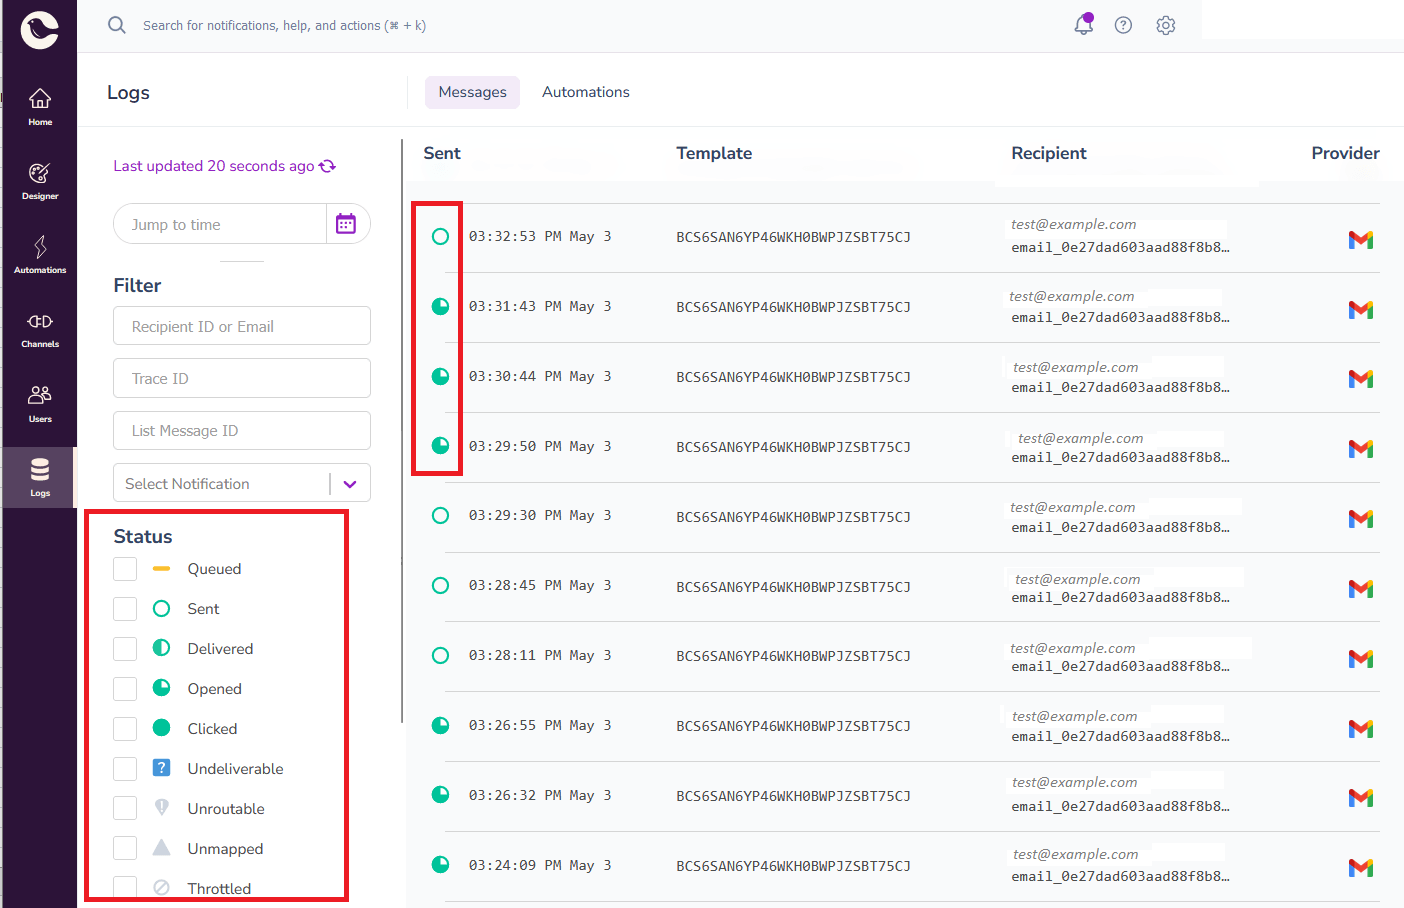
When you’re testing your code by sending an email to yourself, it’s easy to be sure whether the notification was sent or not. But if you want to check if an email was sent to a user, you will need to check the Courier logs.
Navigate to the Logs page in the Courier app. You'll see a list of all notifications sent from your account, with their status, including whether each one was sent, delivered, opened, or clicked, or whether there were any errors with sending.
Conclusion
This tutorial covered how to integrate the sending of password reset notifications in Courier into your Laravel codebase, using the Courier PHP SDK. You can use this same technique for sending other kinds of notifications in Courier such as welcome emails, shopping cart abandonment notifications, and order confirmation emails.
You can also use the Courier PHP SDK to interact with almost anything you might want to do in Courier, including updating notification preferences, invoking automations, or updating audiences.
Please contact us if you want to further discuss your project and unique requirements.
Similar resources
Build with AI: let your agent handle notifications end to end
Courier's Build with AI toolkit gives coding agents direct access to your notification infrastructure. Four integration points, one goal: let your agent send messages, debug deliveries, manage users, and follow notification best practices without context-switching. Works with Claude Code, Cursor, and any agent that can run shell commands or call MCP tools.
By Kyle Seyler
April 07, 2026

How to Use Claude Code on Mobile to Design, Test, and Ship Multichannel Notifications
A walkthrough of using Claude Code's mobile app with Courier's MCP server and CLI to design, test, and ship a multichannel product announcement from a phone. Covers the full workflow: drafting the content outline, creating notification templates using Courier's elemental format, building channel-specific variants for email, Slack, push, and SMS, customizing brand styling through the API, iterating on design with test sends, getting team approval, and publishing with custom routing rules. The whole thing took a couple hours, mostly cold start and design iterations.
By Kyle Seyler
April 06, 2026
Transactional, Product, and Marketing Notifications: What Are the Differences?
Understanding the difference between transactional, product, and marketing notifications is essential for developers building notification infrastructure. Transactional notifications confirm user actions and require no opt-in. Product notifications drive feature adoption through education. Marketing notifications promote sales and require explicit consent. This guide explains the legal requirements, best practices, and when to use each notification type to build compliant systems users trust.Retry
By Kyle Seyler
October 23, 2025
© 2026 Courier. All rights reserved.