Chapter 2
How to Build a Notification Center
A technical guide to notification center architecture covering backend, delivery, and frontend layers. Includes implementation code for React, iOS, Android, and React Native, plus multi-channel orchestration, real-time delivery, and customization.
Last updated: May 2026
Architecture overview
Building a notification center means coordinating three distinct layers that need to work together smoothly enough that users never think about the complexity underneath.

The backend layer is where everything starts. Your application triggers notification events whenever something happens that users might care about. Someone comments on a document, an order ships, a payment fails. The notification API receives these events and processes them, figuring out who should receive the notification, what it should say, and where it should go. Message routing determines which channels to use based on your rules and user preferences. Think of this layer as mission control, handling logic and decision-making before anything reaches a user.
The delivery layer is all infrastructure. WebSocket connections handle real-time delivery because HTTP polling is too slow for modern expectations. Message persistence ensures nothing gets lost if a user is offline when the notification fires. State synchronization keeps everything consistent across devices. Integration with push notification services handles mobile through APNs and FCM. This layer doesn't make decisions, it just reliably executes on them.
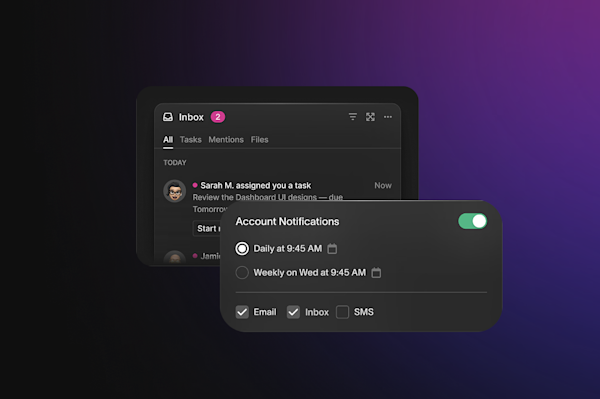
The frontend layer is what users actually see and interact with. UI components display the inbox, toasts, and badges. State management tracks which messages are read, unread, or archived. User authentication keeps everything secure. Real-time updates make new messages appear instantly without user action.
Every layer has failure modes. WebSockets drop. Databases go down. Users lose connectivity. Mobile apps get suspended by the OS. A reliable notification center needs retry logic, queuing, fallbacks, and more monitoring than you initially thought necessary. This is why most teams who start building notification centers in-house end up either abandoning the project or shipping something that technically works but doesn't feel reliable.
SDK and platform support
Courier provides native SDKs for every major platform. Installation and minimum version requirements vary by platform.
| Platform | Package | Install method | Minimum version |
|---|---|---|---|
| Web (React) | @trycourier/courier-react | npm | React 16+ |
| Web (vanilla JS) | @trycourier/courier-ui-inbox | npm | Any framework |
| iOS | courier-ios | Swift Package Manager | iOS 15+ |
| Android | courier-android | Gradle via JitPack | Android 5.0+ |
| React Native | @trycourier/courier-react-native | npm + CocoaPods | iOS 15+, Android 5+ |
| Flutter | courier-flutter | pub.dev | Flutter 3.0+ |
Each SDK ships with the same core capabilities: real-time WebSocket delivery, cross-device state sync, and the pre-built CourierInbox component. The component renders with a default theme out of the box and accepts configuration objects for custom styling.
Core capabilities
Real-time delivery
Real-time message delivery is non-negotiable for a modern notification center. When we talk about real-time we mean WebSocket connections, not HTTP polling. The moment someone comments on a post or approves a request, that notification should show up without any action from the user.
The technical challenge with WebSockets is that they're stateful connections, which means they can break in ways HTTP requests don't. Users lose connectivity constantly: elevators, tunnels, switching from WiFi to cellular, apps backgrounding. Your code needs connection recovery with automatic reconnection, authentication reestablishment, and syncing messages that arrived while disconnected. Connection health monitoring becomes its own job with heartbeats, timeouts, and exponential backoff on reconnection attempts.

Cross-channel state sync
Cross-channel state management sounds simple until you try to implement it. Here's the scenario that needs to work perfectly: you send a notification to someone via inbox and email simultaneously. They see the email first, open it, read it. Now they open your mobile app. The inbox notification should already be marked as read because the system knows they dealt with it via email.
This same cross-channel sync needs to work for SMS and push notifications too. User clicks a link in an SMS, the inbox message updates. They dismiss a push notification, the inbox archives. The goal is making the notification system feel like one coherent thing instead of separate systems sending similar messages.
Courier handles this synchronization automatically. When a notification goes out through multiple channels, the backend tracks interaction events from all of them. These events flow back to a central state store that maintains the canonical state for each message. Any time the state changes, it propagates to all channels and devices.
Multi-device sync
Users switch between web, iOS, and Android constantly throughout the day. Your notification center needs to stay in sync across all of them without the user thinking about it. Read something on your phone during your commute, it's marked read on your laptop when you get to the office. This isn't optional functionality anymore, it's baseline expectation.
The technical challenge is maintaining a single source of truth while handling the reality that devices aren't always connected, clocks aren't perfectly synchronized, and users might take actions on multiple devices in quick succession. You need conflict resolution logic, offline queuing for actions taken while disconnected, and efficient sync protocols.
Automation and journeys
The simplest notification system sends messages immediately when events happen. A better system lets you build logic around those notifications.
Courier's Journeys handles this through a visual workflow builder that doesn't require code. You can schedule notifications to send at optimal times instead of immediately. You can add delays between messages to avoid overwhelming users. You can build conditional logic like "if user hasn't verified their email within 24 hours, send a reminder." You can chain notifications across channels based on behavior: try push first, wait an hour, if unopened then send email. You can fetch data from your APIs to personalize messages based on current state.
The visual customer journey builder means non-technical team members can create and modify these workflows. Product managers can test messaging strategies. Marketing can iterate on campaign timing. Support can adjust onboarding sequences. All without filing requests to engineering.
User preferences
User preference management is essential yet somehow many systems get it wrong. Users need control over what notifications they receive and how:
- Choose notification types they care about (mentions yes, routine updates no)
- Select preferred channels per type (approvals via inbox and email, updates only inbox)
- Set global preferences ("no notifications after 8pm")
- Manage subscription topics (billing yes, marketing no)
Courier's preference system is hosted, meaning you don't build and maintain the preference UI yourself. The backend API enforces these preferences automatically when routing notifications. The system handles GDPR and CCPA compliance requirements.
Technical implementation
Let's look at what it actually takes to get a notification center running in a real application.
React setup
Install the package:
Copied!
npm install @trycourier/courier-react
Add the inbox component:
Copied!
import { useCourier, CourierInbox } from "@trycourier/courier-react";import { useEffect } from "react";export default function NotificationCenter() {const courier = useCourier();useEffect(() => {courier.shared.signIn({userId: 'user_123',jwt: 'your_jwt_token'});}, []);return (<div><h1>Notifications</h1><CourierInbox /></div>);}
That's it. You now have a functional notification center with real-time delivery and cross-device sync. The SDK handles state management and backend communication.
You only need to sign in with Courier once in your app, whether you're using Inbox, Toast, or accessing specific attributes the SDK exposes.
Web Components (vanilla JS)
If you're not using React, the Web Components SDK works with vanilla JavaScript or any framework:
Copied!
npm install @trycourier/courier-ui-inbox
Copied!
<body><courier-inbox></courier-inbox><script type="module">import { Courier } from '@trycourier/courier-js';Courier.shared.signIn({userId: 'user_123',jwt: 'your_jwt_token'});</script></body>
iOS setup
Mobile implementations follow similar patterns with platform-specific considerations. Add the package via Swift Package Manager:
Copied!
dependencies: [.package(url: "https://github.com/trycourier/courier-ios",from: "5.0.0")]
Then initialize and display:
Copied!
import Courier_iOS// AuthenticateCourier.shared.signIn(userId: "user_123",jwt: "your_jwt_token")// SwiftUIstruct ContentView: View {var body: some View {VStack {Text("Notifications")CourierInboxView()}}}
The SDK handles platform-specific details like lifecycle management when the app backgrounds, push notification registration, and state restoration.
The iOS SDK has been getting regular updates that make it progressively more capable. Recent releases added long press gesture support with haptic feedback, pull-to-refresh even when the inbox is empty, improved WebSocket handling that prevents disconnections after 10 minutes of foreground inactivity, and better background/foreground transition logic.
Android setup
Add the Courier SDK to your gradle dependencies:
Copied!
repositories {google()mavenCentral()maven { url 'https://www.jitpack.io' }}dependencies {implementation 'com.github.trycourier:courier-android:latest'}
Then initialize:
Copied!
import com.courier.android.Courierclass MainActivity : AppCompatActivity() {override fun onCreate(savedInstanceState: Bundle?) {super.onCreate(savedInstanceState)Courier.shared.signIn(userId = "user_123",jwt = "your_jwt_token")setContent {CourierInbox()}}}
React Native setup
For React Native, install the package and native dependencies:
Copied!
npm install @trycourier/courier-react-nativecd ios && pod install
Update your Android MainActivity:
Copied!
import com.courierreactnative.CourierReactNativeActivityclass MainActivity : CourierReactNativeActivity() {// Your activity code}
And make sure your iOS Podfile specifies the minimum version:
Copied!
platform :ios, '15.0' # Courier requires iOS 15+
Then use it in your components:
Copied!
import { Courier, CourierInbox } from '@trycourier/courier-react-native';import { useEffect } from 'react';export default function NotificationScreen() {useEffect(() => {Courier.shared.signIn({userId: 'user_123',jwt: 'your_jwt_token'});}, []);return <CourierInbox />;}
Sending notifications
Having the inbox component running is only half the equation. You need to actually send messages to it.
The simplest notification is an API call with recipient, content, and routing:
Copied!
const { requestId } = await courier.send({message: {to: {user_id: "user_123"},content: {title: "New Comment",body: "Sarah commented on your post"},routing: {method: "all",channels: ["inbox"]}}});
Multi-channel delivery
Multi-channel orchestration is where things get interesting. Instead of writing separate code for each channel, you make one API call that targets all of them:
Copied!
const { requestId } = await courier.send({message: {to: {user_id: "user_123",email: "user@example.com",phone_number: "+1234567890",slack: {access_token: "xoxb-your-token",channel: "C1234567890"}},content: {title: "Order Shipped",body: "Your order #12345 has shipped and will arrive tomorrow"},routing: {method: "all",channels: ["inbox", "email", "push", "sms", "chat"]}}});
The same notification content automatically adapts to each channel. The inbox gets rich text and action buttons. Email renders as HTML. Push condenses to a lock screen format. SMS becomes plain text with shortened links.
The routing engine gives you control over how channels interact. Send to all channels simultaneously with "all", or try channels in sequence with fallbacks using "single":
Copied!
routing: {method: "single",channels: ["push", "sms", "email"]}
This tries push first. If unavailable, it tries SMS, then email.
Using templates

When you're sending the same type of notification repeatedly, templates make more sense than hardcoding content:
Copied!
const { requestId } = await courier.send({message: {to: {user_id: "user_123"},template: "comment-notification",data: {commenter: "Sarah",post_title: "Q4 Planning",comment_preview: "Great insights on the roadmap..."}}});
Templates live in Courier's Designer where non-technical team members can edit content without touching code. Templates automatically adapt across channels.
Toast notifications

While the inbox handles persistent messages, toast notifications are for brief, temporary alerts:
Copied!
import { CourierToast } from "@trycourier/courier-react";function SuccessMessage() {return (<CourierToasttitle="Payment Successful"body="Your card has been charged $49.99"duration={5000}/>);}
Toasts work alongside the inbox cleanly. The toast gives immediate feedback while the inbox maintains the permanent record. You can configure toast position, duration, styling, and whether they should automatically dismiss or require user interaction.
How teams use this in production
DroneDeploy builds drone mapping software for construction sites. Processing large map files takes time, so they needed a notification center that would tell users when jobs were complete without requiring them to sit and watch a progress bar.
"With Courier, we added a beautiful inbox and in-app push notifications in a matter of weeks. We used the great looking pre-built component to save even more time. Notifications are not our core competency, so it made complete sense to integrate rather than build out and support our own implementation."
James Pipe, VP of Product, DroneDeploy
LaunchDarkly built their feature flag approval workflow around the notification center. When someone requests a new flag or an approval change, the notification reaches the right people immediately and stays in the inbox until the action is resolved.
"We were able to build the in-app notification experience that we wanted with excellent support and communication from the Courier staff."
Lucy Wonsower, Software Engineer, LaunchDarkly
Both teams chose Courier's pre-built component over building custom infrastructure. The component handles WebSocket management, state sync, and cross-device reads, the parts that take the most engineering time to get right.
Customization
Theming works through configuration objects where you specify colors, fonts, border radius, and spacing. The Inbox component takes these theme configurations and applies them throughout.

Courier provides brand settings in the dashboard where you can configure your design system once and apply it across all notifications. Dark mode support is built into the components.
The built-in views handle most common needs: Unread, All Messages, and Archived. For more specific needs, you can create custom filtered views that display subsets of messages based on tags, categories, dates, or any other metadata.

Action buttons transform notifications from passive displays into interactive workflows. An approval notification includes approve and reject buttons. A meeting invitation includes accept and decline. These actions can deep link to specific screens or trigger custom handlers.
Digest notifications help manage volume. Instead of sending 15 individual notifications about thread comments, you send one that says "15 new comments on Q4 Planning." Courier's Digests feature groups similar notifications by time window, combines them into a single digest message, and sends at optimal times.
Frequently asked questions
How long does it take to add a notification center with Courier?
The pre-built CourierInbox component can be running in an existing application in a few hours. The React, iOS, Android, Flutter, and React Native SDKs all follow the same pattern: install the package, call signIn with a user ID and JWT, and render the component. Customizing the theme and sending your first notification from the API typically adds another day. The work that takes weeks when building from scratch, WebSocket infrastructure, state management, cross-device sync, is handled by the SDK.
How does JWT authentication work for Courier's notification center?
Each user session requires a signed JWT generated on your backend using your Courier API key. The JWT contains the user ID and an expiration time. Your application passes this token to Courier.shared.signIn() on the client. Courier validates the token before establishing the WebSocket connection. When the token expires, you generate a new one on your backend and call signIn again. The authentication documentation covers token generation for Node, Python, Go, Ruby, Java, C#, and PHP.
What happens to notifications sent while a user is offline?
Messages sent while a user is offline are persisted and delivered when the connection is re-established. The inbox loads unread messages on reconnection, so users see everything they missed without any additional code. State, read, unread, archived, stays consistent because it's managed server-side, not in local storage.
Can I use the notification center alongside push notifications?
Yes. Courier's cross-channel integration means the inbox and push notifications share state. When a user opens a push notification, the corresponding inbox message is marked as read. When a user reads a message in the inbox, the push badge count updates. This works across iOS, Android, and web push through a single API call that targets all channels simultaneously.

How do I customize the appearance of the notification center?
The CourierInbox component accepts a theme configuration object where you set colors, fonts, border radius, and spacing. Courier also has brand settings in the dashboard that apply your design system globally across all notifications. Dark mode support is built in. For cases where the configuration options aren't enough, the SDKs support custom component rendering so you can replace any part of the UI with your own implementation while keeping the underlying state management and delivery infrastructure.
Talk to a solutions expert to see how Courier's notification center fits into your stack, or get started for free with 10,000 notifications per month.
Previous chapter
Introduction to Notification Centers
Learn what notification centers are and why they're essential for modern apps. Covers use cases from DroneDeploy and LaunchDarkly, plus key components like cross-channel sync and action buttons that separate good implementations from great ones.
Next chapter
Best Practices for Notification Centers
Best practices for notification design covering content writing, format selection, and user experience principles. Includes guidance on batching, preference management, common pitfalls to avoid, plus performance optimization and security considerations.
© 2026 Courier. All rights reserved.