Implementing Hubspot Browser Push Notifications [Top 2 Ways]
This step-by-step guide (with screenshots) will show you how to set up browser push notifications for your Hubspot website with OneSignal & WebPush.
Updated Jun 30, 2026
Push notifications are clickable pop-up messages that show up on their browsers. They act as an efficient communication conduit that enables applications to share messages, offers, or other information with users. As long as subscribers are online or have their browsers open on their devices, they can receive these notifications.
HubSpot is a CRM platform with everything you need for a growing business. Push notifications are one of the most highlighted features in HubSpot, and this article will discuss two main ways to implement push notifications with HubSpot.
I'll give a brief overview of those approaches and then guide you through the steps of implementing push notifications.
1. Using Onesignal
OneSignal is an excellent platform for notification management with spectacular features like segmentation, automatic messaging, and real-time reporting. In addition, OneSignal lets you send SMS, emails, and in-app messages. The four pricing tiers for OneSignal are Free, Growth, Professional, and Enterprise.
Pros of Using Onesignal
- Easy to integrate.
- Omnichannel support is available.
- Excellent documentation.
- Simple and effective GUI.
- Very scalable.
Cons of Using Onesignal
- It costs a lot more than the alternatives.
- Older users must upgrade to a premium model to access new features.
- Monitoring performance might be complicated.
Tutorial: How to Implement Push Notifications with OneSignal
Step 1 - Creating a OneSignal Account
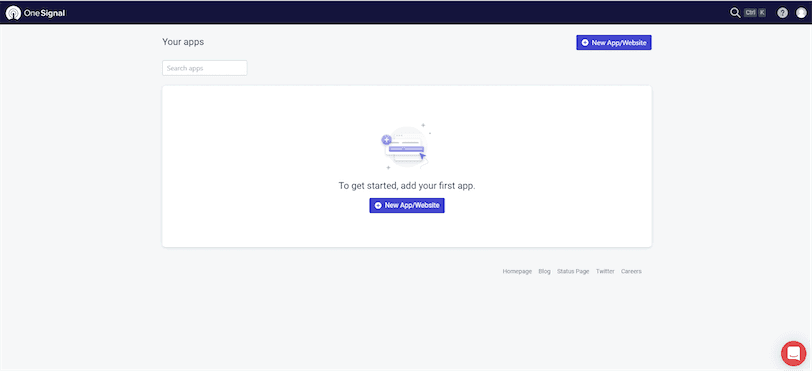
You can easily create a free OneSignal account by visiting their registration page. After registration, go to the Apps page, and you will see a UI like the one below:
Step 2 - Creating a new OneSignal App
Then, click on the New App/Website button to create a new app. You will see a list of application platforms supported by OneSignal. Select Web as the application type.
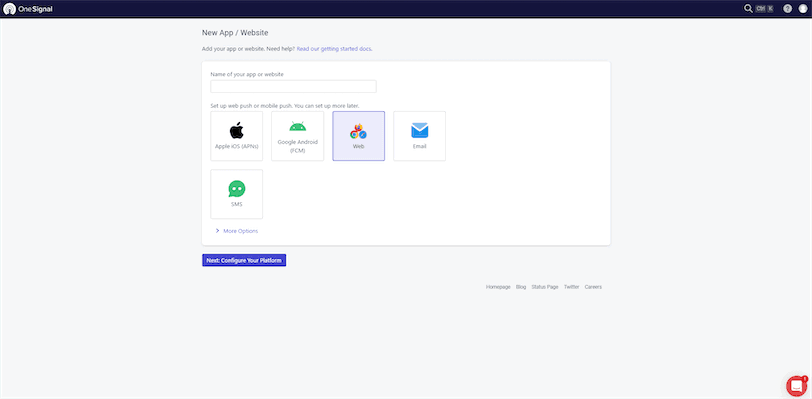
Then, you will be redirected to the Web Configuration page. Select Typical Site as the integration type and enter the relevant details.
Step 3 - Install OneSignal on HubSpot
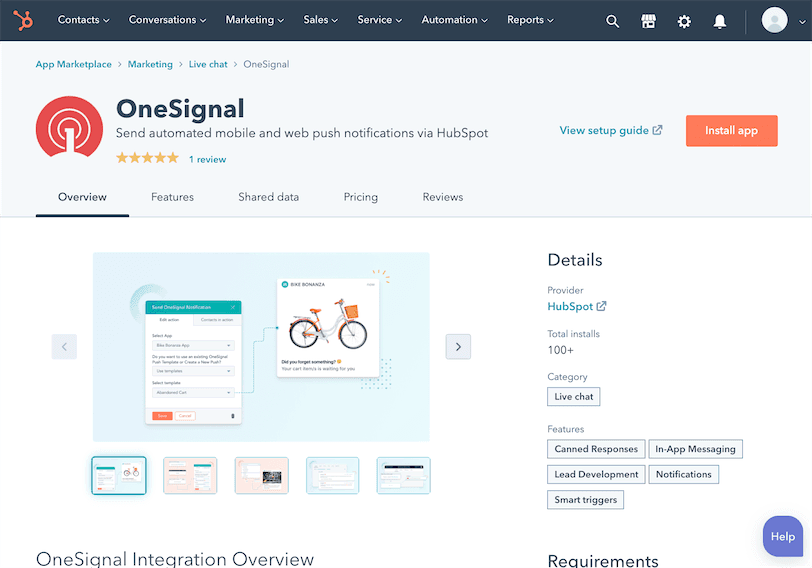
After creating a OneSignal application, you need to install OneSignal to your HubSpot application. First, select the app marketplace in HubSpot by clicking the marketplace button in the main navigation bar. Then search for OneSignal and click the Install app button.
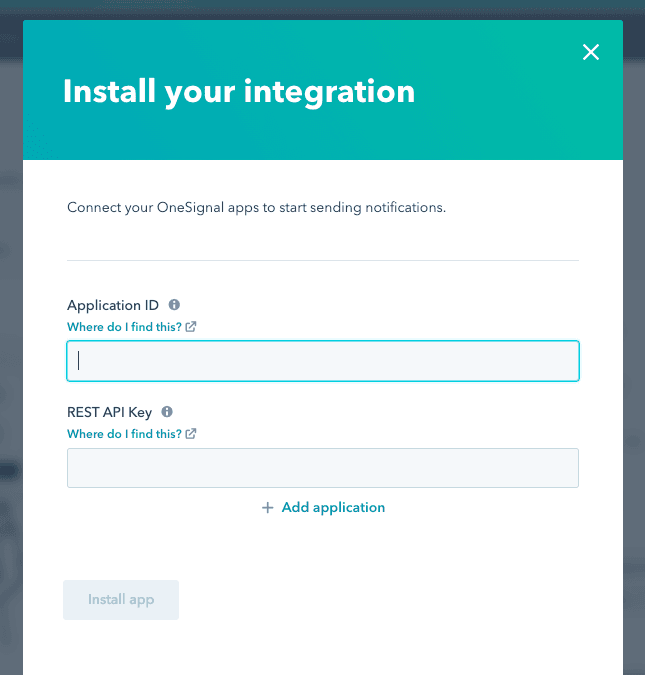
Then, you need to enter the App ID and REST API Key. You can find them in the OneSignal dashboard under the settings section.
Step 4 - Mapping OneSignal User to HubSpot
There are two options for mapping users across HubSpot and OneSignal:
Option 1: External User Id (Recommended)
Select the HubSpot Contact attribute you want to match to OneSignal under HubSpot Settings > Integrations > Connected Apps > OneSignal > Your preferences.
 Select the HubSpot contact property you want to match with the OneSignal
 external_user_id property from the dropdown.
Option 2: OneSignal set Email method
For this option, you need to use OneSignal's setEmailfunction using their SDK to associate OneSignal users with email addresses.
Step 5 - Defining the HubSpot Workflow
Now, you need to define a HubSpot workflow to automate OneSignal push notifications.
- First, go to Automation > Workflows in HubSpot and click Create workflow.
- Select Contact-based and click the Next button in the top right.
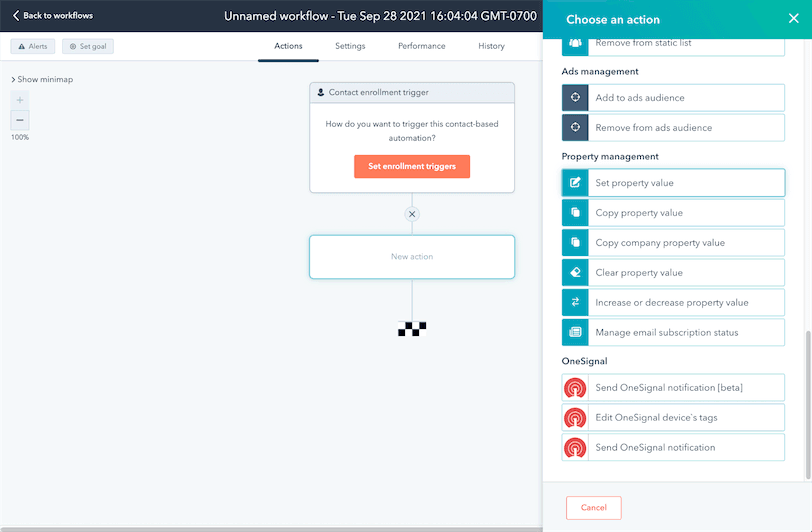
- Click + to add an action after setting your enrollment triggers.
- Afterward, click the Send OneSignal notification option in the right side panel.
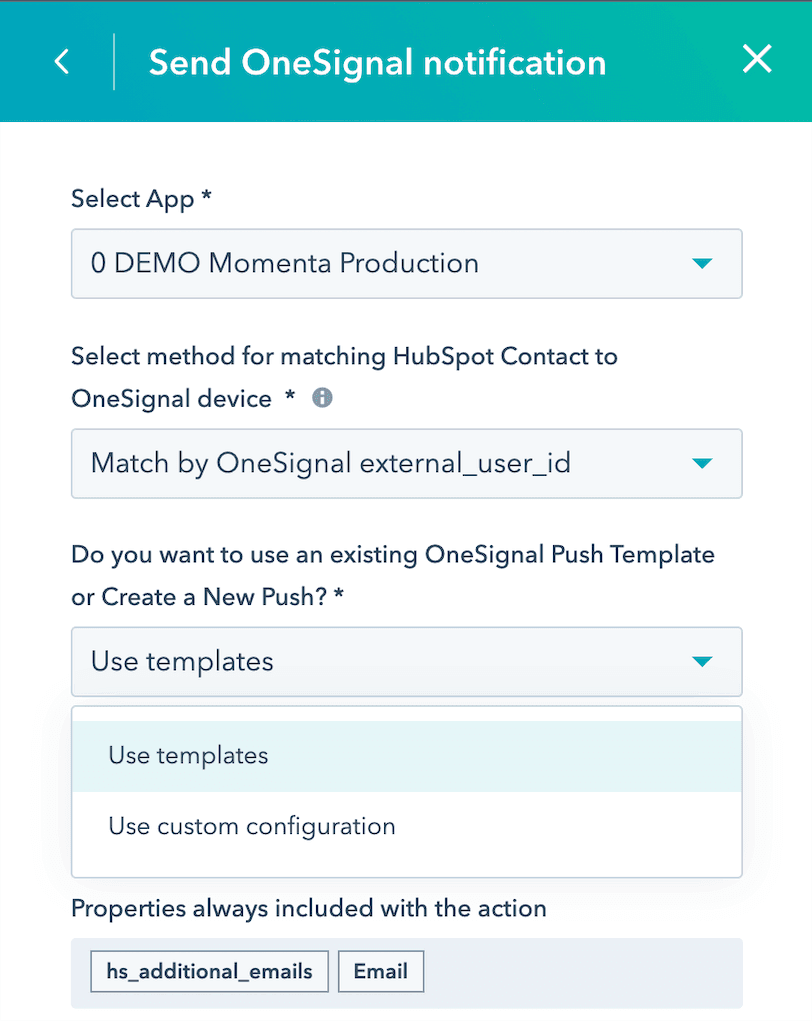
- Choose your OneSignal App and enter the appropriate settings. You can choose between sending push notifications using a template or a custom configuration.
- Once you finalize the settings, click the Save button.
Step 6 - Editing OneSignal device's tags Workflow Action
After that, you will get an option to edit the OneSignal device's tags Workflow Action. OneSignal uses Data Tags to add custom properties to users. HubSpot Contact Properties can be added via tags in OneSignal for message personalization, segmentation, and delivering in-app messages.
After selecting the OneSignal app, enter a JSON string in the format { "key": "value"} and click the Save button.
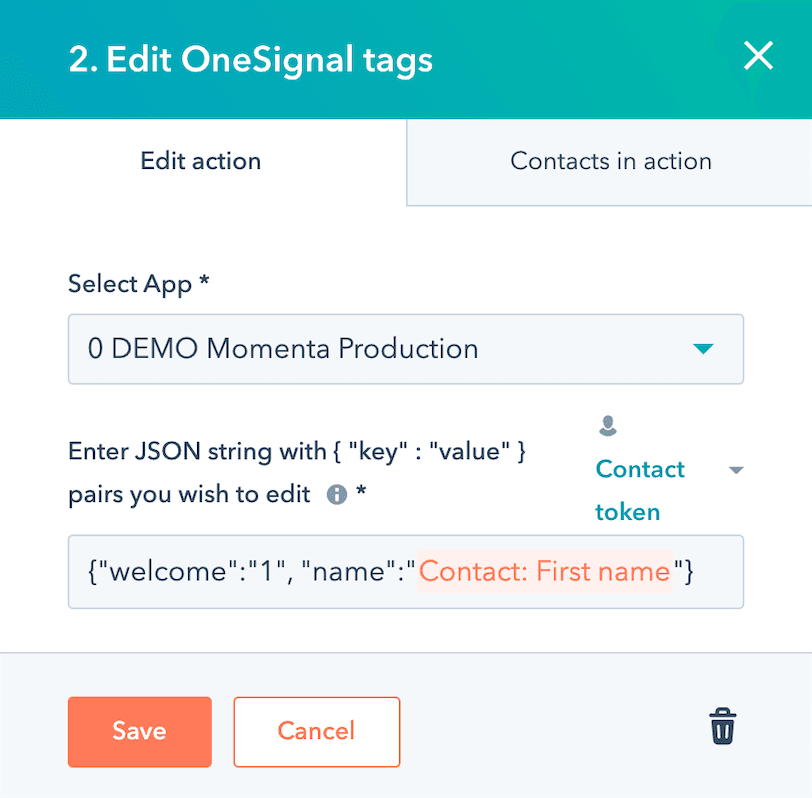
You can use these tags to filter segments in the OneSignal Dashboard.
Step 7 - Sending Notifications
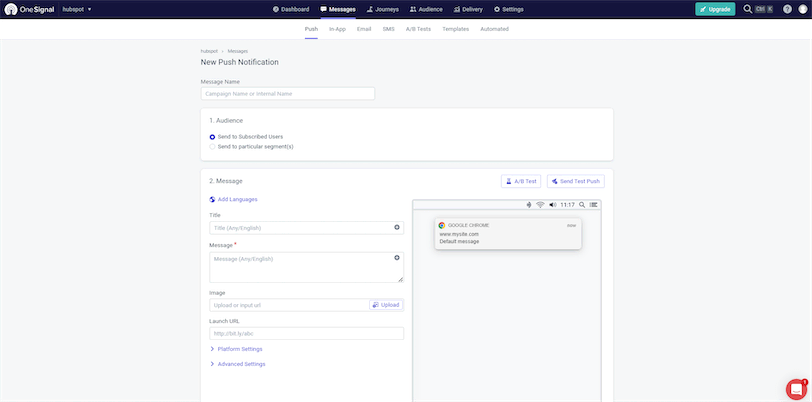
Now, your application is ready to receive push notifications. You can go to the OneSignal console and create push notifications by selecting the New Push option under the New Message dropdown.
2. Using WebPush
WebPush is another notification service you can use to implement push notifications with Hubspot. It supports all the major browsers and comes with some fantastic features. WebPush provides a free plan to get started with a maximum of 100 subscribers, and you need to update the plan to increase the subscriber count.
Pros of Using WebPush
- Code-free installation.
- Direct massage experience.
- CRM-powered messaging.
- Supports segmentation.
Cons of Using WebPush
- The free plan is for the first 100 push notification subscribers only.
- It's more costly compared to others.
- Doesn't have good community support.
Tutorial: How to Implement Push Notifications with WebPush
Step 1 - Sign up using a Hubspot account.
You can quickly get started with WebPush using your HubSpot account.
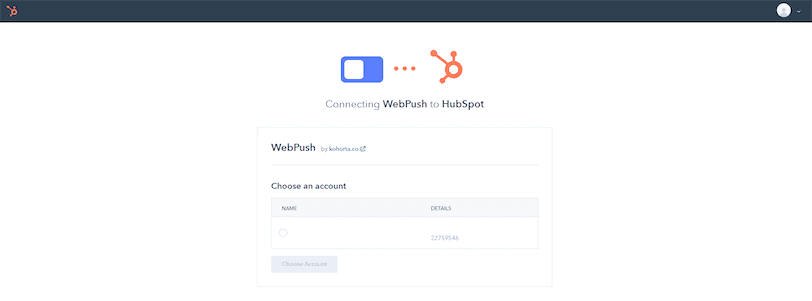
Then, you will see an option to connect your app to WebPush.
 Step 2 - Start sending files from WebPush to your HubSpot account.
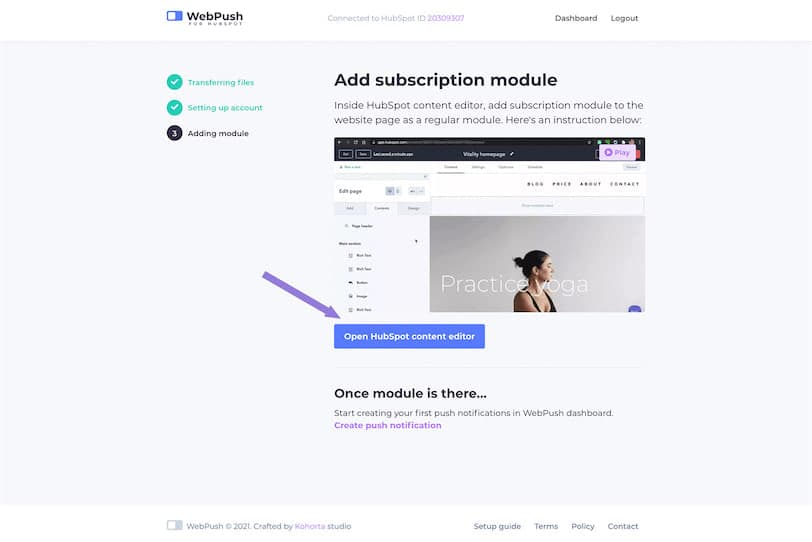
 Step 3 - Add Subscription Module
Click the Open HubSpot content editor button, and it will install the subscription module to the web page.
Step 4 - Sending push notifications
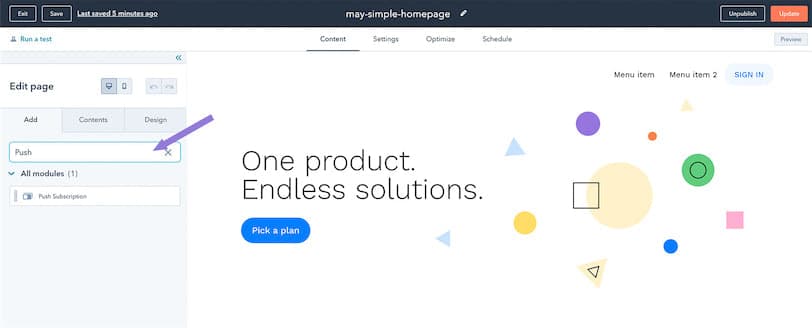
Open a specific page in your HubSpot app to add a WebPush subscription banner. You can find the Push Subscription module from the left side panel.
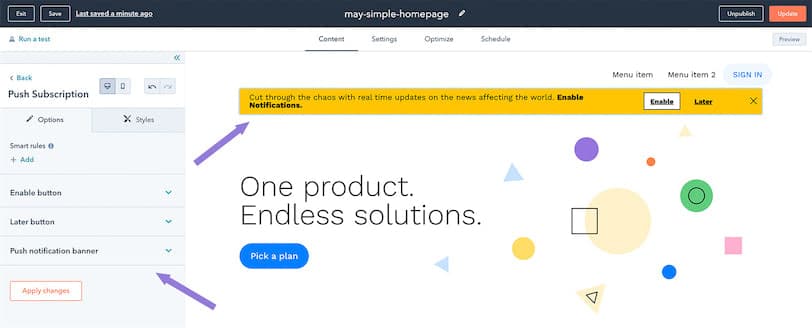
Then, drag and drop the module to the page and design your push notification banner.
Wrapping It Up
This article discussed two methods for implementing push notifications with the HubSpot applications: OneSignal, and WebPush. You can quickly get started with any of these methods with a basic understanding of programming. I hope this article will help you to implement push notifications for your HubSpot applications.
Keep exploring
More guides
One API, every channel
Ship notifications without the boilerplate
Courier gives you one API for email, SMS, push, and chat, with templates, routing, retries, and delivery logs built in.
Last updated Jun 30, 2026. Code samples are illustrative; provider APIs and pricing change over time, so check each provider’s docs before relying on them.