5 Must-Have Test Cases for Chrome Browser Notifications
Five essential test cases for browser notifications, covering permissions, cross-browser display, action buttons, and debugging notifications that stop working.
Updated Jun 30, 2026
Browser-based notifications are a good way to boost user engagement and deliver important updates to your users in a timely fashion. Users opt-in to allow you to deliver these alert-style notifications directly to their browser, even when they are not engaging with your site. With the user's consent, browser-based notifications can be used for a myriad of use cases such as product updates, promotions, alerts, and more.
Although browser notifications are great for re-engaging churning customers, they are notoriously difficult to implement and test. In that context, this article discusses five test cases that help guarantee your notifications are working as expected. Ensuring that your notifications will run correctly in these cases can help maintain a certain level of quality in your apps and improve the overall user experience. The examples also cover the different stages of the notification lifecycle, from permission request to sending and responding to notifications, as well as edge cases (scenarios that are rare but occur from time to time). Specifically, you should always test and confirm the following:
- The browser supports notification.
- You have the necessary permissions.
- Notifications arrive and look correct.
- Notification buttons are properly handled.
- Notifications work if permission is initially denied and then later allowed.
The article also explains how to debug notifications that have stopped working, using some common errors as examples.
1. The Browser Supports Notification
Browsers that do not support notifications are a common problem when implementing browser-based notifications. Most browsers support the Notification API, but some, like Internet Explorer, do not. You can find a full list of browsers that support the Notification API here.
It is important for your website to first check whether your browser supports notification or not before trying to request notification permission. An easy way of checking if a browser supports notifications is checking if the notification function is available in the window object.
if ('Notification' in window) {// API supported} else {// API not supported}
Having a graceful solution in place if your user's browser does not support notifications is also important. If notifications are critical to your website, you can alert the user to switch to a browser that supports notifications (e.g., chrome) for a smoother experience. Rather than just logging an error in the console, it is good practice to notify the user and inform them about the drawbacks of using a browser that does not support notifications.
2. You Have the Necessary Permissions
To send notifications to a user from your website, you first need their permission. You can check the Notification.permission property to confirm if you are allowed to send notifications. This property has three possible states:
- Default: This is the initial state when the user has not granted or denied permission.
- Granted: This means the user has allowed your website to send them notifications.
- Denied: This means the user has denied you permission to send them notifications.
To request permission from a user, you use the Notification.requestPermission() method. This returns a promise with the result of your request:
Notification.requestPermission().then((permission) => {switch (permission) {case "granted":// do somethingbreak;case "denied":// do somethingbreak;default:// handle default case herebreak;}});
A prompt like the one below will appear on your user's browser when your website requests their permission:
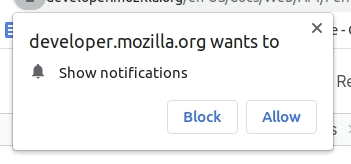
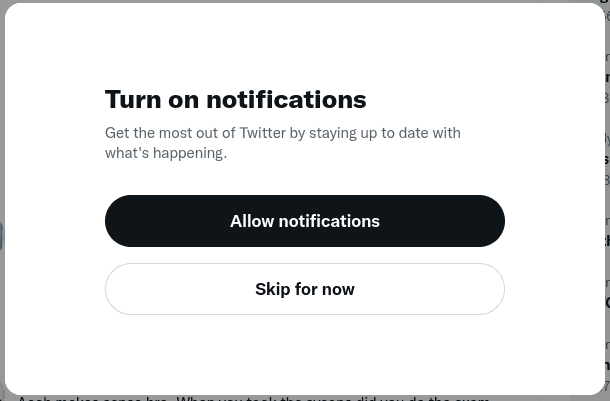
Rather than requesting permission immediately when the page loads, it's better to explain why you would like to send notifications first. This helps the user make a more informed decision, as notifications are often viewed as spam. The following is an example from the Twitter website:
Note: Notifications are not supported for websites that work within an iframe of another website. Requesting permission from within an iframe will lead to permission being denied.
3. Notifications Arrive and Look Correct
Different browsers have different ways of showing notifications to the user. The same notification on Google Chrome can look different when displayed on Mozilla Firefox. The example below shows the same notification shown on Chrome (right) and Firefox (left):
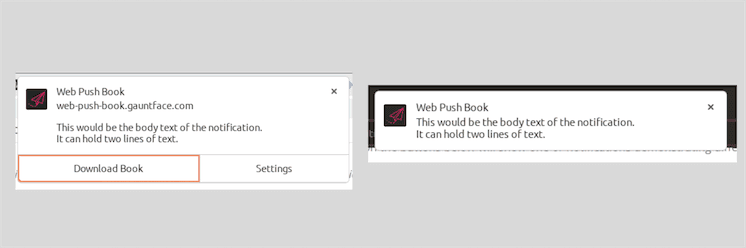
This difference is due to the wide variety of attributes involved in displaying a notification. The basic ones are title and body, but other options can also be icon, image, dir (text direction), lang (language),tag, and sound.
Some best practices to make sure your notification looks good on all browsers include the following:
- Keep your title short: This ensures the title is readable, as notifications only show up for a few seconds and are automatically dismissed.
- The notification body should only be a few lines: Most browsers will cut the body after a certain word count.
- If icons or images are included, make sure they are properly sized: Some browsers (especially mobile ones) will crop or cut to fit the device's aspect ratio.
- Add a tag to your notification: This is a unique identifier to your notification signaling its purpose (e.g., new message). This helps manage scenarios where the user has many notifications coming in at the same time. If notifications share the same tag, the latest one can be displayed instead of bombarding the user with endless messages.
- Provide lang and dir attributes if you support multiple languages on your website: This informs the browser how best to display your text to the end user. If these attributes are not provided, the browser will default to its current configuration.
4. Notification Buttons Are Properly Handled
You can add buttons to your notifications, which are known as actions. Unfortunately, these buttons are not supported on all browsers. To test if they are available on a particular browser, you can check if the actions property exists on the notification prototype. See the sample code below:
if ('actions' in Notification.prototype) {// Notification buttons are supported} else {// Notification buttons are NOT supported}
You should also test the number of buttons (actions) you can add to a notification. Most browsers support a maximum of two, but some can be less or more. To check this, use the Notification.maxActions property, which will return the maximum number of actions supported.
You can send notifications with buttons by simply adding an actions object to your notification options:
var notification = new Notification('50% Flash Sale', {actions: [{action: 'shop', title: 'Shop Now'},{action: 'set-reminder', title: 'Remind me Later'}]});
Handling the button click is as simple as adding an event listener, which is demonstrated in the sample code shown below:
notification.onclick = function(event) {event.preventDefault(); // prevent the browser from focusing the notification's tabif(event.action=="shop"){//handle the user clicking on shop}else if(event.action=="set-reminder"){// set a reminder for the user}}
5. Notifications Work if Permission Is Initially Denied and Then Later Allowed
Users often initially deny permission for websites to send browser notifications but then later opt in after realizing the value. To make sure notifications work in this case, it is important we constantly monitor the status of our permission since it can be changed manually by the user at any time. If you continuously check the permission status, when the user grants your website permission, you can set them up to receive notifications (e.g., subscribing them for push notification). You can do this by regularly checking the Notification.permission property or by setting a change listener to your permission state using the Permissions API, as you can see in the following example:
navigator.permissions.query({ name: "notifications" }) //query for the notification permission.then(function (permissionStatus) {console.log("Notification status is ", permissionStatus.state); // log the current statepermissionStatus.onchange = () => { // set an onChange listener to the permission Statusswitch (permissionStatus.state) {case "granted":// do somethingbreak;case "denied":// do somethingbreak;default:// handle default case herebreak;}};});
Depending on whether you are using local notifications or push notifications, it is good practice to keep track of the notification permission status. When your onChange listener is triggered, this value can be updated either in your local storage or on the server. This way, the notification will always work when the permission is set to granted.
Debugging Notifications That Stop Working
Sometimes notifications can just stop working. It is important to know how to debug and fix this. To properly test and debug notifications, you should have an understanding of the notification lifecycle.
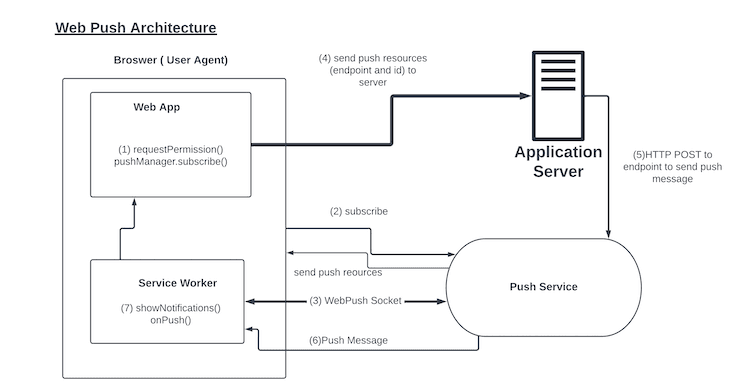
This lifecycle might differ depending on whether your notifications are triggered locally or by a push service. Push notifications are triggered from your server via a push service and can pop up even when the browser is closed, taking full advantage of the Notification API.
Steps 1 and 2 cover requesting notification permission, which allows you to send notifications to the user. Once a user accepts and you register your app with a push service, this service will return a URL and an ID that can be used to send notifications. This URL and ID is sent to your server, which is in charge of remotely sending (pushing) notifications via the push service to your browser.
When a push message is sent, your browser receives the notification and is in charge of displaying it to your user. When a user clicks on the notification or one of its actions, they are directed to your website, which will then handle the user's intent.
Many things can go wrong during these different stages. For example, in stage 1, permission may be denied. In stage 3, the push service might invalidate tokens issued to your app and send through new ones. This means you need to continuously listen for changes and update the application server.
Other common issues that may arise include the following:
- Permissions being revoked: Sometimes a user might revoke permission for you to send them notifications. This can be intentional or unintentional (maybe they reset/reinstalled their browsers). It is important to regularly check your website's permissions in case notifications stop working.
- Nonsecure context: The notification API in most browsers requires you to have an SSL certificate. Your notifications might stop working properly if you are using HTTP or if your HTTPS certificate has expired.
- Chrome notifications are disabled: Most operating systems contain a Do Not Disturb (notification-free) mode that can disable notifications from all programs. Or, in some cases, notifications can be disabled specifically for certain programs. It is important to check if this is the case and enable notifications. In Chrome, make sure the default behavior allows sites to send notifications; if not, notification prompts might not show.
- Browsing in incognito or private mode: The Notification API does not work well in incognito mode. This is because this mode is meant to record as little of the user's browsing history as possible. Testers should not attempt to test notifications in incognito mode. If possible, your website can also check if a user is in incognito/private mode when it fails to send notifications to the user and alert them accordingly.
You can also subscribe to the Notification API error event to listen in on errors. These can be handled in code or sent to the server for further investigation.
Conclusion
Implementing, debugging, and testing browser-based notifications can be hard. This article explored some test cases that can be used for quality assurance in testing browser-based notifications. Ensuring your notifications work correctly in all these test cases will help you confidently provide a rich experience to your users.
Providing the best possible notification experience is painless if you use a platform like Courier, which is an API designed to deliver better notifications. With Courier, you can rest easy knowing your notification will work across browsers. Courier also allows you to design your notifications with its drag-and-drop editor to create reusable templates for different use cases. Courier integrates across other notification channels such as email, SMS, Slack, and more, ensuring an integrated notification system for all your users. Try Courier today!
Author: Michael Nyamande
Keep exploring
More guides
One API, every channel
Ship notifications without the boilerplate
Courier gives you one API for email, SMS, push, and chat, with templates, routing, retries, and delivery logs built in.
Last updated Jun 30, 2026. Code samples are illustrative; provider APIs and pricing change over time, so check each provider’s docs before relying on them.