Documentation Index
Fetch the complete documentation index at: https://www.courier.com/docs/llms.txt
Use this file to discover all available pages before exploring further.
Overview
When working with multi-tenant applications, you often need to send notifications that reflect tenant-specific configurations—such as custom branding, profile data overrides, or tenant-scoped preferences. This tutorial shows you how to invoke an automation with tenant context so that Courier applies the correct tenant configuration to each recipient.Use Cases
You might need tenant context in automations when:- Custom Branding: Each tenant has their own brand identity that should appear in notifications
- Profile Overrides: Tenant-specific user data needs to be merged with base user profiles
- Tenant Preferences: Different tenants have different notification settings or routing rules
- Data Isolation: Each tenant’s data needs to remain scoped to their organization
An Example
For this example, say we want to invoke an automation for a whole tenant and send admins one message and non-admins a different message. We can create a simple automation that looks at the user’s profile and check the user’s role.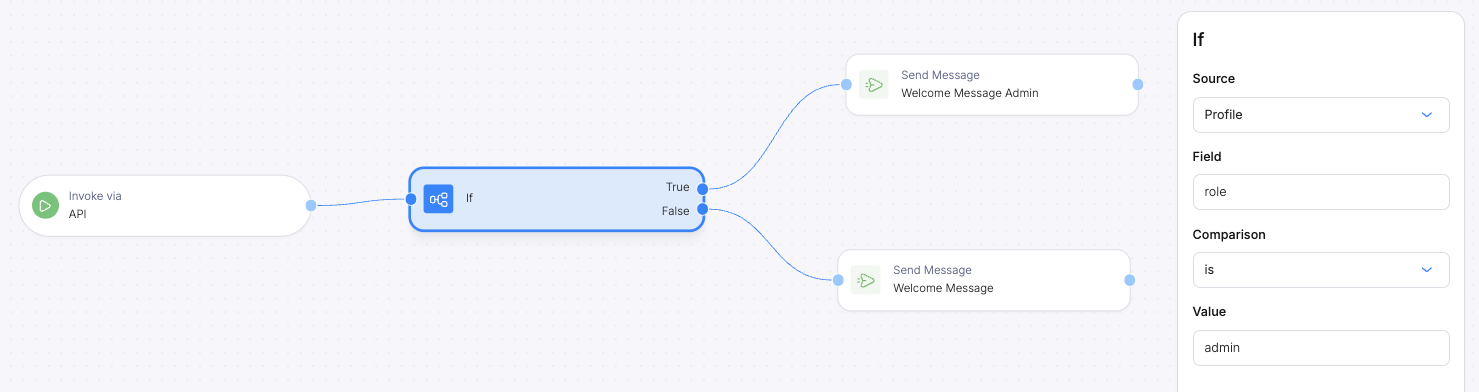
- Pass the
tenant_idin the automation invocation payload (in bothprofileanddata) - Configure the automation’s send node to use the tenant context from the data payload
Step-by-Step Guide
Invoke the automation with tenant_id in the payload
When calling the automation, include the
tenant_id in both the profile object and the data object.profile.tenant_id: Associates the recipient with the tenant for profile lookupsdata.tenant_id: Makes the tenant ID available as a variable in the automation flow
Configure the Send node with tenant context
In your automation, open the Send node’s JSON editor and add a 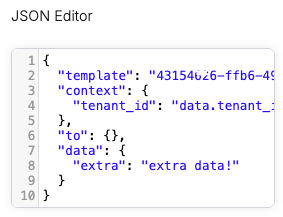
context object that references the tenant_id from your data payload:context.tenant_id field tells Courier to apply tenant-specific configuration. The value "data.tenant_id" references the tenant ID you passed in the automation invocation.Testing Your Configuration
Invoke the automation with a test tenant ID and verify the tenant-specific branding appears in the Data Logs:Troubleshooting
Related Resources
- Managing Tenants - Create and configure tenants
- Automation API Reference - Complete API documentation
- Multi-Tenant Branding - Customize branding for each tenant